Page is loading ...

OPERATING INSTRUCTIONS
HELPFUL TIPS
• This timer repeats the same settings daily.
• To push down or pull up the gray pins, use your finger or
the tip of a small instrument such as a pen or pencil.
• You can set up to 48 different “ON” and “OFF” times in a
24-hour period. Pins pressed down represent the “ON”
time. Pins in the up position represent “OFF” time.
• Switching the unit to “OUTLET ON” will bypass
programming, however, the timer dial will continue to
rotate and maintain the current time.
• Once the timer is plugged into an outlet, it will sit at a slight
upward angle making it easier to read and program the
unit.
INDOOR TIMER
ITEM #0148297
MODEL #UTTNI2412
2
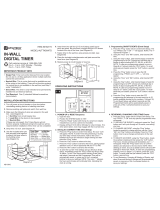
1. Set a period of time for the unit
to be “ON.”
Locate the gray pins and push
them down at the marked times
when the attached device should
be “ON.” Each pin represents a
30-minute time interval.
2. Set the “CURRENT TIME.”
Rotate the entire gray push-pin
dial clockwise until the arrow
marked “CURRENT TIME” aligns
with the current time of day on the
dial. “AM” hours are highlighted in
white. “PM” hours are highlighted
in black.
3. Set “BYPASS SWITCH”.
When the switch is in the “TIMER
ON” position, the unit will
automatically turn your attached
device on and off according to the
programmed time. When the
switch is in the “OUTLET ON”
position, the unit will bypass the
programming and your attached
device will remain on.
4. Plug the unit into an electrical
outlet.
The unit will rest against the outlet
at a slight upward angle, making it
easier to see and operate the
push-pin dial.
5. Attach one device to the unit.
Plug the device into the outlet on
the side of the unit.
SAFETY INFORMATION
This unit is a “polarized” device. One blade of the
plug is wider than the other. It is only intended to
be used with a POLARIZED OUTLET.
Do not attach a device that exceeds the unit ratings.
125 V AC / 60 Hz
15 A / 1,875 W Resistive (General Purpose)
10 A / 1,250 W Tungsten (Incandescent)
1/2 HP (Horsepower Motor)
LIMITED 1-YEAR WARRANTY
Prime warrants this product to be free from manufacturing defects
for a period of one year from the original date of purchase
(“warranty period”). This warranty is limited to the repair or
replacement of this product only and Prime is not liable for any
consequential or incidental damage to other products that may be
used with this unit. This warranty is effective only if such unit is
returned to Prime not later than thirty (30) days after the expiration
of the warranty period. Warranty is void if damage is due to neglect,
misuse, alteration, modification, improper installation, or repair by
anyone other than Prime. This warranty is in lieu of all other
warranties expressed or implied. Some states do not allow
limitations on how long an implied warranty lasts or permit the
exclusion or limitation of incidental or consequential damages, so
the above limitations may not apply to you. This warranty gives you
specific rights, and you may also have other rights which vary from
state to state. If unit should prove defective within the warranty
period, return within the time period set forth above prepaid with
dated proof of purchase to:
Prime Wire & Cable, Inc.
ATTN: Timer Warranty
280 Machlin Court
City of Industry, CA 91789
1
3
4
5
WARNING
R
isk of Electric Shock
K
eep children away. Unplug timer before cleaning. Fully
insert plug. Do not use in wet locations.
Risk of Fire
Do not use to control appliances that contain heating
elements (cooking appliances, heaters, irons, etc.). Do not
exceed electrical ratings. For indoor use only.
Lights do not
turn on as
programmed.
Lights come on
in “AM” but are
supposed to
come on in “PM.”
Lights come on
in “PM” but are
supposed to
come on in “AM.”
Lights come on
before the
actual time.
Connected lights are
not in “ON” position;
they are not
functioning; timer is
not receiving power,
or “BYPASS SWITCH”
is in the “OUTLET ON”
position.
Pins were pushed down
in the “AM” section
(highlighted in white on
the timer dial).
Pins were pushed down
in the “PM” section
(highlighted in black on
the timer dial).
“CURRENT TIME” was
not set properly.
Ensure the connected lights are
functional by plugging them
directly into the outlet. Be sure
the connected lights are in the
“ON” position if they have their
own switch. Make sure the
outlet the timer is plugged into
is active. Check that the
“BYPASS SWITCH” is in the
“TIMER ON” position.
Be sure the pins are pushed
down in the “PM” section
(highlighted in black on the
timer dial).
Be sure the pins are pushed
down in the “AM” section
(highlighted in white on the
timer dial).
Refer to step 2 of this manual.
Be sure “CURRENT TIME” is
set in the white section on the
timer dial if the “CURRENT
TIME” is in the “AM.” The
“CURRENT TIME” should be
set in the black section on the
timer dial if the “CURRENT
TIME” is in the “PM.”
TROUBLESHOOTING
IN CASE OF POWER FAILURE
Unit will stop operating if the power goes out. Once power is
resumed, reset the time of day as explained in Step 2 of the
instructions.
AD
Printed in China
AVERTISSEMENT
Risque de choc électrique
Gardez les enfants à l’écart. Débranchez la minuterie avant de
procéder au nettoyage. Insérez complètement la fiche. N’utilisez
pas l’article dans des endroits humides.
Risque d’incendie
N’utilisez pas cet article pour commander des appareils qui
contiennent des éléments chauffants (appareils de cuisson,
radiateurs, fers, etc.). Ne dépassez pas les capacités électriques.
Pour usage à l’intérieur seulement.
AB1323
PROBLEM POSSIBLE
CAUSE
CORRECTIVE
ACTION
Call customer service at 1-866-994-4148,
8 a.m. - 6 p.m., EST, Monday - Thursday,
8 a.m. - 5 p.m., EST, Friday.
/