Page is loading ...

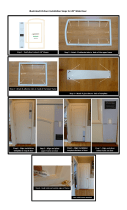
INSTALLATION GUIDE (English Version)
Model #: EZD-FR-28 & EZD-FR-30
EZ-DOOR SELF ADHERING DOOR FRAMES
FOR 28”, 30” And 32” FLAT PANEL DOORS
Lower
Frame
Upper
Frame
Queson, problems, missing parts? Before returning to the store,
Call Trevconn Enterprises Customer Service
8 a.m.—5 p.m., PST, Monday—Friday
1-805-754-2371
WWW.TREVCONN.COM
ONLINE INSTALLATION VIDEO: WWW.TREVCONN.COM
THANK YOU
We appreciate the trust and condence you have placed in Trevconn Enter-
prises through the purchase of EZ-Door Self Adhering Door Frames. We
strive to connually create quality products designed to enhance your
home. Thank you for choosing Trevconn Enterprises.
Safety & Care Informaon
Warranty & Parts Replacement Informaon
The item must be returned in good condion, in original boxes (whenever possible),
and with all paperwork, parts and accessories to ensure full credit.
What This Warranty Covers: Trevconn Enterprises warrants its parts and products to
be free of substanal defects in materials and workmanship from the original date of
purchase under normal home use. This warranty is oered only to the original con-
sumer purchaser and may not be transferred.
How Long The Warranty Lasts: Coverage lasts for one year from the original date of
purchase.
What Trevconn Enterprises Will Do Under The Warranty: During the warranty peri-
od Trevconn Enterprises will replace any part or product that proves to have sub-
stanal defects in materials or workmanship.
Implied Warranes: Trevconn Enterprises disclaims any implied warranty of mer-
chantability, and there are no warranes that extend beyond the descripons on the
face hereof. To the extent that such disclaimer is not valid under applicable law, any
implied warranty shall be coextensive in duraon with this warranty.
What This Warranty Does Not Cover: This warranty does not cover any problems or
damage which result from improper transportaon, improper installaon including
sealant or paint products, mishandling, misuse, abuse, neglect, abnormal use, im-
proper maintenance, accidents, or acts of God, such as hurricanes, re, earthquakes
or oods. This warranty and any applicable implied warranes do not cover inci-
dental or consequenal damages arising from any defects in the product, such as
labor charges for installaon or removal of the product or any associated products.
This warranty does not cover defects or damage caused by normal wear & tear, al-
teraons, environmental condions, or mold.
Read and fully understand ALL instrucons before beginning.
1 Use safe liing techniques.
2 Although EZ-Door Frames are not fragile, to ensure proper mounng, they
should always be handled with care to avoid bending.
3 Do not subject the EZ-Door Frames to extremes of heat. Buildings where
temperature is controlled provide the best condions (recommended con-
dions 33°F to 100°F).
4 In order to prevent door use during installaon, it is recommended you no-
fy others of your intended work.
5 Do not install EZ-Door Frames on doors that have surface moisture or dirt.
6 Choking Hazard—Small Parts. Not for children.
Page 1 of 6
Page 2 of 6

How to Obtain Warranty Service: If you need replacement parts or would like to
make a warranty claim, please contact our Customer Service Representave by
mail, email, fax or telephone at the address or phone numbers listed on this
page. All warranty claims must include the model number of the product, copy
of the original receipt and the nature of the problem. In addion, Trevconn En-
terprises may at its discreon authorize the prepaid return of the claimed defec-
ve part. Merchandise not pre-approved for return will not be accepted and the
associated claim not accepted.
Products should be examined for defects prior to installaon. This warranty also
does not cover labor charges for installaon or removal of the product or any
associated products. If upon inspecon you nd our product has a damaged or
missing part, please contact Trevconn Enterprises customer service to obtain a
replacement part.
Warranty Contact Informaon:
Telephone: (805) 754-2371
Fax: (805) 754-3738
Mail: Trevconn Enterprises
1597 Corte Del Rey
Thousand Oaks, CA 91360
Pre-Installaon
Read Installaon Guide & Watch Online Video: Trevconn Enterprises recom-
mends you read this enre installaon guide prior to beginning the installaon.
Watch the online video: www.trevconn.com/videos
1 Upper
Frame
1 Lower
Frame
1 Tube Caulk
22 Adhesive
Tabs
Box Contents
ONLINE INSTALLATION VIDEO: WWW.TREVCONN.COM
Alignment
Template
4 Glue Dots
Installaon Steps 1—9
Remove the EZ-Door Frames and verify all of the box contents are included. Wipe
the door surface clean if needed.
Locate four glue dots, tear at perforaon and peel tabs apart.
Place one glue dot in each of the posions A, B, C and D on the
reverse side of Alignment Template with the adhesive on paper
surface, press rmly to apply. Once applied discard remaining
paper tabs. The template is now ready to adhere to the door
surface for aligning EZ-Door. Proceed to Step 4 on page 5
Glue Dots
Warranty & Parts Replacement Informaon (Connued)
Page 3 of 6 Page 4 of 6
Remove one side of the paper backing from the double sided adhesive tabs and
rmly ax the tabs to the back side of the lower and upper frames in the areas
shown in the illustraon below. The tabs must be adhered to the at surface on
the back side of the frames which are the approximate size of the tab. Set both
frames aside backside up. (Note: There are 20 tab adhesion points, 2 extra tabs are
provided for your convenience.)
STEP 1
STEP 2
STEP 3

Align the alignment template’s upper le
(if door handle on le) or right (if door
handle on right) hand corner paper edges
with the upper le or right hand corner of
the door edges and with the le or right
hand door edge as shown in the illustra-
ons to the le and right. Press rmly in
the upper and lower areas of the template
where the glue dots are located to apply
the template.
Carefully align the upper frame with the
upper frame alignment lines on the tem-
plate as shown in the illustraons to the
le or right depending on the door handle
locaon. Press rmly in the areas where
the adhesive tabs are located on the upper
frame as placed in Step 2.
Carefully align the lower frame with the
lower frame alignment lines on the tem-
plate as shown in the illustraons to the
le or right depending on the door han-
dle locaon. Press rmly in the areas
where the lower frame adhesive tabs are
located as placed in Step 2.
LEFT HANDLE LEFT HANDLE
RIGHT HANDLE
RIGHT HANDLE
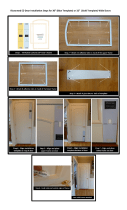
Remove the alignment template from the
top of the door. Align the lower le (if
door handle on le) or right (if door handle
on right) hand corner paper edges with the
lower le or right hand corner of the door
edges as shown in the illustraons to the
le and right. Press rmly in the upper
and lower areas of the template where the
glue dots are located to reapply the tem-
plate.
Using the caulk provided completely caulk the inside and outside edges of the
frames where they meet the door surface. (Hint: Use the caulk sparingly and
smooth to a neat appearance.) Let caulk cure prior to painng the door.
Clean surface of door if needed. Paint the desired color using a latex based paint.
(Note: Not all oil base paints will adhere to EZ-Door’s Frames. Check with your
paint vendor for compability) Enjoy your new modern looking door.
Page 5 of 6
Page 6 of 6
STEP 4
STEP 5
STEP 6
STEP 7
STEP 8
STEP 9
/