South Shore 4959661 Operating instructions
- Category
- Storage chests & cabinets & trunks
- Type
- Operating instructions
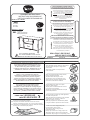
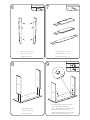
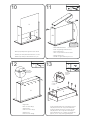
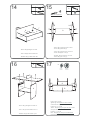
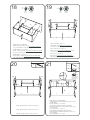
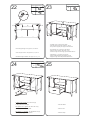
South Shore Furniture 4959661 is a TV stand. It has two drawers and a shelf, assembly is required. The TV stand is made of chocolate brown particleboard. The unit can be used to store a television, video games, DVDs, or other media items. The drawers can be used to store remotes, controllers, or other small items. The shelf can be used to store larger items, such as books or magazines. The TV stand is easy to assemble with the included hardware and instructions.
South Shore Furniture 4959661 is a TV stand. It has two drawers and a shelf, assembly is required. The TV stand is made of chocolate brown particleboard. The unit can be used to store a television, video games, DVDs, or other media items. The drawers can be used to store remotes, controllers, or other small items. The shelf can be used to store larger items, such as books or magazines. The TV stand is easy to assemble with the included hardware and instructions.


-
 1
1
-
 2
2
-
 3
3
-
 4
4
-
 5
5
-
 6
6
-
 7
7
-
 8
8
-
 9
9
-
 10
10


South Shore 4959661 Operating instructions
- Category
- Storage chests & cabinets & trunks
- Type
- Operating instructions
South Shore Furniture 4959661 is a TV stand. It has two drawers and a shelf, assembly is required. The TV stand is made of chocolate brown particleboard. The unit can be used to store a television, video games, DVDs, or other media items. The drawers can be used to store remotes, controllers, or other small items. The shelf can be used to store larger items, such as books or magazines. The TV stand is easy to assemble with the included hardware and instructions.
Ask a question and I''ll find the answer in the document
Finding information in a document is now easier with AI
in other languages
- français: South Shore 4959661 Mode d'emploi
- español: South Shore 4959661 Instrucciones de operación
Related papers
-
South Shore 3210C4 Operating instructions
-
South Shore Furniture 3642027 Installation guide
-
South Shore 10042 Installation guide
-
-
-
-
-
-
-
Other documents
-
-
-
-
-
-
Home Decorators Collection 9001010 Installation guide
-
-
-
-