Page is loading ...

K14347 6/06 Rev. A
-
5878
Wireless Wall Transmitter
INSTALLATION AND SETUP GUIDE
GENERAL INFORMATION
The 5878 is a six-button, eight-loop, wall mountable wireless
transmitter. It is intended for use only with wireless alarm
systems that support 5800 series receivers. Individual buttons
on the transmitter may be programmed for any zone response,
but are typically used for arming or for home automation
functions. Optional function buttons are provided with the
5878.
Do not use for system disarming in an area that
requires security.
This device supports both Standard and High-Security
(encrypted) modes. The latter sends rolling-code encrypted
messaging to the RF receiver.
This device must be used with a receiver or control
that supports high security mode i.e.: 5881EN, 5883,
6150RF, or 6160RF receiver or a LYNXR Series
control panel (Revision 13.1 or higher if you intend
to use it in high security mode).
The 5878 is powered by one replaceable lithium battery de-
signed to provide up to four years of life. For battery
installation, see Replacing the Battery.
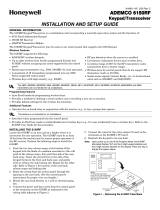
5878-001-V1
SERIAL #1
LOOP 3
SERIAL #2
LOOP 3
SERIAL #1
LOOP 4
LED
SERIAL #1
LOOP 2
SERIAL #2
LOOP 2
SERIAL #1
LOOP 1
STAY
AWAY
12
3
4
5878 WALL TRANSMITTER*
* SERIAL #2 - LOOP 1 = AWAY + 4 BUTTON
LOOP 4 = 3 + 4 BUTTONS
Figure 1 - 5878 Button Designations
PROGRAMMING
The 5878 is assigned two unique serial numbers during
manufacture and each button, or button combination on the
unit also has a distinct "loop" number (refer to Figure 1) that
must be programmed into the control panel during installation.
Assign each button, or button combination, to one of eight
individual zones and designate the Input Type as "BR" (Button
Type RF).
If you are enrolling the 5878 locally with an RF
Keypad, refer to the keypad’s Installation
Instructions for programming instructions.
1. When prompted, enter the serial number either by:
Pressing and releasing the button (or buttons) that you are
programming twice (wait about 5 seconds between button
activations).or Manually through the keypad.
Notes: (1) To activate the transmitter, the 5878 buttons must be
pressed and held for at least one-half second.
(2) Serial #2 is one (1) digit higher than serial #1, which is
printed on the rear of the transmitter.
Loop 4 Setup
Both of the Loop 4 buttons must be enrolled in the control, even
if they will not be used. If one or both of the loops is not being
used, program it as Zone Type 23 (No Alarm Response).
Otherwise assign it to the desired zone type.
2. Exit Programming Mode after programming is complete.
For complete details on how to program the transmitter's
serial number at the control panel, see the control unit's
installation instructions.
Assigning a 5878 to a User
On most control panels, if the wall transmitter is used for
arming functions, you must assign it to a user in order for it to
operate. This is accomplished through User Code programming
at the control panel. See the control panel’s Installation and
Setup Guide for specific instructions on programming User
Codes.
If you are programming arming functions on both serial
numbers, each serial number must be assigned to a separate
user.
SELECTING STANDARD OR HIGH-SECURITY MODE
For use with LYNXR Series controls earlier than
Revision 13.1, the Standard Mode must be
selected.
To select Standard Mode, simultaneously press and hold the
STAY, 1 and 2 buttons for three seconds.
To select High-Security Mode, simultaneously press and hold
the AWAY, 1 and 2 buttons for three seconds.
The LED flashes green when transmitting in Standard Mode
and red when transmitting in High-Security Mode.
ACTIVATING HIGH-SECURITY MODE
To ensure proper functionality, the 5878 must be
synced to the security system.
1. After selecting High-Security mode, put the system in Go/No
Go Test mode.
2. To sync the transmitter with the receiver, simultaneously
press and hold the AWAY, STAY, 1, and 2 buttons until the
panel beeps (see Figure 1). For LYNXR Series controls
proceed to step 4.
Note: The LYNXR Series panels will confirm the synchronization
by sounding two beeps.
3. To sync the device in High Security Mode, press either the
AWAY, STAY, 1, or 2 button ONCE, until the panel beeps
indicating receipt.
4. To sync the second serial number of the wireless key with the
receiver, simultaneously press and hold the 1, 2, 3, and 4
buttons until the panel beeps. For LYNXR Series controls
proceed to step 6.
5. To sync the device in High Security Mode, press the 3 or 4
button ONCE, and hold until the panel beeps indicating
receipt.
Note: If no beep is heard, exit Go/No Go mode, and repeat
Steps 1 - 5.
6. Exit Go/No Go mode by entering user code + 1 (OFF).

USING TWO RECEIVERS IN HIGH-SECURITY MODE
If the control supports two receivers and you plan to use them
in the high-security mode perform the following:
1. Enroll the transmitters into the receivers one at a time, by
disconnecting Receiver #2, and enrolling as described in
“Activating High Security Mode” (above).
2. Disconnect Receiver #1, reconnect Receiver #2, and repeat
the enrollment procedure. This process ensures proper High
Security operation with both receivers.
Temporarily disable the receivers’ supervisory
zones while enrolling, to prevent them from going
into “trouble” when disconnected. After enrolling,
re-enable the supervisory zones.
REPLACING THE BATTERY
The LED will not flash during transmission if the battery is
low. To replace the battery perform the following steps.
1. Slide out the battery tray located at the bottom of the 5878.
2. Carefully remove the battery.
3. Press and hold any button for at least one second.
4. Insert a new battery in the tray as shown in Figure 2.
Positive (+) end must face up. Use Maxell CR2032,
Duracell DL 20325, or Varta CR2032 lithium battery only.
5. Slide the battery back into the 5878.
6. Press any button and verify that the LED flashes.
Improper installation will result in damage
to the battery.
BATTERY
AWAY
STAY
1
2
3
4
NOTE
POSITIVE (+) SIDE
MUST FACE UP
5878-002-V0
Figure 2 – Battery Replacement
MOUNTING THE 5878
The 5878 can be mounted directly to a wall or other surface
using two-sided (double-stick) tape or by using the provided
back plate.
Mount the 5878 using the back plate as follows:
1. Mount the back plate to a sturdy wall using self-tapping
screws supplied (anchors for drywall are not supplied) or two-
sided adhesive tape.
2. Install the 5878 onto the backplate and slide it downward
until the locking device engages.
3. To remove the 5878 from the back plate release the locking
mechanism by pushing it towards the wall, and then care-
fully sliding the 5878 upward until it is released.
STAY
AW
AY
1
2
3
4
5878-003-V0
WALL OR
MOUNTING
SURFACE
LOCKING
DEVICE
BACK PLATE
5878 WALL
TRANSMITTER
MOUNTING
SCREWS (2)
(TYP)
Figure 3 – Installing the 5878
SPECIFICATIONS
Unit Dimensions: 4.5 in (114.3mm) x 2.75 in (69.85mm) x .5 in (12.7mm)
Battery: Maxell CR2032, Duracell DL 20325, or Varta CR2032
FOR WARRANTY INFORMATION AND FOR DETAILS REGARDING THE LIMITATIONS OF THE ENTIRE ALARM SYSTEM, REFER TO THE INSTALLATION
INSTRUCTIONS FOR THE RECEIVER/CONTROL WITH WHICH THIS DEVICE IS USED.
FCC AND INDUSTRY CANADA STATEMENT
THIS DEVICE COMPLIES WITH PART 15 OF FCC RULES AND RSS210 OF INDUSTRY CANADA. OPERATION IS SUBJECT TO THE FOLLOWING TWO
CONDITIONS: (1) THIS DEVICE MAY NOT CAUSE HARMFUL INTERFERENCE, AND (2) THIS DEVICE MUST ACCEPT ANY INTERFERENCE RECEIVED,
INCLUDING INTERFERENCE THAT MAY CAUSE UNDESIRED OPERATION.
THE USER SHALL NOT MAKE ANY CHANGES OR MODIFICATIONS TO THE EQUIPMENT UNLESS AUTHORIZED BY THE INSTALLATION AND SETUP GUIDE
OR THE USER GUIDE.
‡K14347GŠ
K14347 6/06 Rev. A
12800 Brookprinter Place,Poway, CA 92064
Copyright 2006 © Honeywell International Inc.
www.honeywell.com/security
/