Page is loading ...
1. WHAT THIS WARRANTY COVERS :
LG offers you a limited warranty that the enclosed subscriber unit and
its enclosed accessories will be free from defects in material and
workmanship, according to the following terms and conditions:
(1) The limited warranty for the product extends for ONE (1) year
beginning on the date of purchase of the product.
(2) The limited warranty extends only to the original purchaser of the
product and is not assignable or transferable to any subsequent
purchaser/end user.
(3) This warranty is good only to the original purchaser of the
product during the warranty period as long as it is in the U.S,
including Alaska, Hawaii, U.S. Territories and Canada.
(4) The external housing and cosmetic parts shall be free of defects at
the time of shipment and, therefore, shall not be covered under
these limited warranty terms.
(5) Upon request from LG, the consumer must provide information
to reasonably prove the date of purchase.
(6) The customer shall bear the cost of shipping the product to the
Customer Service Department of LG. LG shall bear the cost of
shipping the product back to the consumer after the completion
of service under this limited warranty.
2. WHAT THIS WARRANTY DOES NOT COVER :
(1) Defects or damages resulting from use of the product in other
than its normal and customary manner.
(2) Defects or damages from abnormal use, abnormal conditions,
improper storage, exposure to moisture or dampness,
unauthorized modifications, unauthorized connections,
unauthorized repair, misuse, neglect, abuse, accident, alteration,
improper installation, or other acts which are not the fault of LG,
including damage caused by shipping, blown fuses, spills of food
or liquid.
(3) Breakage or damage to antennas unless caused directly by
defects in material or workmanship.
(4) That the Customer Service Department at LG was not notified by
consumer of the alleged defect or malfunction of the product
during the applicable limited warranty period.
(5) Products which have had the serial number removed or made
illegible.
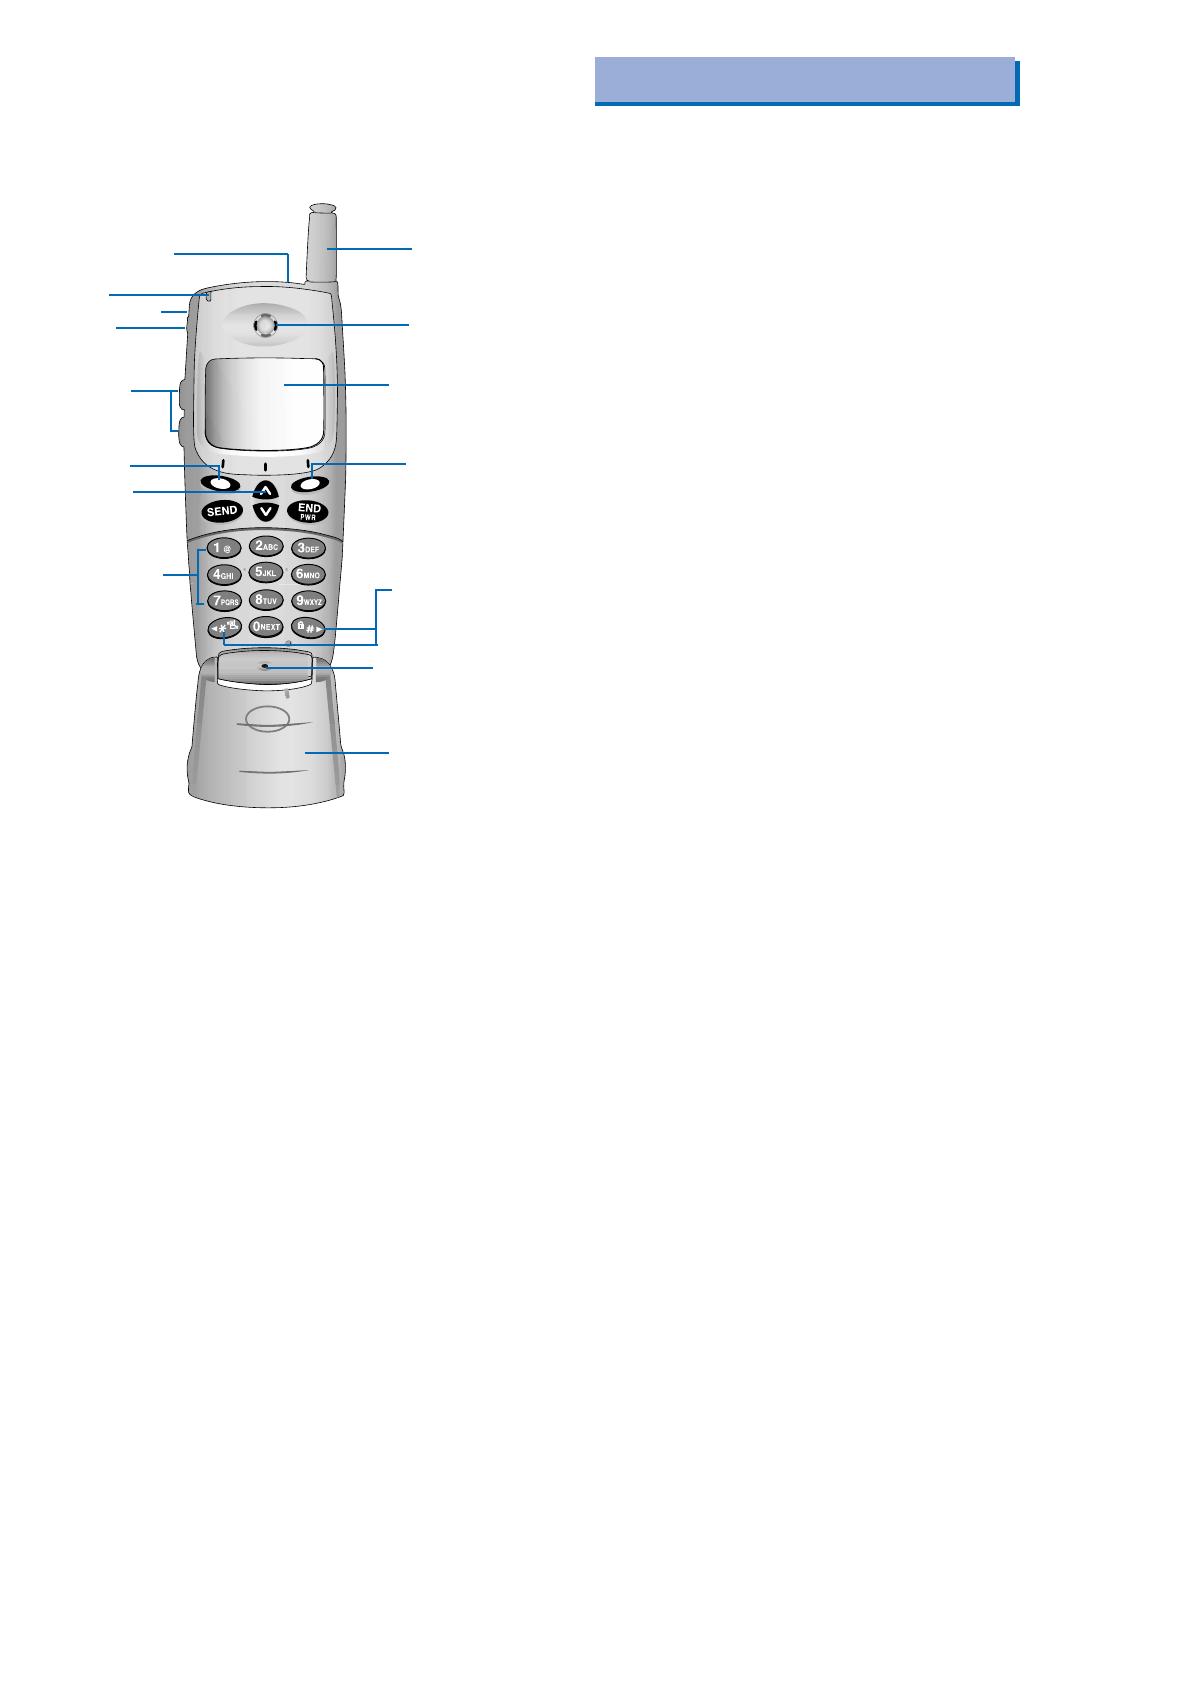
Phone components
This section provides an introduction to the LG-
SP110. It includes illustrations and descriptions of
the important phone parts and instructions for
getting your phone powered up and ready to use.
See page 11 for an overview of your phone.
Antenna
Earpiece
LCD screen
Soft key1
Soft key2
Scroll keys
Microphone
Active Flip
Handstrap hole
Lamp
Buzzer
Side keys
Headset Jack
MSG key
Alphanumeric
keypad
L
IMITED WARRANTY STATEMENT
Infocomm Inc.
10225 Willow Creek Road San Diego, CA 92131
Your wireless telephone gives you the powerful ability to
communicate by voice-almost anywhere, anytime. But an
important responsibility accompanies the benefits of wireless
phones, one that every user must uphold.
When driving a car, driving is your first responsibility. When
using your wireless phone behind the wheel of a car, practice
good common sense and remember the following tips:
1.Get to knew your wireless phone and its features such as speed
dial and redial. If available, these features help you to place your
call without taking attention off the road.
2.When available, use a hands free device. If possible, add an
additional layer of convenience and safety to your wireless phone
with one of the many hands free accessories available today.
3.Position your wireless phone within easy reach. Be able to access
your wireless phone without removing your eyes from the road. If
you get the incoming call at an inconvenient time, if possible, let
your voice mail answer it for you.
4.Let the person you are speaking with know you are driving; if
necessary, suspend the call in heavy traffic or hazardous weather
conditions. Rain, sleet, snow, ice and even heavy traffic can be
hazardous.
5.Do not take notes or look up phone numbers while driving. Jotting
down a “to do” list or flipping through your address book takes
attention away from your primary responsibility, driving safety.
6.Dial sensibly and assess the traffic; If possible, place calls when
you are not moving or before pulling into traffic. Try to plan calls
when your car will be stationary. If you need to make a call while
moving, dial only a few numbers, check the road and your mirrors,
they continue.
(6) This limited warranty is in lieu of all other warranties, express or
implied either in fact or by operations of law, statutory or
otherwise, including, but not limited to any implied warranty of
marketability or fitness for a particular use.
(7) Damage resulting from use of non-LG approved accessories.
(8) All plastic surfaces and all other externally exposed parts that are
scratched or damaged due to normal customer use.
(9) Products operated outside published maximum ratings.
(10) Products used or obtained in a rental program.
(11) Consumables (such as fuses).
3. STATE LAW RIGHTS:
No other express warranty is applicable to this product. THE
DURATION OF ANY IMPLIED WARRANTIES, INCLUDING THE
IMPLIED WARRANTY OF MARKETABILITY, IS LIMITED TO
THE DURATION OF THE EXPRESS WARRANTY HEREIN. LG
INFOCOMM INC. SHALL NOT BE LIABLE FOR THE LOSS OF
THE USE OF THE PRODUCT, INCONVENIENCE, LOSS OR ANY
OTHER DAMAGES, DIRECT OR CONSEQUENTIAL, ARISING
OUT OF THE USE OF, OR INABILITY TO USE, THIS PRODUCT
OR FOR ANY BREACH OF ANY EXPRESS OR IMPLIED
WARRANTY, INCLUDING THE IMPLIED WARRANTY OF
MARKETABILITY APPLICABLE TO THIS PRODUCT.
Some states do not allow the exclusive of limitation of incidental or
consequential damages or limitations on how long an implied
warranty lasts; so these limitations or exclusions may not apply to you.
This warranty gives you specific legal rights and you may also have
other rights which vary from state to state.
4. HOW TO GET WARRANTY SERVICE :
To obtain warranty service, please call the following telephone
number from anywhere in the continental United States:
LG Infocomm Inc.
201 James Record Road Huntsville, AL 35824
Tel. 1-800-793-8896 Fax. 1-800-448-4026
www.lgeservice.com
DO NOT RETURN YOUR PRODUCT TO THE ABOVE
ADDRESS. Please call or write for the location of the LGIC
authorized service center nearest you and for the procedures for
obtaining warranty claims.
Driver Safety Tips

Introduction
Highlights
Congratulations on your purchase of the LG-SP110
phone that has been designed to operate with the
latest digital mobile communication technology, code
division multiple access (CDMA). This CDMA digital
technology has greatly enhanced voice clarity and
can provide various types of advanced features. The
LG-SP110 is a PCS phone that can operate on
digital cellular systems. It is an advanced, compact
phone with diverse enhanced features as follows:
Large, easy-to-read, 5-line, backlight LCD with
status icons.
Paging, Messaging, Voice mail and Caller ID
capability.
18-button keypad.
Exceptionally long battery life using state-of-the-art
Li-ion battery technology and ultra-power saving
circuits.
Choice of 27 ring sounds.
Menu-driven interface with prompts for easy
operation and configuration.
Call privacy inherent with CDMA encoding.
“Any Key” answer, auto-redialing, one- touch and
speed dialing with 199 memory locations.
Multi-language : Two languages are supported
including spanish and English.
Optional accessories.
3
7.Do not engage in stressful or emotional conversations that may be
distracting. Make people you are talking with aware you are
driving and suspend conversations that have the potential to divert
your attention from the road.
8.Use your wireless phone to call for you. Dial 9-1-1 or other local
emergency number in the case of fire, traffic accident or medical
emergencies. Remember, it is a free call on your wireless phone!
9.Use your wireless phone to help others in emergencies, if you see
an auto accident crime in progress or other serious emergency
where lives are in danger, call 9-1-1 or other to call emergency
number, as you would want others to do for you.
10. Call raodside assistance or a special non-emergency wireless
assistance number when necessary. If you see a broken down
vehicle posing no serious hazard, a broken traffic signal, a minor
traffic accident where no one appears injuried, or a vehicle you
know to be stolen, call roadside assistance or other special non-
emergency wireless number.
“The wireless industry reminds you to use your phone safely when
driving.”
For more information, please call to 888-901-SAFE, or visit
our website www.wow-com.com
Provided by the Cellular Telecommunications
Industry Association
Provided by the Cellular Telecommunications Industry Association

Important Information
This user’s guide contains important information on
the use and operation of this phone. Please read all
the information carefully for optimal performance and
to prevent any damage to or misuse of the phone.
Any changes or modifications not expressly
approved in this user’s guide could void your
warranty for this equipment.
Check Components
Each standard unit comes with the LG-SP110
phone, a one-slot desktop charger, and one
rechargeable battery. Please make sure that these
components are all included.
Safety Instructions
WARNING! To reduce the risk of fire or electric
shock, do not expose this product to rain or moisture.
Do not use this product near swimming pools or
other bodies of water.
IMPORTANT! Before installing or operating this
product, read the
SAFETY AND GENERAL INFORMATION
located near the end of this document!
Exposure to Radio Frequency
Energy
In 1991, the Institute of Electrical and Electronics
Engineers (IEEE), and in 1992, the American
National Standards Institute (ANSI), updated the
1982 ANSI Standard for safety levels with respect to
human exposure to RF energy. Over 120 scientists,
engineers and physicians from universities,
government health agencies and industry, after
reviewing the available body of research, developed
this updated Standard. In March, 1993, the U.S.
Federal Communications Commission (FCC)
proposed the adoption of this updated Standard.
The design of your LGIC fixed wireless terminal
complies with this updated Standard. Of course, if
you want to limit RF exposure even further than
updated ANSI Standard, you may choose to control
the duration of your calls and operate your phone in
the most power efficient manner.
4 5
Before You Start
7
FCC Part 15 Class B Compliance
This equipment has been tested and found to
comply with the limits for a Class B digital device,
pursuant to part 15 of the FCC Rules. These are
designed to provide resonable protection against
harmful interference in a residential installation. This
equipment generates, uses and can radiate radio
frequency energy and, if not installed and used in
accordance with the instructions, may caused
harmful interference to radio communications.
However, there is no guarantee that interference will
not occur in a particular installation. If this equipment
does cause harmful interference to radio or
television reception, which can be determined by
turning the equipment off and on, the user is
encouraged to try to correct the interference by one
or more of the following measures :
Reorient or relocate the receiving antenna.
Increase the separation between the equipment and
terminal.
Connect the equipment into an outlet on a circuit
different from that to which the terminal is connected.
Consult you Authorized LGIC Dealer of an experienced
radio/TV technician for help.
6
Introduction
Highlights
Important Information
Check Components
Before You Star
Safety Instructions
Exposure to Radio Frequency Energy
FCC Part 15 Class B Compliance
Chapter 1. Getting Started
Cautions
Phone overview
LCD Icons
Using the Battery Pack
Chapter 2. Basic Functions
Turning the Phone On and Off
Making a Call
Correcting Dialing Mistakes
Receiving Calls
Using Quick Mode
Call Waiting
Mute
Redialing Calls
Adjusting the Volume
Power Save Mode
Signal Strength
Emergency Dialing
Contents
Speed Dialing
Caller ID
Phone Book Features
Key Lock
Chapter 3. Menu Features
General Guidelines to MENU Access
and Settings
Sound
Display
System
Call Information
Features
Utility
Security
Chapter 4. Book Features
Call History
Phone Book
PC-Sync
My Phone #
Chapter 5. Message Features
New Text
Old Text
Voice
Erase All
Setting
Chapter 6. Functions used during a call
Mute
Memo
Key Beep
Chapter 7. Accessories
Chapter 8. Appendix
Menu Tree
Chapter 9. Safety Guidelines
Safety Information
FDA Consumer Update
8 9
10 11
Cautions
Using the phone in proximity to receiving equipment
(i.e., TV or radio) may cause interference.
Keep your phone in a safe place when not in use.
Use only the batteries, antennas, and chargers
provided by LG. The warranty will not be applied
to products provided by other suppliers.
Only authorized personnel should service the
phone and its accessories. Faulty installation or
service may result in accidents and consequently
invalidate the warranty.
Do not hold the antenna while the phone is in use.
Do not use the phone in designated “no cellular
phone use” areas.
Do not expose the phone to high temperature or
humidity.
Avoid getting your phone wet. If the phone gets
wet, turn the power off immediately and remove
the battery pack. If the phone is inoperable, return
it to the dealer for service.
Avoid shock or impact on the phone.
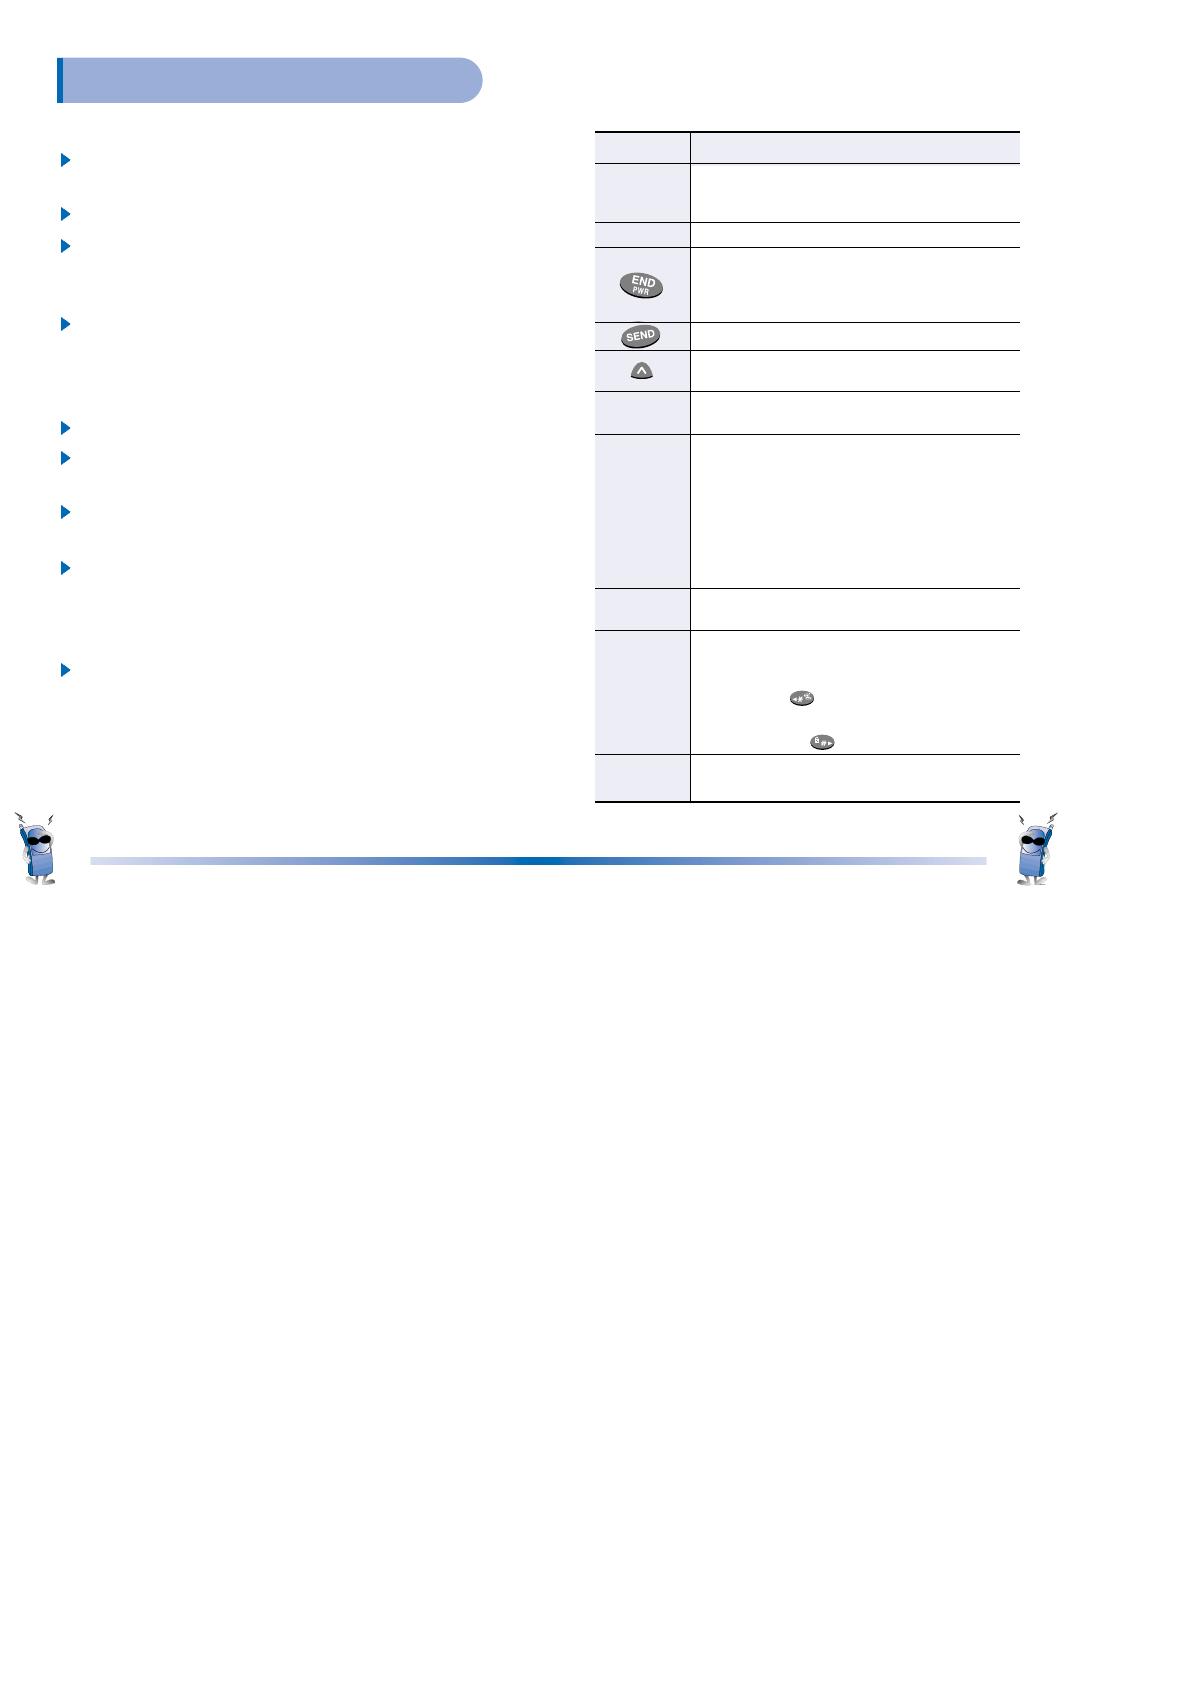
Phone Overview
Function Key Descriptions
Lamp
LCD screen
Active Flip
Soft Keys
Side Keys
Scroll Keys
Alphanume-
ric keypad
The red light goes on when you use the power
key to turn on the phone and when there are
incoming calls and messages.
Displays messages & indicator icons.
When turn power on/off. This key disconnects a
call. Using this key, you can also exit out of a menu
back to the phone’s standby display without
changing the setting.
Allows user to place or answer calls.
This key allows quick access to text and voice
mail notification messages.
Close the active flip to the terminate a call in progress.
Open the active flip to answer an incoming call.
The current operation of a soft key is defined by
the word at the bottom of the display.
Soft Keys 2 :
If you press this key once, you can erase one digit or
character. If you press and hold this key, you can erase
all digit. If you press this key once in a menu, you can
go back one level and if you press and hold the key in a
menu, you can go back to the standby display.
These keys enable you to adjust keybeep volume (in
standby mode) and earpiece volume (in a call status).
These keys are used to scroll through the
memory locations and menu items.
- In the standby status, set the manner mode by
pressing the button. (for 2 seconds)
- In the standby status, set the lock function
by pressing the button. (for 2 seconds)
These keys enable you to enter numbers and
characters and choose menu items.
Chapter 1. Getting Started

12
LCD Icons
Icons Descriptions
Digital indicator
Digital service is available.
NO service
The phone is not receiving a system signal.
In use
A call is in progress.
No icon indicates the phone is in standby mode.
In vibrator mode
Roaming
The phone is outside of its home service area.
Charge level
Battery charge level.
Voice message
When a voice message arrives.
Text message
When a character message arrives.
Signal strength
Current signal strength is indicated by the
number of lines shown.
Display of six bars means the best reception.
An image display which shows the function available
when in use.
D
Using the Battery Pack
Charge the battery full before the initial use of the
phone.
The phone comes with a rechargeable battery pack.
On purchasing the phone, one must charge the
battery fully. Keep the battery charged while not in
use in order to maximize talk time and standby time
when using the phone remotely.
Installing the Battery
To install the battery, insert the bottom of the battery
into the opening on the back of the phone. Then,
push the battery down until the latch clicks.
Removing the Battery
Turn the power off. (If power is not off, a loss of
stored numbers and messages may occur.)
By lifting removal button the battery will become
detached.
13
15
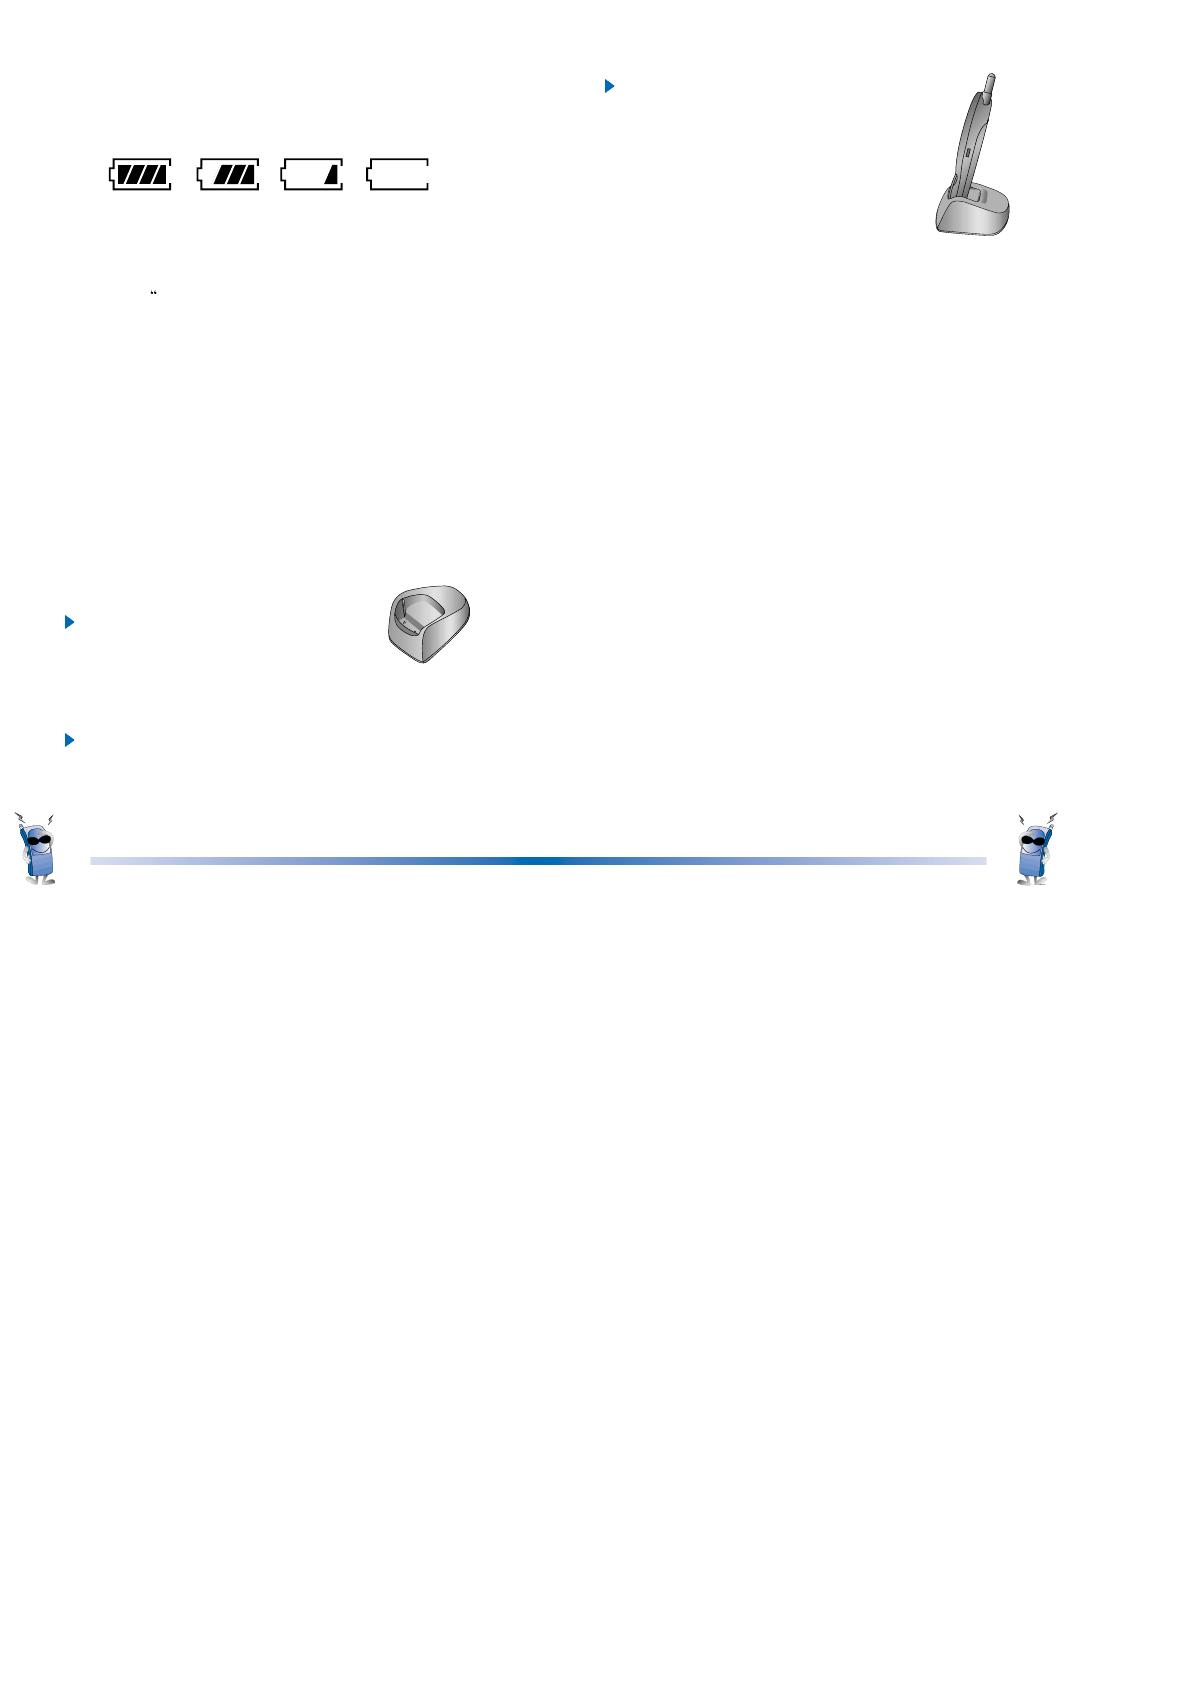
Battery Charge Level
The battery charge level is shown at the top right of
the LCD screen on the phone.
When the battery charge level becomes low, the low
battery sensor will alert you in three ways: Sounding
an audible tone, blinking the battery icon outline, and
displaying
LOW BATTERY WARNING”. If the battery
charge level becomes exceedingly low, the phone
will automatically switch off and any function in
progress will not be saved.
Using the Desktop Charger
The LG-SP110 desktop charger has a slot for
recharging batteries. The slot accommodates phone
and battery pack for charging.
Warning! Use only the desktop charger provided
with the phone. Using the wrong charger may cause
damage to your phone or battery.
1. Plug the charger into a wall outlet.
The charger should operate on a
110/220V AC source.
2. Insert the phone with an installed battery pack or a
battery pack into the charger’s slot.
If your phone is powered on while charging, you’ll
see the bars in the battery icon cycle. When the
battery is fully charged, the bars in the battery icon
will flash on and off.
If your phone is powered off, the display
will show charging status. “Charging...
(Phone is Off)” or “Charging Completion”
will be displayed.
If completely discharged, the battery will
take 3hours to recharge. If you leave the
phone on while it is in the desktop
charger, the battery will take longer to charge.
Caring for the Battery
1. You do not need to completely discharge the battery
before recharging. Unlike other battery systems,
there is no memory effect that could compromise
the battery’s performance.
2. Use only LG batteries and chargers. LG’s chargers
are designed to maximize the battery life.
3. Do not disassemble or short-circuit the battery
pack.
4. Keep the metal contacts of the battery pack clean.
5. Replace the battery when it no longer provides
acceptable performance. The battery pack may be
recharged hundreds of times until it needs
replacing.
6. Recharge the battery if it has not been used for a
long time to maximize usability.
7. Do not expose the battery charger to direct sunlight
or use it in high humidity, such as the bathroom.
8. Do not leave the battery in hot or cold places, this
may deteriorate the battery performance.
14
16 17
Turning the Phone On and Off
Turning the Phone On
1. Install a charged battery pack or connect the
phone to an external power source such as the
cigarette lighter adapter or car kit.
2. Press for a few seconds until the red light at
the top of the phone flashes.
If you want to make a call, fully extend the
antenna for optimum performance.
As with any other radio device, avoid any
unnecessary contact with the antenna while
your phone is on.
Turning the Phone Off
1. Press and hold until “Good Bye~” text is
displayed on the LCD, and then release the button.
2. Protect the antenna by pushing it back into the
phone, if extended.
Making a Call
Whenever you make a call, follow these simple steps:
1. Make sure the phone is turned on.
If not, press .
2.
Enter the phone number with area code, if needed.
3. Press .
If the phone is locked, enter the lock code and
press .
“Call Failed” indicates that the call did not go through.
4. Press to disconnect the call.
5. “This phone has been restricted” displayed on
your screen means that outgoing call restricted
mode is turned on.
If you want to turn off this function, follow the
steps below.
[MENU]
[7] Security Lock code insert
[2] Restrict
“No” [OK]
Correcting Dialing Mistakes
If you have misdialed a number, press Soft Key 2
CLR once to erase the last entered digit or hold
down Soft Key 2 CLR for at least one second to
delete all digits.
Receiving Calls
1. When the phone rings, open the flip cover or
in case the flip cover is closed, press any key
(except ) to answer.
If you press the button once when you
receive a call, you can hold on the present
call, and bell sound or vibration stops. If you
press the button twice, the present call is
terminated.
2. Press to disconnect the call.
Chapter 2. Basic Functions

18 19
In call waiting mode, the active call is put on hold as
you answer another incoming call.
This service is provided by your service provider.
When the call waiting function is activated, your
phone will beep to let you know you have an
incoming call. Your phone may also display the
incoming caller’s identification.
Using Quick Mode
Manner Mode
Set as Manner Mode in a public place.
1.In the standby status, select the function by
pressing the . (for 2 seconds)
In case Manner Mode is set, “Manner Mode” is
displayed on the LCD screen.
If Manner Mode is set, Key Tone dose not sound
and Vibration is selected as a bell sound.
To release the Manner Mode
To release the status, press again but for
a little longer.
Set-up of Lock Function
Used to prevent others from using your phone.
1. In the standby status, set the lock function by
pressing the . (for 2 seconds)
To release the Lock Function
Press Soft Key 1unlock , then enter
password (4 digits).
Call Waiting
Your cellular service may offer the call waiting
function. While you are answering a call, you may
hear two beeps indicating another incoming call.
When call waiting is enabled, you may put the active
call on hold while you answer the other incoming call.
Check with your cellular service about this feature.
1. Press to receive a waiting call.
2. Press again to switch between calls.
Mute
This function prevents your voice from being
transmitted, but you can still hear the other party’s
talking.
1. Press Soft Key 1 MENU and while in a call.
2. To release Mute, press Soft Key 1 MENU and
again.
Redialing Calls
Redialing Calls Manually
1. Press to redial the last number in call
history.
You can also redial any of the last 10 numbers
you have dialed. The last 10 numbers can be
stored in the call history list (See the “Recent
Call History List” on page 41).

20 21
Adjusting the Volume
The volume buttons on the left topside of the phone
can be used to adjust earpiece, ringer, key beep
volumes and message volume (SMS message
volume). The upper button increases and the lower
button decreases the volume.
You may adjust the earpiece volume while you are
in a call.
Adjust the ringer volume while the phone is
ringing.
The ringer volume can also be adjusted through
Menu feature.
If you adjust the ringer volume to minimum, the
LCD displays “-Ringer Off-” and you will not hear
the ringer sound.
The key beep volume is adjusted through Menu
feature.
The message volume is adjusted through Menu
feature.
Power Save Mode
When the phone is in an area without service for 15
minutes, it stops searching for service and enters
into the Power Save Mode. When your phone
activates this feature, “Power Save” is displayed on
your screen. The phone automatically checks for
service periodically or you can check manually by
pressing any key.
Signal Strength
The call quality depends on the signal strength in
your area. The phone displays the current strength
as the number of bars next to the signal strength
icon: the more the bars, the better the signal
strength. If the signal quality is poor, try moving the
phone. If you are in a building, the reception may be
better near a window. For maximum reception,
make sure that the antenna is fully extended.
Emergency Dialing
As long as your phone is registered on the system,
you can place calls to emergency number 911 -
even if your phone is locked or restricted.
1. Press then .
or
1. Press and hold (for more than 2 seconds).
Speed Dialing (see “Dialing Number
from Your Phone Book” on page 29.)
Speed dialing is a convenient feature, allowing you
to make phone calls quickly and easily. Your phone
recalls the phone number from your personal
directory, displays it briefly, and then dials it.
1. Enter memory location number (1 to 199).
2. Press . The phone will recall the telephone
number from memory, display it, and then dial it.
3. Press and hold the last digit of the memory
location number.

22 23
Caller ID
This feature enables the phone number of the caller
to be displayed when you receive the call. You
should check if the cellular service carrier provides
this feature.
Use of Caller ID
The phone number of the caller will be displayed on
the LCD screen when the call is received. The
‘Number is Restricted’ message will be displayed if
the phone is blocked displaying the caller’s phone
number. In addition, the ‘Number is Unavailable’
message will be displayed when the Caller ID cannot
be used. The ‘Missed Call’ message will be
displayed when a call ringing on the phone goes
unanswered. Missed call numbers will be stored in
the call history temporarily and will be displayed later
if the phone number is not blocked.
If the phone number is stored in memory together
with the name, the phone number of caller and
name is displayed on the screen before you answer.
Phone Book Features
Two Types of Phone Books
You can store up to 198 entries in the Phone Book
giving you easy access to your most frequently
dialed phone numbers. There are two types of phone
books: Personal Phone Book Memory and Recent
Call History List.
Personal Phone Book Memory
The phone has 198 personal phone book memory
locations where you can store up to 32 digits with an
associated name of up to 16 characters.
Saving Numbers to Your Personal Phone Book
Memory locations 1 through 8 should be used for
one-touch dialing for your most frequently used
phone numbers.
1. Enter the phone number that you want to
save(Up to 32 digits).
2. By pressing Soft Key 1OPT , the sub-menu
will appear.
3. Select “Save” on the sub-menu.
4. Select your desired label type using the [ ]
button.
5. Enter a name (up to 16 characters) and then
press Soft Key 1 SAVE . If you do not want to
enter a name, press Soft Key 1SAVE to
proceed directly to the next number.
6. The phone will ask you for the memory location
where the number will be saved. Press Soft
Key 1OK to automatically store the number in
the first available memory location. You also
have the option to enter a specific three-digit
memory location number.
(Entry 9 is designated to Emergency Call)
7. The phone will ask whether you want to keep
this number secret or not. Setting memory
location to “Secret” hides the phone number
and is not edited but deleted only. Select “Yes”
or “No” using the [ ] button.
To move the insertion point left or right, press
or .
If you need to use the same key for the next
character, either wait for 2 seconds or press
to move the insertion point to the right.
For example, to enter the name LG, either press
(wait) or press .
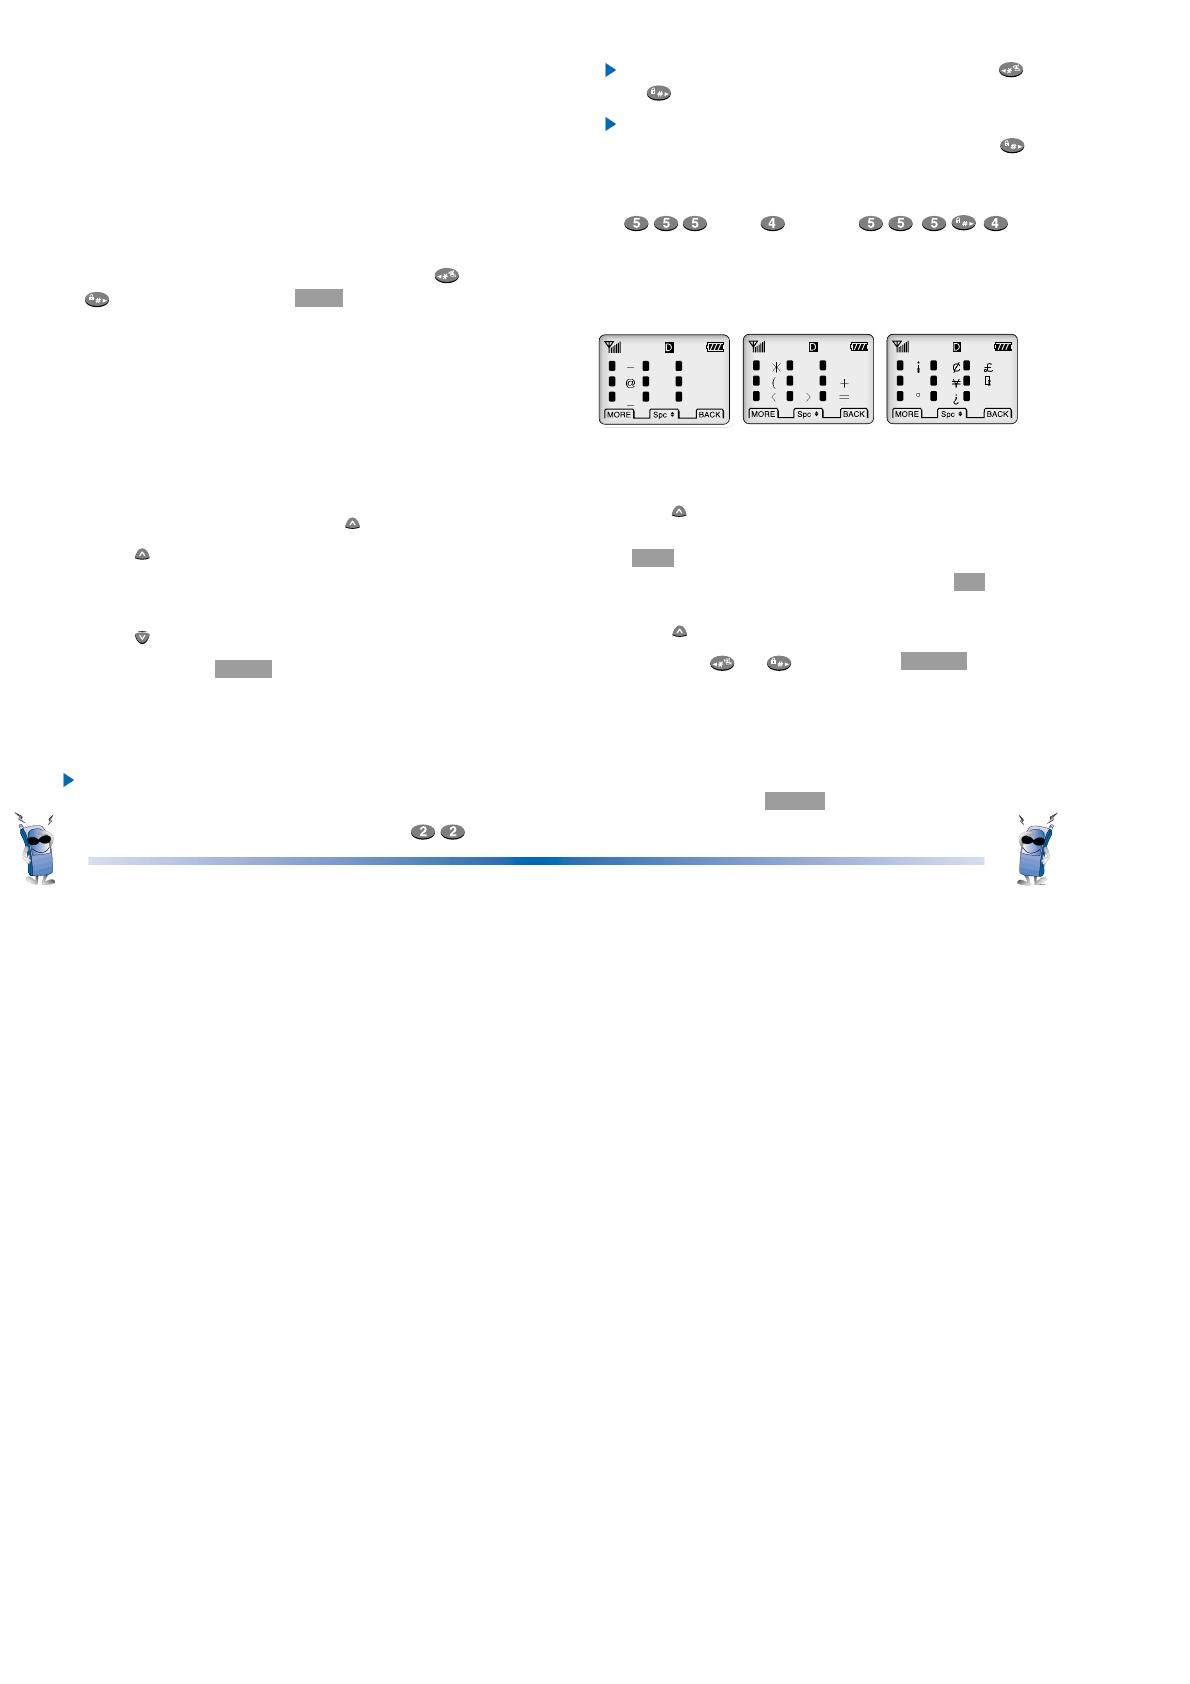
Special Characters
You may use any of the 26 special characters when
entering names for phone book storage or editing.
1. Follow the instructions for Entering Characters.
2. When you want to enter a punctuation character,
press . You will then see a menu after entering
the number you want to call, press Soft Key
1OPT , the sub-menu will appear. Select “Save”
on the sub-menu and then Soft Key 1OK after
select label(Home, Office etc...) and then
press of the punctuation characters.
3. Press the or , Soft Key 1 MORE to see
all 26 characters available.
4. Enter the number next to the character you
want to insert.
5. Continue entering any other characters.
6. Press Soft Key 1 SAVE when you are finished.
24 25
Entering Characters
1. Press the key labeled with the letter you want.
2. Press the same key repeatedly to change the
letter or number at the flashing cursor position
on the screen. When you have the correct
letter or number in position on the screen, wait
for two seconds for the cursor to automatically
advance to the next space or manually move
the cursor to the left or right by pressing or
, press Soft Key 2 CLR to correct any
mistakes.
How to Enter a Name
When entering a name, you can use both upper case
and lower case letters. By default, letters will be
displayed in upper case letter. Following are the
appropriate steps for entering lower case letter. 4
Modes (English upper case, English lower case, Digit,
Special character) are provided to enter character.
You can change the mode using the button.
1. Press once to change from upper case letter
to lower case letter.
2. Enter letter(s).
3. Press to return to upper case letter.
4. Press Soft Key 1 SAVE when you are finished.
When entering names, type the letters with the
numeric key.
Each key corresponds to several characters.
Press a key several times to show the character
you want.
For example, to enter the letter B, press .
1
4
7
2
5
8
3
6
9
§
1
4
7
2
5
8
3
6
9
/
1
4
7
2
5
8
3
6
9
.&
/
!?
#%
)

26
27
Retrieving Numbers
Retrieving by Name Search
1. Press Soft Key 2 BOOK .
2. Press [Phone Book].
3. Press [Find Name].
4. Enter the character(s) that you want to search
for (such as the few letters of the name).
5. Press Soft Key 1 FIND .
The phone then searches for names with that
character string. (Searches will ignore difference
between upper case and lower case letters.)
6. You will see a list of matches.
7. Press Soft Key 1 VIEW to see specifics in that
memory location, or press to place the call.
Retrieving Telephone Numbers
Retrieving Phone Numbers Using Memory
Location Number.
1.Enter Phone Entry Number (up to 3
digits) to be retrieved on the initial display.
2. By pressing Soft Key 1 OPT the sub-menu will
appear.
3.By locating cursor on “Entry” and pressing
Soft Key 1SEL the information stored in the
Entry of the number entered will appear.
Pressing will connect you to the number.
4. As alternative method, press Soft Key 2 BOOK
on the initial display and select [Phone Book]
[Find Entry] will be followed by inquiry of Entry #.
The Entry # for telephone number to be retrieved
may now be entered.
To search telephone numbers, including special
numbers, enter a special number in the initial display
and press Soft Key 1OPT . By selecting “Find” on the
sub-menu, the Entry List will appear. Information
linked to the Entry will appear upon selecting
telephone number for which details are desired.
Modifying Personal Phone Book
Adding Phone Numbers
Add Phone #
1. Locate corresponding Entry.
2. By pressing Soft Key 1OPT in Entry View,
the sub-menu will appear.
3. Select “Add Phone #” on the sub-menu.
4. “Add Phone #” will be completed after entering
new telephone number, followed by addition of
necessary settings such as Label or Secret .
Editing Stored Memory Location
Edit Entry
1. Locate corresponding Entry by name or Entry #.
2. By pressing Soft Key 1 OPT in Entry View the
sub-menu will appear.
3. Select “Edit Entry” in the sub-menu.
4. After entering changes in name, press [SAVE].

28 29
Edit Phone #
1.Locate telephone # to be edited in the
corresponding Entry.
2. Sub-menu will appear by pressing Soft Key 1
OPT after locating cursor on telephone #.
3. Select “Edit Phone #” on the sub-menu.
4. Setting for telephone #, Label and Secret may
now be changed.
Deleting Phone Numbers in Memory
1. Locate subject to be deleted using name or
Entry #.
2. In Entry View, all information stored in selected
Entry may be deleted at once (Erase Entry) or
telephone number may be singled out to be
deleted (Erase Phone #).
3. By selecting Soft Key 1OPT in Entry View, the
sub-menu will appear.
4. To delete telephone number, select “Erase
Phone #” on the sub-menu, and select Soft
Key 1 OK to confirm.
(You may not delete the last number.)
5. To delete an Entry, select “Erase Entry” on the
sub-menu, and select Soft Key 1OK to confirm.
Entry View with next Entry will return.
The numbers, once erased, cannot be
restored permanently. Please be careful!
Dialing Numbers from Your Phone Book
You can make a call using any memory location
either by speed dialing from the memory list or by
pressing while viewing the full contents of the
memory location.
1.One-Touch Dialing : One-touch dialing is a
convenient feature which enables you to dial
frequently used numbers in your personal
phone book by pressing a key once (for
memory location 1 through 8).
Entry 9 is designated to Emergency Call.
For locations 1 to 8, you can use one-touch
dialing(if enabled, see “One-Touch” on page
37.) by pressing and holding down the key
corresponding to the memory location.
2. Two-Touch Dialing (Speed Dialing) : This
dialing feature enables you to dial numbers in
your phone book through two keys (for
locations 10 to 99).
1)Press the first digit.
2)Press and hold the key of the second digit.
3.Three-Touch Dialing (Speed Dialing) : This
dialing feature enables you to dial numbers in
your phone book through three keys (for
location 100 to 199).
1)Press the first digit and second digit.
2)Press and hold the key of the third digit.

30
4. Dialing from a Memory List
1)From a memory list, press the scroll keys to go
to the memory location you want.
2)Press .
5. Dialing from a Memory Location.
On viewing and checking the memory location
to call, press .
Advanced Phone Book Feature
1.Pause Feature : When you call automated
systems (such as voice mail or credit billing
numbers), you often have to enter a series of
numbers. Instead of entering these numbers
by hand, you can store the numbers in your
phone book separated by special characters
called pauses. There are two kinds of pauses:
Hard Pauses (H)
: The phone pauses until you press Soft Key 1
resume to go to the next number.
Time Pause (T)
: The phone will pause for two seconds before
sending the next set of numbers.
Hyphen ( - )
: Hyphens are used for appearance only (e.g.
1-800-555-1234). They will not add a pause
between numbers.
2. Storing a Number with Pauses
1)Enter the phone number.
2)Press Soft Key 1 OPT .
31
3)Select one from the following:
Press [Hard Pause].
Press [Time Pause].
Press [Hyphen], and hyphens will not pause a
number.
4)Enter additional number(s) (e.g. pin number or
credit card number).
5) Press Soft Key 1 OPT and Press Soft Key 1SEL ,
the sub-menu will appear and select “Save” on the
sub-menu, to save this number with pauses.
3. “Prepending” a Stored Number : “Prepend” can
be used if you are out of your home system and
need to add the area code to an existing phone
book number. When a phone book entry or
message callback number shows up on the
display, you can make addition to the beginning
of the original number. However, you cannot
edit the original number during “Prepending”.
1)Recall a number in memory.
2)Enter the appropriate digits to prepend
numbers and the phone number.
3)Press .
Key Lock
This function allows you to carry the phone safely
without accidentally dialing a number.
1. Press and hold Soft Key 1 MENU for about 3
seconds "-KEY LOCKED-" is displayed.
2. To deactivate Key Lock, Press and hold Soft
Key 1 MENU for about 3 seconds again.

Ring & Vib Volume
(MENU )
Adjust the volume of the ringer.
Key Beep
(MENU )
Set Key beep length and touch tone playback speed.
Normal : Sends out a tone for a fixed period of time
only even if you keep the button pressed.
Long : Sends out a continuous tone for as long as
you keep the button pressed.
Key Volume
(MENU )
Adjust the key beep volume (the sound the phone
makes when the keys are pressed).
Ear Volume
(MENU )
Adjust the earpiece volume. You can also adjust this
during a call, by pressing the side keys.
Alerts Sound
(MENU )
1. Fade
(MENU )
Set an alert to inform you when you have lost a call
or lose services.
2. Minute
(MENU )
Alerts you 10 seconds before the end of every
minute during a call.
3. Service
(MENU )
If on, alerts you when service (CDMA / No service)
changes.
When you enter a service area, the phone displays
“Entering Service Area” message.
32
33
Chapter 3. Menu Features
General Guidelines to MENU
Access and Settings
1.Press Soft Key 1MENU . The first 3 menu
items will appear.
2. Press , or to go through the list of
menu features, or use the side keys.
3. Press the number corresponding to the menu
item that you want to select. Then the sub-
menu list will appear on the screen.
4. Press the appropriate number key to select the
sub-menu you want to access.
5. Select preferred settings, using the or keys.
Press Soft Key 2 BACK to go one step backw-
ard while accessing menu or selecting settings.
6. Press Soft Key 1OK to save the settings or
Soft Key 2 BACK to cancel without saving.
Sound
(MENU )
Ring Sound
(MENU )
Select the ringer sound with , or button.
Types of ring sound to notify that you have an
incoming call.
Ring Type
(MENU )
Select one ring type from four types (Ring, Vibrator,
Vib+Ring and Lamp) with , or button.
34
35
Auto Hyphen
(MENU )
Set hyphen option. When on, this automatically inserts
hyphens to be consistent with U.S. phone numbers.
Language
(MENU )
Set the Multi-language feature for displaying each
language. Language support : English/Spanish.
System (MENU )
Version
(MENU )
View the software and PRL version.
Call Information
(MENU )
Last Call
(MENU )
Displays duration of last call in minutes and
seconds.
Home Calls
(MENU )
Displays the total number and time (minutes and
seconds) of all calls made while in the home system
(i.e. not roaming), since last reset. You can reset it
by pressing Soft Key 1 OPT and Press Soft Key 1
SEL after select [Zero] using the [ ] button.
Roam Calls
(MENU )
Displays the total number and time (minutes and
seconds) of all calls made while in the roaming
mode.
When you leave a service area, the phone displays
“Leaving Service Area” message.
4. Call Connect
(MENU )
Alert sound to notify the user when the call is
connected.
Display (MENU )
Backlight
(MENU )
Choose the settings of the LCD and keypad backlight.
“10 seconds” turns the backlight off 10 seconds after
the last key was pressed. “30 seconds” waits 30
seconds after the last key was pressed. “On when
Flip open” means that the backlight is always on while
flip is open. “Always on” means that the backlight is
on regardless of the flip’s status. Choosing “Always
on” significantly decrease battery drain. “Always off”
means that the backlight is never on.
Banner
(MENU )
Enter the banner (up to 16 characters) that is
displayed on the top line when the phone powers up
and when it is in standby mode. Press Soft Key 1
OPT and press Soft Key 1 SEL select [Edit] using
the [ ] button, to make changes to the existing
banner. Enter the characters as you would when
storing a name tag to a memory location. Then
press Soft Key 1 SAVE .
Theme
(MENU )
You can set up the screen displayed on the LCD
screen in the standby mode.
36 37
Auto Answer
(MENU )
Select the number of rings before the phone
automatically answers a call. This feature is most
commonly used with the car kit.
off
after 1 ring(or melody 5 seconds)
after 3 rings(or melody 10 seconds)
after 5 rings(or melody 15 seconds)
Auto Retry
(MENU )
Set the length of time the phone waits before
automatically redialing a number when the attempted
call fails.
One-Touch
(MENU )
Enable/Disable one-touch dialing.
Utility (MENU )
Country
(MENU )
You can search for the national code of all countries
in the world. (total 123 countries)
Calculator
(MENU )
You can calculate simple mathematics. (Can be
entered up to the second decimal place)
For example) 25
100=2500
1) Press and in order.
2) Select using buttons, then press [SEL] button.
You can reset it by pressing Soft Key 1OPT and
Press Soft Key 1SEL after select [Zero] using the
[ ] button.
All Calls
(MENU )
Displays the total number and time (minutes and
seconds) including calls made while in the home
system and while roaming. This is not resetable.
Features (MENU )
Data/Fax
(MENU )
In “Data/Fax” setting, data and fax can be transmitted.
Wireless data communication services refer to
utilization of subscriber terminals for access to internet
with personal computer or laptops at 8Kbps or at
maximum of 13Kbps.
Data In : This setting enable the subscriber terminal to
receive data calls. No incoming calls can
be received with this setting. Outgoing
calls(Voice Fax and data) can be originated
and the setting will revert back to
Off/Disable
of the Power cycle automatically.
Fax In : This setting enables the subscriber terminal
to receive fax transmittals. No incoming
voice calls can be received with this
setting. Outgoing calls(Voice Fax and data)
can be originated and the setting will revert back to
Off/Disable mode of the Power cycle
automatically.
/