
Wifi Weather Station Setup
Setting up your Bresser Wifi-enabled weatherstation isn't a difficult process, but it does require you
to log into the Wifi LAN of the Base Station in order to get it talking to the outside internet, wia your
home or office. Do take your time to read this guide carefully and if neccessary, make some notes.
Bresser Weather Station Wifi Setup/Troubleshooting:
1. First take a note of your home or office wifi router’s name and password and security protocol
(WPA, WPA2 etc.).
2. Connect via Wifi to the weather station base station. We prefer to use a smartphone or tablet to
be able to do this, though you can use a regular computer. Disconnect the smartphone, table or
computer from your local wifi. Find the wifi signal of the weather station on the device – this should
start “PWS”- normally with a 6 digit number after this.
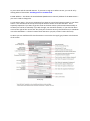
3. Once your device is connected to the PWS wifi signal, use a regular web browser to access the web
address http: //192.168.1.1 – this will allow you enter the details of your wifi router’s login details to
get the base station talking to the internet, via the router. The Pro Weather Link page (pictured
below) should come up automatically once you’ve entered the http: //192.168.1.1 address to your
browser and pressed enter.
4. On the Pro Weather Link page, underneath WIFI router setup, you will find the ‘Search’
button. Sometimes, your router is automatically found and its name entered into the Router box
next to the Search button. If it’s not there, click the search button and the base station will start
looking for local Wifi networks. This can take up to 10 minutes to achieve, so stick with it. If your
router is still not found, you can add it manually, using the ‘Add Router’ button underneath the
‘Search’ button and entering the name of your router/wifi network in the box next to it.
5. Security type – the ‘Security type‘ box is found under the Router name box. Most modern routers
use the WAP2 protocol, which the setup defaults to, but if you’re having trouble connecting, it’s
worth checking the type of security set on your router, as this may be different to WAP2. If it is,
change to the correct security type by clicking the drop down arrow next to the Security type box
(the different protocols should be listed if you do this).
6. Router Password Box – underneath the ‘Security type’ box is the password box. Here you will
enter the password to our home or office router, to make sure it can make connection. You will see
a series of ***** symbols underneath the password box, corresponding to the number of characters
in your password.
7. Weather server setup. If you haven’t created a Wundergroud or Weathercloud account, untick
both of the boxes next to the respective names. If you have already created a Wundergroud or
Weathercloud account, here is where you would enter the station ID and password that have been
assigned to your online account by either service (untick the one you’re not using, though you can
run both services at the same time). Once this has been achieved successfully, the real time
information from the external sensor can be passed to these services via the base station’s wifi link

to your router and the outside internet. If you want to sign up to either service, you can do so by
clicking either of these links: wunderground or weathercloud
8. MAC Address – this shows the standard MAC (Media Access Control) address of the Base Station –
you won’t need to change this.
9. Time Server Setup – this is very important if you want to access local UK time signals on your base
station. You will need to set this up correctly for the base station to receive UK time. This is
especially important if you want to get the clock on the base station synchronised automatically to
UK time (this can be set manually if you wish though, see manual for details). If you click the down
arrow to the right of the ‘Server URL’ box, find your local time server (it should have UK, or Windows
in its title somewhere – it doesn’t matter which UK server you pick, if there’s more than one).
10. Once you are confident all if this information is correct hit the ‘Apply’ grey button at the bottom
of the screen.
-
 1
1
-
 2
2


Bresser 7002581 Owner's manual
- Type
- Owner's manual
- This manual is also suitable for
Ask a question and I''ll find the answer in the document
Finding information in a document is now easier with AI
Related papers
-
Bresser WIFI color weather center Owner's manual
-
Bresser 7902586 Owner's manual
-
-
-
-
Bresser 7002534 Owner's manual
-
-
-
-
Bresser 7802580 Owner's manual
Other documents
-
 Explore Scientific WSX1001 Owner's manual
-
National Geographic 9080600 Owner's manual
-
-
 Explore Scientific WSX3001000000 Owner's manual
-
 Explore Scientific professional 7-in-1 Wi-Fi Weather Centre Owner's manual
-
 Explore Scientific WSX3001000000 Owner's manual
-
 Ambient Weather WS-0262 User manual
-
 Fine offset HP2550 Operating instructions
-
 Ambient Weather WS-0265 Owner's manual
-
 Froggit HP1000SE User manual


