Page is loading ...

INSTRUCTION MANUAL
HEC
-
DR8700
Massage Lounger
CONTENTS
IMPORTANT SAFETY INSTRUCTIONS
……… 1〜4
NAME/FUNCTION OF EACH PART ……… 5〜8
HOW TO PLACE THE MASSAGER …………… 9
HOW TO INSTALL THE STAND ………………… 10
PRIOR TO USE …………………………………… 11
ADJUSTMENT OF CHAIR ………………… 12〜15
FEATURES OF COURSES ……………………… 16
MASSAGING ……………………………… 17〜27
WHOLE BODY SENSOR AUTOMATIC COURSES
…… 17〜20
AUTOMATIC COURSES ………………… 21〜22
MANUAL (ROLLER) COURSES ………… 23〜26
MANUAL (AIR) COURSES …………………… 27
ADJUSTING MASSAGE INTENSITY ………… 28
AFTER USE ………………………………………… 29
MAINTENANCE PROCEDURES ………………… 30
CONTENTS OF MASSAGING …………… 31〜32
TROUBLE
-
SHOOTING …………………………… 33
SPECIFICATIONS ………………………………… 34
WARRANTY ……………………………………… 35
Thank you for purchasing this massage lounger.

IMPORTANT SAFETY INSTRUCTIONS
DANGER To reduce the risk of electric shock:
WARNING To reduce the risk of burns, fire, electric shock, or injury to persons:
This product contains a chemical known to the State of California to cause cancer, birth defects or
other reproductive harm.
An appliance should never be left unattended when plugged in. Unplug from outlet when not in use,
and before putting on or taking off parts.
Do not operate under blanket or pillow. Excessive heating can occur and cause fire, electric shock, or
injury to persons.
Close supervision is necessary when this appliance is used by, on, or near children, invalids, or
disabled persons.
Use this appliance only for its intended use as described in this manual. Do not use attachments not
recommended by the manufacturer.
Never operate this appliance if it has a damaged cord or plug, if it is not working properly, if it has
been dropped or damaged, or dropped into water. Return the appliance to a service center for
examination and repair.
Do not carry this appliance by supply cord or use cord as a handle.
Keep the cord away from heated surfaces.
Never operate the appliance with the air openings blocked. Keep the air openings free of lint, hair,
and the like.
Never drop or insert any object into any opening.
Do not use outdoors.
Do not operate where aerosol (spray) products are being used or where oxygen is being administered.
To disconnect, turn all controls to the off position, then remove the plug from the outlet.
This product is for Household Use Only.
Polarization Instructions
To reduce the risk of electric shock, this appliance has a polarized plug (one blade is wider than the
other). This plug will fit in a polarized outlet only one way. If the plug does not fit fully in the outlet,
reverse the plug. If it still does not fit, contact a qualified electrician to install the proper outlet.
Do not change the plug in any way.
If you are currently receiving medical treatment of any type or if any of the following apply to you, be
sure to consult a doctor prior to using this appliance.
If you are using an internal electronic medical device such as a pacemaker which may be affected by electromagnetic interference
If you have any malignant tumors
If you suffer from heart trouble
If you have lost temperature sensitivity.
If you are having your menstrual period, or if you are pregnant or have just given birth
If you have any sensory problems due to severe peripheral circulation problems caused by illnesses such as diabetes
If you have any injuries to your skin
If you require complete rest
If your body temperature is 38°C (100 or higher (if you are feverish)
If you use the massager while any of the above apply to you, accidents or feeling of sickness may occur.
Example If you have symptoms of acute inflammation [such as fatigue, chills or fluctuating blood pressure] or if you are
suffering from general debility
If you suffer from osteoporosis, or if you suffer from acute pain from causes such as spinal injuries, sprains or torn muscles
If your spine is abnormal or bent
If you are planning to use the massager on a part of the body which is currently receiving medical treatment or which is diseased
1
When using an electrical appliance, basic precautions should always be followed, including the following:
Read all instructions before using this appliance.
Always unplug this appliance from the electrical outlet immediately after using and before cleaning.
Improper connection of the equipment-grounding conductor can result in a risk of electric shock.
Check with a qualified electrician or serviceman if you are in doubt as to whether the product is properly
grounded. Do not modify the plug provided with the product – if it will not fit outlet, have a proper
outlet installed by a qualified electrician.

2
All of the following information is important.
Be sure to follow the instructions carefully.
Do not use the massager if you have been forbidden to use it by a doctor.
Example: If you are suffering from blood clots (embolisms), severe aneurysms, acute varicose veins, skin
inflammation or skin infections (including epidermal infections)
Do not allow persons in the following categories to use massager.
If this is not done, they may be burned.
Those who have a diminished sense of temperature or pain
Those who cannot move their legs by themselves
Do not allow people to use the massager if they are unable to clearly indicate their intentions or if
they do not know how to operate the massager.
If you feel no effect after using the product for a while, consult your doctor or health care professional.
Do not let children use the massager. Do not let them play on or around the massager or allow them
to come near the massager while it is being used.
Be careful not to put your hand or foot into the spaces between any moving parts, including into the
space between the back rest and arm rest or into the space at the underside of the back rest or
between the foot rest and the seat or into the space under the foot rest. Furthermore, do not place
your hands, feet or head inside the upholstery of the massager.
If this is not observed, accidents or injury may occur.
Be sure to check that the upholstery is not
torn before using the massager. If a tear is found, stop using
the massager immediately, disconnect the power plug from the wall outlet and consult the place of
purchase.
Do not use the massager if the upholstery is torn, otherwise injury or electric shock may occur.
f
If this is not observed, there is the danger that you may start to feet sick or an injury may occur.
(When massaging the nape of the neck, place a soft towel on the neck in order to avoid strong stimulation.)
Do not stand or sit on the arm rests, foot rest or back rest.
Do not suddenly release your hand while raising the foot rest manually. To ensure safety, release
your hand gently from the foot rest.
Do not raise or lower the
foot rest while your feet are receiving an air massage.
If this is not observed, injury may occur.
Wipe off any dust that has collected on the prongs or the base of the power plug.
If this is not done, fire may occur.
Do not use the massager at any current other than the designated voltage.
If this is not done, fire or electric shock may occur.
Do not wind the power cord, remote control cord or sensor controller cord around the main unit,
remote control, sensor controller, or remote control stand. Moreover, be careful not to operate the
back rest with the cord hooked on an obstruction.
If this is not done, unreasonable force may b
e applied to the cord, possibly resulting in fire or electric shock.
Do not allow any children to use the massager, play on or around it. Also, while in use, keep children
away from the massager. Lock the plug with the paddle lock provided when not in use and store key
out of reach of children.
Otherwise, an injury may occur.
Be sure to check that there is no person (children in particular), or any pets under the foot rest and
that there are no other obstructions in the way before reclining the back rest or lowering the foot rest
or when using the stretch. In addition, do not leave the foot rest in the raised position when not in use.
If this is not observed, accidents or injury may occur.
PLUG
PLUG
KEY
PADDLE LOCK
COVER
Do not use the massager on the head, the chest, the abdomen, the joint (knee and elbow,etc.) and parts
felt painful. In addition, do not place your hands, feet or arms between the massaging rollers.
If this is not observed, you may fall down and accidents or injury may occur.

3
IMPORTANT SAFETY INSTRUCTIONS (continued)
WARNING To reduce the risk of burns, fire, electric shock, or injury to persons:
Do not scratch, damage, process, excessively bend, pull, twist or bundle the power cord or place
heavy objects on it or clamp it.
If this is not observed, the power cord may become damaged and fire or electric shock may result.
Do not use the product if the power cord or power plug is damaged or if it does not fit securely into
the wall outlet.
If this is not observed, electric shock, short-circuits or fire may result.
Be sure to disconnect the power plug from the wall outlet before cleaning. Do not pull out the power
plug with wet hands.
If this is not observed, electric shock, accidents or injury may result.
Be careful not to spill water over the remote control, sensor controller, seat, or foot rest.
If this is not observed, electric shock, short circuit or fire may occur.
Never attempt to dismantle the massager. Do not allow any person other than a qualified repair
technician to dismantle or repair the massager.
If this is not observed, fire, electric shocks, accidents or injury may occur. Ask the place of purchase of
your nearest Customer Service Center (separate sheet) if repairs are required.
Before using the massager, check all switches and other parts while referring to this instruction
manual to make sure they all operate correctly.
Do not use the massager for more than 20 minutes at a time. In addition, limit the use of the
massager on one point to 5 minutes or less.
Using the massager continuously for long periods of time will apply more stimulation than is necessary
and may result in adverse effects or injury.
Be careful not to fall asleep during massaging.
If this is not observed, accidents or injury may occur.
Place the massager main unit on a level floor surface.
If it is placed on an unstable surface, it may fall over and injury may occur.
If discomfort or pain is felt during use, stop using the massager and consult a doctor immediately.
In addition, if the massage force feels too strong, stop using the massager earlier than planned.
Otherwise, if you continue using the massager under such conditions, an unexpected accident may occur.
If the massager has not been used for a long time, check that it operates correctly and safely before
using it. In addition, check that there are no problems with the cords and other parts.
If this is not done, accidents or injury may occur.
After use, be sure to set the POWER switch to the “OFF” position, and disconnect the power plug
from the wall outlet.
If this is not done, accidents or injury due to a child’s mischief may occur.
At first, do not attempt to recline the seat deeply or lean on the back rest forcibly (until you have
become accustomed to massaging).
If the massaging force is too strong at first, it may result in adverse effects or injury.
Do not wear accessories (such as a necklace or earrings) while massaging.
If this is not done, accidents or injury may occur.
Do not hang anything from the back pad or head rest, or pull the back pad or head rest forcibly.
If this is not observed, the head rest may come off and injury may occur.
Do not place anything other than the remote control and the sensor controller respectively on the
remote control stand.
If this is not done, the stand may break, resulting in injury.
Do not use the massager on bare skin.
If this is not observed, injury may occur.
Do not move the massager while a person is sitting in it.
If this is not observed, the massager may fall over and injury may occur.
Do not swing the head rest because it contains a weight.
If it is not done, injury may occur.
For safety, check that the massaging rollers are located at their origin (about shoulder height) and then
sit on the chair slowly.
Be sure to keep your body straight without twisting and center between the left and right rollers.
If it is not observed, an accident or injury may occur.

Do not attempt to adjust the foot rest slide while reclining.
If this is not done, accidents or injury may occur.
Do not attempt to stand on the foot rest when the foot rest slide position and angle are not completely
returned to the home positions.
If this is not done, the user may fall over, resulting in an accident or an injury, and the floor may be damaged.
Do not use the massager for any other purpose than as a massager or chair.
If this is not done, problems with operation, accidents or injury may occur.
Do not use the massager together with other medical instruments.
If this is not observed, the user may feel sick or it may cause other health problems.
If a power failure occurs, set the POWER switch to the “OFF” position immediately and disconnect
the power plug from the wall outlet.
If this is not done, an accident or injury may occur when the power is restored.
Insert the power plug securely into the wall outlet.
If this is not observed, electric shock, short-circuits or fire may result.
Clean the massager after use so that it will be ready for the next use, and store it in a place which
is low in humidity.
If dust or moisture collect in the massager, fire, electric shock or problems with operation may occur.
If the massager stops working or any other problem occurs with it, stop using it immediately to
prevent accidents, disconnect the power plug and ask the place of purchase to carry out inspection
and repair work.
If this is not done, fire due to electric shock, current leaks or short-circuits may occur.
Do not use the massager on top of a heated carpet or other heater, or near a stove or other heat sources.
If this is not observed, electric shock or fire may occur.
Do not use the massager in bathrooms or in places with high humidity.
If this is not observed, fire, electric shock or problems with operation may result.
Always be sure to disconnect the power plug from the wall outlet when not using the massager.
If this is not done, the insulation may deteriorate and electric shock, current leaks or fire may occur.
Do not attempt to disconnect the power plug by pulling the cord, but always by holding the power
plug and pulling it out. Also, clean the dust off the power plug periodically.
If this is not observed, electric shock, short-circuits or fire may result.
The maximum permissible weight of the user is 120 kg (265lbs).
Otherwise, an accident may happen or damage to the machine may result.
WARNING: Connect this appliance to a properly grounded outlet only. See Grounding Instructions.
Grounding Instructions
This product must be grounded. If it should malfunction or breakdown, grounding provides a path of least
resistance for electric current to reduce the risk of electric shock. This product is equipped with a cord
having an equipment-grounding conductor and a grounding plug. The plug must be plugged into an appropriate
outlet that is properly installed and grounded in accordance with all local codes and ordinances.
This product is for use on a nominal 120-volt circuit, and has a grounding plug that looks like the plug illustrated
in sketch A. Make sure that the product is connected to an outlet having the same configuration as the plug.
No adapter should be used with this product.
GROUNDING METHODS
Sketch A
GROUNDED
OUTLET
GROUNDING
PIN
GROUND
OUTLET BOX
SAVE THESE INSTRUCTIONS
ADAPTER
METAL
SCREW
TAB FOR
GROUNDING SCREW
Sketch B Sketch C
*
Do not use the adapter in Canada.
4

5
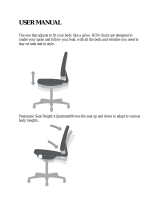
NAME/FUNCTION OF EACH PART
Cord
Power plug
Seat
Stand
Foot rest slide lever
Remote control
Sensor controller
Back rest
Back pad
Arm rest
Head rest
Massaging rollers
Foot rest

Used when moving
the chair.
Casters
6
POWER switch
Used to turn on/off the power
source.
Installation screws
(3 screws)
Stand
Check for the accessories first.
Accessory box
Tools needed: Phillips (crosshead) screwdriver
Not included.

*
All display icons are shown here
for explanation.
Remote control
7
NAME/FUNCTION OF EACH PART (continued)
INSTANT STOP button
Used if you have felt abnormal physical
sensation or want to stop the massager
immediately.
OPERATION ON/OFF
button
Used for switching the operation
ON/OFF.
HOME POSITION
button
Used to return the back rest, foot rest
and seat to their home positions.
BEST POSITION
button
Used to adjust the back rest, foot
rest and seat to the three preset
best positions.
FULL AUTO button
Used to measure the degree
of stress and stiffness using
the sensors and massage your
body automatically based on
the measurement results.
AUTOMATIC COURSE
buttons
Used to select the desired type
of Automatic Course.
MANUAL (ROLLER)
MASSAGE buttons
Used to select the desired type
of upper body massage.
ROLLER ADJUST
buttons
Adjusts the width and speed of the
massaging rollers in five stages.
UPPER BODY STRENGTH ADJUST buttons
Adjusts the strength of upper body massaging in five stages.
LOWER BODY STRENGTH ADJUST buttons
Adjusts the strength of lower body massaging in three
stages. During the Whole Body Sensor Automatic Courses,
the lower body massaging can be turned off.
RECLINING buttons
Adjusts the angles between the back rest, seat and
the foot rest. The back rest, seat and foot rest move
in conjunction with each other.
FOOT REST buttons
Adjusts the angle of the foot rest.
ROLLER POSITION buttons
Used to position the massaging rollers at
your shoulders or move them up and down.
WHOLE BODY SENSOR
AUTOMATIC COURSE buttons
Used to select the desired type of Whole
Body Sensor Automatic Course.
MANUAL (AIR) MASSAGE buttons
Used to select the desired type of lower body air massaging.
SHIATSU ON/OFF buttons
Used to turn ON/OFF shiatsu massage for your calves and soles (the
corresponding lamp lights up when the shiatsu massage is ON).
SENSOR ADJUST button
Used if the sensors do not detect stress and stiffness correctly due
to your skin condition such as dry skin (the red lamp lights up
when the sensor adjustment is ON).
SOLE WARMER ADJUST button
Used to turn ON (HIGH/LOW) or OFF the sole warmer (the HIGH
lamp lights up when the sole warmer is ON in HIGH mode; the
LOW lamp lights up when the sole warmer is ON in LOW mode).
AGE
buttons
Used to measure the degree
of stress and stiffness.

8
Sensor controller
Front Rear
Repeat display
Illuminates if the fingers (hand) are not placed
on the sensor during a measurement of stress
and stiffness in the Whole Body Sensor
Automatic Courses.
STRESS display
Shows the degree of stress
after stress measurement.
WHOLE BODY SENSOR
AUTOMATIC COURSE display
Turns on during a Whole Body
Sensor Automatic Course.
(flickers)
the fingers (
hand
) are not placed
on the sensor correctly.
SOLE WARMER
display
Turns on when the sole
heater is on.
Body areas that can be massaged.
Areas where a high degree of stiffness has been detected.
Areas where a low degree of stiffness has been detected.
STIFFNESS display
The upper part of the lamp indicates the degree of
stiffness, and the lower side of the lamp indicates the
degree of relaxation. The more the upper part of the lamp
is illuminated, the higher the degree of detected stiffness.
Shoulder position measurement /
Original position display
The ”SHOULDER” icon flickers when the user (the shoulder
position) is being measured, and ”ADJUST”
lights up when the measurement is over.
Body pressure display
Shows the degree of pressure between your
body and the massaging rollers.
STRENGTH adjustment display
Shows the degree of massage strength. You can adjust the
massage strength while this indicator is lit, by using the
STRENGTH UPPER BODY and LOWER BODY buttons.
RECLINING buttons
Adjusts the angle between
the back rest and foot rest.
The back rest and foot rest
are moved in conjunction
with each other.
Repeat button
Sensors
The degree of perspiration is measured if the
fingers are placed on the sensors during a
Whole Body Sensor Automatic Course.
To measure stress
Grip the sensor controller with
both fingers (hands) so that the
four sensors at the upper and
lower portions are touched.
Grip the sensor controller with one
fingers (hand) so that the lower three
sensors are touched.
(Stiffness will be measured based
on the amount of perspiration
from your hand.)
To measure stiffness
(Stress will be measured based
on heart rate variability .)
If this button is pressed
during Whole Body Sensor
Automatic Courses or
Automatic Courses, the
current massage pattern
will be repeated once.
Sensors react to the surrounding situation.
STRESS/STIFFNESS
sensor mode display
Stress measurement mode
Stiffness measurement mode
The following icon appears sensor modes.
Flickers if you press the Repeat button on the
sensor controller to repeat the current massage
in a Whole Body Sensor Automatic
Course or Automatic Course.
does not light up if

9
HOW TO PLACE THE MASSAGER
■
■
How to move the massager
When carried by two people.
Hold by the back rest and foot rest when
moving.
When moving using the casters.
Lift up the front and move using the casters.
Press the BEST POSITION
button to fold down the
back rest.
Back rest
Casters
Foot rest
Before moving the massager, be sure to remove the power
plug from the outlet.
Be careful not to step on the power cord, remote control or
sensor during movement.
Be sure to move the massager with the assistance of another
person on an easily damaged floor surface or concrete surface.
Carpet
Decide where to place it
Lay a carpet, etc. on the set-up
area.
Ensure there is sufficient space
to allow the massager to recline.
Place the massager on a level floor surface.
Keep the massager at least 1 m (39
3
/
8
") away from AV products like a TV or radio.
Otherwise, the program may be disturbed by noise.
Do not keep the massager in a place with high humidity like a bathroom.
Do not keep the massager in a place where it will be exposed to direct sunshine for an extended
period, yor in a place near a heater where the temperature may reach high levels.
To prevent damaging the floor and muffle
the noise while massaging.
In order not to touch the wall or other things
when reclined, allow a clearance of 60 cm
(23
5
/
8
") or more to the front and 60 cm (23
5
/
8
")
or more to the back.
60 cm (23
5
/
8
")
or more
Foot rest
Back rest
NOTE
NOTE
●
●
●
● ●
●
●
●
●
●
●
1 2
Do not suddenly release your hand
while raising the foot rest manually.
To ensure safety, release
your hand
gently from
the foot rest.
●
WARNING
Slowly
60 cm (23
5
/
8
")
or more

10
HOW TO INSTALL THE STAND
Tools needed: Phillips (crosshead) screwdriver
Installation
screws
Hand screw
Remove the cover attached to the
right face of the right arm rest.
Reattach the cover to the right
side of the arm rest.
Screwdriver is not included.
Installation screws are included in the accessory
box. (See page 6)
Cover
Gently pull the lower portion
of the cover toward you.
Press the lower
portion of the
cover until you
hear a click.
Place the remote control in the remote control stand
as indicated by arrows ① and then push it in the
direction of arrow ②.
Put the remote control on the
remote control stand (upper part).
Put the sensor controller on the
sensor controller stand (lower part).
Secure the stand on the right-hand
side of the arm rest, using the
installation screws (3 screws).
Place the sensor cable into the hook
on the left side of the sensor stand.
Place the remote control cable into
the hook on the right side of the
sensor stand.
②
①
Remote
control
Sensor
controller
Remote control
stand
Sensor controller
stand
If the remote control
stand moves too
loosely, tighten the
hand screw.
Remote control cord
Hook
1
2
3
4
5
6
Stopper
Attach so that the
stopper is set into
the top of the hook.
Sensor controller
cord
Hook

11
PRIOR TO USE
Check the upholstery of the chair.
●
Check the power cord, remote control cord and sensor controller cord.
●
●
① Insert the power plug into an outlet.
② Set the POWER switch to the “ON”
position.
●
Do not recline the back rest deeply.
●
Do not lean on the back rest forcibly.
●
Do not massage with the back pad flipped to the rear of the back rest.
●
Do not attempt to continuously use the massager on one place for an extended period.
●
Do not attempt to speed up the movement of the massaging rollers or increase the
strength of massage.
Check that the cords are not caught between the back rest and the arm rest, and that they are
not placed beneath the massager.
Check that there is neither breakage nor damage to the cords.
Power switch
Press
Connect the power source.
At first, do not attempt to select a strong method of massaging (until you are
accustomed to massaging).
Otherwise, strong massaging at first may result in injury. Particularly, aged persons and those
who have weak bones need to use the massager with great care.
1
2
3
WARNING
WARNING
Be sure to check that the upholstery
is not torn before using the massager.
If a tear is found, stop using the massager
immediately, disconnect the power plug
from the wall outlet and consult the
place of purchase.
Do not use the massager if the upholstery
is torn, otherwise injury or electric shock
may occur.

12
Back rest
Foot rest
ADJUSTMENT OF CHAIR
●
●
Install the head rest.
Before sitting on the massage chair
Bring all parts of the massage chair to their home position by pressing
the HOME POSITION button.
Sitting on the massage chair while the foot rest is being raised is dangerous.
Be sure to lower the foot rest completely before sitting on the massage chair.
The chair will be automatically brought to its home position by pressing
the HOME POSITION button.
Remove the Hook
-
and
-
loop fasteners
and pass the cord
through.
Align the Hook
-
and
-
loop fasteners.
Hook
-
and
-
loop
fasteners
Cord
Sit on the center of massage chair.
Sit deeply in the massage chair so that the waist touches the back rest.
●
●
Foot rest
Adjust the position of the head rest.
During the massage, adjust the head rest so that it does not touch the shoulders.
●
●
Do not swing the head rest because
it contains a weight.
If it is not observed, injury may occur.
Do not wear accessories (such as a
necklace or earrings) while massaging.
Head rest
1
2
3
Center of the chair
●
●
Do not attempt to stand on the foot rest when
the foot rest slide position and angle are not
completely returned to the home positions.
If this is not done, the user may fall over, resulting in
an accident or an injury, and the floor may be damaged.
If it is not observed, an accident or
injury may occur.
WARNING
WARNING
For safety, check that the massaging rollers are
located at their origin about shoulder height
and then sit on the chair slowly. Be sure to keep
your body straight without twisting and center
between the left and right rollers.
If it is not observed, an accident or injury may occur.

13
BEST POSITION 1 BEST POSITION 3
BEST POSITION 3BEST POSITION 2BEST POSITION 1
●
●
●
●
●
STRETCH course massage will
be selected automatically.
Press the OPERATION ON/OFF button.
When the button is pressed, the lamps of the sole warmer and remote
control will illuminate, and the sole warmer will turn on.
When the foot rest is fully lowered, the foot rest will rise a little.
When the massaging rollers are not located in the upper section, the
massaging rollers will move to the upper section and stop. [at the origin]
During the movement, the icon of “ORIGIN” on the remote control flickers.
Adjust the angle of back rest, foot rest, and the seat.
Pre-set Angles
Press the BEST POSITION button.
Reclining positions change automatically at each press of the button.
(Button illuminates while reclining and flickers when in position)
Posture suited for whole body
massaging
Posture suited for lower body
and air massaging
Posture suited for stretching
* *
Automatically starts massaging
in Air Course.
Reclining can be stopped during the reclining motion by pressing either the BEST POSITION
button, HOME POSITION button, RECLINING button, FOOT REST button, OPERATION ON/OFF
button, or STOP button.
Stretch course
The back rest and foot rest angles are adjusted automatically.
●
WARNING
4
5
ADJUSTMENT OF CHAIR (continued)
BEST POSITION 2
Button Lamp
Illuminates
Illuminates Illuminates
During the reclining motion
At BEST POSITION
When you stop reclining
Flashes
Illuminates
Flashes
(massage courses other than COMFORT AIR
COURSE and STRETCH cannot be selected).
(massage courses other than COMFORT AIR
COURSE and STRETCH cannot be selected).
Be sure to check that there is no person (children in particular), or any pets under
the foot rest and that there are no other obstructions in the way before reclining
the back rest or lowering the foot rest or when using the stretch function.
In addition, do not leave the foot rest in the raised position when not in use.
If this is not observed, accidents or injury may occur.

14
OR
(Remote control)
Back rest
Foot rest
(Sensor controller)
Keep pressing the RECLINING button until the desired angle is achieved.
RECLINING
■
The angle of the foot rest can be adjusted independently.
●
●
Custom Angles
Raise the back rest, and
lower the foot rest by
continuously pressing
the ( ) button.
Recline the back rest,
and raise the foot rest by
continuously pressing
the ( ) button.
When adjusted at BEST POSITION, the seat is
lowered together with the above mentioned
movement.
(It is not possible to adjust only the seat.)
For the sake of safety, if the ( ) button is pressed with the seat raised, the foot rest
may be raised briefly before going down.
Adjustment range
Approx. 50°
Adjustment range Approx. 90°
120°
●
●
●
●
●
If you are using air bags in a calf
&
foot air massage, do not attempt to recline, or use
force to pull out your legs.
If this is not observed, injury may occur.
●
WARNING
Do not suddenly release your hand while raising the foot rest manually.
To ensure safety, release your hand gently from the foot rest.
Adjust the angle of the foot rest.
Keep the FOOT REST button pressed until the desired angle is achieved.
When massaging the soles or calves, adjust the angle so that the massaging
part of the foot rest touches the soles or calves.
Lower the foot rest by
continuously pressing
the button.
(Remote control)
Raise the foot rest by
continuously pressing
the button.
Adjustment range
Approx. 90°
Foot rest
5
6
Slowly
WARNING
Be sure to check that there is no person (children in particular), or any pets under the foot rest
and that there are no other obstructions in the way before reclining the back rest or lowering
the foot rest or when using the stretch function. In addition, do not leave the foot rest in the
raised position when not in use. If this is not observed, accidents or injury may occur.
At first, do not attempt to recline the seat deeply or lean on the back rest forcibly (until
you have become accustomed to massaging).
If the massaging force is too strong at first, it may result in adverse effects or injury.

15
Back rest
Foot rest
■
●
The HOME POSITION button lights up
and the chair automatically returns to
its home position.
●
Adjust the position (sliding length)
of the foot rest.
Adjust the position (sliding length)
of the foot rest to fit the length of
your legs.
●
While pulling the slide lever for the foot rest,
set the foot rest in the desired position. Release
the slide lever to lock the foot rest in position.
(Foot rest sliding length : Maximum approx. 21 cm (8
1
/
4
"))
●
●
●
●
To return the massager to the home position, press the HOME
The foot rest is raised first, and then
lowers completely.
Foot rest
Push the foot rest
with your soles
to extend.
Raise your feet slightly
to retract.
Slide lever for foot rest
Pull the lever toward
you. Release when
desired position is
achieved.
Pull the lever toward
you. Release when
desired position is
achieved.
7
ADJUSTMENT OF CHAIR (continued)
Do not attempt to stand on the foot rest when the foot rest slide position and angle are not completely
returned to the home positions.
If this is not done, the user may fall over, resulting in an accident or an injury, and the floor may be damaged.
Do not attempt to adjust the foot rest slide while reclining.
If this is not done, accidents or injury may occur.
Be careful not to put your hand or foot into the spaces between any moving parts, including into
the space between the back rest and arm rest or into the space at the underside of the back rest
or between the foot rest and the seat or into the space under the foot rest. Furthermore, do not
place your hands, feet or head inside the upholstery of the massager.
If this is not observed, accidents or injury may occur.
WARNING
Be sure to check that there is no person (children
in particular), or any pets under the foot rest and
that there are no other obstructions in the way
before reclining the back rest or lowering the foot
rest or when using the stretch. In addition, do not
leave the foot rest in the raised position when not
in use.
If this is not observed, accidents or injury may occur.
POSITION button.

16
FEATURES OF COURSES
WHOLE BODY SENSOR AUTOMATIC COURSES
Massaging on the degree of stress and stiffness detected by sensors
Sub
-
courses
Features of program
FULL AUTO
Fully automatic massage based on the
degrees of stress and stiffness
STIFFNESS
Shiatsu massage to counteract stiffness
In stress measurement mode, only air massage
of your legs is performed.
RECOVERY
Tapping massage to ease muscle fatigue
RELAX
Kneading massage to relax the whole body
QUICK
Short massage to promote blood circulation
(Reduced time course)
Massaging of each course is possible without placing fingers (hand) on the sensor.
In this case the degree of stress and stiffness is not detected.
The degree of stress and stiffness are measured by placing your fingers (hand) on the sensors.
Sub
-
courses
Features of program
AUTOMATIC COURSES
Easy 1 or 2
-
button operation
Massages automatically by effective
combination of gripping, kneading up,
kneading down, tapping, combo (tapping
and kneading), shiatsu, full stretching,
partial stretching, focus stretching, and
lower body (air) massage.
NECK & SHOULDER
LOWER BACK
STRETCH
COMFORT AIR COURSE
Massages mainly the neck and shoulders
Massages mainly the waist and lower back
Air massage of the whole body
MANUAL COURSES
Full programable upper and lower body massage
Massages with your own adjustment of
massage types such as gripping,
kneading up, kneading down, tapping,
combo (tapping and kneading), shiatsu,
full stretching, partial stretching, focus
stretching, and lower body (air) massage.
Multiple roller massages (for upper body) and air
massages (for lower body) are available.
(See page 17
-
20)
(See page 21
-
22)
(See page 23
-
27)
●
●
●
●
If you have felt abnormal physical sensation
or want to stop the massager immediately.
Press the OPERATION ON/OFF button. Press the INSTANT STOP button.
Press the button for the current operation.
To stop the massage during operation.
All the massaging will stop.
(The massaging rollers are moved
to the upper position and remain
in that position.)
The massaging that corresponds to the
pressed button will stop. (The Massaging
rollers will stop at that point.)
All the massaging will stop and the lamp of
the remote control will turn off.
When you want to restart massaging, press
the OPERATION ON/OFF button.
(The massaging rollers move to the upper
position and remain in that position.)
After the movement, repeat the operation to
begin a massage.
Features of courses
Massages using a whole
body Sensor automatic
course program based on
the degree of stiffness
detected by sensors.
Stretch to relax the whole body
Features of program
When the massaging rollers detach from the body during the Whole Body Sensor Automatic Course or the
Automatic Course, the body pressure sensor will work to stop the operation by pulling back the massaging
rollers for safety. In such a case, begin the operation again from the start.
Automatic massages based on the
degrees of stress and stiffness
measured by sensors prior to
massaging.

17
1
3
4
5
2
HIGH
(Lit) (Lit)
(Neither lamp is lit)
OFF
MASSAGING
(WHOLE BODY SENSOR AUTOMATIC COURSES)
Open the cover of the remote control.
Turn the sole warmer ON/OFF.
Adjust the angle and position of the back rest and the foot rest.
(See page 12
-
15)
●
●
●
●
●
Press the SOLE WARMER button. The sole warmer mode changes as follows each
time the button is pressed. The current mode can be identified by the status of the
corresponding lamp (when the sole warmer is on, the SOLE WARMER HIGH or
LOW lamp is lit).
If you feel that the sole warmer is too hot, turn it off by pressing the SOLE
WARMER button.
*
*
When the room temperature is low, such as in winter, it takes some time to warm up or you may not feel warm.
When the sole warmer is in LOW mode, the heating temperature is
adjusted automatically based on the room temperature.
Room temperature is high
Heating temperature is set to LOW.
Room temperature is low Heating temperature is set to HIGH.
LOW mode saves power consumption by approximately 15 % (compared
to HIGH mode, at room temperature of 25°C (77 )
Press the OPERATION ON/OFF button.
When the foot rest is fully lowered, the foot rest will rise a little.
When the massaging rollers are not located in the upper section, the massaging
rollers will move to the upper section and stop. [at the origin]
(During the movement, the icon of “ORIGIN” on the remote control flickers.)
4
1
3
2
4
When the button is pressed, the lamps of the sole warmer and remote control
will illuminate, and the sole warmer will turn on.
LOW
(See page 23)
6

18
●
The button that is blinking indicates the currently selected Whole Body Sensor Automatic Course.
Press the button to select the desired course.
①
Press the AGE button corresponding
to your age.
②
Grip the sensor controller with your fingers (with
both hands) so that four sensors are touched.
●
●
If you are unable to use both hands, grip the sensor controller with one hand and
move it so that the remaining sensors touch the skin of the other hand.
●
●
Keep calm during stress measurement.
If your skin is dry, the degree of stress/stiffness may not be measured
correctly. In such a case, press the SENSOR ADJUST button (the
SENSOR ADJUST lamp is lit when the sensor adjustment mode is ON).
Wash your hands clean for the correct degree of stress.
(Sebum or dirt interrupt the stress measurement.)
●
●
●
●
Press the desired Whole Body Sensor Automatic Course button.
Kneading massage to
relax the whole body
QUICK
Short massage to promote
blood circulation
(Reduced time course)
Change of course during massaging, or change to the Automatic Course or the Manual Courses, is possible.
Refer to the page 31 and 32 regarding the contents of Whole Body Sensor Automatic Courses.
NOTE
5
6
RELAXRECOVERY
Tapping massage to
ease muscle fatigue
STIFFNESS
FULL AUTO
Fully automatic massage
based on the degrees
of stress and stiffness
Shiatsu massage to
counteract stiffness
Stress is measured.
Before gripping the sensor After gripping the sensor
Sensors
Rear of sensor controller
When stress measurement is completed...
The measured degree
of stress is displayed
on the remote control
display.
6
To the stress measurement
7
To the stiffness measurement (See page 19)
How to grip the sensor controller
when the icon is shown
on the remote control display
How to grip the sensor controller
when the icon is shown
on the remote control display
■
in turn. And stiffness measurement will start.
Be sure to place your fingers (hand) on the sensor. The
degree of stress cannot be measured if your fingers (hand)
are not placed on the sensor. (If your fingers (hand) are not
gripping the sensor, “Grip the sensor” on the remote
control will be illuminated. (The icon lights up when
the user is being measured.)) If your fingers (hand) are not
touching the sensor points, massages will be carried out
according to the standard operation of the selected course.
and icons flash (a beep sounds)
●
●
You do not grip the sensor controller in a calm state.
Your heart rate is extremely high, after exercise for example.
Electrocardiographic monitoring with both hands is not possible.
■
When stress measurement starts...
Air massage of your legs starts.
Stress measurement is not possible in the following cases:
●
In some cases it may take maximum 2 minutes 30 seconds
for the sensor to activate.

19
MASSAGING
(WHOLE BODY SENSOR AUTOMATIC COURSES)
(continued)
Measurement of shoulder position
(Sit deeply on the massage chair and raise your head slightly. The matching of the position of
shoulders may not be possible if the head is leaning on the back rest.)
Decides the position of shoulder.
Massaging rollers move up and down to measure the position of shoulder.
Massaging operation at recognized position of shoulder.
Check that massaging rollers match the position of your shoulder. If not, when the lamp of
is flickering (a beep sounds), adjust the position by pressing the ROLLER POSITION buttons.
(Remote control display)
The massaging rollers are moved up or down by approx. 1 cm (
3
/
8
") each time
the ROLLER POSITION button is pressed.
When it is difficult to adjust with ROLLER POSITION button, move your body for
adjustment. The height that can be adjusted is between approx. 150 (59
1
/
4
")
to 180 cm (71").
Massaging rollers
Position too high
Position too low
Appropriate position
7
Stiffness is measured.
Sensors
①
Grip the sensor controller with your fingers (with one hand) so that three
sensors are touched.
②
●
●
●
Be sure to place your fingers (hand) on the sensor. The degree
of stiffness cannot be measured if your fingers (hand) are not
placed on the sensor. (If your fingers (hand) are not gripping
the sensor, “Grip the sensor” on the remote control will be
illuminated. (The icon lights up when the user is being
measured.)) If your fingers (hand) are not touching the sensor
points, massages will be carried out according to the standard
operation of the selected course.
Rear of sensor controller
Measure the position of shoulder.
Check if the position of shoulder is correct. If not, adjust the position using the ROLLER POSITION
buttons. (The ROLLER POSITION buttons can also be used while massaging is in progress.)
Sensors
How to grip the sensor controller
when the icon is shown on
the remote control display
How to grip the sensor controller
when the icon is shown on
the remote control display
③ Sensor massaging will start.
Measures the degree of stiffness in each part of body with the sensor and informs of the degree of stiffness.
The explanation uses stiffness as an example.
SENSOR MASSAGE
Measurement of the degree of stiffness.
Displays the aim of massaging positions, the stiffness, body pressure and the remaining massaging time on the remote control.
The sensor will display the positions of stiffness
(those where stiffness has been detected) by
measuring the amount of perspiration from your
hand in reaction to sensor massage.
Displays the position where the
stiffness has been detected.
Body areas that can be massaged.
Areas where a high degree of stiffness has been detected.
Areas where a low degree of stiffness has been detected.
Before gripping the sensor After gripping the sensor
/