Page is loading ...

MOTIC INCORPORATION LTD.
Prepared by Motic Instruments Inc. Canada
Episcopic-Fluorescence Attachment EF-INV-ll
Inverted Microscope AE30-31
Instruction Manual

Motic Instruments Inc. Canada
October 06, 2006
2
This manual may not be reproduced or transmitted in whole or in part without
Motic’s express permission.
Fluorescence
This instruction Manual has been prepared for users of the
AE-INV-ll Epi-Fluorescence Attachment used in conjunction
with the Motic AE30/31 Inverted Microscope.
We are constantly endeavouring to improve our instruments and
to adapt them to the requirements of modern research
techniques and testing methods. This involves modification to
the mechanical structure and optical design of our instruments.
Therefore, all descriptions and illustrations in this instruction
manual, including all specifications are subject to change
without notice.

Motic Instruments Inc. Canada
October 06, 2006
3
The optical phenomenon that occurs when light absorbed by a material, creates a molecular
excitation that causes the material to re-emit light at a different wavelength.
Fluorescence Microscope for Epi-Fluorescence
The technique of fluorescence microscopy with epi-illuminators is based on the adaptation of
the vertical illuminator used in reflected light microscopy. The radiation emitted by the light
source first passes through the exciting filter and is incident to a short-pass filter* (dichroic beam
splitter). The radiation is then reflected into the objective, which also serves as a condenser.
The objective concentrates the exciting radiation in the object field. Fluorescent light emitted
from there is collected by the objective and returned in the opposite direction to the short-pass
filter, which directs it into the eyepiece through the barrier filter.
*
A filter designed to allow the passage of radiation of wavelengths shorter than a given limit.

Motic Instruments Inc. Canada
October 06, 2006
4
Table of Contents
1.0 Names of Component Parts
2.0 Setting up the Instrument
3.0 Assembly
4.0 Microscopy
5.0 Troubleshooting Table
6.0 Care and Maintenance

Motic Instruments Inc. Canada
October 06, 2006
5
1.0 Names of Component Parts
Fig. 1
Epi-fluorescence
attachment EF-INV-ll
Light source Epi-fluorescence attachment
Light protective shield
Power supply unit

Motic Instruments Inc. Canada
October 06, 2006
6
2.0 Setting up the Instrument
Avoid placing the instrument in areas exposed to direct sunlight, dust, vibration, high
temperature and high humidity
3.0 Assembly
3.1 Microscope assembly
Follow the instructions in the microscope manual.
For the purpose of performing simultaneous observation with phase contrast, attach the
appropriate phase contrast components referring to the specific instructions provided.
3.2 Installing the Epi-fluorescence attachment
Required tools
Allen hex keys: 1.5mm, 2.5mm and 5mm (supplied with attachment).
Please see illustrations while assembling the attachment
Turn off the microscope power switch and unplug the power cord
Before Starting

Motic Instruments Inc. Canada
October 06, 2006
7
3.3 Protective dust covers
See Figure 2
Pull out rear dust cover, located above the Microscope AC inlet.
Fig. 2
See Figures 3a and 3b
Remove side dust covers located on each side of the microscope base.
Fig. 3a Fig. 3b
Microscope AC inlet
Rear dust cover
Right side cover
Left side cover

Motic Instruments Inc. Canada
October 06, 2006
8
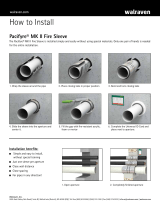
3.4 Attaching the Epi-fluorescence attachment sleeve
See Figure 4
Attach the main body sleeve of the epi-fluorescence attachment into the microscope
stand, with the notch on the sleeve facing left.
Fix the main body sleeve in this position by using the three 5mm Allen hexagonal
screws.
Fig. 4
Epi-fluorescence attachment
main body sleeve
Notch facing left

Motic Instruments Inc. Canada
October 06, 2006
9
3.5 Mounting the Epi-fluorescence attachment main body
See Figure 5
Align the pin on the Epi-fluorescence attachment with the notch in the Epi-
fluorescence attachment sleeve, slide the main body of the Epi-fluorescence
horizontally into the sleeve until it cannot be pushed in any further. To secure,
tighten the fixing screws using a hexagonal Allen key.
Fig. 5
Shutter slider with
Filter holder

Motic Instruments Inc. Canada
October 06, 2006
10
3.6 Installing the shutter slider with the filter holder
See Figure 6
• Loosen one of the slider knobs.
• With the filter slider slot to the left and facing the operator, insert the slider into the
opening of the main body of the fluorescence attachment.
• Tighten the loosened knob.
Fig. 6
Light cut-off slider
• To prevent the specimen from fading during temporary pauses in observation, slide
the shutter to the left.
• When using transmitted light illumination, slide the shutter to the left.
Block the optical path of the Epi-fluorescence by sliding
the shutter to the left.
Shutter slider open position
Filter slot

Motic Instruments Inc. Canada
October 06, 2006
11
3.7 Installing the filter cassette
See Figure 7
• Slide the filter cassette into the opening on the right side of the microscope until the
two pins slot into the two matching holes on the microscope opening surround.
• Using an Allen hex key, secure the cassette firmly with the two 2.5mm clamp
screws.
Fig. 7
2.5mm clamp screws
Filter cassette

Motic Instruments Inc. Canada
October 06, 2006
12
• Position the filter cube cover retaining plate with the opening on the left side of the
microscope.
• Slot the two pins into the two matching holes on the microscope opening surround.
• Using an Allen hex key, secure the filter cube cover retaining plate firmly with the
two 2.5mm clamp screws.
Fig. 8
Filter cube cover
retaining plate
2.5mm Clamp screws

Motic Instruments Inc. Canada
October 06, 2006
13
3.8 Installing the Filter cubes
See Figure 9
Fig. 9
Allen hex
screws
Filter cube
clamp plate
Caution:
Always keep three blocks on the slider. Do not leave any filter slot empty as
strong light may enter and damage the user’s eyes when shifting between
excitation methods.
If fewer than three filter cubes are required for microscopy. Use a “DIA-ILL”
dummy cube to ensure that the open space in the slider is filled.
Never perform lamp centering with the UV filter cube in the optical path as
harmful UV radiation from the lamp may enter the eyes, possibly resulting in loss
of vision.

Motic Instruments Inc. Canada
October 06, 2006
14
There are a filter cube clamp plates at each end of the filter slider. Undo the Allen hex
screws holding the clamp plate on right side of the slider with the hexagonal key
supplied with the fluorescence attachment and secured inside the right filter cube cover
(Fig.10).
Fig. 10
Three filter cubes can be positioned on the filter slider.
Fig. 11
1.5mm Allen hex key

Motic Instruments Inc. Canada
October 06, 2006
15
• Fasten the excitation method changeover lever to a filter cube.
• Insert a filter cube along the dovetail mount from the side opening
(Fig. 11) and push in as far as it will go.
• Remove the changeover lever from the filter cube and install the two remaining
cubes in the same manner.
• Remember the position of the filter cube so that you can insert the ID tag (supplied
with the filter cube) for the cube added.
• Install frequently used filter cubes at the end of the dovetail mount in order to make
replacement easier.
• If daiscopic (transmitted light) illumination is also to be used, install one diascopic
cube (DIA-ILL).
Secure filter cube clamp plate with Allen hex screws (Fig. 9)
Install and secure the filter cube cover on both the right and left sides with the knurled
retaining screws.
Fig. 12a
Left cover

Motic Instruments Inc. Canada
October 06, 2006
16
Fig. 12b
Fasten the excitation method changeover lever
Screw the excitation method changeover lever into the filter cube through the opening in
the white nylon bushing (Fig. 12b) on the right cover.
Fig.13
Insert the filter cube ID tags
Fasten the excitation method
changeover lever to the filter cube
Insert the excitation ID tag
(Supplied with the filter cube)
Nylon bushing
Right cover

Motic Instruments Inc. Canada
October 06, 2006
17
Insert the ID tags for the filter cubes into the ID tag pockets on the filter block cover.
.9 Replacing the filter cubes
• Unscrew the knurled retaining screw and remove the right filter cube cover. Undo the
filter cube clamp plate.
• Screw the excitation method changeover lever into the screw hole on to the side of
the filter cube.
• Draw the filter cube out of the filter cassette.
• Replace the filter cube according to the procedure “Installing the Filter cubes”
3.10 Handling filters cubes
• Always keep filter cubes in the cassette holder.
• When a filter cube is not in use, store in a desiccator, or a sealed container with a
drying agent as interference filter characteristics change if the filter is exposed to
high humidity.
• Do not allow dust to get onto the filters as this will adversely affect the image viewed.
• Be careful when using air blowers, as they sometimes emit fluid when the air can is
not used in an upright position. This fluid can leave difficult-to-remove spots on the
filter surface.
3.11 Installing the light shielding device
The light-shielding device protects your eyes against ultraviolet rays radiated from the
objective to the specimen.
• Attach the light-shielding device to the eyepiece tube housing using the clamp screw
on the right.
• Adjust the height and angle of the light-shielding device with the knurled knob on the
left.
See Figure 14

Motic Instruments Inc. Canada
October 06, 2006
18
Fig. 14
3.12 Installing the light source
Assembly
Attaching the collector lens to the lamp house
• Remove the rubber cap that covers the collector lens focus knob.
• Loosen the set screw at the base of the focusing knob with a 2.5mm Allen hex key.
• While pulling out the collector lens focus knob, insert the collector lens into the lamp
house in the direction indicated by insertion arrow.
Light-shielding device
clamp screw
Height and angle adjustment
knurled knob

Motic Instruments Inc. Canada
October 06, 2006
19
Installing the collector lens in the lamp house:
• Aligning the pin on the collector lens with the collector lens positioning groove of the
lamp house.
Fig. 15
• Return the focusing knob to the original position with focus knob pin in focussing
groove of the collector lens.
• Tighten the set screw at the base of the focusing knob with a 2.5mm Allen hex key.
• Tighten the cheese-head slotted screw, following lamp alignment and focusing.
• Affix the rubber cap covering collector lens focus knob.
Focus knob pin
Set screw
Collector lens focus knob
Cheese head
Slotted screw
Rubber cap
Collector lens focussing grove
Collector lens alignment pin
Collector lens positioning grove
Lamp
this Side

Motic Instruments Inc. Canada
October 06, 2006
20
Attaching the lamp house to the microscope
Attach the lamp house to the microscope using the bayonet ring on the Epi-fluorescence
attachment.
Fig. 16a
Fig. 16b
Secure the bayonet ring by turning it as far as possible in the direction of arrow.
Bayonet ring
Align the positioning pin on the
lamp house flange with the
positioning groove on the bayonet
mount of the fluorescence
attachment
Turn the bayonet ring in the
direction indicated by the arrow
/