Page is loading ...

SR44
ON/OFF
SET
0
0
45
40
5
30
35
40
ON/OFF
SET
ABS
25 30 3
0
45
40
5
ON/OFF
SET
0
0
45
40
5
30
35
40
25
ON/OFF
SET
0 5 1
0
45
40
5
ON/OFF
SET
0
45
40
5
ON/OFF
SET
ABS
0
45
40
5
ON/OFF
SET
ABS
0
45
40
5
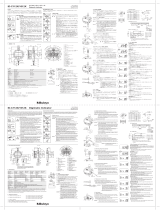
DIGITAL OUTSIDE MICROMETER
Niigata seiki Co., Ltd.
5-3-14, Tsukanome, Sanjo, Niigata, Japan, 955-0055
Tel. : +81-256-33-5522 Fax. : +81-256-33-5518
MAIL [email protected]
URL http://www.niigataseiki.co.jp
Clean measuring surfaces
with cloth.
Confirm 0-Point setting and
re-zero with long press of
[SET] Button (> 2 sec.)
Cycle power by removing
and replacing battery.
Replace battery with new
one.
Measured value is
wrong.
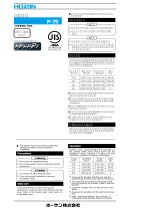
PRECISION OUTSIDE MEASURING INSTRUMENT
EOM133
-
***
Model
No.
INSTRUCTION MANUAL
Thank you for purchasing the Niigata Seiki DIGITAL OUTSIDE MICROMETER.
This precision gauge measures outside dimension of object placed between the Anvil and Spindle.
For safe and proper use of this product, please read this instruction manual before use and follow the procedures described.
Please keep manual where it is accessible to user for future reference.
Keep this manual with the instrument if transferred or leased to a third party.
For inquiries about this product, please contact dealer or Niigata Seiki at the address listed on the following page.
PART
IDENTIFICATION
SPECIFICATIONS
FEATURES
TROUBLESHOOTING
Weight
g
265
380
460
600
515
560
4
6
Accuracy
µ
m
Meas. Range
mm
0 25
25 50
50 75
75 100
100 125
125 150
Model No.
EOM133
-
25
EOM133
-
50
EOM133
-
75
EOM133
-
100
EOM133
-
125
EOM133
-
150
Resolution 0.001mm
Power SR44 (Silver Oxide Battery)
Ratchet stop.Carbide measuring surfaces.
Spherical Anvil Attachment (SR2.5) included.
Auto-display-off function (approx. 6 minutes.)
SR44 (silver oxide battery) included for testing.
Insulating cover Thermal shield
SAFETY PLEASE OBSERVE
Always follow the procedures specified below in order to prevent harm
to yourself or others, and to prevent damage to property.
Indicates risk of personal injury or property
damage if not followed.
CAUTION
Always clean measuring surfaces with soft cloth before use.
Do not turn spindle more than 3mm above upper
measurement range.
This is a precision instrument, handle with care. Do not
drop or subject to excessive forces.
Keep away form high voltage and strong magnetic fields.
Instrument damage may result.
Keep instrument away from direct sunlight or high
temperatures such as in a car, or near a stove or heat source.
Do not disassemble or modify.
Please do not use organic solvents to clean the body of
the instrument.
When not being used for long period of time, please
remove battery.
Only use
as directed. Improper use may cause accident or injury.
Not incl. quantization error (±1 count)
Clamp
Spindle
Anvil
Fixed Side
0-Point
Adj. Hole
Frame
Insulating
Cover
[ON/OFF] Button,
[SET] Button
LCD Display
Meas. SurfacesSleeve
Thimble
Ratchet Stop
Carbide Tips
Battery
Cover
Spherical (Ball)
Attachment
REAR FRONT
ACCS.
Spanner
Calibration Std.
Not w/ EOM133-25
SR44
Silver Oxide Cell
For Test
The gauge is now ready to take measurements.
EOM133-25 0.000 EOM133-50 25.000
EOM133-75 50.000 EOM133-10075.000
EOM133-125 100.000 EOM133-150125.000
SETTING THE ZERO-POINT
BATTERYOPERATION BALL ANVIL
①Remove any grease or dust from the measuring surfaces
using a clean cloth, such as lens cleaning cloth. Make sure
no foreign objects are adhered to the measuring surfaces.
② Place object to be measured between the Anvil and Spindle.
③ With the Thimble Clamp loose, turn the Thimble to capture
the measured object between the measuring surfaces.
Stop after 1~3 “Clicks” from the Ratchet Stop. (Fig. 5)
④ The measured value is displayed on the LCD display.
※ Measurement can also be read off Thimble and Sleeve as
with a standard micrometer.
POWER
The Spherical (Ball) Anvil Attachment can be attached
as required.
After mounting, please set 0-Point following the procedure
“Setting the Zero-Point” above.
CARE
Meas. surfaces touch
Press for > 2 sec.
Match origin lines
Rotate until origins match
When the Spherical Attachment is attached, the measurement
indicated on the Sleeve scale will read 5mm larger than
actual size. (Fig. 6)
If any cutting fluid or moisture gets on the instrument body, wipe
using a soft dry cloth to prevent corrosion.
After use, remove any cutting chips or contamination using a soft
cloth and apply rust preventative oil. Keep out of reach of children.
Fig.3
Lock
Loosen
Fig. 4
Fig.5
Fig.6
Fig.2
Fig.1
① Remove any grease or dust from the measuring surfaces
using a clean cloth, such as a lens cleaning cloth. Make sure
no foreign matter is adhered to the measuring surfaces.
② With Spindle Clamp loose, turn until measuring surfaces
touch. Turn until Ratchet Stop clicks 1~3 times. (Fig. 1)
※ For models other than EOM133-25, please insert the
supplied Calibration Standard between measuring surfaces.
③ To align the Thimble Scale 0-Point reference lines. (Fig. 2)
1. Tighten Spindle Clamp to lock Spindle.
2. Insert the spanner into 0-point Adjustment Hole on rear
of Thimble.
3. Use spanner to rotate Sleeve to align the 0-Point lines. (Fig. 3)
④ Press the [SET] Button for more than two seconds. (Fig. 4)
LCD will display “SET” for 0.5 seconds, and then the
display will read as shown below:
"Click Click"
Ratchet
Stop
Clamp
Workpiece
Sleeve reading = Meas. + 5mm
Spherical Attachment
[SET] Button
Spanner
Thimble
Ratchet
Stop
Battery
Cover
①Rotate the Battery Cover on rear
using coin or similar tool.
②Insert battery with “+” side up.
③Replace Battery Cover.
When [ON/OFF] Button is pressed, power is turned ON, and
measurement is displayed on the LCD.
Press [ON/OFF] Button a second time to turn power OFF.
Setting the origin used for measurements.
Once set, even when power is off the origin is saved and
does not have to be reset with each use.
When battery is replaced origin will go to default setting,
please reset.
Make sure the Battery Cover is closed
securely. Please make sure the gasket is
in the proper place on the Battery Cover.
Only use SR44 type
battery.
CAUTION
Open
ERROR CORRECTIVE ACTION
LCD does not display.
Displayed value is
unstable.
Display is not clear.
If problem persists, or if you have any questions, please conta ct
distributor or place of purchase.
Please note, manufacturer is unable to respond to inquires or provide
service directly. Please contact distributor or place of purchase.
EOM133-125
EOM133-150
No Insulating Cover
Thermal
Shield
"Click Click"

SR44
ON/OFF
SET
0
0
45
40
5
30
35
40
ON/OFF
SET
ABS
25 30 3
0
45
40
5
ON/OFF
SET
0
0
45
40
5
30
35
40
25
ON/OFF
SET
0 5 1
0
45
40
5
ON/OFF
SET
0
45
40
5
ON/OFF
SET
ABS
0
45
40
5
ON/OFF
SET
ABS
0
45
40
5
EOM133
-
***
955-0055
5314
(0256)33-5502( ) FAX(0256)33-5528
URL http://www.niigataseiki.co.jp
20062000E1141-Q
g
265
380
460
600
515
560
4
6
µm
mm
0 25
25 50
50 75
75 100
100 125
125 150
EOM133
-
25
EOM133
-
50
EOM133
-
75
EOM133
-
100
EOM133
-
125
EOM133
-
150
0.001mm
SR44
SR2.5
6
SR44
3mm
1
ON/OFF
SET
LCD
EOM133-25
SR44
OFF
1 3
EOM133-25
0 0
0
0
1.
2. 0
3. 0
SET2
LCDSet 0.5
EOM133-25 0.000 EOM133-50 25.000
EOM133-75 50.000 EOM133-100 75.000
EOM133-125100.000 EOM133-150125.000
1 3
LCD
ON/OFFONLCD
OFF
0
5mm
2
5
6
4
3
3
4
5
6
2
1
2
1
SET
SR44
0
SET
LCD
EOM133-125
EOM133-150
/