Page is loading ...

EZ TURN ENGINE STAND
INS TRU CTIONS
Item #31551

2 Eastwood Technical Assistance: 800.343.9353 >> techelp@eastwood.com
The EASTWOOD EZ-TURN ENGINE STAND features an efficient folding design to minimize storage space when not in use. A 63:1 ratio worm gear drive provides
effortless 360° rotation of the mounted load while automatically locking the rotated load by preventing back drive. Steel, ball bearing Locking Swivel Casters and
a rugged steel frame will support up to a total loaded weight of 1000 lbs. [453 kg.] yet is completely portable for working on and storing engines, transmissions,
and other concentrated heavy loads around vehicles and shop areas.
CONTENTS
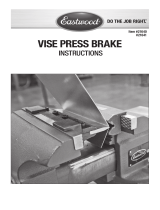
COMPONENTS:
(1) Main Frame Member - [A]
(1) Front Frame Member - [B]
(1) Rear Frame Member - [C]
(2) 3-1/2” Locking Swivel Casters - [D]
(2) 35mm x 10mm Caster Bushing Sleeves - [E]
(2) 3-1/2” Fixed Casters - [F]
(1) EZ-Turn Post/Mounting Plate Ass’y - [G]
(3) Lock Pins - [H]
(3) Pin Clips - [J]
(1) EZ-Turn Brace - [K]
(4) Mounting Arms - [L]
(4) 36mm O.D. x 5mm thick Flat Washers - [M]
HARDWARE:
(2) M8 x 65mm Shoulder Bolts (for Fixed Casters)
(8) M8 x 15mm Bolts (for Swivel Caster mounting)
(10) M8 Flat Washers
(10) M8 Lock Washers
(10) M8 Nuts
(4) M10 x 60mm Shoulder Bolts (for Frame Member assembly)
(4) M10 Flat Washers
(4) M10 Lock Washers
TOOLS REQUIRED
• Two 14mm wrenches (not included)
• Two 17mm wrenches (not included)
• Two 19mm wrench (not included)
SPECIFICATIONS
Max. Weight Capacity: 1000 lbs. [453 kg]
Assembled Engine Stand weight: 67.2 lbs. [30.5 kg]
✓
A
✓
C
✓
B
L
M
H
G
K
J
D
F
E

DANGER indicates a hazardous situation which, if not avoided, will result in death or serious injury.
WARNING indicates a hazardous situation which, if not avoided, could result in death or serious injury.
CAUTION used with the safety alert symbol, indicates a hazardous situation which, if not avoided, could result in minor or moderate injury.
NOTICE is used to address practices not related to personal injury.
READ INSTRUCTIONS
• Thoroughly read and understand this manual before using.
• Save for future reference.
ENGINE STAND CAN TIP OR COLLAPSE CAUSING SEVERE INJURY!
• DO NOT attempt to move Engine Stand on sloped surfaces while loaded.
• DO NOT concentrate a heavy load to either side or end of the Engine Stand. This can cause the balance to shift suddenly,
tipping the Engine Stand and its load which can quickly cause severe injury and property damage!
• DO NOT exceed the rated 1000 lbs. [453 kg.] weight capacity.
• DO NOT use to support humans or animals.
• DO NOT climb on the Engine Stand.
• DO NOT use the Engine Stand to support items other than engines, transmissions or other heavy, concentrated loads.
• DO NOT attempt to transport this Engine Stand with a load attached by any hauling method.
• Use only on a smooth, level and clean work surface. DO NOT use on a sloped or rough textured surface, earth, grass, sand,
gravel or any other loose or unstable surface.
• DO NOT remove or cover any of the factory supplied labels or warnings! They include specific safety information that must be
communicated to future users.
FALL HAZARD!
• Awkward, out of balance body positions may be attempted while trying to reach specific areas of objects placed on the Engine Stand
during use. Failure to ensure proper footing can quickly result in a fall which could inflict serious personal injury or property damage.
IMPROPER MOTOR VEHICLE REPAIR WORK CAN RESULT IN INJURY OR DEATH!
• Performing automotive repair work can cause injury, death and vehicle accidents. DO NOT attempt to use this tool or begin work
without proper training and a thorough understanding of motor vehicle mechanical systems.
• Always consult an authorized manufacturer’s service manual or reference materials on the particular vehicle for the proper
procedures before using this tool.
SAFETY INFORMATION
The following explanations are displayed in this manual, on the labeling, and on all other information provided with this product:
To order parts and supplies: 800.343.9353 >> eastwood.com 3

4 Eastwood Technical Assistance: 800.343.9353 >> techelp@eastwood.com
ASSEMBLY PREPARATION
• Obtaining the assistance of a helper during assembly is strongly recommended.
• The use of ANSI approved safety shoes, heavy work gloves and eye protection are necessary.
• Perform assembly in a large, uncluttered area close to area of intended usage.
• Allow sufficient area for operator and helper to remain clear when choosing operating area.
INJURY HAZARDS!
The Eastwood Engine Stand consists of heavy metal components which can cause potentially serious injuries if allowed to drop.
Avoid pinching hands while handling parts during assembly.
To prevent scratches and damage to the finish of the Engine Stand components, it is strongly advisable to use cardboard, carpet,
blankets etc. covering a 4’ x 4’ area before beginning assembly.
TIP HAZARD!
• Use extreme caution while rotating the Handcrank to rotate the load as a large, top-heavy engine or similar object could result in a
sudden imbalance condition and cause the Engine Stand to suddenly tip.
• While rotating, always stand behind the crank end of the stand and make constant observations of the casters. If any indication of
instability occurs, STOP IMMEDIATELY!
PINCH/CRUSH HAZARD!
• This Engine Stand has moveable components that can crush and pinch. Keep fingers and hands away from pinch points when operating.

To order parts and supplies: 800.343.9353 >> eastwood.com 5
ASSEMBLY
MAIN FRAME MEMBER [A] TO FRONT MEMBER [B]
(FIG 1)
• Place the Front Member [B] with the two caster
mounting plates downward and Align the two holes in
the face with those in the horizontal mounting angle
of [A] and secure them with two M10 x 60 Shoulder
Bolts, Flat Washers, Lock Washers and M10 Nuts us-
ing two 17mm wrenches (not included) (FIG 1).
MAIN FRAME MEMBER [A] TO REAR MEMBER [C]
(FIG 2)
• Place the Rear Member [C] with the four Caster
Mounting tabs downward and Align the two holes in
the face with those in the vertical mounting angles
of [A] and secure them with two M10 x 60 Shoulder
Bolts, Flat Washers, Lock Washers and M10 Nuts us-
ing two 17mm wrenches (not included) (FIG 2).
CASTERS [D] & [E] TO MAIN FRAME ASS’Y [A], [B] & [C]
(FIG 3)
1. Raise the Front end of the Frame Assembly to allow
the two Locking Swivel Casters to fit underneath.
2. Align all mounting holes and secure the Locking
Swivel Casters [D] to the mounting pads with eight
M8 x 15 Bolts, Flat Washers, Lock Washers and
M8 Nuts using two 14mm wrenches (not included)
(FIG 3).
3. Add a moderate amount of a heavy bodied chassis
grease to the I.D. and O D. of the 35mm x 10mm
Bushing Sleeves [E].
4. Insert one each of the 35mm x 10mm Bushing
Sleeves [E] into the center bore of each Fixed
Caster [F].
5. Raise the Rear end of the Frame Assembly to allow
the two Fixed Casters [F] to fit between the
mounting tabs.
6. Align the holes and Place one each of the M8 x
65mm Shoulder Bolts into the holes of the mounting
tabs and each Fixed Caster [F] and secure with two
each 8mm Flat Washers, Lock Washers and M8 Nuts
using two 14mm wrenches (not included) (FIG 3).
FIG. 1
A
B
✓
FIG. 2
FIG. 3
✓
A
✓
✓
✓
B
C
✓
F
✓
E
✓
E Caster
Bushing Sleeve

6 Eastwood Technical Assistance: 800.343.9353 >> techelp@eastwood.com
FIG. 4
FIG. 5
EZ-TURN POST/MOUNTING PLATE ASS’Y [G] TO MAIN
FRAME ASS’Y [A], [B] & [C]
1.
Stand the EZ-Turn Post/Mounting Plate Ass’y [G] up
with the bottom resting on the Main Frame Member
[A] with the welded-on ferrule facing forward (FIG 4).
2. Align the through hole of the ferrule with the lower
holes in the two vertical angle mounts of the Main
Frame Member [A], insert a M12 x 70mm Shoulder
Bolt and secure a 12mm Flat Washer, Lock Washer
and M12 Nut using two 19mm wrenches (not in-
cluded) (FIG 4).
3. Align the holes in the Rear Frame Member [C] and
bottom of the EZ-Turn Post/Mounting Plate Ass’y [G]
and slip a Lock Pin [H] through. Secure the pin with
a 13mm x 24mm O.D. Flat Washer and a Pin Clip [J]
(FIG 5).
4. Insert another Lock Pin [H] through the upper holes
of the vertical angle mounts of the Main Frame Mem-
ber [A] and secure the pin with a 13mm x 24mm O.D.
Flat Washer and a Pin Clip [J] (FIG 5).
EZ-TURN BRACE [K] TO EZ-TURN POST/MOUNTING
PLATE [G] AND MAIN FRAME MEMBER [A]
5. Align the through hole of the Main Frame Member
[A] with holes in one end of the EZ-Turn Brace [K],
insert a M12 x 70mm Shoulder Bolt and secure with
a 12mm Flat Washer, Lock Washer and M12 Nut
using two 19mm wrenches (not included) (FIG 6).
NOTE: Do Not fully tighten the bolts but allow some
movement for EZ-Turn.
6. Insert another Lock Pin [H] through the opposite end
of the EZ-Turn Brace [K] and EZ-Turn Post/Mounting
Plate Ass’y [G] and slip a Lock Pin [H] through.
Secure the pin with a 13mm x 24mm O.D. Flat
Washer and a Pin Clip [J] (FIG 6).
INJURY HAZARDS!
The EZ-Turn Post/Mounting Plate Ass’y
[G] is heavy and cumbersome, with
a tendency to tip forward. Obtaining
the assistance of a helper during this
phase of assembly is strongly recom-
mended.
✓
G
✓
M12 x 70mm
✓
J
✓
H
✓
H
✓
J
FIG. 6
The Brace [K] has a “U” shaped feature
connecting the two rails. When prop-
erly assembled the “U” feature must
be on the underside of the Brace [K] to
allow it to fold properly (Fig 6).
✓
J
✓
✓
H
K

To order parts and supplies: 800.343.9353 >> eastwood.com 7
FIG. 7
MOUNTING ARMS [L] TO EZ-TURN POST/MOUNTING
PLATE [G]
1. Arrange the bolting tube feature of the Mounting
Arms [L] outward and the offsets facing forward
(FIG 7).
2. Insert the M12 x 65mm Shoulder Bolts through the
open loops of the Mounting Arms [L] and secure
with the four 36mm O.D. x 5mm thick Flat Washers
[M], Lock Washers and M12 Nuts using two 19mm
wrenches (not included) (FIG 7).
3. The Eastwood EZ-Turn Engine Stand is ready for use.
EZ-TURN ENGINE STAND USE
To Lock: Rotate the Locking Paddles 180° in a Counter-Clockwise direction to fully lock. The “Lock” rotation direction is also indicated by the word “LOCK”
stamped into the metal paddle.
OPERATION
To Rotate : Carefully grasp the Handcrank and slowly rotate it which will in turn rotate the Mounting Plate with the load attached in the desired direction.
Only use mounting bolts of the equivalent grade or stronger as those supplied by the vehicle manufacturer to mount an engine,
transmission or other heavy assembly to this Stand.
The Mounting Plate is drilled with 2 bolt patterns, one small and one large. In addition, the Mounting Arms are elongated and
provide for 3-1/2” [90mm] of adjustment and can be positioned anywhere within 360°. While these features allow for virtually
unlimited combinations of mounting possibilities, it is the responsibility of the user to determine the best mounting arrangement
and to follow all safety warnings presented in the Safety Information section of these instructions.
The Swivel Casters are equipped with a Locking Brake Feature. These MUST be locked before adding a load to prevent unintended
movement of the Engine Stand while attaching the load.
The Eastwood EZ-Turn Engine Stand is equipped with a 63:1 ratio worm gear drive which will prevent back drive rotation of an
engine after it has been rotated into the desired position.
TIP HAZARD!
Use extreme caution while rotating the Handcrank to rotate the load as a large, top-heavy engine or similar object could result
in a sudden imbalance condition and cause the Engine Stand to suddenly tip.
While rotating, always stand behind the crank end of the stand and make constant observations of the casters.
If any indication of instability occurs, STOP IMMEDIATELY!
✓
L
36mm x 5mm
Washers
✓
There are 2 bolt patterns drilled into the
Mounting Plate. First determine which
set most closely match those of the
particular engine or transmission to be
mounted then add the Mounting Arms.

8 Eastwood Technical Assistance: 800.343.9353 >> techelp@eastwood.com
FIG. 8
MAINTENANCE
• Keep all moving components of the Engine Stand well lubricated and free of any dirt or debris accumulations.
• The Engine Stand is finished in rugged powder coating which will provide many years of effort-free beauty, however it is advisable to keep the finish clean
and free from excessive dust and dirt.
• Keep the Engine Stand in a clean and dry environment. DO NOT store it in or expose it to a damp or wet environment.
• Before each use, inspect all components for potential damage and proper alignment. Check all hardware for tightness
• DO NOT use if damage is discovered.
• Occasionally add a heavy-bodied chassis grease to the Zerk fittings located on the main pivot shaft and gearbox.
EZ-TURN FOR STORAGE
• Remove Pin Clips and Flat Washers from the three
Lock Pins and set aside for re-use.
• First remove the Lock Pins securing the EZ-Turn Post
[G] to the Main Frame Member [A].
• Carefully hold the EZ-Turn Post/Mounting Plate
steady with one hand to prevent it from falling
forward while pulling out the Lock Pin at the EZ-Turn
Brace [K] and EZ-Turn Post [G].
• Rotate the EZ-Turn Brace [K] forward and down over
the Main Frame Member [A].
• Carefully rotate the EZ-Turn Post [G] forward and
down with the Mounting Plate resting atop the Main
Frame Member [A] (FIG 8).
• Reinstall the Lock Pins, Washers and Pin Clips in the
open holes to avoid loss.
✓
K
Fold

To order parts and supplies: 800.343.9353 >> eastwood.com 9
NOTES

10 Eastwood Technical Assistance: 800.343.9353 >> techelp@eastwood.com
NOTES

To order parts and supplies: 800.343.9353 >> eastwood.com 11
NOTES

© Copyright 2018 Easthill Group, Inc. 2/18 Instruction item #31551Q Rev 1
If you have any questions about the use of this product, please contact
The Eastwood Technical Assistance Service Department: 800.343.9353 >> email: techelp@eastwood.com
PDF version of this manual is available at eastwood.com
The Eastwood Company 263 Shoemaker Road, Pottstown, PA 19464, USA 800.343.9353 eastwood.com
ADDITIONAL ITEMS
#14530 GRIP Engine Lifting Chain
#31922 Eastwood Engine Crane.
#31571 Rockwood Safety Glasses
#31504 Eastwood 6 Ton Jack Stand Set
#31503 Eastwood 3 Ton Jack Stand Set
/