Page is loading ...

POWER-STEPPER
OWNER’S MANUAL OBS 2233B
Exercise of strenuous nature, as is customarily done on this equipment, should
not be undertaken without first consulting a physician. No specific health
claims are made or implied as they relate to the equipment. Measurements
made by the equipment are believed to be accurate, but only the
measurements of your physician should be relied upon.
IMPORTANT: Read all instructions carefully before using this product. Retain
this product. Owner's manual for future reference.

1
Contents
Implied warranty
2
Safety instructions
3
Hardware pack
5
Explosion diagram
7
Part List
8
Assemble instructions
9
Functions and Features
12
Maintenance
13
Training Organization
14

2
Dear customers
We want to thank you for having chosen my POWER-STTEPPER and wish you a lot of
fun and success during training.
Please note and follow the enclosed safety and assembly instructions carefully.
If you have any questions please do not hesitate to contact us.
Implied Warranty
Prerequisite for the implied warranty is the proper setup in accordance with the operating
instructions. Improper use and /or incorrect transportation can render the warranty void.
The implied warranty is for 1 year, beginning on the date of purchase. If the device you
acquired is defective, please contact our Customer Service within the guarantee period of
12 months as of purchase date. The warranty applies to the following parts (as far as
included in the scope of delivery): Frame, cable, electronic devices, foam, and plastic
parts. The guarantee does not cover:
• Damage effected by outer force
• Intervention by unauthorised parties
• Incorrect handling of the product
• Non-compliance of the operating instructions
Wear parts and expendable items are also not covered.
The device is only intended for private use. The warranty does not apply to professional
usage.
Spare parts can be ordered from Customer Services (Inset page) as needed.
Please make sure you have the following information on hand when ordering spare parts.
• Operating instructions
• Model number (located on the cover sheet of these instructions)
• Description of attachments
• Attachment number
• Proof of purchase with purchase date
Please do not send the device to our firm without being requested to do so by our Service
team. The costs of unsolicited shipments will be borne by the sender.

3
Safety instructions
This product has plentiful design and fabrication in terms of safe use. However, the
operator shall still follow the instructions below in operation to provide against
emergencies. We will not be responsible for any consequences arising from abnormal
operations.
Follow the steps of the assembly instructions carefully. After the assembly of product,
ensure the screw and cap are fastened.
Use the parts provided by the manufacturer. Unauthorized replacement is strictly
prohibited.
When starting exercise, first consider your health status. Exercise should be done
properly, regularly and gradually to ensure that you have sufficient physical strength
during exercising. This is beneficial to your health.
The device is adapt to adult, keep the children away when unsupervised.
Wear comfortable and close-fitting clothes when using this product to avoid catch of
clothes by the machine and cause danger. Immediately stop exercise when you do
not feel well and lie down for a rest.
This exerciser is used by only one person.
Use with device damaged is strictly prohibited.
Don’t use this device outdoor.
The device should be placed on a smooth, clean, level and waterless ground, and
ensure the sufficient free space around the equipment.
This equipment is made for home use only and is class B, the maximum body weight
is 100 kg.
Carefully check each part before use, especially attention to the most abrasive parts.
Replace defective components immediately. The safety level of this equipment can
be maintained only if it is checked regularly for all assembly procedure mentioned in
the assembly instruction sheet.
Warning that any of the adjustment devices that could interfere with the user’s
movement should not be left projecting.
Do not splash water directly onto the appliance for cleaning. If necessary, the
appliance can be cleaned by a cloth moistened with soft detergent.

4
The stepper is suitable for your cardio-pulmonary function, and temper your muscle
for your leg and haunch. But it is not suitable for therapeutic purposes.
Correct Disposal of this product.
This marking indicates that this product should not be disposed with other
household wastes throughout the EU. To prevent possible harm to the
environment or human health from uncontrolled waste disposal, recycle it
responsibly to promote the sustainable reuse of material resources. To return your
used device, please use the return and collection systems or contact the retailer
where the product was purchased. They can take this product for environmental safe
recycling.
Caution: read the operation manual carefully before use.

5
HARDWARE PACK

6
NO.
Description
QTY
22/24
PEDAL TUBE AND FRONT STABILIZER WELDING
1
1
UNDER FRAME
1
51/53
UPPER FRAME AND SENSOR WIRE
1
4/6/7
REAR STABILIZER AND TRANSPORTATION WHEELS
1
36/39
HANDLEBAR
1
21
HYDRAULIC CYLINDER
1
12
FOOT PEDAL
1 SET
23
WATER BOTTLE FRAME
1
40
MONITOR
1
5
12 SIDE END CAP
2
9
STOPPER
2
31
BALL KNOB
1
54
BIG CROSS HEAD MACHINE SCREW (M5*16)
2
10/11/50
CROSS HEAD MACHINE SCREW M6*40 + FLATE
WASHER + SPRING WASHER
4
18/33/46
HEX BOLT M8*20 + BIG FLAT WASHER + PLASTIC CAP
2
14/15/46/52
ALLEN BOLT M8*20 + FLAT WASHER + PLASTIC CAP
3
42/47/49
CARRIAGE BOLT M8*40 + CURVE WASHER + ACORN
NUT
2
13/14/15
ALLEN BOLT M8*40 + FLAT WASHER + NYLON NUT
2
2/3/8/48
CARRIAGE BOLT M10*90 + CURVE WASHER +
SPRING WASHER + ACORN NUT
2
28/29/30/35
HEX BOLT M10*95 + FLAT WASHER + NYLON NUT +
PLASTIC CAP
1

7
Explosion diagram
Most of the displayed parts in this diagram are shipped pre-assembled. For spare
parts, please do always specify parts numbers used on this diagram or in the following
parts list.

8
Parts List
NO
DESCRIPTION
Q’TY
NO
DESCRIPTION
Q’TY
1
UNDER FRAME
1
28
NY LON NUT (M10)
1
2
ACORN NUT (M10)
2
29
FLAT WASHER (10)
2
3
CURVE WASHER (10)
2
30
HEX BOLT (M10*95)
1
4
REAR STABILIZER
1
31
BALL KNOB
1
5
12 SIDE END CAP
2
32
CABLE PROTECTOR
5
6
BIG CROSS HEAD MACHINE
SCREW (M5*12)
4
33
HEX BOLT (M8*20)
2
7
TRANSPORTATION WHEELS
2
34
GRIP
2
8
CARRIAGE BOLT (M10*90)
2
35
PLASTIC CAP (M10)
2
9
STOPPER
2
36
HANDLEBAR
1
10
CROSS HEAD MACHINE
SCREW (M6*40)
4
11
FLAT WASHER (6)
4
38
HAND PULSE (UP)
2
12
FOOT PEDAL
1P
39
HANDLEBAR
1
13
ALLEN BOLT (M8*40)
2
40
MONITOR
1
14
FLAT WASHER (8)
5
41
HAND PULSE WIRE
1
15
NYLON NUT (M8)
5
42
CARRIAGE BOLT (M8*40)
2
16
FLAT COVER
2
43
CROSS HEAD MACHINE
SCREW (M3*12)
6
17
HEX BOLT (M8*16)
2
44
HAND PULSE (DOWN)
2
18
BIG FLAT WASHER (8)
4
45
GRIP
1
19
END CAP
2
46
PLASTIC CAP (M8)
5
20
SLEEVE
6
47
CURVE WASHER (8)
2
21
HYDRAULIC CYLINDER
2
48
SPRING WASHER (10)
2
22
PEDAL TUBE
2
49
ACORN NUT (M8)
2
23
WATER BOTTLE FRAME
1
50
SPRING WASHER (6)
4
24
FRONT STABILIZER WELDING
1
51
UPPER FRAME
1
25
MAGNET
1
52
ALLEN BOLT (M8*20)
3
26
CROSS HEAD MACHINE
SCREW (M5*10)
2
53
SENSOR WIRE
1
27
SENSOR WIRE
1
54
BIG CROSS HEAD
MACHINE SCREW (M5*16)
2

9
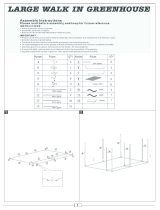
Assemble instructions
Step 1
A) Attach two 12 side end cap (5) to rear stabilizer (4). Adjust the level of two end cap (5).
B) Attach stopper (9) to rear stabilizer (4).
C) Attach rear stabilizer (4) to under frame (1) with carriage bolt (8), curve washer (3),
spring washer (48) and acorn nut (2). Make sure the transportation wheels (7) face
outside.
Step 2
A) Attach front stabilizer welding (24) to under frame (1) with bolt (30), flat washer (29),
nylon nut (28) and plastic cap (35). Insert ball knob (31) into another hole of front
stabilizer welding (24) and under frame (1).
B) Attach foot pedal (12R) and (12L) to cross head machine screw (10), flat washer (11)
and spring washer (50).

10
Step 3
A) Connect two sensor wires (27&53) together. See the drawing of (A).
B) Attach upper frame (51) to under frame (1) with Allen bolt (52), flat washer (14), nylon
nut (15) and plastic cap (46).
Step 4
A) Attach two hydraulic cylinder (21) to upper frame (51) with hex bolt (33), big flat
washer (18) and plastic cap (46).
B) Attach the other end of hydraulic cylinder (21) to pedal tube (22) with Allen bolt (13), flat
washer (14) and nylon nut (15).
Note: How to adjust the hydraulic cylinder. The cylinder 12 sections, the bigger the
number is, the bigger the resistance is. Turn the top of the cylinder clockwise, the
resistance will become bigger. The number which the arrow point is the exact section.

11
Step 5
A) Attach handle bar (36) to upper frame (51) with carriage bolt (42), curve washer (47)
and acorn nut (49).
B) Insert the computer to the top of the oval tube of upper frame (51). Connect up plug of
sensor cable (27) to the socket of the computer (40). Insert the plug of hand pulse
cable (41) to the socket of the computer.
C) Connect the wire on handle bar (36) to monitor (40).
Step 6
Attach water bottle frame (23) to upper frame (51) with big cross head machine screw
(54).
Note: Make sure you fasten the bolts securely to avoid shaking when pedaling.

12
Functions and Features
1. SCAN: Press “mode” key to select “scan” mode w/a “scan” sign on the
upper left comer of the upper left comer of the monitor. Then this function
will automatically scans through, all the functions displayed on the bottom
line of the monitor.
2. TIME: Automatically accumulates workout time when starting exercise.
3. COUNT: Automatically accumulates workout counts when starting
exercise.
4. TOTAL COUNT: Automatically accumulates different sessions workout
counts when starting exercise.
5. CALS: Automatically accumulates calories amount consumed when
starting exercise.
6. PULSE (Option): Automatically detects and displays your current heart rate
when exercising.
7. Button to activate the computer.
MODE: To select functions of time, count, total count, calories and pulse (if
available). Hold the button for 2 seconds to have a total reset.
1. The value of pulse function is for reference only, please do not consider as
medical purpose.
2. If there is a possibility to see an improper display on the monitor, please
replace the batteries to have a good result.
3. Please use 2 pcs of 1.5V AA batteries as a power supply.
4. The monitor will be automatically shut off if there is no signal coming in for 4
to 5 minutes.
5. The monitor will be auto-powered when start exercise, push button or insert
pulse cable w/signal in.

13
Maintenance
How to folding
How to move the device
Lift the device to 45º so that the move wheels point downwards and to the front, and use
the fixed handlebar to move it.
How to maintain the device
Inspect and tighten all parts of the device regularly. Replace any worn part immediately.
For continued smooth operation of the device, the front and rear thwart pipes should be
kept clean. Using a soft cloth and mild detergent, clean any dust and residue that may
build up where the wheels move on the thwart pipes. Other components of the device can
be also be cleaned in this manner.
IMPORTANT: Never use the abrasives or solvents to clean the device. To prevent
damage to the computer, keep liquids away and keep it out of direct sunlight.
Computer trouble-shooting
If the computer does not function properly, the batteries should be replaced. In addition,
make sure that the connectors are plugged into the computer.

14
Training Organization
Warm-up phase
Before every training you should warm-up for 5~10 minutes. Here you can do some
stretching and training with low resistance.
Exercise phase
During the actual training a rate of 70%~85% of the maximum pulse rate should be
chosen. Maximum pulse rate=220-Age. The time-length of your training session can be
calculated with the following rule of thumb:
Daily training session: approx. 10 min. per unit
2-3 x per week: approx. 30 min. per unit
1-2 x per week: approx. 60 min. per unit
Warning! Incorrect/excessive training can cause health injury.
Cool down
To introduce an effective cool-down of the muscles and the metabolism the intensity
should be drastically decreased during the last 5~10 minutes. Stretching is also helpful for
the prevention of muscle aches.
Success
Even after a short period of regular exercise you will notice that you constantly have to
increase the resistance to reach your optimum pulse rate. The units will be continuously
easier and you will feel a lot fitter during your normal day. For this achievement you
should motivate yourself to exercise regular. Choose fixed hours for your training session
and do not start training too aggressively. An old quote amongst sportsman says:
“The most difficult thing about training is to start it.”
Wish you have a lot of fun and success with your bike.
/