Saramonic UWMIC9S UHF Wireless Microphone System User manual

Type
User manual

Saramonic UWMIC9S UHF Wireless Microphone System is a portable and versatile audio solution designed for various applications. With its wide switching RF bandwidth, easy-to-read OLED display, and infrared synchronization, it offers reliable wireless operation for DSLR video, field recording, broadcast TV, and more. The system features a camera-mountable receiver (RX9S) and a body-pack transmitter (TX9S) with a BMP-type microphone input connector. It provides adjustable microphone gain, auto-scan function for interference-free operation, and a mute function for added control.

Saramonic UWMIC9S UHF Wireless Microphone System is a portable and versatile audio solution designed for various applications. With its wide switching RF bandwidth, easy-to-read OLED display, and infrared synchronization, it offers reliable wireless operation for DSLR video, field recording, broadcast TV, and more. The system features a camera-mountable receiver (RX9S) and a body-pack transmitter (TX9S) with a BMP-type microphone input connector. It provides adjustable microphone gain, auto-scan function for interference-free operation, and a mute function for added control.

User Manual
用户手册
UHF Wireless Microphone System
无线麦克风系统
UwMic9S Kit2 (TX9S+TX9S+RX9S)
Statement
Please read this manual carefully before using and strictly operate and store in accordance with
the instructions. Please save it for your future reference.
If the user manual can not help you to solve certain problems, please ask your retailer for help or
Cautions
1. Do not use the unit under water, don't expose it to rain. Please store it in a cool, dry place.
2. Please use and store it in normal temperature. Do ot move it from overheated to supercooled
condition frequently as well as keep away from heat sources such as heater and oven.
3. When using and storing, please pay attention to dust and moisture.
4. Be careful to violent collision.
5. To avoid acoustical feed-back, do not hold the microphone close to the loudspeakers.
6. For the best sound pick-up pattern do not hold your hand against the microphone head.
7. Remove the batteries from the battery compartment when the device is not used for a long
time.
3
General Introduction
The Saramonic UwMic9S UHF wireless
microphone system is intended for portable
wireless operation and can be used in several
environments for applications such as DSLR
video, field recording, broadcast TV, electronic
news gathering (ENG), on-the-spot interviews,
and more.
Portable Receiver RX9S
Introduction
The Saramonic RX9S is a camera-mountable
integrated wireless receiver. It features a
wide switching RF bandwidth, an easy-to-
read, high-contrast OLED display and infrared
synchronization between transmitter and
receiver.
Equipped with an auto-scan function, the RX9S
can automatically search for an available
transmission frequency.
The selectable output mode allows you to
choose the output signal to be mono or stereo.
Product Structure
① Antennas
② A channel output jack
Connect the RX9S to a video camera,
camcorder, mixer or amplifier with the
supplied output cables.
③ B channel output jack
Connect the RX9S to a video camera,
camcorder, mixer or amplifier with the
supplied output cables.
④ RF-A indicator
RF indicator displays the RF input level as
follows:
Solid Green: RF signal is strong.
Flash Green: RF signal is weak.
Lights off: RF signal is disconnected.
⑤ IR/POWER indicator
Indicates the battery level as follows:
Solid Green: Sufficient battery level.
Solid Red: Low batter level.
Charging Status:
Flashing Red: Charging.
⑥ RF-B indicator
RF indicator displays the RF input level as
follows:
Green light: RF signal is strong.
Lights off: RF signal is disconnected.
⑦ MIC IN/LINE IN jack
It can be connected to the 3.5mm lavalier
microphone or line-in devices
⑧ OLED display
Display menus, please refer to "OLED Display
Operation Guide" (page 4) for more details.
⑨ Power button
Long Press to turn on or off the RX9S.
4
Attach the shoe mount adapter.
① Please attach the belt clip upside-down
before attach-ing the shoe mount adapter.
Push the bottom of the belt clip to make
some space between the belt clip and the
receiver.
Align the belt clip with the two vertical
grooves on the shoe mount adapter and
insert the adapter in the direction of the
arrow.
Push the shoe mount adapter in fully until the
belt clip fits into the horizontal groove on the
adapter holds.
⑩ SET button
Long press the SET button to enter the
displayed menu.
Then, short press the SET button to confirm
your option or long press again to exit
without saving.
⑪ + or – button
Selects functions or values shown on the
display.
⑫ ON/OFF switch A (A channel)
⑬ ON/OFF switch B (B channel)
⑭ Cold shoe mount adapter
⑮ USB-C charging port (DC 5V)
Attaching Accessories
Connect the supplied cable to the output jack.
① Choose the corresponding cable and plug into
the OUTPUT jack.
② For a secure connection, turn to lock the
connector.
Attach a belt clip. Please Refer to "Attaching
Accessories" (page 7).
5
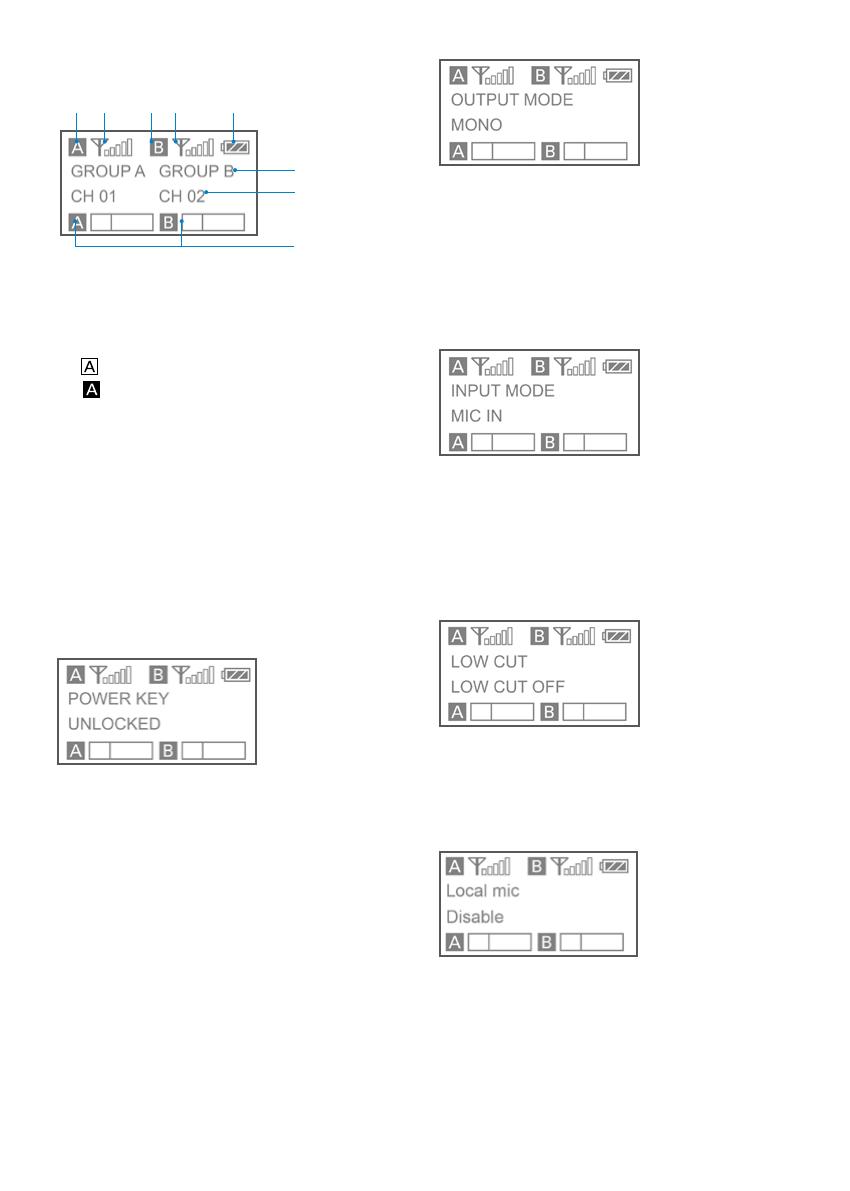
Output mode. The output mode can be selected
to mono or stereo. When the output mode is
mono, the audio from left and right channel will
be mixed. When it is stereo, the left (Group B)
and right (Group A) audio channel output will be
separated. Please make sure the ON/OFF switch
of both channels have been turn to ON position.
System default is mono.
Input mode. The input mode can be selected
to Mic in or Line in. When the input mode is
Mic in mode, the receiver can be connected
to the 3.5mm lavalier microphone. When the
input mode is Line in mode, the receiver can be
connected to the line-in devices. System default
is "Mic in".
Low cut. Long press the SET button to
turn on or off low cut function.
Attenuate low-frequency rumble from
audio at 1kHz. System default is low cut off.
Default is“Low cut off.
Local mic
Long press the set button to adjust the input
type between Enable and Disable.
When the receiver is connected to 3.5mm
lavalier microphone or line-in devices, please
set the Local mic to “Enable”. If not, please set
the Local mic to “Disable”. Default is ”Disable”.
When the mode is disable, the mic/line in jack of
receiver can not be operated normally.
Home screen. If no operation is performed for
20 seconds on the other screens, the display will
automatically return to the home screen.
Group icon
Indicates the power of group A is turned off.
Indicates the power of group A is turned on.
RF level indicator
Indicates the current reception level.
Battery level indicator
Displays the battery level. Please replace
both batteries immediately when the
indicator starts flashing.
Name of the channel group
Current channel
Displays the current channel number.
Audio input level meter
Displays the audio input level.
Power key. Long press the SET button to
unlocked or locked the power key. Lock the
power key to prevent the receiver being turned
off unwittingly while using.
Unlocked: Long press the power key to turn
the receiver on or off (System default).
Locked: The receiver will not be turned off
even after pressing the power key.
OLED Display Operation Guide
① ②
6
MIC GAIN. Adjust the microphone’s gain value
as request (0-15). Default is “13”.
Select channel. Details of operation, please refer to
"Manually setting the receiver channel" (page ).
Set output volume. Set the volume of output
audio within the range 0 to 15. The setting is
retained even after the power is turned off.
Default is 13.
Auto scan function. Automatically scan an
available and clear channel. Details of operation,
please refer to "Using the auto scan function"
(page ).
Infrared matching function. Match the receiver
and transmitter via infrared. Details of operation,
please refer to "Match the channel of receiver
and transmitter" (page).
Set backlight. Set the backgroud LED light to
ON or Delay 60 /30 /10 seconds. Default is
"Delay 30s."
7
Restore default setting.
Version of the UwMic9S RX9S.
Body-pack Transmitter UwMic9S TX9
Introduction
The Saramonic UwMic9S TX9S is a camera-
mountable body-pack transmitter.
It features a wide switching RF bandwidth,
an easy-to-read OLED display and infrared
synchronization between transmitter and
receiver.
Auto-scan function, no longer has to be
disturbed by the channel adjustment and offers
more intuitive and faster operation for users.
Moreover, it is equipped with a muting function
and a BMP-type microphone input connector.
Product Structure
8
① Antennas
② Connect to the 3.5mm lavalier microphone
③ Connect to the line-in devices
④ AUDIO indicator / IR (infrared detector)
AUDIO indicator: Indicates the audio input
level. IR (infrared detector): Receives the
frequency from the receiver.
Solid Green: Audio input level is appropriate.
Flashing Red: Audio is muted (i.e., disabled).
For details on setting the mute function,
please refer to "Set Mute key" (page 8).
⑤ POWER indicator
Indicates the battery level as follows:
Solid Green: Sufficient battery level.
Solid Red: Low battery.
Charging Status:
Flashing Red: Charging.
⑥ OLED display
Display menus, please refer to "OLED Display
Operation Guide" (page 8) for more details.
⑦ Power / Mute button
Power ON:
Press button for one second or longer
Power OFF:
Press button until it turns off
Mute ON/OFF:
Short press button
⑧ SET button
Long press the SET button to enter the
displayed menu. Then, short press the SET
button to confirm your option or long press
again to exit without saving.
⑨ + or – button
Selects functions or values shown on the
display.
⑩ USB-C charging port (DC 5V)
Attaching Accessories
1. Attach a belt clip
Insert one end of the belt clip into one of two
holes on either side of the transmitter, and then
insert the other end into the port of MIC IN on
the other side.
2. Connect the mcirophone
For a secure connection, turn to lock the
connector.
Note: Please turn off the transmitter before
attaching or removing the microphone.
9
OLED Display Operation Guide
Home screen. If no operatIon is performed for
20 seconds on the other screens, the display will
automatically return to the home screen.
Channel group indicator
Indicates the channel group.
Mute indicator
Mute OFF Mute ON
Battery level indicator
Displays the battery level. Please replace
both batteries immediately when the
indicator starts flashing.
Name of the channel group
Channel and frequency
Indicate the current channel and frequency.
The status of Power / Mute button.
Menu display section. Displays various
functions. Press the + or - button to switch functions.
Set Power key. Select Unlocked or Locked.
Set "Locked" to lock the power button to prevent
the unit being turned off or muted unwittingly
while using. Default is "Unlocked."
Select Channel. Long press the SET button to
enter the menu. Use the "+" and "-" to select the
channel you need and shot press the SET button
to confirm
Select Group. You can choose "A" or "B" channel
group. Each group has 96 channels. Default is
'Group A."
Set Mute key. If you want to mute the audio,
please select "Enable" first and then short press
the power button. Default is "Enable."
Microphone Sensitivity Setting:
If you want adjust the microphone’s gain, you
can set the microphone’s gain from 00-08.
Default is “05”.
10
IR Match. Set to match with the receiver. The
screen will display "Matching" when in process.
After successful matching, it will indicate "Match
success."
Set Backlight. Select ON or Delay 10 / 30 /60
seconds. Default is "Delay 30s."
Restore default setting.
Version of the UwMic9S TX9S.
Operation Guide
1. Connect the receiver to the mic jack of a
camera, camcorder or mixer with the supplied
cable.
2. Turn on the receiver by long pressing the
power button.
3. Set the channel of the receiver by two ways:
Using the auto scan function
Use the + or – button to display the auto scan
screen on the receiver.
Long press the SET button to select “Auto scan?”
Press the SET button to confirm.
A
B
The channel with the least noise and interference
will be displayed.
A. Indicates the current least noise channel is
CH 03 and ask you if you would like to use it.
You can short press the SET button to confirm
the channel within 20 seconds or long press the
SET button to exit the displayed menu without
saving.
11
B. Counting down 20 second
Note:
After 20 seconds have elapsed, the display
returns to the home screen without saving.
Some noise may occur when power is
turned on, you could turn down the audio
input level of devices connected to the
receiver accordingly.
Manually setting the receiver channel.
Use the + or – button to display the channel
menu on the receiver.
Long press the SET button to select the menu.
Use the + or – button to select the desired
channel and confirm it by short pressing the SET
button.
4. Match the channel of receiver and transmitter.
Using infrared transmission to transfer the
frequency set on the receiver to a transmitter.
For the TX9S
• Turn on the transmitter and receiver.
• Use the + or – button to display the “Match
with TX” menu on receiver.
• Use the + or – button to display the "Match
with RX" menu on transmitter.
Both long press the SET button to select the
menu and short press it to confirm.
• Place the infrared transmitter port on the
receiver near the infrared detector on the
transmitter.
If "Match success" displayed on the OLED
screen, the frequency for use on the
transmitter is set.
After matching successfully, press the SET
button of receiver to return to the previous
menu.
12
Packing list
Body-pack transmitter: TX9S
Portable receiver: RX9S
DK3A Omnidirectional Lavalier Microphone Kit
SR-C2004 3.5mm TRS Male to Dual Locking-type
3.5mm TRS Male Y-Cable
XLR to 3.5mm TRS Locking-type Plug Audio
Cable
3.5mm TRS Locking-type Plug Audio Cable for
Cameras
Antenna
Belt Clip
Cold Shoe Mount Adapter
Specification
Receiver RX9S
Channel number 96
Channel group A and B
Oscillator type PLL synthesizer
Audio output connector RX9S: 3.5 mm mini jack
Antenna 1/4λ wire antenna
Audio output level –60 dBV
Headphone output level 30mW (16 Ω)
Receive frequencies 514.56MHz - 595.46MHz
Receive sensitivity -95 dBm
Signal to noise ratio 70 dB or more
Voice delay 12 ms
Reference deviation ±5 kHz (–60 dBV, 1 kHz input)
Frequency response 40 Hz to 18 kHz (+/-3dB)
Distortion 0.5% or less
Spur suppression -60 dB
Reference audio input level –60 dBV (MIC input, 0 dB
attenuation)
Weight (excluding batteries) RX9S: Approx. 218.7g
Power Requirements Built-In Li-ion Battery or USB-C
DC 5V
Dimensions RX9S: 170.9 × 63.5 × 30.0 mm
Operating temperature 0 °C to 50 °C
Storage temperature –20 °C to +55°C
Transmitter TX9S
Channel number 96
Channel group A or B
Oscillator type PLL synthesizer
Carrier frequencies 514.56MHz - 595.46MHz
Reference deviation ±5 kHz (–60 dBV, 1 kHz input)
Signal to noise ratio 70 dB or more
Spur suppression -60 dB
Voice delay 12 ms
Antenna 1/4λ wire antenna
Audio input connector TX9S: 3.5mm mini jack
Reference audio input level –60 dBV (MIC input, 0 dB
attenuation)
Distortion 0.5% or less
Weight TX9S: Approx. 211.4g
Power Requirements Built-In Li-ion Battery or USB-C
DC 5V
Dimensions TX9S: 170.9 × 63.5 × 30.0 mm
Operating temperature 0°C to 50°C
Storage temperature –20°C to +55°C
www.saramonic.com
Saramonic is a trademark registered and owned by Shenzhen DSQN Investment CO., LTD.
COPYRIGHT 2011-2021 SARAMONIC INTERNATIONAL ( A brand of DSQN )
Room 2009, Shenzhou Bairuida Bldg, Banxuegang Road, Bantian Street, Longgang District,
Shenzhen, China 518129 Tel: 400-613-1096 Email: [email protected]
深圳市大盛青牛投资有限公司
广东省深圳市龙岗区坂雪岗大道百瑞达大厦A栋2009室
全国服务热线:400-613-1096
中国制造MadeinChina
Please follow our WeChat account for more details.
扫描二维码关注枫笛Saramonic微信公众号。
For better recording experience, the app-lication
SmartRecorder is recommended.
为获得更好的录制体验,推荐使用枫笛Saramonic自主研发
应用软件SmartRecorder。
FCC Caution:
This device complies with part 15 of the FCC Rules. Operation is subject to the following
two conditions: (1) This device may not cause harmful interference, and (2) this device
must accept any interference received, including interference that may cause undesired
operation.
Any Changes or modifications not expressly approved by the party responsible for
compliance could void the user's authority to operate the equipment.
IMPORTANT NOTE:
Note: This equipment has been tested and found to comply with the limits for a Class B digital
device, pursuant to part 15 of the FCC Rules. These limits are designed to provide reasonable
protection against harmful interference in a residential installation. This equipment generates,
uses and can radiate radio frequency energy and, if not installed and used in accordance with
the instructions, may cause harmful interference to radio communications. However, there is
no guarantee that interference will not occur in a particular installation. If this equipment does
cause harmful interference to radio or television reception, which can be determined by turning
the equipment off and on, the user is encouraged to try to correct the interference by one or
more of the following measures:
Reorient or relocate the receiving antenna.
Increase the separation between the equipment and receiver.
Connect the equipment into an outlet on a circuit different from that to which the receiver is
connected.
—Consult the dealer or an experienced radio/TV technician for help.
FCC Radiation Exposure Statement:
The device has been evaluated to meet general RF exposure equirement. The device
can be used in portable exposure ondition without restriction.
This device for License use only.
  • Page 1 1
  • Page 2 2
  • Page 3 3
  • Page 4 4
  • Page 5 5
  • Page 6 6
  • Page 7 7
  • Page 8 8
  • Page 9 9
  • Page 10 10
  • Page 11 11
  • Page 12 12
  • Page 13 13
  • Page 14 14

Saramonic UWMIC9S UHF Wireless Microphone System User manual

Type
User manual

Saramonic UWMIC9S UHF Wireless Microphone System is a portable and versatile audio solution designed for various applications. With its wide switching RF bandwidth, easy-to-read OLED display, and infrared synchronization, it offers reliable wireless operation for DSLR video, field recording, broadcast TV, and more. The system features a camera-mountable receiver (RX9S) and a body-pack transmitter (TX9S) with a BMP-type microphone input connector. It provides adjustable microphone gain, auto-scan function for interference-free operation, and a mute function for added control.

Ask a question and I''ll find the answer in the document

Finding information in a document is now easier with AI