Hoymiles DTU-Pro Installation guide

Category
Bridges & repeaters
Type
Installation guide

Hoymiles DTU-Pro is a powerful device that enables communication between solar panels and the Hoymiles monitoring platform, providing real-time data and remote management capabilities. With its Wi-Fi and Ethernet connectivity options, it ensures seamless data transmission. The DTU-Pro features multiple ports, including RS485, DRM (for Australia), and Ethernet, allowing for versatile integration with different system components. It also includes SD card support for local data storage and a USB port for firmware updates.

Hoymiles DTU-Pro is a powerful device that enables communication between solar panels and the Hoymiles monitoring platform, providing real-time data and remote management capabilities. With its Wi-Fi and Ethernet connectivity options, it ensures seamless data transmission. The DTU-Pro features multiple ports, including RS485, DRM (for Australia), and Ethernet, allowing for versatile integration with different system components. It also includes SD card support for local data storage and a USB port for firmware updates.

A
B
C
D
E
F
G
H
I
J
K
L
M
01
1. Interface Layout
Item Description
SD Card Slot
DTU Power Indicator
DTU Communication Indicator (With Server)
DTU Communication Indicator (With MI)
DTU Alarm Indicator
Wi-Fi Antenna (2.4G)
RS485
DRM Port (For Australia only)
Ethernet Port
USB Port
Reset Bottom
Power Port
2.4G Antenna
- Screw the bracket on the wall, please
use at least two screw holes (one on
each side) to affix the bracket (M4
screws need to be prepared by
installer).
3. Installation
DTU-Pro(Wi-Fi) Quick Installation Guide
A) Take the two 2.4G antennas out of the box,
and screw the antennas into the Wi-Fi port
and 2.4G port.
B) Check the box for the following items:
- Hoymiles DTU-Pro
- Two Antennas
- Adapter
- Bracket
- 5-Pin Plug
C) Choose the way DTU-Pro connects to the Internet:
Use Wi-Fi or Ethernet. Prepare the following items if
needed:
- Ethernet Cable (if Ethernet option is selected)
- Hoymiles Installer App installed (if Wi-Fi option is
selected)
B) Choose an installation location.
- Install on the top floor to increase signal strength.
- Install near the center of the PV array.
- Install at least 0.5 m above the ground and more than 0.8 m away from corners.
Note: Please do not install the DTU directly above metal or concrete to prevent signal interference.
C) Choose the installation method.
Option 1: Mount the DTU on the wall.
A) Download the Hoymiles Mobile Installer
App.
2. Preparation
Region: Global AP040226 REV1.2 © 2020 Hoymiles Power Electronics Inc. All rights reserved.
02
5. Online Setup
Create an online account to complete the DTU installation (refer to “Quick Installation Guide for S-Miles Cloud (Hoymiles
Monitoring Platform) Online Registration” for detailed account creation steps).
Note: For more setup details regarding the Export Management and the Local Installation Assistant, please acquire the
related Operation Guide from Hoymiles Technical Service Center at [email protected].
6. Warning
Warning
- Only qualified personnel can install or replace the DTU.
- Do not attempt to repair the DTU, as it contains the parts that are not serviceable to users. If the DTU breaks down,
please contact your distributor for maintenance. Opening the DTU without permission will invalidate the warranty.
4. Installation Map
Complete the installation map.
A) Peel the serial number label (as circled
below) from the DTU and place it on the
installation map.
Product information is subject to change without notice. (Please download reference manuals at www.hoymiles.com.)
- Match the bracket’s upper buckle with
the DTU-Pro.
- Match the bracket’s lower buckle by
gently pressing the lower side of the
DTU-Pro until you hear a clicking sound.
Please make sure the antennas are
perpendicular to the wall.
- If you place the DTU on the table, please
make sure the antennas are
perpendicular to the table.
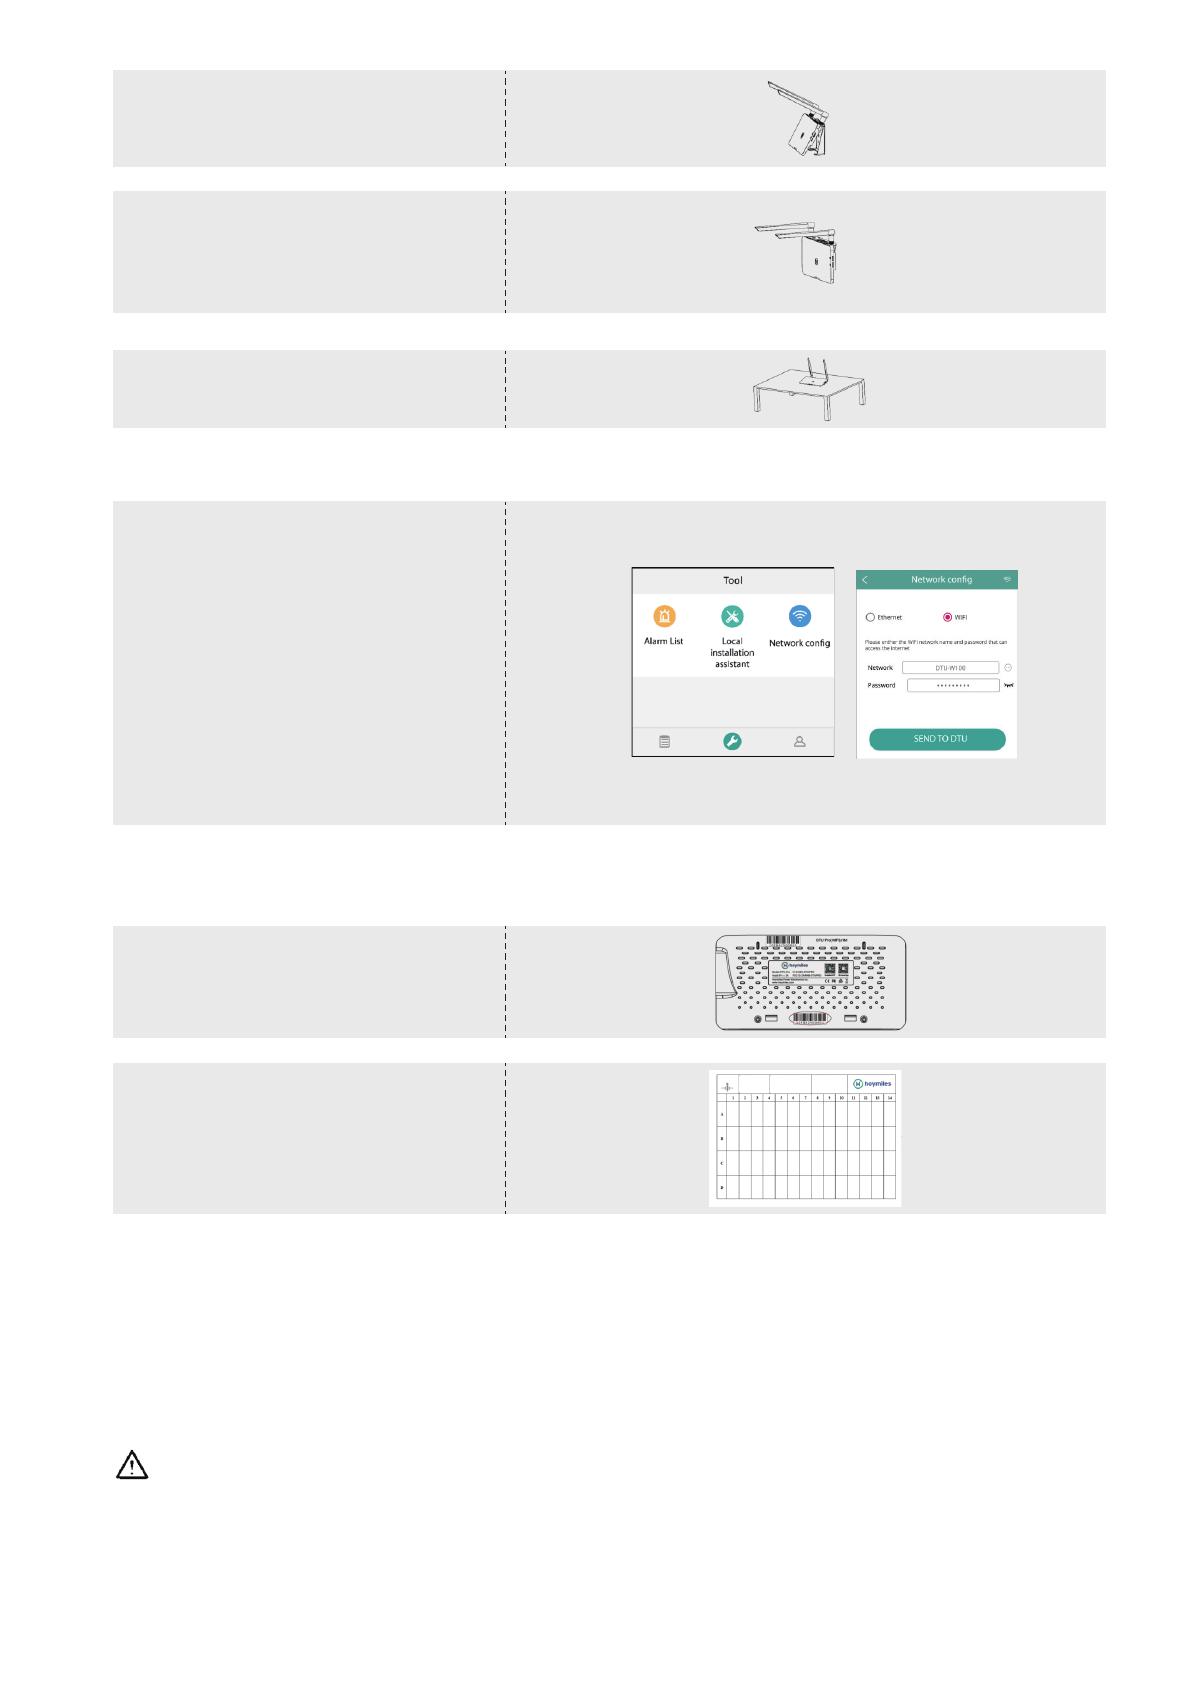
- Use the smartphone/tablet/laptop to
open the Installer App and login. Locate
“O&M” on the bottom of the page, select
“Network Config”, and then complete the
Wi-Fi configuration (If Wi-Fi option is
selected).
- Use a LAN cable, with one end
connected to the house router and the
other to the DTU Ethernet port. Use the
smartphone/tablet to open the Installer
App and login. Locate “O&M” on the
bottom of the page, select “Network
Config”, and then select “Ethernet” (if
Ethernet option is selected).
Option 2: Place the DTU on the table.
D) Plug in the power adapter to power the DTU.
E) Set up with Internet.
B) Complete the system information of the
installation map as shown below.
N S E W
(circle one)
Panel Group:
Azimuth:
Tilt:
Sheet _ of _
Customer Information: DTU Serial Number:
To sheet _______
To sheet _______
To sheet _______
To sheet _______
Region: Global AP040226 REV1.2 © 2020 Hoymiles Power Electronics Inc. All rights reserved.
  • Page 1 1
  • Page 2 2

Hoymiles DTU-Pro Installation guide

Category
Bridges & repeaters
Type
Installation guide

Hoymiles DTU-Pro is a powerful device that enables communication between solar panels and the Hoymiles monitoring platform, providing real-time data and remote management capabilities. With its Wi-Fi and Ethernet connectivity options, it ensures seamless data transmission. The DTU-Pro features multiple ports, including RS485, DRM (for Australia), and Ethernet, allowing for versatile integration with different system components. It also includes SD card support for local data storage and a USB port for firmware updates.

Ask a question and I''ll find the answer in the document

Finding information in a document is now easier with AI