Page is loading ...

INSTALLATION & ASSEMBLEY
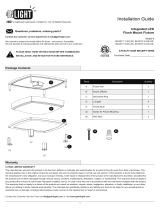
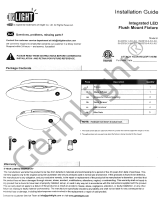
Remove the fixture and the mounting package from the box and make sure that no parts
are missing by referencing the illustrations on the installation instructions.
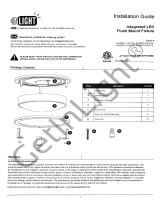
1. Pull the supply wires (4 &5) and house ground wire (6) out from the outlet box (1).
2. Thread the fixture screws (8) into the appropriate threaded holes of the outlet box (1).
3. Electrical connections, connect the black fixture black wire (10) to the black supply wire
(5) and the white fixture wire (9) to the white supply wire (4) using wire nut (7).
4. Connect the fixture ground wire (11) to the supply ground wire (6) together using wire
nut (7).
Wrap all wire connections with electrical tape to ensure secure connection.
5. Carefully tuck all wires back into the outlet box. Place the fixture pan (2) over outlet box
and feed fixture screws (8) through keyhole slots.
Rotate the fixture pan(2) clockwise until screws(8) slid into the narrow end of the keyhole
slots and tighten firmly.
6. Final assembly- Secure the lens (3) and ring (12) to fixture pan (2) using three cap nuts
(13).
7. Installation complete, restore power at the circuit breaker and turn light switch on to
activate this fixture.
Dimming- This product is compatible with most common residential type dimmers, dimming
performance depends on dimmers.
Care and maintenance – Use dry and clean cloth to wipe the surface of the fixture.
Replacement- This LED product has no bulb to replace.
1.OUTLET BOX (EXCLUDED)
2. FIXTURE PAN
3. LENS
4. WHITE SUPPLY WIRE
5. BLACK SUPPLY WIRE
6. HOUSE GROUND WIRE
7. WIRE NUTS
8. FIXTURE SCREW
9. WHITE FIXTURE WIRE
10. BLACK FIXTURE WIRE
11. FIXTURE GROUND WIRE
12. RING
13. CAP NUTS
Turn off the main power at the circuit breaker before installing and servicing the
fixture to prevent possible injury from electric shock.
All electrical connections must be in accordance with local and National Electrical
Code (N.E.C.) standards. If you are unfamiliar with proper electrical wiring
connections, obtain the services of a qualified electrician.
INSTALLATION INSTRUCTIONS
LED FLUSH MOUNT FIXTURE 120VAC Input, Dimmable
READ AND FILLOW SAFETY INFORMATION
/