Page is loading ...

1
INSTALLATION OF ROLLUP SHADE
INSTALACIÓ N DE PERSIANA ENROLLABLE
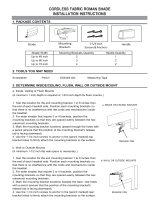
HARDWARE CONTENTS
ADITAMENTOS
Cord Cleat
Soporte para el cordón
Small Screw
Tornillo pequeño
Mounting Hook
Gancho de montaje
Mounting Screw
Tornillo de montaje
Plastic Screw Plug
Tapόn plastic de tornillos
Printed in China
Impreso eri China

2
ASSEMBLY INSTRUCTIONS
INSTRUCCIONES DE ENSAMBLAJE
1. Mark center of shade. Mark center of window. Position
shade by aligning center marks. Mark position of eyelets on
shade with a pencil (not included). For outside mounts, make
sure both marks are level. For inside mounts, make sure both
marks are the same distance back from the front edge of
window frame.
Marque el centro de la persiana. Marque el centro de la ventana.
Coloque la persiana alineando las marcas centrales. Marque la posición
de los ojales en la persiana con un lapis (no se incluye). Para los
montajes exteriors, aseqúrese de que ambas marcas estén niveladas.
Para los montajes interiors, aseqúrese de que ambas marcas estén a la
misma distancia del borde frontal del marco de la ventana.
2. Predrill holes at marked locations using 1/16 in. drill bit
(not included). Using pliers (not included), insert and tighten
mounting hooks (BB) making sure they point upward for
outside mounts and forward for inside mounts.
Pretaladre orificios en las ubicaciones marcadas con una broca para
taladro de 1/16 pulg. (no se incluye). Usando unas pinzas (no se
incluyen), inserte y apriete los ganchos de montaje (BB), asequrándose
de que apunten hacia arriba para los montajes exteriors y hacia delante
para los montajes interiors.
3. Hang shade by hooking the mounting eyelets over the
mounting hooks (BB).
Cuelgue la persiana enganchando los ojales de montaje sobre los
ganchos de montaje (BB).
Inside Mount
Montaje interior
Outside Mount
Montaje exterior
Inside Mount
Montaje interior
Outside Mount
Montaje exterior
Outside Mount
Montaje exterior
Inside Mount
Montaje interior

4
ELIMATE LOOPED PULL CORDS
(pre-1995 mini blinds & pleated shades)
(1.) Cut the looped pull cord just above the tassel, and remove equalizer
buckle (if any).
(2.) Insert cord through tassel and tie cord ends to secure the tassel.
ELIMINE LAS CUERDAS DE TIRO CON BUCLE
(mini persianas y persianas plegables anteriores a 1995)
(1.) Corte la cuerda de tiro con bucle por encima de la borla y quite la hebilla de
compensición de peso (si tiene).
(2.) Inserte la cuerda a través de la borla y ate los extremos de la cuerda para
asegurar la borla.
INSTALL CORD STOPS
(all pre-2001 horizontal blinds & corded shades)
(1.) Lower the blind to its proper length and lock cords into position at
head rail.
For each pull cord:
(2.) Pinch together a portion of the pull cord to create a loop near the
headrail, then slide the cord stop over the loop end.
(3.) Slip the free end of the pull cord throught the loop to loosely knot the
cord stop onto the pull cord.
(4.) Tighten the knot to secure the cord stop one to two inches below the
head rail to limit movement of inner lift cords.
INSTALACIÓ N DE TOPES
(para todas las persianas horizontals y persianas con cuerda anteriores a 2001)
(1.) Baje la persiana hasta la longitude adecuada y trabe las cuerdas en su lugar
en el riel superior.
Para cada cuerda de tiro:
(2.) Pliegue una parte de la cuerda de tiro para crear un bucle cerca del riel
superior, luego deslice el tope sobre el extreme del bucle.
(3.) Deslice el extreme libre de la cuerda de tiro a través del bucle para anudar
levemente el tope a la cuerda de tiro.
(4.) Ajuste el nudo para asegurarse de que el tope se ubique una o dos pul
gadas (2,5 o 5 cm) por debajo del riel superior y para limitar el movimiento
de las cuerdas de levantamiento internas.
INSTALL TIE-DOWN DEVICES
(pre-1997 vertical blinds & draperies)
(1.) Insert cord or chain into tie-down device.
(2.) Attach the tie-down device to the floor or wall so that the cord is fully
extended and securely fastened.
INSTALACIÓ N DE LOS DIPOSITIVOS DE AMARRE
(persianas verticals y cortinas anteriores a 1997)
(1.) Inserte la cuerda o la cadena en el dispositivo de amarre.
(2.)Sujete el dispositivo de amarre en el piso o en la pared para que la cuerda
se extienda completameta y quede bien ajustada.

5
ROMAN SHADE RETROFIT KIT INSTRUCTION
(pre-2011 Roman Shades)
INSTRUCCIONES DEL KIT DE REACONDICIONAMIENTO PARA LA PERSIANA ROMANA
(persianas romanas anteriores a 2011)
Warning: Accessible cords on roman shades may pose a strangulation hazard to young
children. Follow the instructions below to eliminate the cords from your corded roman shade.
Parts and complete instructions for this Retro Fit Kit are available from the Window
Coverings Safety Council at: www.windowcoverings.org
Advertencia: Las cuerdas accesibles de las persianas romanas pueden representar un peligro de
estrangulación para los niños pequeños. Sig alas siguientes instrucciones para eliminar las
cuerdas de la persiana romana con cuerdas. Las Instrucciones completes y en partes de este kit
de reacondicionamiento están disponibles desde el Window Coverings Safety Council en:
www.windowcoverings.org
Removing lift cords from your Roman Shade is essential for
child safety. Complete instructions will be included with the
Retro Fit Kit.
Follow all steps included in the Retro Fit Instruction for using
Shade Adjusters instead of cords to ensure both safety and
correct operation of your Roman Shade.
For Cordless Roman Shade, be aware of the cords retreating
back to the head-rail, handle with care.
Quitar las cuerdas de levantamiento de su persiana romana es
fundamental para la seguridad de los niños. Las instrucciones
completas se inclurán con el kit de reacondicionamiento.
Siga todos los pasos que se incluyen en las instrucciones de
reacondicionamiento para utilizar los ajustadores de persianas en
lugar de las cuerdas para asegurar tanto la seguridad como el
correcto funcionamiento de su persiana romana.
Para las ventanas romanas sin cuerdas, tenga en cuenta que las
cuenta que las cuerdas se repliegan en el riel superior y utilicela con
cuidado.
WARNING: CHOKING HARZARD – Young children can choke on the metal clips that adjust
the cordless shade. Do not let children touch, please with, or remove metal clips from the
shade.
ADVERTENCIA: PELIGRO DE ASFIXIA – Los niños pequeños se pueden atragantar con los
sujetadores de metal con los que se ajusta la persiana sin cuerdas. No deje que los niños toquen,
quiten o jueguen con los sujetadores de metal de la persiana.

7
Replace or retrofit blinds, shades and draperies purchased before 2011 with today’s safer
products.
Remplace o acondicione persianas y cortinas adquiridas antes de 2011 con productos actuales, más
seguros.
And remember to always follow these basics window-cord safety rules:
Y recuerde seguir siempre estas reglas básicas de seguridad paracuerdas de ventanas:
(1) Move all cribs, beds, furniture and toys away from windows and
window cords, preferably to another wall.
Aleje todas las cunas, camas, muebles y juguetes de ventanas y cuerdas de
ventanas. Es preferable ue los coloque cerca de paredes sin ventanas.
(2) Keep all window pull cords and inner lift cords out of the reach of
children. Make sure that tasseled pull cords are short, that
continuous-loop cords are permanently anchored to the floor or wall,
and that cord stops are properly installed and adjusted to limit
movement of inner lift cords.
Mantenga todas las cuerdas de ventanas de tiro y de levantamiento internas
fuera del alcance de los niños. Asegúrese de que las cuerdas de tiro con borla
sean cortas, que las cuerdas de bucle continuo estén permanentemente
ancladas al piso o a la pared y que los topes estén correctamente instalados y
ajustados para limitar el movimiento de las cuerdas de levantamiento
internas.
(3) Lock cords into position whenever horizontal blinds or shades are
lowered, including when they come to rest on a windowsill.
Trabe las cuerdas en su posición cuando baje las persianas o persianas
horizontals, e incluso cuando se apoyen en un alféizar.
(4) Replace window blinds and corded shades manufactured before 2011
within today’s safer products.
Reemplace las persianas y las persianas con cuerda fabricadas antes de
2011 con productos actuales, más seguros.
Install cordless window coverings in children’s bedrooms and play areas.
Instale persianas sin cuerda en los dormitories y áreas de juego de los niños.
For Roman Shades with accessible rear cords, please order retrofit kits from the Window Coverings
Safety Council at: www.windowcoverings.org
Para las persianas romanas con cuerdas traseras accesibles, solicite kits de reacondicionamiento del Window
Coverings Safety Council en: www.windowcoverings.org
/