XtremeMac TANGO TRX User manual
- Category
- Docking speakers
- Type
- User manual
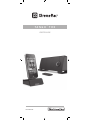
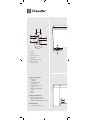
XtremeMac TANGO TRX is a 2.1 wireless high-fidelity audio system, featuring powerful sound through dual 2.75” ported drivers, 1.4” dome tweeters, and a 3.5” downward-firing subwoofer. Enjoy your music wirelessly via Bluetooth, or connect your iPod/iPhone through the dock connector to charge and play your tunes. Enhance your audio experience with customizable bass and treble controls.
XtremeMac TANGO TRX is a 2.1 wireless high-fidelity audio system, featuring powerful sound through dual 2.75” ported drivers, 1.4” dome tweeters, and a 3.5” downward-firing subwoofer. Enjoy your music wirelessly via Bluetooth, or connect your iPod/iPhone through the dock connector to charge and play your tunes. Enhance your audio experience with customizable bass and treble controls.


-
 1
1
-
 2
2
-
 3
3
-
 4
4
-
 5
5
-
 6
6
-
 7
7
-
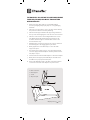 8
8
-
 9
9
-
 10
10
-
 11
11
-
 12
12


XtremeMac TANGO TRX User manual
- Category
- Docking speakers
- Type
- User manual
XtremeMac TANGO TRX is a 2.1 wireless high-fidelity audio system, featuring powerful sound through dual 2.75” ported drivers, 1.4” dome tweeters, and a 3.5” downward-firing subwoofer. Enjoy your music wirelessly via Bluetooth, or connect your iPod/iPhone through the dock connector to charge and play your tunes. Enhance your audio experience with customizable bass and treble controls.
Ask a question and I''ll find the answer in the document
Finding information in a document is now easier with AI
Related papers
-
XtremeMac X2 User manual
-
-
-
-
-
XtremeMac LUNA SST ipu-lss-13 User manual
-
-
XtremeMac Luna Voyager II User guide
-
-
