Page is loading ...

Agilent Technologies
Agilent 53220A/53230A
350 MHz Universal
Frequency Counter/
Timer
User’s Guide

253220A/53230A User’s Guide
Notices
© Agilent Technologies, Inc. 2011
No part of this manual may be reproduced in
any form or by any means (including elec-
tronic storage and retrieval or translation
into a foreign language) without prior agree-
ment and written consent from Agilent
Technologies, Inc. as governed by United
States and international copyright laws.
Manual Part Number
53220-90001
Edition
Second Edition. September 2011
Printed in Malaysia
Agilent Technologies, Inc.
5301 Stevens Creek Blvd.
Santa Clara, CA 95052 USA
Product manuals are provided with your
instrument on CD-ROM and/or in printed
form. Printed manuals are an option. Manu-
als are also available on the web on the
instrument’s product page.
Software Updates / Licenses
Periodically, Agilent releases software
updates to fix known defects and incorpo-
rate product enhancements. To search for
software updates and the latest documenta-
tion for your product, go to the product page
at:
www.agilent.com/find/53220A
www.agilent.com/find/53230A
A portion of the software in this product is
licensed under terms of the General Public
License Version 2 (“GPLv2”). The text of the
license and source code can be found at:
www.agilent.com/find/GPLV2
This product utilizes Microsoft Windows
CE. Agilent highly recommends that all Win-
dows-based computers connected to Win-
dows CE instruments utilize current
anti-virus software. For more information,
go to the product page at:
www.agilent.com/find/53220A
www.agilent.com/find/53230A
Technology Licenses
The hardware and/or software described in
this document are furnished under a license
and may be used or copied only in accor-
dance with the terms of such license.
Declaration of Conformity
Declarations of Conformity for this product
and for other Agilent products may be
downloaded from the Web. Go to
http://regulations.corporate.agilent.com
and click on “Declarations of Conformity.”
You can then search by product number to
find the latest version.
Warranty
The material contained in this docu-
ment is provided “as is,” and is sub-
ject to being changed, without notice,
in future editions. Further, to the max-
imum extent permitted by applicable
law, Agilent disclaims all warranties,
either express or implied, with regard
to this manual and any information
contained herein, including but not
limited to the implied warranties of
merchantability and fitness for a par-
ticular purpose. Agilent shall not be
liable for errors or for incidental or
consequential damages in connec-
tion with the furnishing, use, or per-
formance of this document or of any
information contained herein. Should
Agilent and the user have a separate
written agreement with warranty
terms covering the material in this
document that conflict with these
terms, the warranty terms in the sep-
arate agreement shall control.
Assistance
This product comes with the standard prod-
uct warranty. Warranty options, extended
support contacts, product maintenance
agreements and customer assistance
agreements are also available. Contact your
nearest Agilent Technologies Sales and Ser-
vice office for further information on Agilent
Technologies' full line of Support Programs.
Certification
Agilent Technologies certifies that this prod-
uct met its published specifications at time
of shipment from the factory. Agilent Tech-
nologies further certifies that its calibration
measurements are traceable to the United
States National Institute of Standards and
Technology, to the extent allowed by the
Institute's calibration facility, and to the cal-
ibration facilities of other International
Standards Organization members.
Exclusive Remedies
THE REMEDIES PROVIDED HEREIN ARE
THE CUSTOMER'S SOLE AND EXCLUSIVE
REMEDIES. AGILENT TECHNOLOGIES
SHALL NOT BE LIABLE FOR ANY DIRECT,
INDIRECT, SPECIAL, INCIDENTAL, OR CON-
SEQUENTIAL DAMAGES, WHETHER
BASED ON CONTRACT, TORT, OR ANY
OTHER LEGAL THEORY.
Restricted Rights Legend
U.S. Government Restricted Rights. Soft-
ware and technical data rights granted to
the federal government include only those
rights customarily provided to end user cus-
tomers. Agilent provides this customary
commercial license in Software and techni-
cal data pursuant to FAR 12.211 (Technical
Data) and 12.212 (Computer Software) and,
for the Department of Defense, DFARS
252.227-7015 (Technical Data - Commercial
Items) and DFARS 227.7202-3 (Rights in
Commercial Computer Software or Com-
puter Software Documentation).
Trademarks
Microsoft and Windows are U.S. registered
trademarks of Microsoft Corporation.

53220A/53230A User’s Guide 3
Waste Electrical and
Electronic Equipment (WEEE)
Directive 2002/96/EC
This product complies with the WEEE Direc-
tive (2002/96/EC) marking requirement.
The affixed product label (see below) indi-
cates that you must not discard this electri-
cal/electronic product in domestic
household waste.
Product Category: With reference to the
equipment types in the WEEE directive
Annex 1, this product is classified as a
"Monitoring and Control instrumentation"
product.
Do not dispose in domestic household
waste.
To return unwanted products, contact your
local Agilent office, or see
www.agilent.com/environment/product
for more information.
Lithium Battery Recycling
The 53220A/53230A counters contain a 3V
“coin cell” lithium battery. Agilent recom-
mends that this battery be replaced every
year at the instrument’s 1-year calibration
interval. Replacement procedures are pro-
vided in the 53220A/53230A Service Guide.
Option 300 provides battery operation of the
53220A/53230A using a 12 lithium battery.
Performance of this battery will degrade
over time as a function of the number of bat-
tery charge/discharge cycles.
Refer to local, state, or Federal regulations
when disposing of, or recycling either bat-
tery.
Safety Information
The following general safety precautions
must be observed during all phases of oper-
ation of this instrument. Failure to comply
with these precautions or with specific
warnings or operating instructions in the
product manuals violates safety standards
of design, manufacture, and intended use of
the instrument. Agilent Technologies
assumes no liability for the customer's fail-
ure to comply with these requirements.
General
Do not use this product in any manner not
specified by the manufacturer. The protec-
tive features of this product may be
impaired if it is used in a manner not speci-
fied in the operation instructions.
Before Applying Power
Verify that all safety precautions are taken.
Note the instrument's external markings
described under "Safety Symbols".
Ground the Instrument
The Agilent 53220A/53230A is provided
with a grounding-type power plug. The
instrument chassis and cover must be con-
nected to an electrical ground to minimize
shock hazard. The ground pin must be firmly
connected to an electrical ground (safety
ground) terminal at the power outlet. Any
interruption of the protective (grounding)
conductor or disconnection of the protec-
tive earth terminal will cause a potential
shock hazard that could result in personal
injury.
Fuses
The Agilent 53220A/53230A is provided
with an internal line fuse appropriate for the
line voltages listed on the instrument. This
fuse is not user accessible.
Do Not Operate in an Explosive
Atmosphere
Do not operate the instrument in the pres-
ence of flammable gases or fumes.
Do Not Operate Near
Flammable Liquids
Do not operate the instrument in the pres-
ence of flammable liquids or near contain-
ers of such liquids.
Do Not Remove the Instrument
Cover
Only qualified, service-trained personnel
who are aware of the hazards involved
should remove instrument covers. Always
disconnect the power cable and any exter-
nal circuits before removing the instrument
cover.
Do Not Modify the Instrument
Do not install substitute parts or perform
any unauthorized modification to the prod-
uct. Return the product to an Agilent Sales
and Service Office for service and repair to
ensure that safety features are maintained.
In Case of Damage
Instruments that appear damaged or defec-
tive should be made inoperative and
secured against unintended operation until
they can be repaired by qualified service
personnel.
Cleaning the Instrument
Clean the outside of the instrument with a
soft, lint-free, slightly-dampened cloth. Do
not use detergents or chemical solvents.

453220A/53230A User’s Guide
Safety Notices
CAUTION
A CAUTION notice denotes a hazard. It
calls attention to an operating proce-
dure, practice, or the like that, if not
correctly performed or adhered to,
could result in damage to the product
or loss of important data. Do not pro-
ceed beyond a CAUTION notice until
the indicated conditions are fully
understood and met.
WARNING
A WARNING notice denotes a hazard.
It calls attention to an operating pro-
cedure, practice, or the like that, if not
correctly performed or adhered to,
could result in personal injury or
death. Do not proceed beyond a
WARNING notice until the indicated
conditions are fully understood and
met.
Safety Symbols
WARNING
Do not connect the input channels of
the 53220A/53230A to AC line-voltage
mains or to circuits derived from AC
mains. The instrument must be used
in CAT I (isolated from mains) appli-
cations only. Do not use in other IEC
Measurement Category (CAT II, CAT
III, or CAT IV) applications. Failure to
observe these precautions may result
in electric shock and serious personal
injury.
WARNING
The BNC shells of the input terminals
are connected to the instrument chas-
sis. Verify signal polarity before mak-
ing any connections to the input
terminals.
Protection Limits
The Agilent 53220A/53230A 350 MHz Uni-
versal Counter provides protection circuitry
to prevent damage to the instrument and to
protect against the danger of electric shock,
provided the Protection Limits are not
exceeded and the instrument is properly
grounded. To ensure safe operation of the
instrument, do not exceed the Protection
Limits defined on the front panel:
WARNING
During battery operation, the maxi-
mum measured signal supplied by the
user is + 42V.
WARNING
Product Options 201/202 add parallel
Channel 1 and Channel 2 inputs to the
rear panel of the instrument. Signals
on the center conductor of either
panel’s channel BNCs are also
present on the corresponding center
conductor of the BNC on the opposite
panel.
Installing the Instrument
The Agilent 53220A/53230A operates in the
following line-voltage ranges:
100 - 240V, 50-60 Hz
100 - 127V, 440 Hz
90 VA Max
Instrument ventilation is through the sides
and rear. Do not obstruct the ventilation
holes in any of these locations.
Battery Operation
When operating the 53220A or 53230A
under battery power (Option 300), failure to
observe the following warnings may result
in damage to the instrument, electric shock,
and serious personal injury:
WARNING
Connect the instrument chassis to
earth ground during battery operation
to minimize shock hazard. Any inter-
ruption or disconnection of the pro-
tective earth terminal will cause a
potential shock hazard that could
result in personal injury.
WARNING
Under battery power, the instrument
chassis may float to the potential of
the measured signal supplied by the
user.
Chassis Ground
Refer to manual for addi-
tional safety information.
Standby Power. Unit is not
completely disconnected
from AC mains when power
switch is in standby position.
CAT I
IEC Measurement Category I.
Do NOT connect inputs to AC
mains or to circuits derived
from AC mains.
1 Watt Max into 50W
!
Channel / Setup

53220A/53230A User’s Guide 5
Contents
1 Preparation for Use 11
Front and Rear Panel Overview 13
Front Panel 13
Rear Panel 14
Display 15
About the Instrument 15
Materials Included 15
Operating and Storage Environments 17
Electrical Requirements 18
Applying Power 18
Power-On LED Status 19
Standby Power 19
Battery Operation 20
Battery Care 22
Using Built-In Help 23
Utility Functions 23
Display Configuration 23
User Interaction 27
Reference Settings 28
How the User’s Guide is Organized 32

653220A/53230A User’s Guide
Contents
2 53220A/53230A Software Installation and Interface Configuration 35
Software Requirements 36
Using the Counter Web-Enabled Interface 37
Connecting the Counter and Viewing its Home Page 37
Web Interface Overview 39
Installing the Agilent IO Libraries 41
Installing Instrument Drivers 43
Adding Instruments to the PC Interface 43
Configuring the LAN Interface 44
Configuring the USB Interface 49
Configuring the GPIB Interface 52
Using Interactive IO 55
Firmware and Driver Updates 56
Disabling Calibration Security 56
SCPI Language Emulation Mode 57
Downloading and Installing the Update Utility 57
Downloading the Firmware Update 58
Installing the Firmware Update 58
Downloading IVI-COM Driver Updates 61
3 53220A/53230A Measurements 63
Counter Measurement Summary 64
Reference Oscillator Configuration 66
Reference Oscillator Source 66
Standby Power to the Reference Oscillator (Option 010) 70
Setting the Measurement Mode 71
Setting the Measurement Time Out 74
SCPI Syntax Conventions 75
The MEASure and CONFigure Commands 77
Using MEASure 79

Contents
53220A/53230A User’s Guide 7
Using CONFigure 79
Frequency and Period Measurements 81
Frequency 81
Frequency Ratio 83
Period 85
Time Stamp 87
Time Interval Measurements 90
Time Interval 90
Rise Time and Fall Time 94
Pulse Width 97
Duty Cycle 100
Phase 103
Single-Period 105
Totalizing Measurements 107
Gated 107
Continuous 110
Burst Pulse Measurements 112
Carrier Frequency 113
Pulse PRI and PRF 114
Positive and Negative Widths 117
4 53220A/53230A Input Signal Conditioning 119
Channel Characteristics 120
Signal Conditioning Path 120
Input Impedance 122
Input Range 124
Input Coupling 126
Bandwidth Limiting (Low-Pass) Filter 127
Threshold Level and Sensitivity 129
Burst Measurement Detector Threshold 136
Noise Rejection (Hysteresis) 137

853220A/53230A User’s Guide
Contents
Threshold Slope 139
Measuring Input Signal Levels and Signal Strength 140
5 Triggering and Gating 143
Settings Summary 144
Trigger and Gate Time Line 145
Trigger and Gate Cycle 145
System Trigger 148
Wait-For-Trigger and Triggered States 154
Measurement Gate 156
Gate Set Up 156
Frequency Measurements 158
Totalizing 165
Time Interval Measurements 170
Enabling Gate Signals on the ‘Gate In/Out’ BNC 172
Burst Carrier Frequency Measurements 173
Advanced Gate Control - Gate Start 177
Advanced Gate Control - Gate Stop Hold Off and Gate Stop 182
Automatic Gate Extension 189
6 53220A/53230A Math, Graphing, and Data Logging 191
Math Functions 192
Enabling the CALCulate1 Subsystem 193
Smoothing Data 194
Scaling Functions 195
Statistics 203
Limit Checking 208
Histograms 211
Viewing Histograms 212
Histogram Configuration 213

Contents
53220A/53230A User’s Guide 9
Trend Charts 224
Viewing Trend Charts 225
Data Logging 230
Graphics Functions and Reading Memory 236
7 Formats and Data Flow 237
Reading Formats and Data Flow 238
Specifying a Format 239
Setting the Block Transfer Byte Order 239
Data Flow 240
Counter File System 247
Creating Folders and Files in Flash Memory and on the USB Drive 249
User-Defined Power-On States 258
Managing Folders and Files 261
8 Instrument Status 267
Agilent 53220A/53230A Status System 269
Questionable Data Register Group 269
Standard Operation Register Group 270
Standard Event Register 272
Status Byte Register 273
A 53220A/53230A Error Messages 275
Index 289

10 53220A/53230A User’s Guide
Contents

11
Agilent 53220A/53230A 350 MHz Universal Counter/Timer
User’s Guide
Agilent Technologies
1
Preparation for Use
Front and Rear Panel Overview 13
Front Panel 13
Rear Panel 14
Display 15
About the Instrument 15
Materials Included 15
Operating and Storage Environments 17
Electrical Requirements 18
Applying Power 18
Power-On LED Status 19
Standby Power 19
Battery Operation 20
Battery Care 22
Using Built-In Help 23
Utility Functions 23
Display Configuration 23
User Interaction 27
Reference Settings 28
How the User’s Guide is Organized 32
Welcome. This user’s guide contains configuration and operating information
for the Agilent 53220A/53230A 350 MHz Universal Counter/Timer.
The 53220A/53230A is a 2U, 1/2-module width LXI Class C instrument. The
2U, 1/2-module width references refer to the 53220A/53230A’s physical size
relative to standard EIA rack cabinet dimensions. LXI, an acronym for LAN
eXtensions for Instrumentation, is an instrumentation standard for devices
that use the Ethernet (LAN) as their primary remote communications
interface.

12 53220A/53230A User’s Guide
1 Preparation for Use
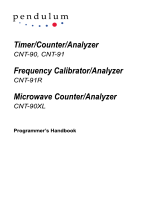
Figure 1-1. The 53220A/53230A Universal Frequency Counter/Timer.
Preset
Digits
Help
Utility
Shift
Graph
3
6
7
1
4
2
5
0
98
+/-
.
Math
Data
Log
Auto
Scale
Freq
Period
Time
Interval
Totalize
Measure View System
Trigger
Gate
Back
Local
321
Channel / Setup
1 Watt Max into 50W
!
53230A 350 MHz 20 ps
Universal Frequency Counter / Timer
.
Agilent
ABC
D
E
F
G
*
H
Opt 010 UOCXO
Line
100-240V, 50-60 Hz
100-127V, 400 Hz
90VA Max
USB LAN
Int Ref Out Trig In
Ext Ref In Gate In/Out
Ch 1 Opt 201 Ch 2
Opt 106/115
IECS / NMB-001
N10149
ISM 1-A
Intertek
Opt 300 Battery
A
B
C D
GP-IB
(53220A/53230A Only)
Opt 150 sw
(53230A Only)

53220A/53230A User’s Guide 13
Preparation for Use 1
Front and Rear Panel Overview
Figure 1-1 shows the front and rear panels of the Agilent 53230A 350 MHz
Universal Frequency Counter/Timer. The 53220A and the 53230A are
dimensionally identical and available with the same product options - with the
exception of Pulse Measurement Firmware Option 150 available with the
53230A only.
Front Panel
The shaded areas of the front panel represent keys that perform similar
functions. These areas are briefly described below.
A. Measure Keys - display soft key menus from which the measurement
function is selected. Auto Scale senses the input signal (greater than 100 Hz) on
input channel 1, 2, or 3 and automatically sets the range and input threshold
required to make the selected measurement. Counter measurements are
covered in Chapter 3.
B. View Keys - select how measurement data is displayed on the front panel.
Display configuration is covered later in this chapter. Graphics, math, and
data logging are covered in Chapter 6.
C. System Keys - provide instrument-wide configuration which includes
setting the counter preset state and access to utility functions and to the
counter’s built-in help system. For measurement configuration involving
numeric entry, Shift changes the key definitions to the numbers at the lower
left of the keys.
D. Channel Keys - select the input channel and displays the soft key menu
used to configure the input signal path. Note that Figure 1-1 includes Channel
3 Option 106 / 115. Signal path configuration is covered in Chapter 4.
E. Gate and Trigger Keys - select the gating and triggering soft key menus
used to control the measurement. Gating and triggering are covered in
Chapter 5.
F. Soft Keys - are the menus from which the counter is configured. The menus
and soft keys themselves are defined by the “functional” keys described above.
G. Power/Standby Button - switches the instrument between ‘on’ and ‘off’, or
between ‘on’ and ‘standby’.

14 53220A/53230A User’s Guide
1 Preparation for Use
Standby power (when enabled) is provided by the line voltage or Battery
Option 300 and is used to maintain the temperature of the oven-controlled
crystal oscillator (OCXO) - Option 010. See “Applying Power” in this chapter
for more information.
H. USB ‘Host’ Port - available for transferring measurement data and
instrument configurations between the counter and a USB storage device. The
front panel port is for information transfer only. The rear panel USB port is
used for instrument (I/O) control. Data flow is covered in Chapter 7.
Rear Panel
The 53230A rear panel shown in Figure 1-1 includes product Option 201
(parallel rear panel inputs) and GPIB interface. The rear panel
terminals are briefly described below.
A. Parallel Rear Panel Inputs - product Options 201 and 202 add parallel
inputs on the rear panel. Note that these ARE NOT separate inputs. Signals on
the center conductor of either panel’s channel BNCs are ALSO present on the
opposite panel’s center conductor. Signal path configuration is covered in
Chapter 4.
B. Ext Ref In - is the connector for providing an external reference oscillator
signal. Valid external refererence oscillator (time base) frequencies are 1, 5,
and 10 MHz.
Int Ref Out - is the connector for accessing the counter’s internal 10 MHz
reference oscillator. The oscillator signal is a 0.5 Vrms (into 50Ω) sine wave.
Reference oscillator usage and configuration are covered in Chapter 3.
C. Gate In/Out - is an input for external gate signals, and an output for
routing the counter’s internal gate to other devices. Additional information on
this connector is covered in the section “Enabling Gate Signals on the ‘Gate
in/Out’ BNC” in Chapter 5.
Trig In - is the connector for supplying an external trigger signal to the
counter. Triggering is covered in Chapter 5.
D. USB and LAN - are the standard input/output (I/O) ports. Configuration of
these ports and the GPIB interface is covered in Chapter 2.

53220A/53230A User’s Guide 15
Preparation for Use 1
Display
The layout of the 53220A/53230A display is shown in Figure 1-2.
Figure 1-2. The 53220A/53230A Display.
About the Instrument
This section lists the accessories shipped with the 53220A/53230A and
contains information on its specified operating and storage environments and
electrical requirements.
Materials Included
The following accessories are shipped standard with the 53220A/53230A
counter:
Channel Configuration
Main Measurement Display
Softkey Navigation
I
nput Settings
: measurement start edge
10% : trigger threshold
AC : input coupling (ac or dc)
1MW: input Impedance (1MW, 50W)
5V : input Range (5V, 50V, 500V)
Probe : probe enabled
BW : bandwidth filter enabled
Channel and Function
Soft Keys
S
econdary Measurements
Main Measurement
Data Entry Area
Status Indicators
RMT: remote (LAN, USB, GPIB) operatio
n
ExtRef: external frequency reference
ExtRef : invalid external reference
ExtTrig: external trigger source
Ch. 1 Ch. 2
Gate
Battery status:
charge level
black – user disabled
red – software disabled

16 53220A/53230A User’s Guide
1 Preparation for Use
1Power cord
2USB cable
3Agilent I/O Libraries Suite CD-ROM
4Agilent 53210A/53220A/53230A Product Reference CD-ROM
Additionally, your instrument may have shipped with one or more of the
following options installed.
Table 1-1. 53220A/53230A Product Options.
No Manuals?
There are three printed manuals available with the 53220A/53230A:
•Agilent 53220A/53230A Quick Start Tutorial (p/n 53220-90005)
•Agilent 53220A/53230A User’s Guide (p/n 53220-90001)
•Agilent 53210A/53220A/53230A Service Guide (p/n 53220-90010)
53220A
Opt. 010: Ultra High-Stability OCXO Timebase
Opt. 106: 6 GHz Microwave Input (Ch. 3)
Opt. 115: 15 GHz Microwave Input (Ch. 3)
Opt. 201: Add parallel Channel 1 and Channel 2 inputs on rear panel
Opt. 202: Install Option 106/115 on front panel
Opt. 203: Install Option 106/115 on rear panel
Opt. 300: Internal Lithium Ion Smart Battery and Charger
Opt. 400: GPIB Interface
53230A
Opt. 010: Ultra High-Stability OCXO Timebase
Opt. 106: 6 GHz Microwave Input (Ch. 3)
Opt. 115: 15 GHz Microwave Input (Ch. 3)
Opt. 150: Pulse Microwave Measurements (53230A only)
Opt. 201: Add parallel Channel 1 and Channel 2 inputs on rear panel
Opt. 202: Install Option 106/115 on front panel
Opt. 203: Install Option 106/115 on rear panel
Opt. 300: Internal Lithium Ion Smart Battery and Charger
Opt. 400: GPIB Interface
NOTE Each of the product options listed in Table 1-1 is available after the original purchase of the
instrument. Refer to the 53210A/53220A/53230A Service Guide (p/n 53220-90010) for
installation instructions for each of these options.

53220A/53230A User’s Guide 17
Preparation for Use 1
53220A/53230A Option 0B0 (delete printed manuals) is the default product
documentation option. If Option 0B0 was ordered, only the Quick Start
Tutorial and 53210A/53220A/53230A Product Reference CD-ROM are shipped
with the instrument. All manuals are available on the CD. To obtain printed
manuals from Agilent, contact your Agilent representative.
The 53220A and 53230A
Except where noted, the information contained in this user’s guide applies to
both the 53220A and 53230A.
Operating and Storage Environments
When operating the 53220A/53230A counter, note the following
environmental specifications:
When storing the 53220A/53230A counter, note the following storage
specification:
Use care when moving the counter from cold to warm conditions as
condensation may develop. Ensure that any condensation has evaporated and
that the counter has thermally stabilized before turning on the instrument.
Environment: EN61010, Pollution Degree 2; Indoor Locations
Temperature: 0 °C to +55 °C
Humidity: 5% to 80% RH (non-condensing)
Altitude: up to 3000 meters, or 10,000 feet
Temperature: -30 °C to +70 °C

18 53220A/53230A User’s Guide
1 Preparation for Use
Electrical Requirements
The electrical (power) requirements of the 53220A/53230A are summarized
below.
Line voltage and frequency are sensed at power on and no input power
adjustments (e.g. fuse changes, line voltage selection) are required.
Applying Power
Connect the power cord and press the “on/standby” button on the front panel
( ). During the power-on sequence the counter performs an auto-calibration
and self-test which includes:
•power supply verification
•FPGA test
•front panel verification
•measurement board verification
•channel 3 test (if present)
•Option 300 battery test (300 if present)
Power Supply: CAT I (do not connect to AC mains)
100 to 240V @ 50/60 Hz (-5% to +10%)
100 to 120V @ 400 Hz (+ 10%)
Power Consumption: 90 VA max when power is on or battery
option is charging. 6 VA max during
power off or standby
NOTE For additional information, refer to the Safety Information pages at the beginning of this
guide. For a complete list of 53220A/53230A product specifications, refer to the data sheet
included on the 53210A/53220A/53230A Product Reference CD (p/n 53220-13601), or on
the Web at:
www.agilent.com/find/53220A
www.agilent.com/find/53230A

53220A/53230A User’s Guide 19
Preparation for Use 1
Power-On LED Status
The led located under the on/standby button is an indication of the
on/off/standby condition of the instrument. The different conditions are
summarized in the table below. The ‘off’ status is determined by the presence
of OXCO Option 010.
Table 1-2. Power-On LED Status and Color.
Standby Power
The power modes of the 53220A/53230A counter are ‘on’ ‘off’, and ‘standby’.
In standby mode with the instrument connected to line voltage, standby power
is supplied to maintain the temperature within the ultra high-stability oven
controlled crystal oscillator (Option 010).
Battery Option 300 itself supplies standby power for the OCXO when the
53220A/53230A is not connected to line voltage.
Refer to “Standby Power to the Reference Oscillator” in Chapter 3 for
information on enabling/disabling standby power.
NOTE If the 53220A/53230A does not turn on when the on/standby button is pressed,
verify AC power is available to the instrument and that the power cord is securely
connected. If the instrument still does not turn on, the cooling fan is not audible,
or if the front panel display is off when power is applied, return the unit to Agilent
for repair.
Instrument ’Off’
Power Source Instrument
‘On’
OCXO w/
Standby
enabled
OCXO w/
Standby
disabled
No
OCXO
AC Line green amber off off
Opt. 300 Battery
(enabled)
green amber
(blinking)
off off
Opt. 300 Battery
(disabled)
off off off off

20 53220A/53230A User’s Guide
1 Preparation for Use
Cycling Power and Counter Accuracy
With standby power enabled, repeated power cycling (line or battery) does not
affect the standard or ultra-high stability OCXO.
Battery Operation
WARNING
During battery operation, the maximum measured signal supplied by the user is + 42V.
Also, connect the instrument chassis to earth ground during battery operation to mini-
mize shock hazard. Any interruption or disconnection of the protective earth terminal
will cause a potential shock hazard that could result in personal injury.
Under battery power, the instrument chassis may float to the potential of the measured
signal supplied by the user.
With Battery Option 300 installed and enabled, the 53220A/53230A counter
can be operated using battery power for up to three hours.
Removing AC power when the battery is enabled switches the counter to
battery power automatically with no interruption of operation. Similarly,
there is no interruption in the transition back to line power, provided line
power is connected before the battery is disabled.
/