Soundmaster NR917 User manual
- Category
- Audio turntables
- Type
- User manual
Soundmaster NR917 is an old fashion turntable AM/FM cassette CD/MP3 player with a stylish retro look and many playback functions. Listen to your favorite music on CD, cassette, AM/FM radio, or connect your phone via Bluetooth to stream your playlist wirelessly. You can also connect a USB stick or SD card to the device via the USB and SD slots.
Soundmaster NR917 is an old fashion turntable AM/FM cassette CD/MP3 player with a stylish retro look and many playback functions. Listen to your favorite music on CD, cassette, AM/FM radio, or connect your phone via Bluetooth to stream your playlist wirelessly. You can also connect a USB stick or SD card to the device via the USB and SD slots.


-
 1
1
-
 2
2
-
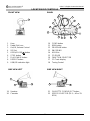 3
3
-
 4
4
-
 5
5
-
 6
6
-
 7
7
-
 8
8


Soundmaster NR917 User manual
- Category
- Audio turntables
- Type
- User manual
Soundmaster NR917 is an old fashion turntable AM/FM cassette CD/MP3 player with a stylish retro look and many playback functions. Listen to your favorite music on CD, cassette, AM/FM radio, or connect your phone via Bluetooth to stream your playlist wirelessly. You can also connect a USB stick or SD card to the device via the USB and SD slots.
Ask a question and I''ll find the answer in the document
Finding information in a document is now easier with AI
Related papers
-
Soundmaster ICD2020 User manual
-
Soundmaster DAB150 User manual
-
-
-
Soundmaster DAB80 User manual
-
Soundmaster UR580 User manual
-
Soundmaster SCD7900SW User manual
-
-
Soundmaster UR240 User manual
-
Soundmaster SCD1800 User manual
Other documents
-
 WOERLEIN Elite line DAB1000 User manual
-
Studebaker SB2135BT Owner's manual
-
 WOERLEIN Soundmaster UR2016 User manual
-
1byone Nostalgic Wooden Turntable 471NA-0007 User manual
-
Sylvania SRC2019AC Owner's manual
-
-
-
 Symphonic WF-13C1 User manual
-
 Symphonic SC319A User manual
-
 Symphonic SC313A User manual


