Page is loading ...

Volume: Modular Synthesis Plug-in System PLG100-XG
y
Power User
PLG100-XG: XG/GM Multi-Part Board
The PLG100-XG board is a 16-part multi-
timbral synthesizer. Sounds are accessed via
PERFORMANCE Mode as Parts 17-32 when used
in the S30/80 and CS6x/6R synthesizers (S/CS).
The board must be installed in slot 2. (Slot 1 on
the S30, which has only one slot). The PLG100-
XG board is unique and behaves differently than
the other PLG series boards. Even if you are
familiar with one or more of the PLG series you
will want to pay close attention to how this board
works within the S/CS products.
You select and play the PLG100-XG
sounds normally from Performance Edit mode.
Because the board is multi-timbral and built for
sequencing and sequence playback, you do not
access it from Voice mode. The PLG100-XG is
multi-timbral and like the internal S80, the mulit-
timbral mode is Performance mode.
The PLG100-XG Voices occupy MIDI
channels 1-16. But, hey so do the Internal Parts.
How do you not play both simultaneously?
First, press the [UTILITY] button and set
the main Receive Channel OFF (also called the
Basic Channel).
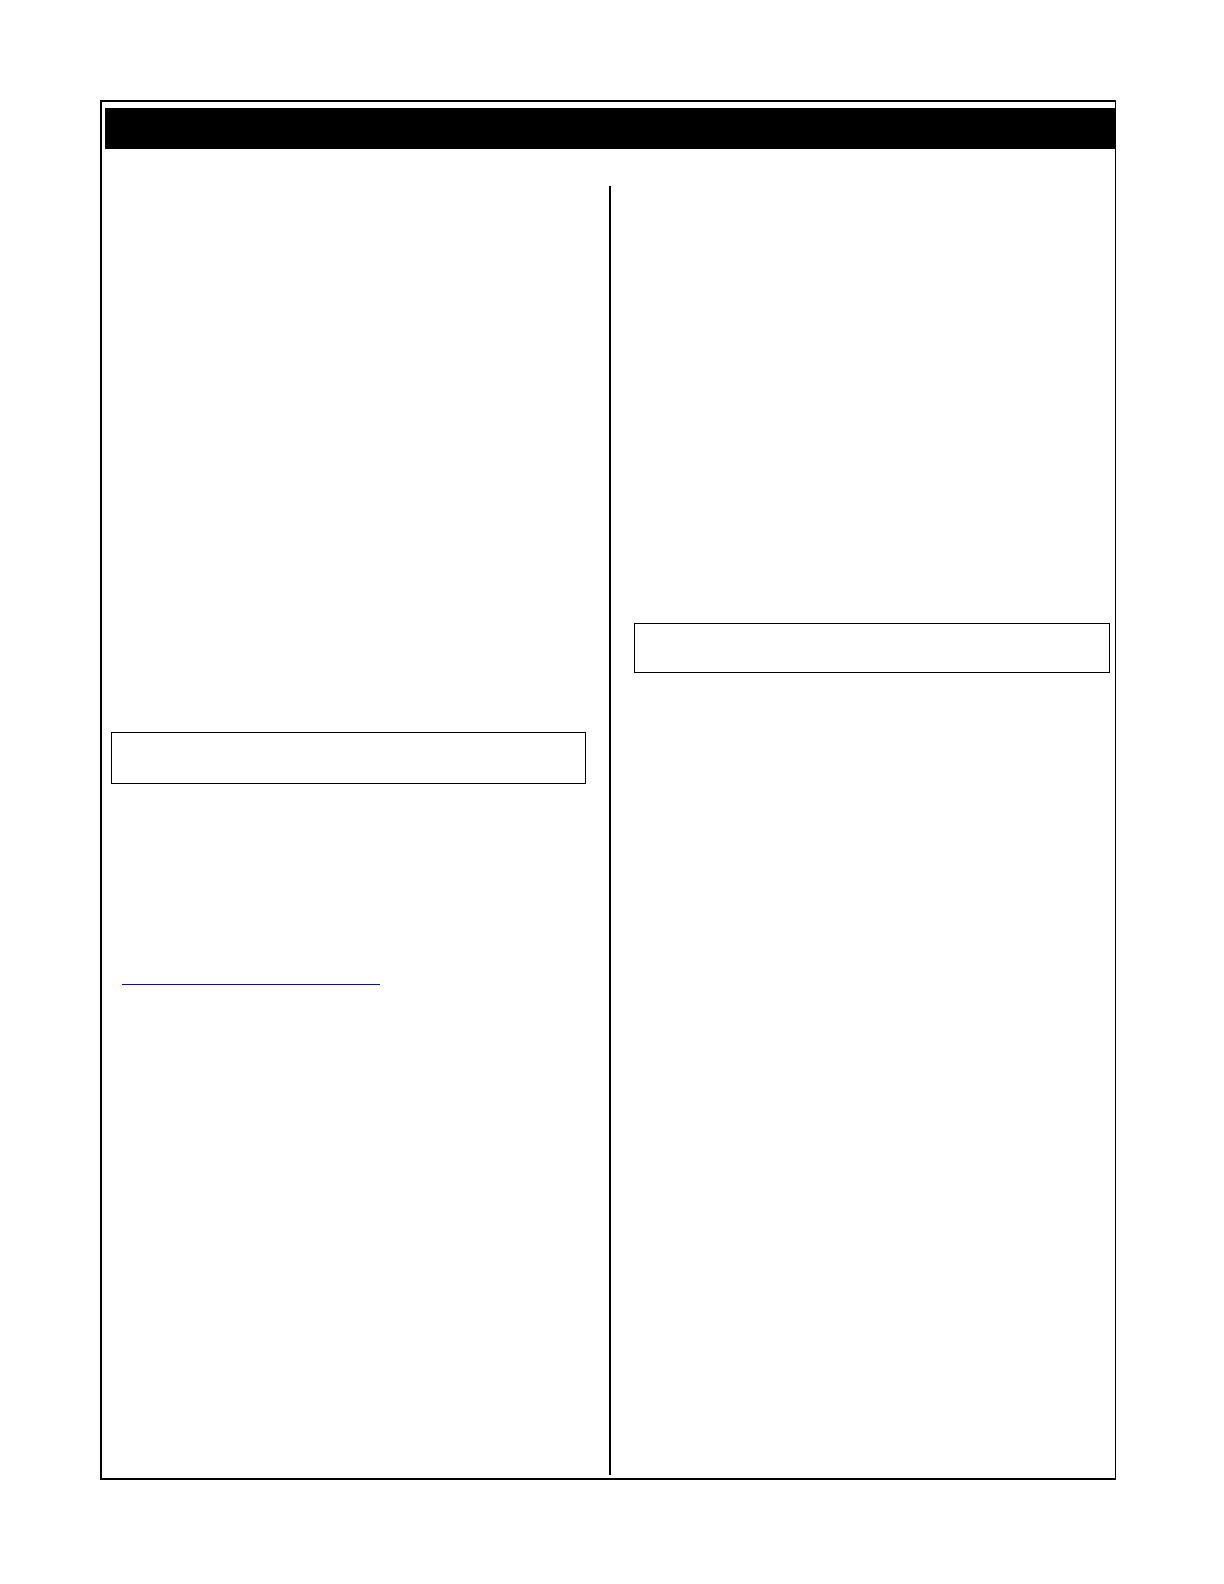
v MIDI Ch) Recv Trans Local DevNo
Sys off 1 on all
Fig: The Receive channel parameter is automatically
set to off when a GM/XG Reset command is received
and the INTERNAL PART parameter is set to ALL OFF
(the default condition).
To audition the sounds on the board:
• Select any Performance
• Press [EDIT]
• Use Knob ‘A’ to select Part 17; Knob ‘C’ to
advance through the sounds.
6MIX Vce) Bank Number
Part17 NORM/0004001(A01) [--:GrandPno]
• If you are hearing two parts layered this is because
both Part 1 and Part 17 default to the same MIDI
channel (1) and by default you are probably
transmitting on channel 1. If you wish to isolate
just the XG sounds, turn the basic MIDI receive
channel OFF. The basic Receive Channel is found
under [UTLITY]. (More on this later).
When you have a PLG100-XG board installed in a
host keyboard product you may want to turn the
basic Receive channel OFF. The advantages are
that you will be able to play just the PLG100-XG
sounds when you select them via Performance
Edit and they will not play in the background
when you want to play your internal Performance
Layers from Performance Play mode.
The way that the PLG100-XG works, you
can use any Performance to access the XG
sounds. They are separate from the rest of your
S/CS sounds. The GM/XG reset command in
conjunction with the INTERNAL PART
parameter (discussed in detail later in this
article) will automatically turn off unwanted parts
according to 3 different templates.
MULTI-TIMBRAL: PARTS and MIDI channels
Now let’s see how the Multi-timbral capability of
the S/CS series works wen you add a multi-part
board. The S30, S80, CS6x and CS6R are 16
MIDI channel systems. You have access to your
sounds in as a multi-timbral setup (called
Performance) via what are called PARTS. AWM2
sounds from [PRE1], [PRE2], [INT], and [EXT]
occupy Part01 through Part16. You may be
familiar with the PLG150 series boards (AN, DX,
PF and VL), which add a single PART to either
[PLG1] or [PLG2] as PartP1 and PartP2,
respectively. (Single part means they are only
capable of contributing a single sound at a time).
The PLG100-XG board is a multi-part board that
adds 16 additional AWM2 Parts to the system. A
Part is assigned a MIDI channel and you can
place as many Parts on a single MIDI channel as
you require. A Part can be key limited, velocity
limited, and edited as you deem necessary.
The purpose of the XG/GM board is principally to
playback MIDI song files that have been
specifically prepared to take advantage of the
XG/GM sound set and protocol. These prepared
XG/GM files will automatically setup and recall
the proper Voices and effects. It is important to
understand that although there are now 32
Parts, there are still only 16 MIDI channels in
PLG100-XG TUTORIAL
2 y
yy
y Power User
the system. This means that sounds will share
MIDI channels. You can layer PLG sounds with
internal AWM2 sounds or you can key zone them
to create splits on a particular channel. Or you
can use the XG sounds exclusively, or not at all.
Of course, you can change the MIDI channel of
any Part, as required.
Summary: As you add Plug in boards each will
have its own Part but share a MIDI channel with
one of the internal sounds. You can then choose
to layer (play together) or split (limit the key
range) the Parts on a single MIDI channel. You
also can turn each of the Parts ON or OFF, as
suits your needs. [Although the board goes into
slot 2, the [PLG2] bank button cannot be used to
access the XG Voices. They are only accessible
via a PERFORMANCE (edit).
Checking Installation
Check to make sure your board is properly
installed. Here’s how:
On the host: Press [UTILITY]
Use the MENU feature (SHIFT+PAGE) or PAGE
knob to navigate to the PLG Status screen
v
PLG Status> PLG1:PLG150-DX Expand
Plugin PLG2:PLG100-XG 4----
Figure 1: Your screen may differ according to which
boards you have. The “Expand” parameter will be
active only when you have two boards of the same type
installed and polyphony expansion is possible. The
PLG100-XG must occupy slot 2 in a S80, CS6x or
CS6R. The S30 has only one slot but it can use a
PLG100-XG.
For more details about XG visit the XG website at
http://www.yamaha-xg.com/ The source for all
things XG.
Specification and Operation
The PLG100-XG board has 480 normal
preset voices and 12 Drum kits. The technology
behind the XG board is AWM2 sample playback.
The board has its own Reverb, Chorus and
Variation processors. Variation is so called
because it is switchable between being a system-
wide effect (where all parts have a send to it)
and an Insertion Effect (where it is isolated on a
single part but can be manipulated via MIDI in
real time).
XG is a special protocol that features
more than 32 real time control change (cc)
messages that can be used to do everything from
tuning individual drums in real time to setting up
effect processors from the sequencer. XG is an
extended set of General MIDI that not only gives
you more sound selections, it lets you control the
performance of sounds remotely via MIDI
commands. Think of the set of 128 sounds as the
principal bank and in parallel banks you can
select alternate sounds. XG gives you access to
more sounds by listing the sounds in parallel
banks. You just need to use the correct bank
select code to access them (MSB/LSB bank select
commands). Even the PLG150 series boards have
XG extension banks that conform to the XG
standard – allowing you to select and substitute
sounds from alternate technologies within XG.
For example, you could substitute a DX electric
piano, a VL saxophone, an AN synth bass, or a
PF acoustic piano for the appropriate XG sound.
More on this feature in another Power User issue.
When you install the PLG100-XG board in
the host S/CS product, you have the option of
turning GM/XG Receive Switch ON. This is set
under [UTILITY] MIDI System – this screen will
only appear when a PLG100-XG board is
installed.
MIDI GM/XG Receive> Sw InternalPart
Sys on all off
Fig: shows the default condition - ready to playback
GM/XG song files when a reset message is received
Typically, the first command sent from a properly
prepared GM or XG file will be the GM reset and
/or XG ON command. A bit of explanation is due
here. In GM and XG modules the parameters that
edit Voices, the mix and the effects are not
stored in RAM, as with a typical synthesizer or
module – they are stored within the sequence
data. Typical GM modules do not have an internal
RAM bank that memorizes your multi – the multi
is stored in the so called “Setup Bar” in the song.
Each new song has its own setup – system
exclusive and Control Change messages that
represent every parameter. Therefore, the very
first event of a good GM/XG file will return all
parameters to a neutral condition via a RESET
command. RESET condition places a grand piano
in each channel except MIDI channel 10, which is
reserved for drum kits. It will return all pan
positions to center, all volumes to 100, all
reverbs to 40, all chorus sends to 0, and it will
neutralize all controllers. Following the reset
comes all the information to reconfigure the
song. The SETUP BAR (usually one measure) is a
very important concept within XG and GM. Open
the MIDI file that came with your PLG100-XG and
take a look at the first measure of track one in
your sequencers ‘event list’ view. What happens
to the internal S80/30, CS6/6R sounds when this
reset message is received via MIDI – that will
depend on the settings of the GM/XG receive
Switch and the appropriately named INTERNAL
PART parameter (as in, “What happens to the
Internal Parts?” parameter.
3 y
yy
y Power User
INTERNAL PART setting and GM/XG Resets
If you have the GM/XG Receive Switch ON and
the unit receives a GM ON and/or XG Reset
command from a sequencer or via MIDI, the
system will react in one of three ways, depending
on the setting of the [UTILITY] INTERNAL PART
parameter. The Internal Part parameter refers to
what will happen to the Internal S/CS Parts 1-
16 of a Performance when a reset is received -
for the S80, CS6x and CS6R this also includes
PartP1 (the PLG1) if a PLG150 series board is
installed in [PLG1]. These settings will determine
how your S/CS synth reacts when you playback a
GM/XG song file.
When GM/XG is ON and INTERNAL PART =
ALL OFF: only the XG board parts will be output.
When a GM ON/XG Reset command is received,
MIDI Receive channels of the internal sounds are
turned OFF - including the main Basic Receive
Channel in Utility mode – only the XG board
sounds will be output. The PLG100-XG Parts 17-
32 will occupy MIDI channels 1-16. All Internal
host sounds will be shut off, including the PartP1
(PLG1). This is the default condition. This
effectively makes the S/CS host a GM/XG device.
XG default condition will place a Grand Piano on
all XG parts 17-25, 27-32; Part 26 (MIDI Ch.
10) will be Standard Drum Kit; Parts 17-32 will
occupy MIDI channels 1-16.
When GM/XG is ON and INTERNAL PART =
ALL PART: with this setting you can combine or
replace any of the 16 PLG100-XG sounds with
internal sounds of the S/CS. All parts are output
and available for use. You access sounds by
assigning their receive channels 1-16. (You can
mute any internal or PLG1 sound by setting its
receive channel to OFF.) The internal parts
maintain their MIDI channel assignments -
including the main Basic Channel setting. The XG
sounds will reset to the default XG condition.
Your selected internal S/CS sounds can be stored
with the Performance – the XG setup must be
stored in the song data.
When GM/XG is ON and INTERNAL PART =
LAYER PART: this setting will let you combine
an internal Performance Layer sound with a 16-
part XG setup. Any internal part that has its
Layer Switch set to ON (up to a maximum of 4
Parts) will be active along with the XG board
sounds. In this manner you can play a
Performance Layer sound on top of a GM/XG
sequence. A Performance Layer refers to a sound
that is made up from up to 4 internal Voices –
(one of which can be a PLG1 sound). The other
individual internal parts will have their MIDI
receive channel set to OFF, and only those with
the LAYER switch ON will be active. The setting
of the basic Receive Channel in [UTILITY] will not
change. You can play the internal layer sound(s)
on the Layer Channel as set in Performance
Common (see below) for details). The XG sounds
will reset to the default XG condition.
TRY IT: You can experiment with how this all
works by sending an XG reset command to the
S/CS from the XGworks 3.0 Lite software or the
XG Editor software. Here’s how: From the main
track screen you will see an XG icon on the
toolbar,
x
. Clicking this will launch the XG Editor
(Mac users - XG Editor is a stand-alone
program). Once the XG Editor screen is open you
will see another small XG icon on the toolbar of
the editor
x
– this one will automatically send
the XG Reset message, which looks like this:
F0 43 10 4C 00 00 7E 00 F7
Experiment with sending this to see how your
synth’s PERFORMANCE mode responds to the
various settings.
SOME PRACTICAL APPLICATIONS
Playing back GM/XG files: ALL OFF
If your intention is to playback an XG or GM file
using just the PLG100-XG board sounds, you will
want to set the MIDI System [UTILITY] page with
GM/XG Receive Switch ON and the INTERNAL
PART parameter set to ALL OFF. In this
condition, when Reset command (usually the first
event of a well-prepared GM/XG file) is sent it
will turn the receive channel OFF for all Internal
parts and let the XG board sounds have exclusive
access to the 16 MIDI channels. You can choose
any Performance because the Reset will insure
that only the XG Voices will be heard. Program
Changes to Internal sounds is not possible.
Combining and/or Replacing PLG100-XG
sounds with S/CS sounds: ALL PART
If you want to replace some of the GM/XG
sounds with rich Internal sounds, set the
INTERNAL PART parameter to ALL PART.
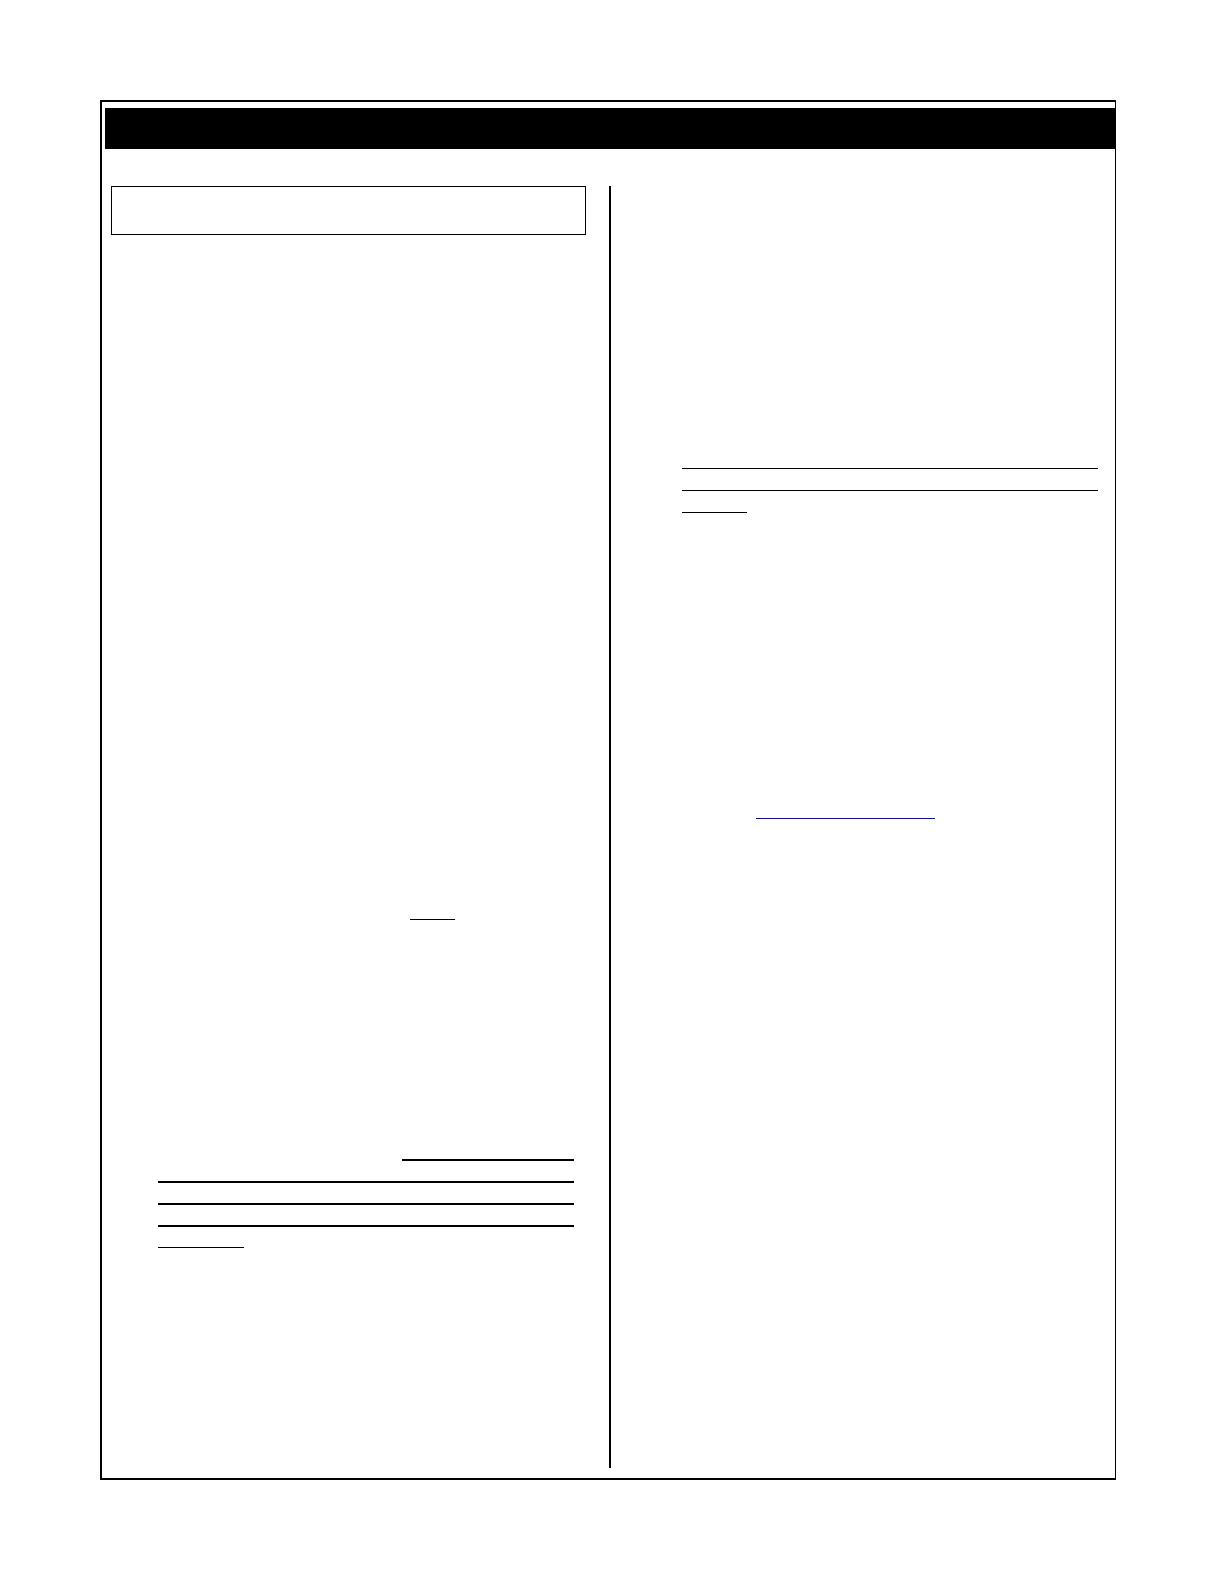
MIDI GM/XG Receive) Sw InternalPart
Sys on 4all part
To activate an internal sound you need to set the
RECEIVE channel for the Part. The MIDI receive
channel is found in each Performance part on the
“LYR Mode” screen. From [PERFORM] mode,
press [EDIT]. You can select an Internal Part for
editing by turning Knob A or touching the
Program buttons [1]-[16], or [PLG1] directly.

4 y
yy
y Power User
Use the PAGE knob to scroll down to it (shown
below).
For example, let’s say you want to replace the
XG sound for MIDI channel 6 with an internal
sound: Activate the MIDI receive channel for
PART 6. Set the other internal Parts to RcvCh
OFF, Parts01-05, and Parts07-16:
vLYR Mode) Mode Arp Layer RcvCh
Part 06 poly off off 406
You can deactivate the XG sound on channel 6 by
locating its corresponding PART and turning the
RECEIVE channel to OFF. Part 22 will correspond
to ch06 (see chart 2). To select Part 22 you must
use Knob A.
vLYR Mode) RcvCh
Part 22 4off
Fig: Notice that the XG Parts do not have a Layer
Switch.
This will effectively replace the PLG100-XG sound
with the Internal sound selected for Part 6. If you
use a bank select / program change message to
select the Internal PART 06 sound in the track
controlling MIDI channel 6, it will automatically
silence the XG part. A Bank Select/PC for the
S/CS sound will send the XG board to a ‘silent’
Voice. (Each bank of sounds has its own unique
bank message).
The chart below lists the MSB/LSB and
Program Change range for the various Memory
host locations. Obviously, the order in which the
events occur is important. For example, bank
select and program changes for individual PARTS
should always follow those that select the
Performance (common sense rules here). The
Single # column is for systems that only allow a
single number for bank select (i.e., Cakewalk).
Bank Select and Program Change Information
Change individual PARTS within a PERFORMANCE
--Bank Select--
MEMORY MSB LSB PC Single #
Preset 1 63 0 0-127 8064
Preset 2 63 1 0-127 8065
INT 63 8 0-127 8072
EXT 63 9 0-127 8073
PLG1 63 24 0-63 8088
PLG2 63 25 0-63 8089
Drum Preset 63 32 0-7 8096
Drum INT 63 40 0-1 8104
Drum EXT 63 41 0-1 8105
To select a Performance*
INT PERFORM 63 64 0-127 8128
EXT PERFORM 63 65 0-63 8129
CLIP KIT (CS6) 63 104 0-3 8168
*requires a main Receive channel setting
Chart 1:
For information on the XG Bank Select and Program
Change messages see the PLG100-XG booklet.
In order for you to prevent a GM/XG program
change from adversely affecting the internal
Parts, you can deactivate the Program Change
setting for each internal Part that you want to
use in place of an XG sound. Use your PAGE knob
to locate the Receive Switch 4 (RCV Sw4) page
that lets you turn Bank Select and PC to OFF for
the PART (shown below). The internal sounds
used will be memorized in the S/CS Performance
– XG sounds will be recalled via Bank Select and
Program changes in the song data. XG setups are
not stored in S/CS Performances.
vRCV Sw 4) BankSel PgmChng CtrChng
Part06 off off on
PLG MIDI
Part Channel (default)
17 1
18 2
19 3
20 4
21 5
22 6
23 7
24 8
25 9
26 10 Drums default channel
27 11
28 12
29 13
30 14
31 15
32 16
Chart 2
Playing a Performance Layer sound along
with an XG sequence: LAYER PART
If you want to play along with a GM/XG
MIDI sequence using an internal S/CS
Performance Layer sound (up to 4 internal
sounds) - set the MIDI Sys page in [UTILITY]
Internal Part parameter as follows:
MIDI GM/XG Receive) Sw InternalPart
Sys on 4layer part
Any sound from Part 1-16 (internal) and PartP1
(Plug-in 1) can be activated for real time play by
turning the LAYER switch ON for that part.
vLYR Mode) Mode Arp Layer RcvCh
PartP1 poly off 4on off
Parts with the LAYER SWITCH ON Parts receive on the
Layer Channel - which is programmable per
Performance (shown below):
5 y
yy
y Power User
GEN MIDI Arp Out ArpCh LayerCh
Common off 1 1
Fig: Each Performance can store its own Layer Channel
setting (MIDI channel on which the 4 Parts are
communicated with). Selection is 1-16, or Basic
Channel. Found in the Common parameter area.
Summary: Basically, any Performance will do
when you use the ALL OFF setting. If you have
favorite Performance Layer sounds that you want
to feature in a MIDI sequence, use the LAYER
PART setting. Simply adjust the Performance’s
Layer Channel, as necessary, and turn off the
internal parts you do not need. If you want to
creatively replace some or eventually all the
sounds of GM or XG sequence, use the ALL PART
setting. You may want to store a template
Performance that has all the internal Parts 1-16
and PartP1 (PLG1) set to receive channel = OFF
and the PC set to OFF as well. This way you can
activate them, as you need them. XG setups can
only be stored via System Exclusive and Control
Change messages – they are not stored in the
Performance.
Things you must know about using the
PLG100-XG board in the S/CS synths
• The primary purpose of the PLG100-XG
board in the S/CS system is to bring GM/XG
playback compatibility to the unit.
• The PLG100-XG sounds are accessed from
PERFORMANCE mode only. You will see it as
PARTS 17-32, while internal AWM2 sounds
occupy Parts 1-16. You must access the
board from Performance EDIT via KN A. The
[PLG2] button is not active with a PLG100-
XG board installed.
• The PLG100-XG can only occupy slot 2 in the
S80/CS6x and CS6R (the multi-timbral slot).
The S30 only has only one slot but it is
capable of using the PLG100-XG board.
• There are 16 MIDI channels in the system –
you can choose to combine (split/layer)
internal Voices with the XG sounds or you
can replace them. The [UTILITY]
INTERNAL PART parameter will
determine how the host responds when
a GM Reset or XG ON command is
received. Even though the XG board is Parts
17-32, it will use MIDI channels 1-16.
• The best way to access the XG multi-part
system, when sequencing, is via the provided
XG Editor. The software allows you to easily
navigate through the 480 XG Voices and 12
drum kits via an organized category listing.
The way that GM/XG systems work is that
program setups are stored as part of the
sequence data. Usually found at the very
beginning of all properly prepared GM/XG
files are the reset commands. A GM ON/XG
RESET command returns all settings to
default values: Grand Piano on MIDI
channels 1-9, 11-16, standard GM drum kit
on channel 10; volumes set to 100; pan to
center; Reverb to 40; chorus send to 0; etc.
In the very first bar you would put all your
setup data, i.e., bank select/program
change, volume, setting for the effects, pan
and so on. The XG Editor lets you set
everything using a graphic interface map and
when you have it sounding just as you like,
you can have the software create (insert) the
entire XG parameter setup into the sequence
for you. This includes all effect routing, voice
selections and the GM/XG reset commands –
it is all done for you (icon on the toolbar for
Insert XG Parameter). Or you can store this
setup data separately and send it prior to
playing back the file. If you are not using
XGworks as your principal sequencer you will
want to download an instrument
definition/mixer map/environment for the
PLG100-XG for the software you are using.
You should be able to find XG maps for most
of the popular sequencing programs. Look
up a program called XG-edit (for Windows
and Mac). You can find this at the Yamaha
site: www.xgfactory.com Look under
Shareware.
• If you do not have a mixer map or definition
and you are not using XGworks, good-luck
selecting sounds. No, just kidding. It can be
done. It is just that there are a lot of sounds
to wade through. Recognize that the Program
Changes in the XG protocol 1-128 call up the
basic GM sound and in parallel banks XG
offers substitutes. For example, sound #82 is
Saw Ld (sawtooth lead) but in parallel banks
you will find 12 substitutes for the sawtooth
lead. Use knob C to select individual program
changes and knob B to move through parallel
banks. Sound #34 is Fingered Bass (Electric
Bass w/Finger) but in bank 65 you will find a
fingered bass with a modulation effect, “Mod
Bass”. You may wonder why the basic sound
is repeated so much – well in other products
you may find a different substitute in those
repeated slots. The MU128 and MU2000 will
offer more selections as substitutes for that
program change number. But if someone
prepared an XG file using a ‘fingered bass’
substitute sound that you did not have, well
you would still get the basic fingered bass
sound – you just wouldn’t know you were
missing it! (This illustrates some of the
important features of XG: compatibility,
scalability and expandability.
6 y
yy
y Power User
• It is normal for the screen of the host S/CS
product not to reflect the settings and
program names as you change data in the
software. You will hear the results, however,
but the screen will not update. This may
seem a bit strange at first but is due in part
to the fact that the screen is part of the host,
not the PLG board, after all. It will only
reflect selections you make via its front
panel. The Board does not have a screen but
uses the computer to help you select sounds.
Don’t panic if you hear a flute and the S/CS
screen reads Grand Piano. This is normal
when you are using the computer to edit the
PLG100-XG board.
• In order to view the names of the selected
instruments in an XG song file: open the XG
Editor prior to beginning playback of the
song. When you start playback from
XGworks, the setup bar will cause the
software to show you the names and the
mixer setup for the file.
• XG Parts 17-32 are not stored in the S/CS
Performance. All GM/XG parameters must be
stored in the sequence data (setup bar). All
data concerning the Internal or PLG1 banks
will be stored in the S/CS Performance.
• Bank select and Program change messages
can help you distinguish between the
PLG100-XG sounds and the sounds of the
mother. A bank select/program change
command for the internal sounds will send
the corresponding XG board PART to a ‘silent’
Voice. Bank Select/Program messages can be
blocked for internal parts, as necessary.
Tips: Troubleshooting
• A GM ON/XG Reset message will, under the
default conditions, turn all Internal parts of a
Performance (Part01-Part16, and PartP1, to
OFF. It also turns the overall basic MIDI
receive channel OFF in UTILITY. Any system
(main Receive) Program Changes that follow
this will be ignored.
MIDI Ch) Recv Trans Local DevNo
Sys off 1 on all
• When not using the XG board you can set
the main Receive channel to OFF in [UTILITY]
(see figure above) – this will let you play just
Internal sounds from Play mode and not
have to hear the XG board.
• You will only need the Basic Receive Channel
in a scenario where you need to send the
entire unit a Program Change. For example,
you want to select an entire Performance
remotely from the sequence. You can
actually place the message in the sequence.
In this case you would have to select a main
Receive channel on which you are going to
send the selection messages. A Basic Receive
Channel can be set and maintained when you
are using the LAYER PART and ALL PART
(Internal PART) settings, not with an ALL
OFF setting – when ALL OFF is select the
basic channel will be switched OFF. The
timing sequence of Bank Select and Program
Change messages is important.
• Even with the main Receive channel in the
OFF position individual Parts of your
Performance will receive all MIDI messages.
• If you are getting multiple sounds playing a
part of music, please check and set the
Internal Part parameter appropriately in
[UTILITY]. Check your receive channel
assignments. And verify that a GM or XG
reset is included in the song file.
• Remember that 3 Parts can default to
channel 16: Part 16 (host AWM2 sound), Part
32 (PLG100-XG) and PartP1 (PLG150 board).
• Internal S/CS sounds will be stored in the
S/CS Performance – XG setups are not
stored in the Performance. The PLG100-XG
voice and effect setups should be stored as
part of the sequence song data.
• Go to www.yamaha-xg.com for more details
on the expert use of XG – it is much deeper
than most people think. There is an excellent
tutorial on XGworks. Also point your browser
to www.xgcentral.com to find tons of XG files
made by end users from all over the world.
• If you are getting no sound from any Parts,
Performances or Voices, try the Master
Volume in [UTILITY]. Some song files have a
fade out and leave the Master Volume set to
0 (another good reason to use reset
commands). If you stop a song during a fade
out you may inadvertently lower the volume
of the entire machine.
Prepared by: Phil Clendeninn
Product Marketing Specialist
Digital Musical Instruments
©Yamaha Corporation of America
/