Page is loading ...

363911
Video Kit
Manuale installatore • Installation manual
LE08972AF-01PC-20W03

Video Kit
3
230 Vac
230 Vac 12 V
230 Vac
230 Vac 12 V
*
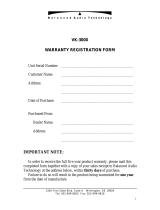
• Vecchio impianto a campanello
Impianto esistente con 3 fili e sola chiamata.
• Old system with bell
Existing system with 3 wires and just call.
• Ancienne installation a sonnette
Installation existante à 3 fils et un seul appel.
• Alte klingelanlage
Vorhandene 3-Leiter Anlage nur mit Ruffunktion.
• Vieja instalación con timbre
Instalación existente con 3 hilos y una llamada.
• Oude deurbelinstallatie
Bestaande 3-aderige installatie met alleen een
oproepfunctie.
• Antiga instalação em campaínha
Instalação existente com 3 fios e somente
chamada.
• Stara instalacja dzwonkowa
Istniejąca instalacja 3-przewodowa tylko z funkcją
dzwonka
• Nuovo impianto citofonico
Impianto realizzato senza modifiche ai 2 fili
esistenti: chiamata, videocitofono e serratura.
• New door entry system
System made without modifications to the 2 existing
wires; call, video handset and electric door lock.
• Nouvelle installation phonique
Installation réalisée sans modifications sur les 2 fils
existants: appel, vidéophone, et serrure électrique.
• Neue haustelefonanlage
Anlage ohne Änderungen an den vorhandenen
2 Leiter: Ruffunktion, Gegensprechanlage und
elektrisches Schloss.
• Nueva instalación interfónica
Instalación realizada sin las modificaciones a los 2
hilos existentes: llamada, videoportero y cerradura
eléctrica.
• Nieuwe deurtelefooninstallatie
Installatie aangelegd zonder wijzigingen aan de
2 bestaande aders: oproep, beeldhuistelefoon en
elektrisch deurslot.
• Nova instalação do intercomunicador
Instalação realizada sem modificar os 2 fios
existentes: chamada, intercomunicador vídeo e
fechadura eléctrica.
• Nowy system wideodomofonowy
Instalacja realizowana bez modyfikacji istniejącego
okablowania (2 przewody) z funkcjami systemu
wideodomofonowego
* Acquistabile separatamente
* Can be purchased separately
* Vendu séparément
* Auf Anfrage getrennt erhältlich
* A la venta por separado
* Apart verkrijgbaar
* Adquirível separadamente
* Dodatkowy aparat zamawiany oddzielnie

4
D
B C
A
>0,2 mm
2
BTicino
L4669
0,35 mm
2
0,28 mm
2
BTicino
C9881U/5E
AWG24 UTP5
BTicino
336904
One PTT
278 TP
0,28 mm
2
OneSYT
+ Digital
TP
5/10
OneSYT
+ Num
TP
5/10
GIGA TW
CAT5E
AWG24
One SYT
+ Num TP
8/10
Cable
ARB.6060-1
6/10
Cable
EV6R
6/10
1
mm
2
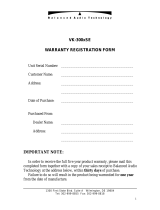
A 50 m 140 m 145 m 200 m 200 m 145 m 200 m 50 m –
B 50 m 115 m 80 m 200 m 115 m 80 m 200 m 50 m –
C 50 m 100 m 65 m 200 m 100 m 65 m 200 m 50 m –
D 30 m 30 m – 50 m 30 m – – – 100 m
• Cavi e distanze (mm
2
)
• Cables and distances (mm
2
)
• Câbles et distances (mm
2
)
• Kabeln und Abstände (mm
2
)
• Cables y distancias (mm
2
)
• Kabels en afstanden (mm
2
)
• Cabos e distâncias (mm
2
)
• Przekrój przewodu (mm
2
) a odległość

Video Kit
5
•
Schema monofamiliare
•
One-family diagram
•
Schéma mono-familial
•
Schema Einfamilienhaus
•
Esquema monofamiliar
•
Schema eensgezins
•
Esquema monofamiliar
•
Schemat dla domu jednorodzinnego
N
= –
= –
T = –
S = –
P
= –
–
=
ON
OFF
P
= –
= –
= –
= –
M
J2
J1
N
= –
= –
2
1
BUS
PL S+
S-
A
B
BUS5M 21 1
1 Monofamiliare - One family - Mono-familial - Einfamilienhaus
Monofamiliar - Eengezins - Monofamiliar - Jednorodzinny
2 Bifamiliare - Two family - Bi-familial - Zweifamilienhaus
Bifamiliar - Tweegezins - Bifamiliar - Dwurodzinny
• A Pulsante locale apertura serratura.
B Chiamata al piano.
S+ S- 18 V; 4 A impulsivi. 250 mA mantenimento (30 Ω max).
• A Door lock release local pushbutton.
B Floor call.
S+ S- 18 V; 4 A impulsive. 250 mA holding current (30 Ω max).
• A Bouton local ouverture serrure.
B Appel à l’étage.
S+ S- 18 V; 4 A impulsifs. 250 mA entretien (30 Ω max).
• A Lokale Schlossöffnungstaste.
B Etagenruf.
S+ S- 18 V; 4 A impulsstrom. 250 mA Haltestrom (30 Ω max).
• A Pulsador local apertura cerradura.
B Llamada al piso.
S+ S- 18 V; 4 A por impulsos. 250 mA mantenimiento (30 Ω max).
• A Lokale knop opening slot.
B Oproep aan verdieping.
S+ S- 18 V; 4 A impulsief; 250 mA onderhoud (30 Ω max).
• A Botão local de abertura da fechadura.
B Chamada ao piso.
S+ S- 18 V; 4 A instantâneos. 250 mA continuos (30 Ω max).
• A Lokalny przycisk otwarcia zamka
B Wywołanie z przycisku dzwonka
S+ S- 18V; 4A impuls, 250 mA podtrzymanie (maks. 30 Ω)

6
• Schema bifamiliare 1
• Two-family diagram 1
• Schéma bi-familiale 1
• Schema Zweifamilienhaus 1
• Esquema bifamiliar 1
• Schema tweegezins 1
• Esquema bifamiliar 1
• Schemat dla domu dwurodzinnego - 1
*
ON
OFF
ON
OFF
P
= –
= –
= –
= –
M
J2
J1
N
= –
= *1
P
= –
= –
= –
= –
M
J2
J1
N
= –
= –
BUS
PL S+
S-
N
= –
= –
T = –
S = –
P
= –
–
=
2
1
A
B
BUS5M 21 1
B
BUS5M 21 1
1 - Monofamiliare - One family - Mono-familial
- Einfamilienhaus Monofamiliar - Eengezins
- Monofamiliar - Jednorodzinny
2 - Bifamiliare - Two family - Bi-familial
- Zweifamilienhaus Bifamiliar - Tweegezins
- Bifamiliar - Dwurodzinny
• Nota: è possibile installare un solo Classe300X per ogni rete Wi-Fi (SSID)
• Nota: It is possible to install just one Classe300X for each Wi-Fi (SSID) network
• Note : il est possible d’installer un seul dispositif Classe 300X pour chaque réseau Wi-Fi (SSID)
• Anmerkung: es kann nur ein Gerät Classe 300X für jedes Wi-Fi-Netz (SSID) installiert werden
• Nota: se pueden instalar un solo Classe300X por cada red Wi-Fi (SSID)
• Opmerking: per WiFi-netwerk (SSID) kan slechts één Classe300X worden geïnstalleerd
• Nota: é possível instalar apenas um Classe300X para cada rede Wi-Fi (SSID)
• Uwaga: dla jednej sieci Wi-Fi (SSID) można zainstalować wyłącznie 1 aparat Classe300X
* • Il secondo posto interno ed il configuratore 3501/1 devono essere acquistati separatemente.
• The second internal unit and the 3501/1 configurator must be purchased separately.
• Le deuxième poste interne et le configurateur 3501/1 doivent être achetés séparément.
• Die zweite Hausstation und der Konfigurator 3501/1 werden getrennt verkauft.
• La segunda unidad interior y el configurador 3501/1 se han de comprar por separado.
• De tweede binnenpost en de configurator 3501/1 moeten apart worden gekocht.
• A segunda unidade interna e o configurador 3501/1 devem ser adquiridos separadamente.
• Dodatkowy aparat wewnętrzny oraz konfigurator 3501/1 zamawiane oddzielnie.
• A Pulsante locale apertura serratura.
B Chiamata al piano.
S+ S- 18 V; 4 A impulsivi. 250 mA mantenimento (30 Ω max).
• A Door lock release local pushbutton.
B Floor call.
S+ S- 18 V; 4 A impulsive. 250 mA holding current (30 Ω max).
• A Bouton local ouverture serrure.
B Appel à l’étage.
S+ S- 18 V; 4 A impulsifs. 250 mA entretien (30 Ω max).
• A Lokale Schlossöffnungstaste.
B Etagenruf.
S+ S- 18 V; 4 A impulsstrom. 250 mA Haltestrom (30 Ω max).
• A Pulsador local apertura cerradura.
B Llamada al piso.
S+ S- 18 V; 4 A por impulsos. 250 mA mantenimiento (30 Ω max).
• A Lokale knop opening slot.
B Oproep aan verdieping.
S+ S- 18 V; 4 A impulsief; 250 mA onderhoud (30 Ω max).
• A Botão local de abertura da fechadura.
B Chamada ao piso.
S+ S- 18 V; 4 A instantâneos. 250 mA continuos (30 Ω max).
• A Lokalny przycisk otwarcia zamka
B Wywołanie z przycisku dzwonka
S+ S- 18V; 4A impuls, 250 mA podtrzymanie (maks. 30 Ω)

Video Kit
7
• Schema bifamiliare 2
• Two-family diagram 2
• Schéma bi-familiale 2
•
Schema Zweifamilienhaus 2
• Esquema bifamiliar 2
• Schema tweegezins 2
• Esquema bifamiliar 2
• Schemat dla domu dwurodzinnego - 2
BUS
PL S+
S-
ON
OFF
ON
OFF
P
= –
= –
= –
= –
M
J2
J1
N
= –
= *1
P
= –
= –
= –
= –
M
J2
J1
N
= –
= –
N
= –
= –
T = –
S = –
P
= –
–
=
2
1
A
B
BUS5M 21 1
B
BUS5M
2
1
1
*
* • Il secondo posto interno ed il configuratore 3501/1 devono essere acquistati separatemente.
• The second internal unit and the 3501/1 configurator must be purchased separately.
• Le deuxième poste interne et le configurateur 3501/1 doivent être achetés séparément.
• Die zweite Hausstation und der Konfigurator 3501/1 werden getrennt verkauft.
• La segunda unidad interior y el configurador 3501/1 se han de comprar por separado.
• De tweede binnenpost en de configurator 3501/1 moeten apart worden gekocht.
• A segunda unidade interna e o configurador 3501/1 devem ser adquiridos separadamente.
• Dodatkowy aparat wewnętrzny oraz konfigurator 3501/1 zamawiane oddzielnie.
1 - Monofamiliare - One family - Mono-familial
- Einfamilienhaus Monofamiliar - Eengezins
- Monofamiliar - Jednorodzinny
2 - Bifamiliare - Two family - Bi-familial
- Zweifamilienhaus Bifamiliar - Tweegezins
- Bifamiliar - Dwurodzinny
• Nota: è possibile installare un solo Classe300X per ogni rete Wi-Fi (SSID)
• Nota: It is possible to install just one Classe300X for each Wi-Fi (SSID) network
• Note : il est possible d’installer un seul dispositif Classe 300X pour chaque réseau
Wi-Fi (SSID)
• Anmerkung: es kann nur ein Gerät Classe 300X für jedes Wi-Fi-Netz (SSID) installiert
werden
• Nota: se pueden instalar un solo Classe300X por cada red Wi-Fi (SSID)
• Opmerking: per WiFi-netwerk (SSID) kan slechts één Classe300X worden
geïnstalleerd
• Nota: é possível instalar apenas um Classe300X para cada rede Wi-Fi (SSID)
• Uwaga: dla jednej sieci Wi-Fi (SSID) można zainstalować wyłącznie 1 aparat
Classe300X

8
BUSPL S+
S-
N
= –
= –
T = –
S = –
P
= –
–
=
8 A cosφ = 1
4 A cosφ = 0,7
3 A cosφ = 0,4
24 Vdc; 24 Vac
24 Vac
24 Vac
NO
NC
C
346250 (*)
S-
S+
C
NC
NO
A
* • Fornito a corredo.
• Supplied.
• Fourni.
• Wird mitgeliefert.
• En dotación.
• Standaard meegeleverd.
• Fornecido no equipamento base.
• W zestawie
• Opzione serratura a relè
• Relay door lock option
• Option serrure à relais
• Option Relais-Schloss
• Opción cerradura de relé
• Optie relaisslot
• Opção trinco de relê
• Opcja z przekaźnikiem dla
zamka
• A Pulsante locale apertura serratura.
S+ S- 18 V; 4 A impulsivi. 250 mA mantenimento (30 Ω max).
• A Door lock release local pushbutton.
S+ S- 18 V; 4 A impulsive. 250 mA holding current (30 Ω max).
• A Bouton local ouverture serrure.
S+ S- 18 V; 4 A impulsifs. 250 mA entretien (30 Ω max).
• A Lokale Schlossöffnungstaste.
S+ S- 18 V; 4 A impulsstrom. 250 mA Haltestrom (30 Ω max).
• A Pulsador local apertura cerradura.
S+ S- 18 V; 4 A por impulsos. 250 mA mantenimiento (30 Ω max).
• A Lokale knop opening slot.
S+ S- 18 V; 4 A impulsief; 250 mA onderhoud (30 Ω max).
• A Botão local de abertura da fechadura.
S+ S- 18 V; 4 A instantâneos. 250 mA continuos (30 Ω max).
• A Lokalny przycisk otwarcia zamka
S+ S- 18V; 4A impuls, 250 mA podtrzymanie (maks. 30 Ω)

Video Kit
9
194 mm
162 mm
25 mm
100 mm
190 mm
26 mm
• Altezza consigliata salvo diversa normativa vigente.
• Recommended height, unless different regulations are specified.
• Hauteur conseillée sauf autre norme en vigueur.
• Empfohlene Höhe falls die gesetzlichen Vorschriften nichts anderes vorschreiben.
• Altura recomendada salvo normativa vigente diferente.
• Aanbevolen hoogte behoudens andere normen in voege.
• Altura aconselhada a não ser se a norma em vigor for diferente.
• Zalecana wysokość montażu o ile inne wymagania lub normy nie stanowią inaczej
160 – 165 cm
90–130 cm
• Dati dimensionali
• Dimensional data
• Données dimensionnelles
• Maße
• Datos dimensionales
• Formaatgegevens
• Dados dimensionais
• Dane wymiarowe
• Campo di ripresa
• Field of view
• Éclairage cadrage caméra
• Aufnahmebereich
• Campo de filmación
• Campo de filmagem
• Opnameveld
• Pole widzenia kamery
50 cm
105°
140 cm
80°
115 cm
50cm

10
1
2
3
4
4
6
7
16
15
14
12
13
11
10
9
8
1 - Telecamera
2 - LED illuminazione campo di ripresa
3 - Morsetti di collegamento
4 - Pulsanti di chiamata
5 - LED connessione attiva
6 - Posizione antenna lettore badge
7 - LED indicazione porta aperta
8 - Microfono
9 - Regolazione microfono
10 - Regolazione altoparlante
11 - Switch mono/bifamiliare
12 - Pulsante programmazione badge/Reset
13 - Pannello LED per illuminazione pulsante di
chiamata
14 - Sede dei configuratori
15 - Sensore di luminosità per retroilluminazione
notturna
16 - Altoparlante
1 - Caméra
2 - Voyant éclairage champ de cadrage
3 - Bornes de branchement
4 - Boutons d’appel
5 - Position antenne lecteur badge
6 - Voyant connexion active
7 - Voyant indication porte ouverte
8 - Micro
9 - Réglage micro
10 - Réglage haut-parleur
11 - Commutateur mono/bi-familial
12 - Bouton de programmation badge/Reset
13 - Panneau Voyant d’éclairage bouton d’appel
14 - Logement des configurateurs
15 - Capteur de luminosité pour rétro-éclairage
nocturne
16 - Haut-parleur
1 - Camera
2 - Viewing field lighting LED
3 - Connection clamps
4 - Call pushbuttons
5 - Position of the key card reader aerial
6 - Active connection LED
7 - Open door notification LED
8 - Microphone
9 - Microphone adjustment
10 - Loudspeaker adjustment
11 - One-family/two-family switch
12 - Key card programming pushbutton / Reset
13 - LED panel for call pushbutton lighting
14 - Configurator socket
15 - Brightness sensor for night backlighting
16 - Loudspeaker
• Posto esterno
• Entrance panel
• Poste extérieur
• Türstation
• Placa exterior
• Externe plaats
• Unidade externa
• Panel zewnętrzny
5

Video Kit
13
L’immagine rappresenta il dispositivo con tutte le funzioni abilitate. Verifica sul manuale installatore come abilitare le funzioni.
I manuali completi sono disponibili sul sito: www.bticino.com
Nota: nel momento in cui l’app DOOR ENTRY è collegata con l’impianto (es. rispondere ad una chiamata, visualizzare un Posto Esterno, ecc.), non si possono
eseguire altre operazioni ad eccezione del tasto apertura serratura e Tasto Preferiti (configurato per la funzione Luci Scale o Comando Diretto Serratura ) che
continuano a funzionare.
Note: when the DOOR ENTRY is connected to the system (e.g. answer a call, display an Entrance Panel, etc.), no operations can be made, with the exception of
the door lock release key and Favorite Key (configured for the Staircase Light or Door Lock Direct Control functions) that continue to operate.
1 - 7” (Touch screen) display
2 - OFF key
3 - App: touch to display the information page where
you find a QR code that allows the download of the
DOOR ENTRY app to interact with your device
4 - Date and time
5 - Wi-Fi Connection
6 - Device/app association and enabled/disabled for-
warding of call
7 - Bell exclusion
8 - Office activation
9 - Answering machine activation
10 - Microphone
11 - Quick actions
12 - Tactile guides for the blinds
13 - Connection key:
The green LED flashes to indicate an incoming call
The green LED comes on steady to indicate that
there is an active call
14 - Auto-switching on/Cycling:
The red LED turns on when the key is pressed
15 - Favorites Key: the red LED turns on when the key is
pressed (Basic configuration = STAIRCASE LIGHT. For
a different configuration refer to the physical con-
figuration table in the following pages.)
16 - Door lock release key:
The red LED turns on when the key is pressed
17 - Wi-Fi Status:
Red LED flashing = Wi-Fi is active but not connected
to a network
LED off = disabled or properly functioning Wi-Fi
Green LED fixed = the Classe 300X is exchanging
data with the DOOR ENTRY app (forwarding of call,
auto-switching on, configuration)
18 - Message status:
Red LED flashing = new unread note/s or message/s
in the answering machine
19 - Bell exclusion Status: Red LED on = Call bell disabled
20 - Functions (only the icons for the configured func-
tions are displayed)
21 - Configurator seat (See “Configurator Functions”)
22 - Configurator J1: remove if the additional power sup-
ply is present (clamp 1 and 2)
23 - J2 configurator: for correct operation do not remove
24 - Line termination ON/OFF micro-switch
25 - Mini USB socket for device Firmware update
26 - Loudspeaker
27 - Additional power supply clamps (1 - 2)
28 - 2 WIRE SCS/BUS connection clamps
29 - Clamps ( ) for the connection of an external call
to the floor pushbutton
30 - Additional bell connection clamps (1 - 5M) Point-to-
Point connections are required on the clamps of the
additional bells
Wireless device in compliance with 802.11b/g/n standard, frequency 2.4 – 2.4835 GHz, transmission power < 20 dBm.
WEP/WPA/WPA2 safety protocol.
The image shows the device with all its functions enabled. Check on the Installer Manual how to enable the functions.
The complete manuals are available on the website: www.bticino.com

20
4
3
5
* Per garantire l’impermeabilità montare le guarnizioni a corredo.
* To guarantee water tightness make sure to t the seals supplied.
* Pour garantir l’imperméabilité, monter les joints fournis à cet eet.
* Um die Abdichtung sicherzustellen, montieren Sie die mitgelieferten Dichtungen.
* Montar las juntas de la dotación para garantizar la impermeabilidad.
* Monteer de geleverde pakkingen om de waterdichtheid te waarborgen.
* Para garantir a impermeabilidade, montar as vedações fornecidas juntamente.
* Aby zagwarantować nieprzemakalność, zamontuj dostarczone uszczelki.
**
2
*
*
1
• Installazione posto esterno
• Entrance panel installation
•
Installation du poste extérieur
• Installation der Türstation
•
Instalación de la placa exterior
• Installatie externe plaats
•
Instalação da unidade externa
• Instalacja panelu zewnętrznego
** Prima dell’installazione assicurarsi che la vite sia completamente avvitata.
** Before installing make sure that the screw is completely tightened.
** Avant l’installation, s’assurer que la vis soit complètement vissée.
** Vor der Installation sicherstellen, dass die Schraube richtig festgeschraubt ist.
** Antes de la instalación, compruebe que el tornillo esté completamente enroscado.
** Vóór de installatie controleren of de schroef volledig vastgedraaid is.
** Antes da instalação vericar se o parafuso está completamente atarraxado.
** Przed zainstalowaniem upewnić się, czy śruba jest całkowicie dokręcona

Video Kit
21
1
2
3
4
5
• Die Kamera darf nicht vor starken Lichtquellen oder an Orten installiert werden, wo das Subjekt sich im Gegenlicht befindet. Farbkameras besitzen bei schlechter Beleuchtung
eine geringere Empfindlichkeit als Schwarz/Weiß Kameras. Wir empfehlen daher eine zusätzliche Beleuchtungsquelle vorzusehen.
• La telecámara no debe ser instalada delante de fuentes luminosas grande en lugares en donde el individuo filmado se encuentre demasiado en contraluz. Las
telecámaras en colores presentan, en condiciones de escasa luminosidad, una sensibilidad inferior respecto a las telecámaras en blanco/negro. Por lo tanto es
aconsejable en ambientes escasamente iluminados prever una fuente de iluminación extra.
• Installeer de camera niet tegenover grote lichtbronnen of op plaatsen waar de opname van het onderwerp door sterk tegenlicht wordt gestoord. Camera’s met zijn bij een
zwakke verlichting minder gevoelig dan zwart-wit camera’s. Daarom is het raadzaam om zwak verlichte omgevingen van extra verlichting te voorzien.
• A câmara não deve ser montada diante de fortes fontes de luz, ou então em lugares onde o elemento que deve ser filmado fique muito em contraluz. As câmaras em
cores apresentam, quando há pouca luminosidade, uma sensibilidade inferior em relação às câmaras em branco e preto. Portanto, recomenda-se, quando os ambientes
forem pouco iluminados providenciar uma fonte de iluminação adicional.
• Kamera nie może być zainstalowana naprzeciw silnych źródeł światła, lub w miejscach, gdzie obiekt filmowany pozostaje w cieniu. W miejscach, gdzie występuje słabe
oświetlenie, zalecane jest zamontowanie dodatkowego oświetlenia pola widzenia kamery.
• La telecamera non deve essere installata di fronte a grandi sorgenti
luminose, oppure in luoghi dove il soggetto ripreso rimanga molto
in controluce. Le telecamere a colori presentano, in condizioni di
scarsa luminosità, una sensibilità inferiore rispetto alle telecamere
in bianco/nero. Si consiglia pertanto, in ambienti poco illuminati di
prevedere una fonte di illuminazione aggiuntiva.
• The camera must not be installed in front of large light sources, or in
places where the subject viewed remains in deep shadow. In poor
lighting conditions colour cameras are less sensitive than black/white
cameras. An extra lighting source should be added in poorly lit rooms.
• La télécaméra ne doit pas être installée en face de fortes sources
lumineuses, ou bien dans des endroits où le sujet pris reste très
à contre-jour. Les télécaméras couleurs présentent, dans des
conditions de faible luminosité, une sensibilité inférieure aux
télécaméras noir/blanc. Il est donc conseillé, dans des milieux peu
éclairés, de prévoir une source de lumière supplémentaire.

Video Kit
23
• Configurazione posto esterno
• Entrance panel configuration
• Configuration poste extérieur
• Konfiguration Türstation
• Configuración placa exterior
• Configuratie externe plaats
•
Configuração unidade externa
• Konfiguracja panelu zewnętrznego
P T S N
P
- Possono non essere configurati.
- They do not need to be configured.
- Ils peuvent ne pas être configurés
- Brauchen nicht konfiguriert zu werden.
- Pueden no precisar configuración.
- Kunnen niet worden geconfigureerd.
- Podem não serconfigurados.
- Nie wymagają konfiguracji
N
S
T
- Temporizzatore serratura (vedi tabella).
- Door lock timer relay (see table).
- Temporisation serrure (voir tableau).
- Zeitgeber schlossrelaiscerradura (siehe Tabelle).
- Temporizador relé cerradura (véase la tabla).
- Timer deurslotrelais (zie de tabel).
- Temporizador do relé da fechadura (veja a tabela).
- Czas otwarcia zamka (patrz tabela poniżej)
– 1 2 3 4 * 5 6 7
4 s 1 s 2 s 3 s
**
6 s 8 s 10 s
- Dispositivo di comunicazione contactless operante alla frequenza di 125kHz. Potenza di trasmissione < 66dBuA/m a 10m.
- Contactless communication device which works at the frequency of 125kHz. Transmission power < 66dBuA/m at 10m
- Dispositif de communication sans contact qui fonctionne à la fréquence de 125kHz. Puissance de transmission < 66dBuA/m à 10m.
- Kontaktloses Kommunikationsgerät mit einer Frequenz von 125kHz. Übertragungsleistung 66dBuA/m in 10m
- Dispositivo de comunicación sin contacto que trabaje con la frecuencia de 125kHz. Potencia de transmisión < 66dBuA/m a 10m.
- Contactloos communicatieapparaat dat werkt met een frequentie van 125kHz. Zendvermogen < 66dBuA/m a 10m.
- Dispositivo de comunicação sem contato que atua na frequência de 125 kHz. Potência de transmissão < 66dBuA/m a 10m.
- Urządzenie z czytnikiem zbliżeniowym wykorzystującym częstotliwość 125 kHz. Moc transmisji <66dBuA/m przy 10m
• Tutte le volte che si modifica la configurazione è necessario togliere e ridare
l’alimentazione all’impianto, attendendo circa 1 minuto.
• Every time the configuration is altered the system must be switched off and
back on again, waiting for about 1 minute.
• Chaque fois que l’on modifie la configuration, il faut retirer, puis redonner
l’alimentation à l’installation, après avoir attendu environ 1 minute.
• Jedes Mal, wenn die Konfiguration geändert wird, den Strom abschalten,
etwa 1 Minute warten und dann wieder einschalten.
• Cada vez que modifica la configuración, es necesario cortar y volver a dar
alimentación a la instalación, después de esperar aproximadamente 1 minuto.
• Na iedere wijziging in de configuratie moet de installatie ongeveer 1 minuut
van het elektriciteitsnet worden afgesloten.
• Todas as vezes que se modificar a configuração é necessário ligar e desligar
a instalação da energia eléctrica, esperando cerca de 1 minuto.
• Po każdej zmianie konfiguracji konieczne jest wyłączenie zasilania systemu i
ponowne włączenie go po upływie ok. 1 min.
* Funzionamento come pulsante per max. 10 sec. dopodichè entra in stand-by. Per estendere tale funzionamento oltre i 10 sec. utilizzare l’attuatore 346210 configurato con MOD=5.
** Come pulsante da Posto Interno o Pulsante locale. 4S con apertura tramite Badge residenti.
* Operation as pushbutton for 10 sec. max after which it goes in stand-by. In order to extend this type of operation over 10 seconds, use the actuator, item 346210 configured with MOD=5.
** As pushbutton from Internal Unit or local Pushbutton. 4S with release using resident Key cards.
* Fonctionnement comme bouton pendant 10 sec. max., ensuite passe en stand-by. Pour étendre ce fonctionnement au-delà de 10 sec., utiliser l’actionneur 346210 configuré sur MOD=5.
** Comme bouton de Poste interne ou Bouton local. 4S avec ouverture avec Badges résidents.
* Die Tastenfunktion dauert max. 10 sec.; danach schaltet sie auf Standby. Um diese Funktion zu verlängern und mehr als 10 sec. dauern zu lassen, den Aktor 346210 verwen-
den und mit MOD=5 konfigurieren.
** Als Taste einer Hausstation oder als lokale Taste. 4S mit Öffnung durch das Badge der Bewohner.
* Funcionamiento como pulsador durante al máx.10 s. después se pone en standby. Para ampliar dicho funcionamiento a más de 10 s., use el actuador 346210 configurado con MOD = 5.
** Como pulsador en la unidad interior o pulsador local. 4S con apertura mediante una credencial de residentes.
* 10 sec. lange werking als knop, vervolgens vindt de overschakeling naar stand-by plaats. Laat deze functie langer dan 10 sec. duren met behulp van de actuator 346210 die
als MOD=5 is geconfigureerd.
** Als knop binnenpost of lokale knop. 4S met opening met inwonersbadge.
* Funcionamento como botão por um máximo de 10 segundos, depois disto dispõe-se em standby. Para prolongar este funcionamento por mais de 10 segundos, utilizar
o atuador 346210 configurado com MOD=5.
** Como botão de Unidade Interna ou Botão local. 4S com abertura por meio dos Crachás residentes.
* Działanie przy naciśnięciu przycisku przez maks. 10 sek. a następnie przechodzi w tryb czuwania. Aby osiągnąć czas dłuższy niż 10 sek. należy użyć aktora przekaźnikowego
346210 skonfigurowanego z MOD=5.
** Działanie przy naciśnięciu przycisku aparatu wewnętrznego lub lokalnego przycisku otwarcia zamka. Przy otwarciu brelokiem czas wynosi 4 sek.

24
• Programmazione Badge
• Badge programming
• Programmation des badges
• Badge programmieren
• Programación de credenciales
• Badge Programmeren
• Programação do Crachá
• Programowanie breloków zbliżeniowych
• Nuovo badge gestore impianto
Per motivi di sicurezza è previsto un badge “Gestore“ programmato direttamente dall’installatore. Per accedere alla
programmazione di un badge “RESIDENTE” è necessario essere in possesso di un badge gestore impianto.
Il posto esterno segnalerà l’avvenuta accettazione o cancellazione del badge con segnali acustici e visivi dei led
presenti sul posto esterno.
La presentazione di un badge non riconosciuto o un errore di programmazione, comporta l’interruzione della
procedura e la segnalazione tramite un beep lungo e l’accensione dei LED connessione e serratura.
Nota: Il badge gestore impianto non comanda la serratura ma abilita solo la programmazione dei badge residenti.
• New manager master badge
For safety reasons, a “MASTER” badge is required, directly programmed by the installer. To access the programming of a
“RESIDENT” badge you must be in possession of a system operator badge.
The entrance panel will notify that the badge has been accepted or deleted by means of sound notifications, as well as
visual indications using the LEDs on the entrance panel.
The presentation of an unrecognised badge or a programming error will lead to interruption of the procedure. A signal
will be given by means of a long beep and the connection and door lock LED will light up.
Note: The system management key card does not control the door lock but only enables the resident key card
programming.
• Nouveau badge master de gestion
Pour des raisons de sécurité, est prévu un badge “MASTER“ programmé directement par l’installateur. Pour
accéder à la programmation d’un badge «RÉSIDENT», il est nécessaire de disposer d’un badge master de gestion
installation.
Le poste externe signale l’acceptation ou l’élimination du badge par des signaux sonores et visuels et par
l’allumage des leds présents sur le poste externe.
La présentation d’un badge non reconnu ou une erreur de programmation provoque l’interruption de la procédure
et l’émission d’un bip prolongé avec allumage des voyants connexion et serrure.
Note: le badge administrateur de l’installation ne commande pas la serrure mais active uniquement la
programmation des badges résidents.
• Neuer Master-Verwaltungs-Badge
Aus Sicherheitsgründen ist ein „MASTER“-Badge vorgesehen, der direkt vom Installateur programmiert wird. Damit
können die anderen Badges (Bewohner) programmiert werden.
Die Türstation meldet die erfolgte Annahme oder Löschung des Badges durch akustische und visuelle Led-Signale, die an
derselben vorgesehen sind.
Das Vorlegen eines nicht erkennbaren Badges oder ein Programmierungsfehler, unterbricht die Prozedur und erzeuge
eine Meldung durch einen langen Piepton und das Aufleuchten der LED Verbindung und Schloss.
N.B.: Das Badge Anlagenbetreiber steuert nicht das Schloss sondern aktiviert nur die Programmierung der
Bewohnerbadges.
• Nueva credencial maestra de administrador
Por razones de seguridad se prevé una credencial “maestra” programada directamente por el instalador. Para
acceder a programar una credencial “RESIDENTE” se ha de poseer una credencial de administrador del sistema.
La placa exterior indicará si acepta o cancela unacredencial con unaseñal acústica y visual de los leds incorporados
en la placa exterior.
La presentación de una credencial no reconocida o un error de programación interrumpe el procedimiento y se
produce la indicación mediante un beep largo y el encendido de los LEDs de conexión y cerradura.
Nota: La credencial gestor del sistema no acciona la cerradura sino que habilita solamente la programación de los
credenciales residentes.
• Nieuwe master beheerder badge
Om veiligheidsredenen is een “beheerdersbadge” voorzien die direct door de installateur wordt geprogrammeerd. Voor
toegang tot de programmering van een “INWONERSBADGE” moet over een beheerdersbadge worden beschikt
Het externe punt geeft met behulp van geluids- en lichtsignalen van de leds op het externe punt aan of de badge
geaccepteerd of gewist is.

Video Kit
27
• Cancellazione badge gestore impianto
• Deleting the manager master badge
• Élimination badge master de gestion
• Master-Verwaltungs-Badge löschen
• Cancelación de una credencial maestra de administrador
• Master beheerder badge wissen
• Cancelamento de crachá master gestor
• Skasowanie breloka administratora
• Tenere premuto il pulsante di programmazione fino al
lampeggio del LED Serratura e tono di conferma.
• Press and hold down the programming pushbutton until the Door
lock LED starts flashing, and a confirmation sound is heard.
• Maintenir enfoncée la touche de programmation jusqu’à ce que le
LED Serrure clignote et que la tonalité de confirmation soit émise.
• Programmierungstaste gedrückt halten, bis die LED des Schlosses
blinkt und das Bestätigungssignal ertönt.
• Mantenga apretado el pulsador de programación hasta que
parpadea el LED Cerradura y se emite el tono de confirmación.
• Houd de programmeringsknop ingedrukt tot de LED Slot knippert
en u ter bevestiging een geluidssignaal hoort.
• Mantenha carregado o botão de programação até o lampejo do
LED da Fechadura e o tom de confirmação.
• Przytrzymać przycisk programowania do momentu aż LED
otwarcia zamka zacznie migać i pojawi się dźwięk potwierdzenia.
1 beep
1 beep
1 beep
1 Piepton
1 bip
1 beep
1 beep
1 dźwięk
≥ 5s
• Ripremere il pulsante di programmazione per 10 secondi.
Quando la cancellazione è avvenuta si accende il LED Serratura
e il dispositivo emette 2 beep.
• Press the programming pushbutton again for 10 seconds.
When the cancellation is completed, the Door lock LED comes, on
and the device emits 2 beeps.
• Appuyer à nouveau sur le bouton de programmation pendant
10 secondes.
Une fois l’effacement obtenu, le LED Serrure s’allume et le
dispositif émet 2 bips.
• Die Programmierungstaste 10 Sekunden lang drücken.
Nach erfolgter Löschung leuchtet die LED des Schlosses auf und die
Vorrichtung erzeugt 2 Pieptöne.
• Vuelva a apretar el pulsador de programación unos 10 segundos.
Cuando la cancelación se produce, se ilumina el LED Cerradura
y el dispositivo emite 2 bips.
• Druk nogmaals 10 seconden lang op de programmeringsknop.
De LED Slot gaat branden en u hoort een geluidssignaal als de
badge is gewist.
• Carregar de novo no botão de programação por 10 segundos.
Uma vez que interveio o cancelamento, acende-se o LED da
Fechadura e o dispositivo emite 2 beepw.
• Przytrzymać przycisk programowania ponownie przez 10 sek.
Po skasowaniu LED otwarcia zamka zaświeci się i pojawią się 2
dźwięki potwierdzenia.
≥ 10s
2 beep
2 beep
2 beep
2 Piepton
2 bip
2 beep
2 beep
2 dźwięki

28
• Avvicinare al lettore il badge gestore impianto fino al
lampeggio del LED Serratura e tono di conferma.
• Move the system manager badge close to the reader until the
Door lock LED flashes, and a confirmation sound is heard.
• Approcher le Badge administrateur installation du lecteur
et attendre que le LED Serrure clignote et qu’une tonalité
de confirmation soit émise.
• Dem Lesegerät das Badge des Anlagenbetreibers nähern, bis die
LED des Schlosses blinkt und das Bestätigungssignal ertönt.
• Acerque al lector la credencial del administrador del sistema
hasta que parpadea el LED de la Cerradura y se produzca el
tono de confirmación.
• Houd de installatiebeheerder badge voor het leesapparaat tot de
LED slot gaat knipperen en u ter bevestiging een geluidssignaal hoort.
• Aproxime ao leitor o Crachá gestor da instalação até o lampejo
do LED da Fechadura e o tom de confirmação.
• Zbliżyć Brelok administratora do obszaru czytnika panelu i
zaczekać na zaświecenie się LED otwarcia zamka i pojawienie się
sygnału dźwiękowego.
1 beep
1 beep
1 beep
1 Piepton
1 bip
1 beep
1 beep
1 dźwięk
• Gestore impianto
• Manager master
• Master de gestion
• Master Verwaltung
• Credencial maestra de
administrador
• Master beheerder
• Master gestor
• Master Administratora
• Programmazione badge residente
• System management key card programming
• Programmation badge résident
• Programmierung des Badges Bewohner
• Programación de la credencial del residente
• Programmering inwonersbadge
• Programação de crachá residente
• Programowanie breloka mieszkańca
• Avvicinare al lettore il badge residente da memorizzare,
fino all’accensione del LED Serratura e tono di conferma.
Per programmare altri badge residenti, avvicinarli al
lettore entro 30 secondi dal precedente. Per confermare
la fine della programmazione avvicinare badge gestore
impianto oppure attendere 30 secondi. Due beep brevi
confermano l’avvenuta programmazione.
• Badge residente
• Resident badge
• Badge résident
• Bewohner-Badge
• Credencial residente
• Inwonerbadge
• Crechá residente
• Brelok Mieszkańca
2 beep
2 beep
2 beep
2 Piepton
2 bip
2 beep
2 beep
2 dźwięki
• Move the resident badge to save close to the reader until the Door
lock LED flashes, and a confirmation sound is heard. If program-
ming other resident badges, move each one close to the reader
within 30 seconds from the previous one. To confirm that the
programming procedure has been completed move the system
manager badge close, or wait 30 seconds. Two short beeps confirm
that programming has been successful.
• Approcher le Badge résident à mémoriser du lecteur et at-
tendre que le LED Serrure clignote et qu’une tonalité de confir-
mation soit émise. Pour programmer d’autres badges résidents,
les approcher du lecteur dans les 30 secondes l’un après l’autre.
Pour confirmer la fin de la programmation, approcher le badge
master de gestion installation ou bien attendre 30 secondes.
Deux bips brefs confirment la programmation.
• Dem Lesegerät das Badge des Bewohners nähern, das gespeichert
werden soll, bis die LED des Schlosses blinkt und das Bestätigungs-
signal ertönt. Um weitere Badge zu programmieren, diese inner-
halb von 30 Sekunden nach dem vorhergehenden dem Lesegerät
nähern. Um das Ende der Programmierung zu bestätigen, das
Badge des Anlagetreibers nähern oder 30 Sekunden warten. Zwei
kurze Pieptöne bestätigen, dass die Programmierung erfolgt ist.
• Acerque al lector la credencial residente que desea memorizar
hasta que parpadea el LED de la Cerradura y se produzca el
tono de confirmación. Para programar otras credenciales resi-
dentes, es preciso acercarlas al lector antes de 30 segundos.
Acerque al lector la credencial residente que desea memorizar

30
• Cancellazione di tutti i badge residenti in memoria
• Cancellation of all the residents badges saved in the
memory
• Effacement de tous les badges résidents mémorisés
• Alle gespeicherten Badges der Bewohner löschen
• Cancelación de todas las credenciales residentes
memorizadas
• Alle inwonerbadges uit het geheugen wissen
• Cancelamento de todos os crachás residentes na memória
• Kasowanie z pamięci wszystkich breloków mieszkańca
• Avvicinare al lettore il badge gestore impianto fino al
lampeggio del LED Serratura e tono di conferma.
• Move the system manager badge close to the reader until the
Door lock LED flashes, and a confirmation sound is heard.
• Approcher le Badge administrateur installation du lecteur
et attendre que le LED Serrure clignote et qu’une tonalité
de confirmation soit émise.
• Dem Lesegerät das Badge des Anlagenbetreibers nähern, bis die
LED des Schlosses blinkt und das Bestätigungssignal ertönt.
• Acerque al lector la credencial del administrador del sistema
hasta que parpadea el LED de la Cerradura y se produzca el
tono de confirmación.
• Houd de installatiebeheerder badge voor het leesapparaat tot de
LED slot gaat knipperen en u ter bevestiging een geluidssignaal hoort.
• Aproxime ao leitor o Crachá gestor da instalação até o lampejo
do LED da Fechadura e o tom de confirmação.
• Zbliżyć Brelok administratora do obszaru czytnika panelu i
zaczekać na zaświecenie się LED otwarcia zamka i pojawienie się
sygnału dźwiękowego.
1 beep
1 beep
1 beep
1 Piepton
1 bip
1 beep
1 beep
1 dźwięk
• Gestore impianto
• Manager master
• Master de gestion
• Master Verwaltung
• Credencial maestra de
administrador
• Master beheerder
• Master gestor
• Master Administratora
• Riavvicinare per 2 volte consecutive il badge gestore impianto.
Quando la cancellazione è avvenuta si accende il LED Serratura
e il dispositivo emette 2 beep.
• Move the system manager badge close twice in succession. When
the cancellation is completed, the Door lock LED comes, on and the
device emits 2 beeps.
• Approcher à nouveau 2 fois de suite le badge master de gestion
installation. Une fois l’effacement obtenu, le LED Serrure
s’allume et le dispositif émet 2 bips.
• Das Badge des Anlagetreibers 2 Mal nähern. Nach erfolgter
Löschung leuchtet die LED des Schlosses auf und die Vorrichtung
erzeugt 2 Pieptöne.
• Acerque 2 veces seguidas la credencial maestra de
administrador del sistema. Cuando se produce la cancelación,
se ilumina el LED Cerradura y el dispositivo emite 2 bips.
• Houd de installatiebeheerder badge 2 maal voor het leesapparaat.
De LED slot gaat branden en u hoort 2 pieptonen als de badges
zijn gewist.
• Voltar a aproximar, por 2 vezes consecutivas, o crachá gestor da
instalação. Uma vez que interveio o cancelamento, acendese o
LED da fechadura e o dispositivo emite 2 beep.
• Powtórnie zbliżyć Brelok administratora do obszaru czytnika
panelu 2 razy. Zaświecenie się LED otwarcia zamka i dwa krótkie
dźwięki potwierdzają zakończenie procedury powodzeniem.
• 2 volte Gestore impianto
• Twice Manager master
• 2 fois Master de gestion
• 2 Mal Master Verwaltung
• 2 veces Credencial maestra
de administrador
• 2 maal Master beheerder
• 2 vezes Master gestor
• 2 razy zbliżyć brelok Master
Administratora
2 beep
2 beep
2 beep
2 Piepton
2 bip
2 beep
2 beep
2 dźwięki

Video Kit
33
• Installazione con base da tavolo 344632
• Installation with table-top base 344632
• Installation avec base de table 344632
• Installation auf Tischhalterung 344632
• Instalación con una base de mesa 344632
• Installatie op tafelsteun 344632
• Instalação com uma base de mesa 344632
• Montaż na podstawce biurkowej 344632
• È possibile installare il dispositivo su base da tavolo (344632) acquistabile separatamente.
• It is possible to install the device on table-top base (344632) to be purchased separately.
• Il est possible d’installer le dispositif sur base de table (344632) vendue séparément.
• Das Gerät kann auf eine separat zu erwerbende Tischunterlage (344632) installiert werden.
• El dispositivo se puede instalar sobre una base de sobremesa (344632) en venta por separado.
• Het apparaat kan geïnstalleerd worden op de apart te bestellen tafelsteun (344632).
• É possível instalar o dispositivo em uma base para mesa (344632) adquirível separadamente.
• Możliwy jest montaż aparatu na podstawce biurkowej (344632) zamawianej oddzielnie

Video Kit
35
Nota: è consigliato installare il Classe300X in prossimità del router Wi-Fi
Nota: è possibile installare un solo Classe300X per ogni rete Wi-Fi (SSID)
Nota: è possibile installare un solo Classe300X per ogni appartamento.
Nota: It is recommended that the Classe300X is installed near the Wi-Fi router
Nota: It is possible to install just one Classe300X for each Wi-Fi (SSID) network
Note: it is possible to install just one Classe300X for each apartment.
Note : il est recommandé d’installer le dispositif Classe 300X à proximité du router Wi-Fi
Note : il est possible d’installer un seul dispositif Classe 300X pour chaque réseau Wi-Fi (SSID)
Note: il est possible d’installer un seul dispositif Classe 300X pour chaque appartement.
Anmerkung: das Gerät Classe 300X möglichst in der Nähe des Routers Wi-Fi installieren
Anmerkung: es kann nur ein Gerät Classe 300X für jedes Wi-Fi-Netz (SSID) installiert werden
Anmerkung: Es kann nur ein Gerät Classe 300X pro Wohnung installiert werden
Nota: es aconsejable instalar el Classe300X cerca del router Wi-Fi
Nota: se pueden instalar un solo Classe300X por cada red Wi-Fi (SSID)
Nota: se pueden instalar un solo Classe300X por cada apartamento.
Opmerking: het wordt aanbevolen om Classe300X in de buurt van de WiFi-router te installeren
Opmerking: per WiFi-netwerk (SSID) kan slechts één Classe300X worden geïnstalleerd
Opmerking: per appartement kan slechts één Classe300X worden geïnstalleerd.
Nota: recomenda-se instalar o Classe300X em proximidade do router Wi-Fi
Nota: é possível instalar apenas um Classe300X para cada rede Wi-Fi (SSID)
Nota: é possível instalar apenas um Classe300X para cada apartamento.
Uwaga: Zalecane jest zainstalowanie Classe 300X13E jak najbliżej routera Wi-Fi
Uwaga: Możliwe jest zainstalowanie tylko jednego aparatu Classe 300X13E dla jednej sieci Wi-Fi (SSID)
Uwaga: Możliwe jest zainstalowanie tylko jednego aparatu Classe 300X13E w mieszkaniu
– Pareti divisorie in muratura
– Pareti in legno
– Pareti in cartongesso
– Tabiques de albañilería
– Paredes de madera
– Paredes de pladur
– Cloisons en dur
– Cloisons en bois
– Cloisons en placoplâtre
– Paredes divisórias de alvenaria
– Paredes de madeira
– Paredes de gesso cartonado
– Partition masonry walls
– Wood walls
– Plasterboard walls
– Ścianki działowe murowane
– Ścianki drewniane
– Ścianki karton gipsowe
– Muren van metselwerk
– Houten muren
– Gipsplaten muren
– Trennwände aus Mauerwerk
– Holzwände
– Wände aus Gipskarton
– Pareti in cemento armato – Pareti portanti
– Pareti in pietra – Pareti metalliche
– Paredes de hormigón armado – Paredes portantes
– Paredes de piedra – Paredes metálicas
– Murs en ciment armé – Murs porteurs
– Murs en pierre – Cloisons métalliques
– Walls in reinforced concrete – Load-bearing walls
– Stone walls – Metal walls
– Ściany z cegły i zbrojonego betonu – Ściany nośne
– Ściany z kamienia – Ściany metalowe
– Muren van gewapend beton – Dragende muren
– Stenen muren – Metalen muren
– Betonwände – Tragende Wände
– Wände aus Stein – Wände aus Metall
– Paredes de cimento armado – Paredes estruturais
– Paredes de pedra – Paredes metálicas

Video Kit
37
• Configurazione posto interno
• Internal unit configuration
• Configuration poste interne
• Konfiguration einer Hausstation
• Configuración de la unidad interior
• Het interne punt configureren
•
Configuração da unidade interna
• Konfiguracja aparatu wewnętrznego
J1 J2 N P M M
J1 = Estrai se è presente l’alimentazione
supplementare (morsetto 1 & 2)
J2 = Per il corretto funzionamento non estrarre
NN = Indirizzo del dispositivo
PP = Indirizzo del PE di cui apri la Serratura con PI a
riposo e a cui indirizzi l’autoaccensione
MM = Modalità di funzionamento secondo le tabelle
alle pagine seguenti.
J1 = Extraire en présence de l’alimentation
supplémentaire (bornes 1 et 2)
J2 = Pour le bon fonctionnement ne pas extraire
NN = Adresse du dispositif
PP = Adresse du PE dont la serrure est ouverte
avec PI au repos et auquel est adressé l’auto-
allumage
MM = Modalité de fonctionnement conformément
aux tableaux des pages suivantes.
J1 = Extraiga con presencia de la alimentación
adicional (borne 1 & 2)
J2 = Para el funcionamiento correcto, no efectúe la
extracción.
NN = Dirección del dispositivo
PP = Dirección PE de la que abre la Cerradura
con UI en reposo y a la que dirige el
autoencendido
MM = Modo de funcionamiento según las tablas de
las páginas siguientes.
J1 = Extrai caso esteja presente a alimentação
adicional (borne 1 & 2)
J2 = Para o correto funcionamento não extrair
NN = Endereço do dispositivo
PP = Endereço da UE através da qual você abre
a fechadura com a UI em repouso e àqual
endereça o autoacendimento
MM = Modalidade de funcionamento segundo as
tabelas das próximas páginas.
J1 = Remove if the additional power supply is present
(clamp 1 and 2)
J2 = For correct operation do not remove
NN = Device address
PP = Address of the EP of which you can open the
Door Lock with Handset idle, and to which you
can send the auto-on command
MM = Mode of operation according to the tables on
the following pages
J1 = Abziehen, wenn ein zusätzliche Stromversorgung
vorhanden ist (Klemme 1&2)
J2 =
Für einen einwandfreien Betrieb nicht heraus nehmen.
NN = Adresse der Vorrichtung
PP = Adresse der TS mit dem zu öffnenden Schloss, mit
HS im Ruhestand, der die Selbstschaltung bestimmt
ist
MM = Funktionsmodus laut Tabellen in den
nachfolgenden Seiten
J1 = uitnemen als een extra voeding aanwezig is
(aansluitklem 1 & 2)
J2 = Niet uitnemen voor een correcte werking
NN = Adres van het apparaat
PP = Adres van buitenpost waar het slot van wordt
ontgrendeld met binnenpost in ruststand en waar
de automatische inschakeling naar wordt gestuurd
MM = Functioneringswijze volgens de tabellen op de
volgende pagina’s
J1 = Wyjąć jeżeli podłączony jest dodatkowy
zasilacz (zaciski 1 i 2)
J2 = Nie wyjmować - konieczny dla prawidłowego
działania
NN = Adres aparatu
PP = Adres domyślnego PZ, przy którym zamek może
być otwarty bez wywołania oraz na który działa
komenda autoaktywacji
MM = Tryb pracy zgodnie z tabelami na dalszych
stronach
/