Page is loading ...

Vermont Castings • Intrepid FlexBurn
®
Owner’s Manual_R16 • 2018 - ___ • 05/21 13-90-30007345C
Owner’s Manual
Operation & Care
INSTALLER: Leave this manual with party responsible for use and operation.
OWNER: Retain this manual for future reference.
Contact your dealer with questions on installation, operation, or service.
NOTE
To obtain a French translation of this manual, please
contact your dealer or visit www.vermontcastings.com
Pour obtenir une traduction française de ce manuel, s’il
vous plaît contacter votre revendeur ou visitez www.
vermontcastings.com
If the information in these instructions is not
followed exactly, a re may result causing
property damage, personal injury, or death.
WARNING
!
• Donotstoreorusegasolineorotherammablevapors
and liquids in the vicinity of this or any other appliance.
• Donotover re - If appliance orchimney connector
glows, you are over ring. Over ring will void your
warranty.
• Comply with all minimum clearances to combustibles
asspecied.Failuretocomplymaycausehousere.
Installationandserviceofthisapplianceshouldbeperformedby
qualiedpersonnel.Hearth&HomeTechnologiesrecommends
HHTFactoryTrainedorNFIcertiedprofessionals.
HOT SURFACES!
Glass and other surfaces are hot
duringoperationANDcooldown.
Hot glass will cause burns.
WARNING
!
• Do not touch glass until it is cooled
• NEVERallowchildrentotouchglass
• Keep children away
• CAREFULLYSUPERVISEchildreninsameroomas
replace.
• Alert children and adults to hazards of high
temperatures
• High temperatures may ignite clothing or other
ammable materials.
• Keep clothing, furniture, draperies and other
ammablematerialsaway.
Intrepid FlexBurn
®
Wood Burning Stove
Model2115/2115-CAT
NOTICE: SAVE THESE INSTRUCTIONS

Vermont Castings • Intrepid FlexBurn
®
Owner’s Manual_R16 • 2018 - ___ • 05/212 3-90-30007345C
CongratulationsonyourchoiceofaVermontCastingsIntrepidFlexBurn
®
WoodStove.AtVermontCastingswetakeAmerican
craftsmanshipseriously.Weassureyouthatyourcast-ironVermontCastingsstovehasbeenmadewiththeutmostcare
and will provide you with many years of service.
Asyoubecomeacquaintedwithyournewstove,youwillndthatitsappearanceismatchedbyitsfunctionality,duetocast
iron’s unique ability to absorb and radiate heat.
Also,VermontCastingsproductsareamongthe cleanest-burningwoodstoves availabletoday.However,cleanburning
depends on both the manufacturer and the operator. Please read this manual carefully to understand how to properly operate
and maintain your stove.
AtVermontCastings,wearecommittedtoyoursatisfactionasacustomer.Thatiswhywemaintainanexclusivenetworkof
thenestdealersintheindustry.Ourdealersarechosenfortheirexpertiseanddedicationtocustomerservice.Feelfreeto
contactyourAuthorizedVermontCastingsDealeranytimeyouhaveaparticularquestionaboutyourstoveoritsperformance.
ThismanualcontainsvaluableinstructionsontheoperationofyourVermontCastingsIntrepidFlexBurn
®
WoodStove.Italso
containsusefulinformationonmaintenance.Pleasereadthemanualthoroughlyandkeepitasareference.
Note: Cast iron is an artisan crafted material, which is made the same way today as nearly 2000 years ago. Due to
the intrinsic primitive nature of the casting process, part to part variation is normal and adds to the character of a
hand built cast iron appliance.
US ENVIRONMENTAL PROTECTION AGENCY
Certiedtocomplywith2020,particulateemissionsstandards
at .6g/hr (without catalyst) and .3 g/hr (catalytic).
Please read this entire manual before you install and use
your new stove. Failure to follow instructions may result in
property damage, bodily injury, or even death.
LABEL TICKET
ECO: LABEL SIZE: 6.5” H x 13.5” W
PART # / REV: 3-90-30007343_R1 ADHESIVE:
ORIGINATOR: Spidlet MATERIAL: 24 Gauge Aluminum
DATE: 05/16/18 INK: Black Background Aluminum Lettering
(4) Slotted Holes = .156 x .25
(1) Round Hole = .630
(1) Round Hole = .140
(4) Corners = R.062
Barcode label must have the serial number on it. The
barcode label must be able to read Code 39 Full ASCII.
352 Mountain House Road
Halifax, PA 17032
BARCODE LABEL
HF
Serial No.
N
o
de série:
3-90-30007343_R1
Date of Manufacture / Date de fabrication:
2018 2019 2020 JAN FEB MAR APR MAY JUN JUL AUG SEP OCT NOV DEC
Manufactured by / Fabriqué par: Hearth and Home Technologies 352 Mountain House Road, Halifax PA 17032
US ENVIRONMENTAL PROTECTION AGENCY
Certied to comply with 2020, particulate emissions standards at .6g/hr (without catalyst) and .3 g/hr (catalytic). This wood heater needs
periodic inspection and replacement for proper operation. Consult the Owner’s Manual for further information. It is against Federal
Regulations to operate this wood heater in a manner inconsistent with operating instructions in the Owner’s Manual.
MODEL / MODÈLE: “Intrepid FlexBurn
®
2115/2115-CAT”
LISTED SOLID FUEL ROOM HEATER
CHAUFFE-PIÈCE À COMBUSTIBLE SOLIDE RÉPERTORIÉ
Report #/Rapport #0135WS038S / 0135WS038E
Tested to / Testé à: UL 1482-2011 (R2015), ULC-S627-00
APPROVED FOR USE IN MOBILE HOMES IN THE U.S. ONLY
Install and use only in accordance with manufacturer’s installation
and operation instructions. Contact local building or re ofcials about
restrictions and installation inspection in your area. Install only with legs
provided in accordance with installation instructions.
WARNING: Risk of ame and smoke spillage. Do not obstruct the space
beneath the heater.
Fuel: Use with solid wood fuel only. Do not burn other fuels.
Build a re directly on hearth only. Do not elevate re. Keep doors fully
closed or fully open while operating.
Chimney: Use a minimum 6” diameter factory built high temperature
(H.T.) chimney which is listed to UL 103HT (2100°F) or 8” X 8” nominal or
larger approved masonry chimney with ue liner. For Canada ULC S629
Chimney system is required.
Do not connect this unit to a chimney ue serving another appliance.
Chimney Connector: Use a minimum 6” diameter 24 gauge chimney
connector. Install chimney connector at least 18” from ceiling. Refer to
local building codes and Vermont Castings Owner’s Guide for precautions
for passing a chimney or chimney connector through a combustible wall
or ceiling.
Floor Protection US: The unit may be installed on a combustible oor
if the bottom heat shield is installed and non-combustible spark & ember
protection is used. The bottom heat shield is required unless the unit will
be installed on a completely non-combustible surface (example: unpainted
concrete over bare earth). There is no required R or K value. The oor
protector should extend 8” (203 mm) from either side of the loading door,
16” (406 mm) from the front of the unit and 6” (152 mm) to the rear of the
unit. The oor protector must extend underneath any horizontal run of
chimney connector and extend 2” (51mm) beyond each side.
Floor Protection Canada: The unit may be installed on a combustible
oor if the bottom heat shield is installed and non-combustible spark &
ember protection is used. The bottom heat shield is required unless the
unit will be installed on a completely non-combustible surface (example:
unpainted concrete over bare earth). There is no required R or K value.
The oor protector should extend 8” (203 mm) from either side of the
loading door, 18” (457 mm) from the front of the unit and 6” (152 mm)
to the rear of the unit. The oor protector must extend underneath any
horizontal run of chimney connector and extend 2” (51mm) beyond each
side.
Do not remove or cover this label.
CAUTION: Burning of materials other than the specied fuels may make
the Catalyst in the combustor inactive. The combustor is fragile, handle
carefully. The performance of the catalytic device or it’s durability have not
been evaluated as part of the certication.
Catalytic Combustor Part No. 30007430
Combustion air cannot be obstructed.
Damper must be open before opening doors.
Do not overre. Glowing parts indicate overring.
Replace glass only with 5mm ceramic
Inspect and Clean Chimney Frequently – Under Certain
Conditions of Use, Creosote Buildup May Occur Rapidly.
Installer conformément aux instructions du fabricant. Contacter
les autorités locates pour connaître les restrictions et inspections
nécessaires. N’installer que les pattes qui sont incluses, en
conformité avec les instructions du fabricant.
Ne pas obstruer l’espace sous le poele.
Attention: Risque de ammes et de fumée spilage. Ne pas
obstruer l’espace sous le chauffe-eau.
Le registre doit être ouvert avant d’ouvrir les portes.
Combustible: N’utiliser que du bois comme combustible.
Ne pas utiliser d’autres types de combustible. Inspecter et
nettoyer la cheminée fréquemment - Sous certainesusages,
l’accumulation de créosote peu se produire rapidement. Garder
les portes toutes fermées ou toutes ouvertes durant l’opération.
Faire le feu directement sur la grille prévue à cet effet. Laisser
les portes du poêle soit complètement ouverts ou complètement
fermées lors de l’utilisation. Ne pasraccorder le conduit de
cheminée du poêle à une cheminée servant à d’autres appareils.
N’utiliser que les vitres de céramique Vermont Castings en cas
de remplacement de celles-ci.
Protection de plancher Canada: L’unité peut être installée
sur un plancher combustible si l’écran thermique inférieur est
installé et qu’une protection contre les étincelles et les braises
incombustibles est utilisée. L’écran thermique inférieur est
requis à moins que l’unité ne soit installée sur une surface
complètement incombustible (exemple: béton non peint sur de
la terre nue). Il n’y a pas de valeur R ou K requise. Le protecteur
de plancher doit se prolonger de 8 po (203 mm) de chaque côté
de la porte de chargement, de 18 po (457 mm) mm) à l’avant
de l’appareil et de 6 po (152 mm) à l’arrière de l’appareil. Le
protecteur de plancher doit se prolonger sous n’importe quel
passage horizontal de cheminée et s’étendre 2 “(51mm) au-delà
de chaque côté.
Replacer uniquement qu’avec une glace 5mm Vermont Castings.
Attention: Bruler des matières autres que celles spéciées
pourrait rendre le caralyseur inactif.
Attention: Le catalyseur est fragile, manipulaer avec soin.
CAUTION:
HOT WHILE IN
OPERATION- DO NOT TOUCH- KEEP
CHILDREN AND CLOTHING AWAY- CONTACT
MAY CAUSE SKIN BURNS- SEE NAMEPLATE
AND INSTRUCTIONS. KEEP FURNISHINGS
AND OTHER COMBUSTIBLE MATERIALS A
CONSIDERABLE DISTANCE AWAY FROM THE APPLIANCE
ATTENTION:
CHAUD LORS DU
FONCTIONNEMENT- NE TOUCHEZ PAS L’APPAREIL-
GARDEZ LES ENFANTS ET LES VÊTEMENTS ÉLOIGNÉS-
TOUT CONTACT PEUT ENTRAÎNER DES BRÛLURES DE
LA PEAU. RÉFÉREZ-VOUS À LA PLAQUE SIGNALÉTIQUE
ET AU MODE D’EMPLOI. GARDEZ LE MOBILIER ET LES
AUTRES MATÉRIAUX COMBUSTIBLES BIEN À L’ÉCART DE
L’APPAREIL.
Minimum Alcove dimensions (Double Wall Pipe, Ceiling Exit)
62” (1575mm) Ceiling height, 59-7/8” (1521mm) Wide, 30-7/8” (784mm) deep
dimensions minimales de l’alcôve (tuyau à double paroi, sortie au plafond)
62“ (1575mm) Hauteur de plafond, 59-7/8” (1521mm) de large, 30-7/8“ (784mm) de profondeur
Made in U.S.A. of US and imported parts. / Fabriqué aux États-Unis-
d’Amérique par des pièces d’origine américaine et pièces importées.
I
J
K
USA
CAN
I
Minimum Floor Protection / Protection minimale du plancher
Floor Protection - Type I
I Sides (From door opening) 8”
J Front to Glass 16”
K Rear 6”
Protection de plancher - Type I
I Côtes (de l’ouverture de la porte) 203 mm
J Devant, par rapport au verr 457 mm
K Arrière 152 mm
Minimum Clearances to Combustible Materials / Minimum De Degagement Jusqu’a la construction combustible
A B C D E F G H*
Single Wall Pipe
12
(305mm)
14
(356mm)
15
(381mm)
22-1/2
(572mm)
6-1/2
(165mm)
12
(305mm)
58-1/2
(1486mm)
N/A
Single Wall w/Opt
Radiant Shield
8
(203mm)
10
(254mm)
15
(381mm)
22-1/2
(572mm)
6
(152mm)
11-1/2
(292mm)
58-1/2
(1486mm)
N/A
Double Wall Pipe
10
(254mm)
11-1/2
(292mm)
11
(280mm)
18
(457mm)
6
(152mm)
11
(280mm)
58-1/2
(1486mm)
N/A
Alcove Double
Wall, Ceiling Exit
12
(305mm)
13-1/2
(343mm)
17
(432mm)
24
(610mm)
N/A N/A
37-1/2
(953mm)
N/A
Vertical, 90°
Elbow Rear Exit
11
(280mm)
13
(330mm)
15
(381mm)
22-1/2
(572mm)
N/A N/A
58-1/2
(1486mm)
18*
(457mm)
Straight Backwall
Exit
13
(330mm)
N/A
15
(381mm)
22-1/2
(572mm)
N/A N/A
58-1/2
(1486mm)
N/A
C
D
B
A
Backwall/Sidewall /
Mur Arrière/Mur De Côté
F
E
Corner Installation /
Installation Du Coin
G
H*
90° Off Top Up & Out Ceiling Clearance
/ Espace Libre Du Dessus De L'appareil
Au Plafond Avec 90° De Courbure
A
Horizontal Thru Wall /
Horizontale Au Mur
SerialNo.
SAMPLE
TestLab&ReportNo.
ModelName
Mfg. Date

Vermont Castings • Intrepid FlexBurn
®
Owner’s Manual_R16 • 2018 - ___ • 05/21 33-90-30007345C
TABLE OF CONTENTS
Safety Alert Key:
• DANGER! Indicatesahazardoussituationwhich,ifnotavoidedwill result in death or serious injury.
• WARNING!Indicatesahazardoussituationwhich,ifnotavoidedcould result in death or serious injury.
• CAUTION! Indicatesahazardoussituationwhich,ifnotavoided,could result in minor or moderate injury.
• NOTICE:Indicatespracticeswhichmaycausedamagetotheapplianceortoproperty.
!
A. Warranty Policy ........................................................ 4
1 Product Specic and Important Safety Information
A. ApplianceCertication ............................................. 6
B. BTU&EciencySpecications ............................... 6
C. MobileHomeApproved(USAONLY) ...................... 6
D. GlassSpecications ................................................ 6
E. CaliforniaSafetyInformation ................................... 6
2 Operating Instructions
A. TheIntrepidFlexBurn
®
Controls .............................. 8
B. ConditioningYourStove .......................................... 9
C. Ways to Add Fuel ..................................................... 10
D. Ash Disposal ............................................................ 13
E. Opacity(VisibleSmoke) ..........................................14
F. NegativePressure ................................................... 14
G. ImportantInformation ............................................... 15
3 Maintenance
A. CleaningandReplacementoftheGlass ................. 16
B. DamperAdjustment ................................................. 17
C. DoorLatchAdjustment ............................................ 17
D. GasketReplacement ............................................... 17
E. TheChimneySystem .............................................. 18
F. TheCatalyticElement .............................................. 19
4 Troubleshooting Guide ............................................ 21
5 Reference Material
A. Service&MaintenanceLog ..................................... 22
B. ServicePartsList ..................................................... 23
C. ContactInformation ................................................. 28
= Contains updated information

Vermont Castings • Intrepid FlexBurn
®
Owner’s Manual_R16 • 2018 - ___ • 05/214 3-90-30007345C
Hearth & Home Technologies LLC
LIMITED LIFETIME WARRANTY
Hearth & Home Technologies LLC (“HHT”) extends the following warranty for HHT gas, wood, pellet and electric hearth appliances
(each a “Product” and collecvely, the “Product(s)”) and certain component parts set forth in the table below (“Component Part(s)”)
that are purchased from a HHT authorized dealer or distributor.
WARRANTY COVERAGE:
HHT warrants that the Products and their Component Parts will be free from defects in materials and workmanship for the applicable
period of Warranty coverage set forth in the table below (“Warranty Period”). If a Product or Component Parts are found to be
defecve in materials or workmanship during the applicable Warranty Period, HHT will, at its opon, repair the applicable Component
Part(s), replace the applicable Component Part(s), or refund the purchase price of the applicable Product(s). The maximum amount
recoverable under this Warranty is limited to the purchase price of the Product. This Warranty is transferable from the original purchaser
to subsequent owners, but the Warranty Period will not be extended in duraon or expanded in coverage for any such transfer. This
Warranty is subject to condions, exclusions, and limitaons as described below.
WARRANTY PERIOD:
Warranty coverage begins at the date of installaon. In the case of new home construcons, Warranty coverage begins on the date of
rst occupancy of the dwelling or six months aer the sale of the Product(s) by an independent, authorized HHT dealer or distributor,
whichever occurs earlier. However, the Warranty coverage shall commence no later than 24 months following the date of Product
shipment from HHT, regardless of the installaon or occupancy date.
The term “Lifeme” in the table below is dened as: 20 years from the beginning date of warranty coverage for gas appliances, and 10
years from the beginning date of warranty coverage for wood and pellet appliances. These me periods reect the minimum expected
useful lives of the designated Component Parts under normal operang condions.
Page 1 of 2
4021-645L 10/20
Component
Parts
Labor Gas Pellet Wood Electric Venting Component Parts Covered by this Warranty
X
All parts except as covered by Warranty Conditions,
Warranty Exclusions, and Warranty Limitations listed
X X
Igniters, Auger Motors, Electronic Components, and
Glass
X
Electrical components limited to modules, remotes/wall
switches, valves, pilots, blowers, junction boxes, wire
harnesses, transformers and lights (excluding light bulbs)
X X Molded Refractory Panels, Glass Liners
X Vent Free Burners, Vent Free Logs
X X Castings, Medallions and Baffles
6 years 3 years X Catalysts
7 years 3 years X X Manifold tubes, HHT Chimney and Terminations
10 years 1 year X Burners, logs and refractory
Limited
Lifetime
3 years X X X
Firebox and heat exchanger, FlexBurn® System
(engine, inner cover, access cover and fireback)
1 Year
None
X X X X X All purchased replacement parts
Warranty Period HHT Manufactured Appliances and Venting
All parts including handles, external enameled
components and other material except as covered by
Warranty Conditions, Warranty Exclusions, and
Warranty Limitations listed
2 years
X1 Year X X X
2 Years
5 years 1 year
Firepots, burnpots, mechanical feeders/auger
assemblies
3 years X
A. Warranty Policy

Vermont Castings • Intrepid FlexBurn
®
Owner’s Manual_R16 • 2018 - ___ • 05/21 53-90-30007345C
WARRANTY CONDITIONS:
•
Because HHT cannot control the quality of any Products sold by unauthorized sellers, this Warranty only covers Products that are
purchased through an HHT authorized dealer or distributor unless otherwise prohibited by law; a list of HHT authorized dealers
is available on the HHT branded websites.
• This Warranty is only valid while the applicable Product remains at the site of original installaon.
• This Warranty is only valid in the country in which the HHT authorized dealer or distributor that sold the applicable Product is
authorized to sell applicable Product.
• Contact your installing distributor or dealer for Warranty service. If the installing dealer or distributor is unable to provide
necessary parts, contact the nearest HHT authorized dealer or supplier. Addional service fees may apply if you are seeking
Warranty service from a dealer other than the dealer from whom you originally purchased the applicable Product.
• No HHT consumer should bear cost of warranty service or costs incurred while servicing warranty claims (i.e., travel, gas, or
mileage) when the service is performed within the terms of this Warranty. Check with your dealer or distributor in advance for
any costs to you when arranging a warranty call. Travel and shipping charges for parts are not covered by this Warranty.
WARRANTY EXCLUSIONS:
This Warranty does not cover the following:
•
Changes in surface nishes as a result of normal use. As a heang appliance, some changes in color of interior and exterior surface
nishes may occur. This is not a aw and is not covered under the Warranty.
• Damage to printed, plated, or enameled surfaces caused by ngerprints, accidents, misuse, scratches, melted items or other
external sources and residues le on the plated surfaces from the use of abrasive cleaners or polishes.
• Repair or replacement of parts that are subject to normal wear and tear during the Warranty Period are not covered. These parts
include: paint, wood and pellet gaskets, rebricks, grates, ame guides, baeries and the discoloraon of glass.
•
Minor expansion, contracon, or movement of certain parts causing noise. These condions are normal and complaints related to
this noise are not covered by this Warranty.
• Damages resulng from: (1) failure to install, operate, or maintain the applicable Product in accordance with the installaon
instrucons, operang instrucons, and lisng agent idencaon label furnished with the applicable Product; (2) failure to
install the applicable Product in accordance with local building codes; (3) shipping or improper handling; (4) improper operaon,
abuse, misuse, connued operaon with damaged, corroded or failed components, accident, or improperly/incorrectly performed
repairs; (5) environmental condions, inadequate venlaon, negave pressure, or draing caused by ghtly sealed construcons,
insucient make-up air supply, or handling devices such as exhaust fans or forced air furnaces or other such causes; (6) use of fuels
other than those specied in the operaon instrucons; (7) installaon or use of components not supplied with the applicable
Product or any other components not expressly authorized and approved by HHT; (8) modicaon of the appliance not expressly
authorized and approved by HHT in wring; and/or (9) interrupons or uctuaons of electrical power supply to the applicable
Product.
• Non-HHT venng components, hearth connecons or other accessories used in conjuncon with the applicable Product.
• Any part of a pre-exisng replace system in which an insert or a decorave gas applicable Product is installed.
•
HHT’s obligaon under this Warranty does not extend to the Product’s capability to heat the desired space. Informaon is provided
to assist the consumer and the dealer in selecng the proper Product for the applicaon. Consideraon must be given to the
Product locaon and conguraon, environmental condions, insulaon and air ghtness of the structure.
This warranty is void if:
• The applicable Product has been over-red, operated in atmospheres contaminated by chlorine, uorine, or other damaging
chemicals. Over-ring can be idened by, but not limited to, warped plates or tubes, deformaon/warping of interior cast iron
structure or components, rust colored cast iron, bubbling, cracking and discoloraon of steel or enamel nishes.
• The applicable Product is subjected to prolonged periods of dampness or condensaon.
•
There is any damage to the applicable Product due to water or weather damage which is the result of, but not limited to, improper
chimney or venng installaon.
LIMITATIONS OF REMEDIES AND LIABILITY:
•
EXCEPT TO THE EXTENT PROVIDED BY LAW, HHT MAKES NO EXPRESS WARRANTIES OTHER THAN THE WARRANTY SPECIFIED
HEREIN. The owner’s exclusive remedy and HHT’s sole obligaon under this Warranty or in contract, tort or otherwise, shall be
limited to replacement of the Component Part(s), repair of the Component Part(s), or refund of the original purchase price of the
applicable Product(s), as specied above; provided, however, that (i) if HHT is unable to provide replacement of the Component
Part(s) and repair of the Component Part(s) is not commercially praccable or cannot be mely made, or (ii) the customer is
willing to accept a refund of the purchase price of the applicable Product(s), HHT may discharge all such obligaons by refunding
the purchase price of the applicable Product. In no event will HHT be liable for any incidental or consequenal damages caused
by defects in the applicable Product. Some States do not allow the exclusion or limitaon of incidental or consequenal damages,
so the above limitaon or exclusion may not apply to you. This Warranty gives you specic legal rights and you may also have
other rights which vary from State to State. THE DURATION OF ANY IMPLIED WARRANTY IS LIMITED TO DURATION OF THE
EXPRESSED WARRANTY SPECIFIED ABOVE FOR THE APPLICABLE PRODUCT. Some States do not allow limitaons on how long an
implied warranty lasts, so the above limitaon may not apply to you.
Page 2 of 2
4021-645L 10/20

Vermont Castings • Intrepid FlexBurn
®
Owner’s Manual_R16 • 2018 - ___ • 05/21 63-90-30007345C
A. Appliance Certication
C. Mobile Home Approved (USA ONLY)
• This appliance is approved for mobile home installations
in the USA when not installed in a sleeping room and
when an outside combustion air inlet is provided.
• Thestructuralintegrityofthemobilehomeoor,ceiling,
and walls must be maintained.
• The appliance must be properly grounded to the frame
of the mobile home with #8 copper ground wire, and
chimneymustbelistedtoUL103HToralistedUL-1777
fulllengthsixinch(152mm)diameterlinermustbeused.
• Outside air must be provided in a mobile home
installation.
• Mobilehomebracketkit#0003264mustbeinstalled.
D. Glass Specications
This appliance is equipped with 5mm ceramic glass.
Replaceglassonlywith5mmceramicglass.Pleasecontact
your dealer for replacement glass.
E. California Safety Information
B. BTU & Eciency Specications
MODEL: IntrepidFlexBurn
®
2115/2115-CAT
LABORATORY: OMNITestLaboratories,Inc
REPORT NO. 0135WS038S/0135WS038E
TYPE: SolidFuelTypeRoomHeaters
STANDARD(s): UL1482-2011(R2015),ULC-S627-00
EPA Report #:
114-18(without catalyst)
115-18(catalytic)
EPA Certied Emissions:
.6 g/hr (without catalyst)
.3 g/hr (catalytic)
*LHV Tested Eciency:
80.3%(without catalyst)
82.8%(catalytic)
**HHV Tested Eciency:
74.3%(without catalyst)
76.7%(catalytic)
***EPA BTU Output:
12,500-18,500
(without catalyst)
10,700-16,000
(catalytic)
****Peak BTU/Hour Output:
36,900 (without catalyst)
34,900 (catalytic)
Vent Size: 6Inch(152mm)
Firebox Size: 1.3 cu. ft.
Recommended Length: 14”
Max. Wood Length: 15”
Fuel Orientation: East,West
Fuel
SeasonedCordwood
(20%moisture)
* Weighted average LHV eciency using Douglas Fir
dimensional lumber and data collected during EPA
emissions test.
**Weighted average HHV eciency using Douglas
Fir dimensional lumber and data collected during EPA
emissions test.
***Ecienciesarebasedontestresultscalculatedusing
B415; these calculated eciencies are then used to
calculateoutputBTU’s.
****ApeakBTUoutoftheappliancecalculatedusingthe
maximumrsthourburnratefromtheHighEPATestand
theBTUcontentofcordwood(8600)timestheeciency.
1 1
Product Specic and Important Safety Information
!
WARNING
This product and the fuels used to operate this product
(wood), and the products of combustion of such fuels, can
expose you to chemicals including carbon black, which
isknowntotheStateofCaliforniatocause cancer, and
carbonmonoxide,whichisknowtotheStateofCalifornia
to cause birth defects or other reproductive harm. For
more information go to: www.P65Warnings.ca.gov
This wood appliance needs periodic inspection and repair for
properoperation.Itisagainstfederalregulationstooperate
this wood appliance in a manner inconsistent with operating
instructions in this manual.
The Vermont Castings Intrepid FlexBurn
®
WoodAppliancemeetstheU.S.Environmental
Protection Agency’s crib wood emission limits
forwoodappliancessoldafterMay15,2020.

Vermont Castings • Intrepid FlexBurn
®
Owner’s Manual_R16 • 2018 - ___ • 05/21 73-90-30007345C
NOTE:Hearth&HomeTechnologies,manufacturerofthis
appliance, reserves the right to alter its products, their
specicationsand/orpricewithoutnotice.
Improper installation, adjustment, alteration, service or
maintenance can cause injury or property damage.
Forassistanceoradditionalinformation,consultaqualied
installer, service agency or your dealer.
Vermont Castings is a registered trademark of Hearth &
HomeTechnologies.
• Installationanduseofanydamagedappliance.
• Modicationoftheappliance.
• InstallationotherthanasinstructedbyHearth&Home
Technologies.
• Installation and/or use of any component part not
approvedbyHearth&HomeTechnologies.
• Operating appliance without fully assembling all
components.
• Operatingappliancewithoutlegsattached(ifsupplied
with appliance).
• DoNOTOverre-Ifapplianceorchimneyconnector
glows,youareoverring.
Anysuchactionthatmaycausearehazard.
Fire Risk.
Hearth & Home Technologies disclaims any
responsibility for, and the warranty will be voided
by, the following actions:
WARNING
!

Vermont Castings • Intrepid FlexBurn
®
Owner’s Manual_R16 • 2018 - ___ • 05/218 3-90-30007345C
2 2
Operating Instructions
A. The Intrepid FlexBurn
®
Controls
Two controls regulate the performance of the Intrepid
FlexBurn
®
: a primary air control suppliesoxygenforthere,
and a damperdirectsairowwithinthestovetoactivateand
deactivate the combustion system. (Figure 2.1)
Symbolsonthestoveareremindersofthecorrectdirections
forusingthecontrols.Thewords‘Left’and‘right’inthese
directions are facing the stove.
Figure 2.1-TheIntrepidFlexBurn
®
controls are conveniently located
and easy to operate.
DamperHandle
AirControlLever
DoorHandleHolder
(Behindleg)
Ashdoor
Handle
Andirons
DoorHandle
Low Heat High Heat
Figure 2.2 - The handle may be positioned anywhere between the
twoextremesfordierentheatlevels.
Damper Positions
Open
(UpdraftMode)
Closed
(HighEciency
Mode)
Figure 2.3-Thedamperiseither openorclosed.Thereareno
intermediate positions.
A Damper Directs Air Flow Within the Stove
The damper handle on the right side of the stove operates
thedampertodirectairowwithinthestove.
The damper is open when the handle points down, enabling
smoketopassdirectlyintothechimney.Thedampermust
beopenwhenstartingorrevivingare,andalwayswhen
the griddle or doors are opened.
The damper is closed when the handle points forward.
Smoketravels through the secondary combustion system
where it can be further burned, before passing up the
chimney. (Figure 2.3)
The damper should always be either fully open or fully
closed. There are no intermediate positions. When
closing the damper, be sure to pull rmly enough to snap
the handle into the locked position.
Thiswoodheaterhasamanufactured-setminimumlow
burnratethatmustnotbealtered.Itisagainstfederal
regulations to alter this setting or otherwise operate this
wood heater in a manner inconsistent with operating
instructions in this manual.
WARNING
!
A Single Air Control Regulates Heat Output and Burn Time
The primary air control lever,onthetop-rightofthestove,
controls the amount of incoming air for starting, maintaining,
andrevivingare.
Oncetheaircontrolismanuallyset,abi-metallicthermostat
automatically maintains the heat output at a constant level
for a more even heat over the life of the burn.
Moreairenteringthestovemakesthereburnhotterand
faster, while less air prolongs the burn at a lower heat output
level.
Forthegreatestairsupplyandmaximumheatoutput(but
theshortestburntime),movethelevertowardtheuecollar.
Forarethatwilllastlongerwithlessheat,movethelever
awayfromtheuecollar.(Figure2.2)
Note: Operationwiththefrontdoorsopenandthedamper
in the closed position are not permitted and could cause
smokespillagetotheinsideofthedwelling.

Vermont Castings • Intrepid FlexBurn
®
Owner’s Manual_R16 • 2018 - ___ • 05/21 93-90-30007345C
B. Conditioning Your Stove
Castironisextremelystrong,butitcanbe broken with a
sharp blow from a hammer or from the thermal shock of
rapidandextremetemperaturechange.
The cast plates expand and contract with changes in
temperature. When you rst begin using your Intrepid
FlexBurn
®
, minimize thermal stress by letting the plates
adjust gradually during three or four initial break-in res
followingSteps1-3below.
Wood Burning Operation
BurnonlysolidwoodintheIntrepidFlexBurn
®
WoodStove,
and burn it directly on the grate. Do not elevate the fuel.
Donotburncoal or otherfuels.IntheUnited States, itis
against the law to operate this wood heater in a manner
inconsistent with operating instructions in this manual.
The bypass damper must be open when starting a re
or when refueling.
Do not use chemicals or uids to start the re. Do not
burn garbage. Never use ammable uids such as
gasoline, gasoline type lantern fuel, kerosene, charcoal
lighter uid, naptha, engine oil or similar liquids to
start or “freshen up” a re in this heater. Keep all such
liquids well away from the heater while it is in use.
1. Openthestovebypassdamper,andopentheprimaryair
control fully.
2. Place several sheets of crumpled newspaper in the
stove.Placesixoreightpiecesofdrykindlingsplittoa
nger-widthsizeonthepaper.Onthekindling,laytwoor
threelarger sticksofsplit drywoodapproximately1-2"
(25-51mm)indiameter.(Figure2.4)
NOTE:Somechimneys mustbe“primed,”or warmed up,
beforetheywilldrawsucientlytostartare.Tocorrectthis
situation, roll up a couple pieces of newspaper, place them
ontopofthekindlingandtowardthebackofthestove,light
them,andclosethedoors.Thiswillencouragethesmoketo
riserapidly,makingiteasiertoestablishagooddraft.Once
the draft is established, open the front door and light the rest
of the fuel from the bottom. Do not light the main bed of fuel
until the chimney begins drawing, and repeat the procedure
as often as necessary if the initial attempt is unsuccessful.
NOTE:Eectivenessofa“top-down”methodtostartare.
Smoke emissions when starting a re can be dicult to
control because the stove is not yet heated to its optimum
temperature.One method of reducing emissions duringa
coldstart-upistheuseofa“top-down”kindlingprocedure.
Inthis,placelargerpiecesofkindlingonthebottomofthe
kindlingpilefollowedbysmallerandsmallerpiecesasthe
pile is added to. Very nelysplit pieces should be on the
top.Lightthekindlingpilewithamatchatthetopandallow
thekindlingtoburndownwardintothelargerpieces.This
reduces smoke by slowly increasing the re size without
creatinganair-starvedcondition.
4. If your Intrepid FlexBurn
®
has been broken-in
previously using Steps 1-3, continue to build the re
gradually.Addlargerwoodwithadiameterof3-4"(75-
100mm).Continue addingsplitlogsof thissizetothe
briskly-burning re until there is a glowing ember bed
2-3"(51-75mm)deep.Agoodemberbedisnecessary
for proper functioning of the combustion system.
5. Close the damper when a sucient ember bed is
establishedandthegriddletemperaturereaches450°F
(230°C). This will force the smoke into the secondary
combustion chamber where the smoke and gases will
ignite if the stove is suciently hot. Even though it is
possiblefortheretogetquitehotwithinafewminutes
afterareisstarted,secondarycombustionmaystopor
theremaygooutiftherediesdownimmediatelyasa
result of the damper being closed too early.
6. Adjust the air control for your desired heat output.
NOTE: Stove installations vary widely, and the operating
guidance given here is only a starting point. This manual will
explainin detail how the features of yourinstallation may
help or hinder good draft, and how you may need to vary
yourringtechniqueifyourinstallationdoesn’tencourage
a good draft.
High-Eciency Wood Burning with the Catalytic Combustor
YourIntrepidFlexBurn
®
has an optional catalytic combustor
available as an accessory. When operating the stove with
the catalytic combustor, use the same operation instructions
as outlined in the previous section.
Figure 2.4-Starttherewithnewspaperanddrykindling.
3. Lightthenewspaperandclosethedoor.Graduallybuild
uptherebyaddingafew3-5"(80-120mm)diameter
piecesofsplit rewood. If this is one of the rst few
“break-in” res, let the re burn brightly, and then
let it die out. During the break-in res, do not let the
stove get hotter than 500°F. (260°C) as measured on
anoptionalstove-topthermometer.Adjusttheaircontrol
leverasnecessarytocontrol the re. Some odorfrom
thestove’shotmetalandthepaintisnormalfortherst
fewres.

Vermont Castings • Intrepid FlexBurn
®
Owner’s Manual_R16 • 2018 - ___ • 05/2110 3-90-30007345C
While not required, operating your stove with the catalytic
combustor installed creates optimum conditions for
secondarycombustionandwillincreaseyoureciencyup
to15%onlowburn,makingsureyougetthemostheatout
of each load of wood.
The catalytic element is a ceramic “honeycomb” coated
with the catalytic material. The element sits at the bottom
of the secondary combustion chamber. Smoke, gases
and particulates that are not fully combusted during the
secondary combustion process pass through the catalyst,
creatingatertiaryburn.Thisresultsinhighereciencyand
lower emissions.
Thecatalystwillinitiatecombustionofsmokeandparticulates
at500°-600°F(260°-315°C),halfthetemperaturenormally
requiredforunaidedsecondarycombustion.Ifyoufollowed
the startup operation steps in the previous section the stove
willbesucientlyhottoallowthecombustortowork.Once
the combustor starts working, heat generated by burning
thesmokewillkeepitworking.
To determine whether the combustor is operating, refer to
the temperature probe which shows the operating range
of the catalytic combustor. This is located on the back of
the stove and is viewed from the top. NOTE: It will take
several minutes after closing the bypass damper for the
temperatureprobetofullyadjusttothenewtemperature.If
the probe indicator is below the operate catalyst range when
the bypass damper is closed, add fuel or open the bypass
dampertoallowtheretofurtherbuildbeforeengagingthe
catalyst again.
Ifthe probeindicatorisabovetheoperatecatalystrange,
the catalytic combustor is running too hot and may be
damaged.In many cases, decreasing the primaryair can
reduce the catalyst temperature and adding less wood with
each loading can also help if overheating is persistent. Do
not add wood to the stove if the probe reads above the
operate catalyst range.
Avoidusingafullloadofverydrywoodintherebox,such
asdryslabwoodorwoodwithbelow14%moisturecontent.
This may result in continuous very high temperatures in the
secondary combustion area and damage the combustor.
Neverburntreatedwood,garbage,solventsortrash.Allof
these may poison the catalyst and prevent it from operating
properly.Never burn cardboard orloose paper except for
kindlingpurposes.Neverburncoal;doingsocanproduce
soot or large akes of char or y ash that can coat the
combustor and cause smoke to spill into the room. Coal
smokecanalsopoisonthecatalystsothatitwon’toperate
properly.
C. Ways to Add Fuel
TheIntrepidFlexBurn’sgriddleliftsforconvenienttop-loading
of logs, and is the easiest way to add fuel. (Figure 2.5)
However, the front doors open as well for adding an
occasionallogtothere.TheIntrepidFlexBurn
®
WoodStove
is not approved for operation with the front doors open.
Intrepid
Figure 2.5-Toploadingisthebestwaytoaddfuelduringregular
use.Frontloadingisusefulforkindlingare.
To open the front doors, insert the handle into the door latch
stubandturnitclockwise.(Figure2.6)
To close them, always close the left door rst. Turn the
handle in the right door to the left and up (to the open
position) and close it. Finally, push on the door as you turn
thehandlecounterclockwise.Thedoorswilldrawinslightly,
andthehandleshouldoersomeresistanceasyouturnit
to the closed position.
Toreducetheriskofbreakingtheglass,avoidstrikingthe
glass or slamming the doors.
When you are not using the door handle, store it in the
holder behind the right front leg of the stove.
Clockwiseto
Open
Counterclockwise
to Close
Figure 2.6-Toopenthefrontdoors,turnthehandleclockwise.
Fire Risk
• Donotleavethereunattendedwhenthe
door is unlatched
• Operateonlywithfrontdoorsandashpan
door closed.
• Unstablerewoodcouldfalloutoftherebox
creatingarehazardtoyourhome.
WARNING
!

Vermont Castings • Intrepid FlexBurn
®
Owner’s Manual_R16 • 2018 - ___ • 05/21 113-90-30007345C
WARNING
!
For safety and greatest eciency, operate your stove
only with all doors/griddles fully closed. The test
standard for your stove when it is operated in this
mode is UL 1482.
Refuel While the Embers Are Still Hot
Whenreloading,bestresultswillbeachievedifyourstde-
ash the stove by stirring the fuel bed to allow ash to fall
through the grate into the ash pan.
Donotbreakthecharcoalintoverysmallpiecesorpoundor
compressthecharcoalbed.Checktomakesureairholesat
thebottomoftherebackarenotblockedbyashorembers
(blockagewillreduceperformanceofthestove).
It is important that air can circulate through the charcoal
bed.Larger pieces of charcoal allow more airto circulate
underthewood,resultinginthererevivingmorequickly.
(Figure 2.7)
ST264a
add wood fire
11/00
Figure 2.7-Addfullsizelogsaftertheemberbedis3"(75mm)deep.
NOTE:Iftheremainingcharcoalbedisrelativelythick(2-3"
/51-75mm)andifyourfueliswellseasoned,itispossible
toaddfresh fuel(smaller piecesrst)close the door and
damper, and reset the primary air control for the desired
heatoutputimmediately.Thisoptimizesbotheciencyand
emissions performance.
Forsafetywhenrefueling,wearlong-cuedstoveglovesto
protect your hands and forearms. Add fuel while the stove
stillhasplentyofglowingemberstore-kindlethereand
include some smaller pieces of wood in the new fuel load to
helpthestoveregainitsoperatingtemperaturequickly.Use
this sequence as a guide to successful refueling:
1. Openthedamper.
2. De-ash the stove as described above. Open the ash
doorandcheckthelevelofashintheashpan.Empty
the pan if necessary and replace it in the stove. Close
the ash door.
3. Open the griddle top and using a poker, push the
remaining coals against the rear wall to cover the
openingintherefractory.Loadthewood(placingsmaller
piecesrst)withthewoodagainstthebackwall.Close
the griddle top.
4. Wait several minutes for the new wood to fully ignite if the
stovetopsurfacetemperatureisbelow450°F(230°C).
5. Close the damper. And adjust the air control for the
amount of heat your desire.
WARNING
!
DO NOT OPERATE THE STOVE WITH THE ASH
DOOR OPEN. OPERATION WITH THE ASH DOOR
OPEN CAN CAUSE AN OVER-FIRING CONDITION TO
OCCUR. OVER-FIRING THE STOVE IS DANGEROUS
AND CAN RESULT IN PROPERTY DAMAGE, INJURY
OR LOSS OF LIFE.
Andirons Help Protect the Glass
Yourstovehasandironstokeeplogsawayfromtheglass
panels. The andirons are essential to maintain clear re
viewing,andshouldbeleftinplace.Sincetheandironsmay
slightly hinder refueling through the front doors, most stove
owners will prefer the convenience of top loading through
the griddle. Do not place fuel between the andirons and the
doors.
Burn Only High-Quality Wood
The Intrepid FlexBurn
®
is designed to burn natural wood
only; do not burn fuels other than that for which it was
designed.
IMPORTANT: Do not burn any type of articial or
synthetic materials such as re starter logs (containing
wax) in this appliance. Never burn liquid-based fuels
such as kerosene, gasoline or alcohol.
Burninganymaterialsnotallowedintheseinstructions,or
over-ringthestove,mayvoidthewarranty.
You’ll enjoy the best results when burning wood that has
been adequately air-dried. The wood should be 14” - 16”
(356-406 mm) in length.Avoid burning “green” wood that
has not been properly seasoned. Do not burn construction
materials;theyoftencontainchemicalsandmetalsthatcan
damage the inside surfaces of the stove and pollute the
air.Donotburnoceandriftwood;whenitburns,thesaltit
containswillattackthecastiron.
Thebesthardwood fuelsincludeoak,maple, beech,ash,
and hickory that has been split, stacked, and air-dried
outside under cover for at least one year.
Ifhardwoodis notavailable,youcanburn softwoodsthat
includetamarack,yellowpine,whitepine,Easternredcedar,
r,andredwood.Theseshouldalsobeproperlydried.
Storesplitwoodundercovertokeepitdry.Evenforshort-
termstorage,besuretokeepwoodasafedistancefromthe
stoveandkeepitoutoftheareasaroundthestoveusedfor
refueling and ash removal.

Vermont Castings • Intrepid FlexBurn
®
Owner’s Manual_R16 • 2018 - ___ • 05/2112 3-90-30007345C
Surface Thermometer is a Valuable Guide to Operation
An optional surface thermometer tells you when to adjust
the air control, and when to refuel. (Figure 2.8)
Figure 2.8-Taketemperaturereadingswithathermometerlocated
in the middle of the griddle.
For example, when the thermometer registers at least
450°F(230°C)onthestovetopafterstart-upyouknowthe
stove is hot enough and it may be time to close the damper
ifasucientemberbedhasalsobeenestablished.Note
that the stove will warm up much sooner than the chimney,
though;awarmchimneyisthekeytoeasy,eectivestove
operation.Whenthermometerreadingsdropbelow350°F.
(175°C)it’stimetoadjusttheaircontrolforahigherburn
rateortoreloadthestove.Atemperaturereadingover650°F
(340°C)whenthedamperisclosedisasigntoreducethe
air supply to slow the burn rate.
Usethefollowingtemperaturerangesasaguide:
• Readingsinthe350°-500°F.(175°-260°C)rangeindicate
low to medium heat output.
• 500°-600°F. (260°-315°C) readings indicate medium
heat output.
• Readingsof600°-650°F.(315-340°C)indicatehighheat
output. Operating your Intrepid FlexBurn
®
continuously
atgriddletemperatureshigherthan650°F(340°C)may
damagethecastironorenamelnish.
Use the Air Control Settings that Work Best for You
No single air control setting will t every situation. Each
installation will dier depending on the quality of the fuel,
theamountofheatdesired,andhowlongyouwishthere
to burn; outdoor air temperature and pressure also aect
draft.
The control setting also depends on your particular
installation’s “draft,” or the force that moves air from the
stove up through the chimney. Draft is aected by such
things as the length, type, and location of the chimney, local
geography, nearby obstructions, and other factors.
Toomuchdraft maycauseexcessivetemperatures inthe
IntrepidFlexBurn
®
,andcouldevendamagethestove.On
theotherhand,toolittledraftcancausebackpungintothe
roomand/orthe“plugging”ofthechimney.
Howdoyouknowifyourdraftisexcessivelyhighorlow?
Symptoms of too much draft include an uncontrollable
burn or a glowing-red stove part. Signs of weak draft are
smokeleakingintotheroomthroughthestoveorchimney
connector joints or low heat output.
Insomenewerhomesthatarewell-insulatedandweather-
tight, poor draft may result from an insucient air supply
inthehouse.Insuchinstances,anopenwindownearthe
stove on the windward side of the house can provide the
combustion air supply needed.
Another option for getting more combustion air to the stove
is to duct air directly from outside to the stove. In some
areas provisions for outside combustion air are required in
all new construction.
When rst using the stove, keep track of the air control
settings.Youwillquicklyndthataspecicsettingwillgive
youaxed amountofheat.It maytakeaweek ortwoto
determine the amount of heat and the length of burn you
shouldexpectfromvarioussettings.
Most installations do not require a large amount of
combustion air, especially if adequate draft is available.
Donotforanyreasonattempttoincreasetheringofyour
heater by altering the air control adjustment range outlined
in these directions.

Vermont Castings • Intrepid FlexBurn
®
Owner’s Manual_R16 • 2018 - ___ • 05/21 133-90-30007345C
D. Ash Disposal
(RefertotherstpageoftheOperationsection.)
DO NOT OPERATE THE STOVE WITH THE ASH DOOR
OPEN. OPERATION WITH THE ASH DOOR OPEN CAN
CAUSE AN OVER-FIRING CONDITION TO OCCUR.
OVER-FIRING THE STOVE IS DANGEROUS AND CAN
RESULT IN PROPERTY DAMAGE, INJURY OR LOSS OF
LIFE.
Routineashremovalisimportantforeaseofmaintenance,
and is important for the stove’s durability. Remove ash
beforeitreachesthetopoftheashpan.Checkthelevelat
leastoncea day.Everyfew days,clearanyash fromthe
outeredgesoftherebox.Mostoftheashwillfallthrough
thegrate.Stirtheashwithashovelorpokersothatitfalls
through the grate slots.
IMPORTANT:Checkthelevelofashintheashpanbefore
reloadingthestove.Iftheashlevelisclosetothetopedge
of the pan, empty the pan according to this procedure:
• Openthedamper.
• Open the griddle or front doors, and use a shovel or
pokertostirexcessashthroughtheashslotsinthegrate
down into the ash pan.
• Close the griddle or doors, and unlatch the ash door.
(Figure2.9)Itwillpivot,swingingtheashpanoutofthe
stove.
Figure 2.9- Turn the ashdoor handle clockwise to open and
counterclockwisetoclose.
Open
Close
• Lifttoremovetheashpan,makingsuretokeepitlevel.
• Tokeepthecoverfromslidingoandtokeepashfrom
fallingontheoor,donottilttheashpanforward.
• If the stove is in operation, close the ash door while
disposing of the ash.
• Properly dispose of the ash in a metal container with a
tight-ttinglid.Store the container outdoors away from
all combustible material.
• Returnthe ashpantoitsoriginalpositioninthe stove,
and close and latch the ash door.
• Slidethecoverontothepan,makingsureitissecurely
closed.(Figure2.10)
Figure 2.10-Besurethecoverissecurelyattachedbeforeremoving
the ash pan.
CAUTION
!
Never use your household or shop vacuum cleaner to
removeashfromthestove;alwaysremoveanddispose
of the ash properly.
Empty the ash pan regularly, typically every one to three
days. The frequency will vary depending on how you
operateyourIntrepidFlexBurn
®
: ash will accumulate faster
at higher heat outputs.
Removed ash should be placed outdoors in a metal
containerwithatight-ttinglid.Keeptheclosedcontainerof
ashonanoncombustibleoororontheground,wellaway
from all combustible materials, pending nal disposal. If
the ash is disposed of by burial in soil or otherwise locally
dispersed,itshouldbekeptintheclosedcontaineruntilall
cinders have thoroughly cooled.
WARNING
!
Do not operate the stove with the ash door open. This
will result in over-ring, and could cause damage to
the stove, void the warranty, or even lead to a house
re.

Vermont Castings • Intrepid FlexBurn
®
Owner’s Manual_R16 • 2018 - ___ • 05/2114 3-90-30007345C
E. Opacity (Visible Smoke)
This is the measure of how cleanly your appliance is burning.
Opacity is measured in percent; 100% opacity is when
anobjectistotallyobscuredbythesmokecolumnfroma
chimney,and0%opacitymeansthatnosmokecolumncan
be seen. As you become familiar with your appliance, you
shouldperiodicallychecktheopacity.Thiswillallowyouto
knowhowtoburnasnearlysmoke-freeaspossible(goalof
0%opacity).
Whenburningyourrstre,youwillexperiencesmokeand
odor from the appliance resulting from the curing of paint
andburningoofanyoilsremainingfrommanufacturing.
OPEN WINDOWS DURING INITIAL BURN TO DISSIPATE
SMOKE AND ODORS!
• Odors may be irritating to sensitive individuals.
• Smokedetectorsmayactivate.
CAUTION
!
Fire Risk
• DONOTBURNGARBAGEORFLAMMABLE
FLUIDSSUCHASGASOLINE,NAPTHAOR
ENGINEOIL.
WARNING
!
• DoNOTburntreatedwoodorwoodwithsalt(driftwood).
• Maygeneratecarbonmonoxideifburnmaterialother
than wood.
May result in illness or possible death.
Fire Risk
Keep combustible materials, gasoline and other
ammablevaporsandliquidsclearofappliance.
WARNING
!
• Combustible materials may ignite.
• DoNOTstoreammablematerialsintheappliance’s
vicinity.
• DO NOT USE GASOLINE, LANTERN FUEL,
KEROSENE, CHARCOAL LIGHTER FLUID OR
SIMILARLIQUIDSTOSTARTOR“FRESHENUP”A
FIREINTHISAppliance.
• Keep all such liquids well away from the appliance
while it is in use.
Negativepressureresultsfromtheimbalanceofairavailable
fortheappliancetooperateproperly.Itcanbestrongestin
lower levels of the house.
Causes include:
• Exhaustfans(kitchen,bath,etc.)
• Rangehoods
• Combustion air requirements for furnaces, water
appliances and other combustion appliances
• Clothes dryers
• Locationofreturn-airventstofurnaceorairconditioning
• ImbalancesoftheHVACairhandlingsystem
• Upperlevelairleakssuchas:
- Recessedlighting
- Attichatch
- Ductleaks
Tominimizetheeectsofnegativeairpressure:
• Install outside air to the stove with the intake facing
prevailing winds during the heating season
• Ensureadequateoutdoorairforall combustion appliances
andexhaustequipment
• Ensurefurnaceandairconditioningreturnventsarenot
located in the immediate vicinity of the appliance
• Avoidinstallingtheappliancenear doors, walkways or
small isolated spaces
• Recessedlightingshouldbea“sealedcan”design
• Attic hatches weather stripped or sealed
• Atticmountedductworkandairhandlerjointsandseams
taped or sealed
F. Negative Pressure
Asphyxiation Risk
• Negative pressure can cause spillage of
combustionfumes,sootandcarbonmonoxide.
• Appliance needs to draft properly for safety.
WARNING
!

Vermont Castings • Intrepid FlexBurn
®
Owner’s Manual_R16 • 2018 - ___ • 05/2115 3-90-30007345C
Draft Testing: An easy way to test your chimney draft is to
closethestove’sdamper,waitafewminutestolettheairow
stabilize, then see whether you can vary the strength of the
rebyswingingtheaircontrolopenandclosed.Resultsare
notalwaysinstant;youmayneedtowaitafewminutesfor
achangeintheaircontrolsettingtohaveaneectonthe
re.Ifthere’snochange,thenthedraftisn’tstrongenough
yet to let you close the damper, and you’ll need to open it for
awhilelongerandmanagetherewiththeairinletuntilthe
draftstrengthens.Ifyoukeeptrackofyourburninghabitsand
relatethemtotheireectsonthestove’soperation,you’llbe
rewarded with good performance and a safe system.
Conclusion: Wood-burningisanartratherthanascience.
Oncethestoveandchimneysystemareinplace,youcan
only vary your technique, mostly your timing, to achieve good
results.Ifyoukeeptrackofyourburninghabitsandrelatethem
totheireectsonthestove’soperation,you’llberewarded
with good performance and years of reliable heating.
G. Important Information
Creosote is a by-product of slow wood-burning. It’s an
organictarthatcancondenseintheueifitispresentinthe
exhaust,slow-moving,andcoolstolessthan290°F(130°C).
Condensed creosote is volatile, and can generate chimney
resifitgetshotenough.Allthefeaturesthataectchimney
draftalso aectcreosotecondensation -sousewhatever
combination of installation features and operational steps that
will encourage good draft and minimize creosote production.
Becauselettingtheexhaustcooloandslowdownisoneof
thekeystocreosoteaccumulation,itmakessensetolinea
chimney to match the stove’s outlet size, for safety reasons
as well as performance. Canadian law requires a matching
linertoserveanystoveorinsertventedthroughareplace
chimney;intheUS,theNationalFireProtectionAssociation
(NFPA)recommendsachimneylineriftheueismorethan
three times bigger (in square area) than the outlet on the
stoveorinsert.SomelocalitiesenforcetheNFPAguidelines
as part of their building codes.
Fuel: Eventhebeststoveinstallationwillnotperformwell
withpoorfuel.Thebestfuelishardwoodthathasair-dried
12-18months.Softwoodburns,butnotaslongashardwood.
‘Green’woodcontainsalotofmoisture;itwillburn,butsome
oftheheatpotentialisusedtoboiltheextramoisturefrom
the wood. This reduces the amount of heat that reaches your
home and can contribute to a creosote problem. There are
moisturemetersavailableforrewood;youcanalsojudge
your wood by its appearance and weight (Moisture content
of20%orlessisbest).Ifyougetitgreen,liftapieceandget
asenseofitsweight;itcanloseathirdormoreofitsweight
asitdries.Alsolookattheendsofalog;asitdriesitshrinks
andoftencracks.Themoreweatheredandcrackedapiece
is, the drier it is.
Drywoodburnsreadilywithagoodchimneydraft.Butwith
modernstoves,woodcanbetoodryandtoovolatile.Smoke
andcombustiblegasescan‘gasout’fromthewoodquickly
anddenselyenoughtooverloadthecombustionsystem.If
youheararumblingorroaringnoise(likeapropanetorch)
fromthestove,thatisasignthatthestoveisover-ring.
Back-pungresultswhenthereproducesvolatilegases
fasterthanthechimneydraftpullsthemoutoftherebox.
Thegasesbackupinthereboxuntiltheyareconcentrated
enoughandhotenoughtoignite.Ifyourstoveback-pus,
thestoveneedstocooldown.Youshouldopenthedamper
toletthesmokerisetotheuemorequickly,allowmoreair
intotherebox,avoidbigloadsofrewoodandcheckthat
the wood moisture is not too low.

Vermont Castings • Intrepid FlexBurn
®
Owner’s Manual_R16 • 2018 - ___ • 05/21 163-90-30007345C
Keep Your Stove Looking New and Working Its Best
Letthereinthestovegooutandallowthestovetocool
completely before beginning any maintenance procedure.
Care of the Cast Iron Surface
Anoccasionaldustingwithadryragwillkeepthepainted
castironofyourIntrepidFlexBurn
®
lookingnew.
Thestove’spaintcanbetouchedupasneeded.First,mask
the areas, such as enameled parts, glass, or handles, around
the spot to be painted. Clean the spot with a wire brush.
Removethegriddleandsetitaside.Itisnormalforthegriddle
todarkenafteruse.Youcancleanitwithane-bristlewire
brush, or steel wool.
Then, touch up the stove with high temperature stove paint.
Applythepaintsparingly;twolightcoatsofpaintarebetter
than a single heavy one.
Care of the Porcelain Enamel Surface
Useadryorslightlydampragorsoftbrushtoremovespills
orstains.Fordicultjobsthatrequireacleaningagent,use
onlyakitchenappliancecleanerorpolishrecommendedfor
use on enamel surfaces.
Ifporcelainenamelbecomeschippedor scratchedduring
use,apply“enamelepoxy”tothedamagedareaandallow
todry.Oncetheepoxyhasdried,sandtheareatoblendwith
surroundingareaandapplyappropriatecolortouch-uppaint.
Allow to dry completely before operating stove.
A. Cleaning & Replacement of the Glass
Mostofthecarbondepositsontheglasswillburnoduring
hotres.
However, the ash residue that accumulates on the glass
surface should be removed regularly to prevent etching. To
clean the glass, follow this procedure:
• Besuretheglassiscompletelycool.DONOTcleanglass
while hot.
• Clean the glass with water or a cleaner made especially for
thispurpose.Donotuseabrasivecleaners.Usecleaning
agentssparinglyandbesuretokeepthemotheouter
surfaces of the stove.
• Rinsetheglassthoroughly.
• Dry the glass completely.
Figure 3.1-Explodedviewoftheglassassemblyfortherightdoor.
Retainer
Clips (3)
Glass Panel
Gasket
RightDoor
Replace Broken Glass Immediately
Do not operate your stove if the glass in the doors is damaged.
Ifyouneedtoreplacetheglass,useonlythehightemperature
5mmceramicglasssuppliedbyVermontCastings.Donot
use substitutes.
Removing the Glass
1. Removetherightandleftdoorassembliesbyraisingthe
door until the lower and upper hinge pin clears its holes.
Placethedoorsfacedownonapaddedworksurface.Be
especially careful with enameled doors.
2. Removethescrewsthatholdtheglassretainerclipsin
place, and remove the clips.
3. Carefullyliftthebrokenglasspanelfromthedoor.
Installing the Glass
Checkthegasketaroundthewindow;itshouldbesoftand
resilient so that the glass will seal properly against the door.
Replacethegasketifithashardenedorifitiscompressed.
1. Centertheglassonthegasket.
2. Securetheglassonboth doors with the retainerclips.
Tighten all screws. (Figure 3.1)
3. Replacethedoorsonthestove.
4. Openandclosethedoorstocheckthattheytandwork
properly. Adjust as necessary.
3 3
Maintenance

Vermont Castings • Intrepid FlexBurn
®
Owner’s Manual_R16 • 2018 - ___ • 05/2117 3-90-30007345C
PressureAdjustingScrew
Allen Wrench
LockNut
Damper
Figure 3.2-AdjustthedamperwiththeAllenwrench.
Figure 3.3-Rotatepawland/orremoveatwashertoadjustlatch.
ST1154
door pawl
Roller
LockNut
SetScrew
ShoulderScrew
HandleStub
Flat Washer
D. Gasket Replacement (as Needed)
YourIntrepidFlexBurn
®
usesberglassropegasketstomake
a tight seal between some parts. With use, particularly on
movingparts,gasketscanbecomebrittleandcompressed
andcanbegintolosetheireectiveness.Thesewillneed
periodic replacement.
Thesizesofreplaceablegasketarelistedbelow,alongwith
their applications.
Gasket Diameter......And the Parts it Seals
5/16" Thegriddletothestovetop(wirereinforcedgasket)
1/4” Outsidedamperhousing.
3/8" Insidedamperhousingopening.
5/16" The front doors to the stove front; and the doors to
each other.
3/8" Theashdoortothefrontofthebottompanel
3/16" Theouterglasspanestothedoor
Ifyouneedtochangeagasket,rstobtainanappropriate
replacementfromyourVermontCastings’AuthorizedDealer.
Waituntilthereisoutandthestovehascooled.Besureto
followthestandardsafetyprocedureforworkingwithdusty
materials:wearsafetygogglesandadustmask.
Theprocedureforreplacinggasketsisthesame,regardless
ofthegasketlocation.Followthesesteps:
1. Removetheexistinggasketbygraspinganendandpulling
rmly.(Figure3.4)
Tighten the Damper Handle as Needed
A handle on the left side of the stove controls the damper.
The handle attaches to the damper rod with a set screw.
Periodicallycheckthesetscrewandtightenasnecessary.
C. Door Latch Adjustment
The front door of the stove should close securely to prevent
accidental opening and should close tightly to prevent air
fromleakingintotherechamber.Thedoorhandlewillbe
positioned vertically when the door is closed.
Over a period of time, the gasket around the door will
compress and the latch may need adjustment. To adjust the
handle, follow this procedure:
1. Loosenthesetscrewwitha1/8”Allenwrench.
2. Turnthelocknutclockwisewitha9/16"wrench.(Figure
3.3)
3. Oncethedesiredtightnessisachieved,tightentheset
screw. (Figure 3.3)
Test the door seal. Close the door on a dollar bill and attempt
to pull it free. If the bill is freed with little resistance, the
gasket isn’t snug enough at that spot. Continue to make
small adjustments until the setting is right.
Ifadditionaladjustingofthelatchdoesnotenablethedoor
tosealsucientlyinonearea,tryadjustingthegasketinthat
area.Packmorecementorasmallerdiametergasketintothe
channelbeneaththegasketsothemaingasketisraisedand
makescontactwiththedoorframe.Ifthisproceduredoesn’t
solvetheproblem,replacethegasket.Instructionsforgasket
replacement are given later in this section.
B. Damper Adjustment (as Needed)
ThetensionontheIntrepidFlexBurn’sdamperisadjustable
tocompensateforcompressionofthegasketthatsealsthe
damper to the damper housing. To adjust the damper:
1. Removethegriddle.Loosenthelocknutatthecenterof
the damper. (Figure 3.2)
2. Turn the pressure screw approximately one half turn
clockwisewithanAllenwrenchprovidedwithyourstove.
3. Tighten the lock nut. Prevent the pressure screw from
turningasyoutightenthenut.Re-testthedamper.
Figure 3.4-Removegasketthencleanchannelwithwirebrush.

Vermont Castings • Intrepid FlexBurn
®
Owner’s Manual_R16 • 2018 - ___ • 05/21 183-90-30007345C
Cement
Stove Gasket
Figure 3.5-Layabeadofgasketsiliconeorcementthenpress
gasketinplace.
E. The Chimney System
Your Intrepid FlexBurn
®
is designed to reduce creosote
build-upsignicantly.However,regularchimneyinspection
and maintenance must still be performed. For safety, good
stove performance, and to protect your chimney and chimney
connector, inspect your chimney and chimney connector on
a regular schedule. Clean the system if necessary. Failure
tokeepthechimneyandconnectorsystemcleancanresult
inaseriouschimneyre.
6.Startingat one end,pressthegasket into thechannel.
(Figure3.5)Ensureagoodjointwherethegasketmeets
beforetrimminganyexcess.Donotoverlapthegasket
ends or leave ends with ragged edges.
7.Pressthegasketedpartrmlyagainstitsnormalmating
surfacetoseat thegasketevenly initschannel.Close
and latch the door to do this, or tap other parts with the
rubbermallet(orhammer/blockofwood).
8.Cleananyexcesscementfromaroundthechannel,then
letthecementthatholdsthenewgasketdrythoroughly.
9. The stove’s doors may need adjustment after you have
regasketed them. Initially, it may require loosening the
latchtoaccommodatethenewgasket;afterafewweeks,
it may need tightening to compensate for compression of
thenewgasket.
All Gasketed Construction Gaskets
Othergasketsformsealsbetweenallothernon-movingparts,
but these are not subject to the same wear and deterioration
asgasketsonmovingparts.Itisunlikelythatyouwillever
needtoreplacethesegasketsunlesstheinvolvedpartsare
disassembledandthenputbacktogether.Ifthisisthecase,
thejobshouldbedoneonlybyaqualiedservicetechnician.
Refertotheservicepartslistforgasketreplacement.
2. Use a wire brush or the tip of a screwdriver to clean
thechannelofanyremainingcementorbitsofgasket.
Removestubborndepositsofcementwithacoldchisel
if necessary. (Figure 3.4)
3.Determine the correct length of the appropriate-sized
gasketbylayingitoutinthechannel.Allowanextra1-2"
(25-50mm),andmarkthespottobecut.
4.Removethegasketfromthechannel,placeitonawood
cuttingsurface,andcutitatthemarkedspotwithautility
knife.
Twisttheendsslightlytokeepthegasketfromunraveling.
5.Layanunbroken1/8"(3mm)beadofsiliconeorcement
inthenewly-cleanedchannel.(Figure3.5)
When wood is burned slowly, it produces tar, organic vapors
and moisture that combine to form creosote. The creosote
vaporscondenseintherelativelycoolchimneyueofaslow-
burningre.Asaresult,creosoteresidueaccumulatesonthe
uelining.Whenignited,thiscreosotemakesanextremely
hotrewithintheuesystemthatcandamagethechimney
andoverheatadjacentcombustiblematerial.Ifasignicant
layerofcreosotehasaccumulated—1/8"(3mm)ormore
—itshouldberemovedtoreducetheriskofachimneyre.
Youcanneverbetoosafe.Contactyourlocalreauthority
forinformationonwhattodointheeventofachimneyre,
and have a clearly understood plan on how to handle one.
Ifyoudoexperienceachimneyre,actpromptlyto:
• Close the damper and air control lever.
• Get everyone out of the house.
• Call the Fire Department.
Inspect the system every two weeks during the heating
season as part of a regular maintenance schedule. To inspect
the chimney, let the stove cool completely. Then, using a
mirrorandastronglight,sightupthroughtheuecollarinto
thechimneyue.Ifyoucannotinspecttheuesysteminthis
fashion, the stove must be disconnected to provide better
viewing access.
Clean the chimney using a brush the same size and shape
astheueliner.Flexibleberglassrodsareusedtorunthe
brush up and down the liner, causing any deposits to fall
to the bottom of the chimney where they can be removed
throughtheclean-outdoor.
Clean the chimney connector by disconnecting the sections,
takingthemoutside,andremovinganydepositswithasti
wirebrush.Reinstalltheconnectorsectionsaftercleaning,
being sure to secure the joints between individual sections
with sheet metal screws.
Ifyoucannotinspectorcleanthechimneyyourself,contact
yourlocalVermontCastingsdealeroraprofessionalchimney
sweep.
WARNING
!
Inspect and Clean Chimney Frequently – Under
certain conditions of use, creosote buildup may occur
rapidly.

Vermont Castings • Intrepid FlexBurn
®
Owner’s Manual_R16 • 2018 - ___ • 05/21 193-90-30007345C
Maintenance Schedule-The Stove
Daily:
• Clear any ash build-up from around the air holes and
combustionowpathintherefractoryreback.
• Ashes should be removed before they reach the top of
theashpan.Checkaccumulationatleastonceaday.
• Keep the area around the stove clear of any combustible
materials such as wood, furniture or clothing.
Two Months:
• Check door handle to be sure it is working properly.
Gasketingbecomescompressedafteraperiodoftime.
Adjust handle tightness if necessary.
• Check leg bolts and heat shield screws; tighten if
necessary.
• If installed:Inspectthecombustorforyashaccumulation
and physical damage. Clean the combustor as needed.
Annual Spring Cleaning:
• Checkgasketingforwear,andreplaceifnecessary.
• Remove ashes from the ash pan and replace with a
moistureabsorbingmaterial(suchaskittylitter)tokeep
the interior of the stove dry.
• Clean the dust from the inner sides of bottom, rear or pipe
heat shields if your stove is equipped with them. Clean
surfacesarebetterheatreectorsthandirtysurfaces.
• Touchuptheblackpaint.
• Inspectforandremoveashbuild-upbehindthecombustion
package.Thisshouldbedoneinconjunctionwithannual
cleaningofthechimneyconnector.Inspectthepassage
behindthecombustionpackage(amirrorwillbehelpful)
and vacuum away ash using a exible vacuum hose
inserted in the passage. (Figure 3.6)
Clean out any
ash build up
Remove
Access Cover
Figure 3.6 - Inspectandcleanoutashaccumulationbehindthe
combustion system.
The Chimney Connector
Two Weeks
• Inspect the chimney connector and chimney. Clean if
necessary.
Two Months:
• Inspectthechimneyandchimneyconnector.Payparticular
attention to the horizontal runs of chimney connector, and
the elbows. Clean the system if necessary.
Annual Spring Cleaning:
• Disassemblethechimneyconnectorandtakeitoutdoors
for inspection and cleaning. Replace weak sections of
connector.
• Inspectthechimneyforsignsofdeterioration.Repairsto
a masonry chimney should be made by a professional
mason. Replace damaged sections of prefabricated
chimney.Your local Vermont Castings dealer or a
chimney sweep can help determine when replacement
is necessary.
• Thoroughly clean the chimney.
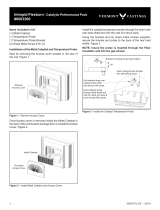
F. The Catalytic Element (Optional)
TheIntrepidFlexburnisdesignedtoburnequallywellwith
or without a catalytic combustor (PartNo.SRV70007430),
howeverhighereciencieswillbeachievedwhenoperating
with the catalyst. The following section only applies if the
catalytic performance pack (Part No. 0003260) has been
purchased and installed. TheIntrepidFlexburnisdesigned
andcertiedtofunctionwithorwithoutacatalyst.Intheevent
thecombustorbecomesnon-functioningthecombustorcan
either be replaced or removed completely.
Ifanon-activecatalystisleftinstalledintheunit,itwillburn
sluggishly and produce noticeable smoke at the outlet of
the venting system. The simplest situation in that case is to
removethedeactivatedcatalystandoperatetheunitasnon-
catalytic. The catalyst can then be replaced as time allows
withoutproducingasmokyburnorlowheatoutput.
IntheUnitedStatesitisagainstthelawtooperatethiswood
heater in a manner inconsistent with the operating instructions
in this manual.
Undernormaloperatingconditions,thecatalyticcombustor
shouldremainactiveforvetosevenyears(dependingonthe
amountofwoodburned).However,itisimportanttomonitor
the combustor periodically to ensure that it is functioning
properly, as well as to determine when it needs to be replaced.
Anon-functioningcombustorwillresultinalossofheating
eciency,andanincreaseincreosoteandemissions.
CAUTION
!
BURN UNTREATED WOOD ONLY. OTHER MATERIALS
SUCH AS WOOD PRESERVATIVES, METALS, FOILS,
COAL, PLASTIC, GARBAGE, SULPHUR, OR OIL, MAY
DAMAGE THE CATALYST.

Vermont Castings • Intrepid FlexBurn
®
Owner’s Manual_R16 • 2018 - ___ • 05/21 203-90-30007345C
Cleaning the Combustor
1. Check the combustors honeycomb-like catalyst for a
buildup of y ash. If any is evident, take the catalyst
outside and clean it by blowing air gently through it. Do
notpushanythingthroughthehoneycomb;thecombustor
should be cleaned by forcing air through the combustor
toremoveyashusingavacuumorcanofcompressed
air.
2.Inspectthecatalystfordamageordegradation.Although
small hairline cracks will not aect performance, the
cataylist should be essentially intact. If the cataylist is
broken in pieces or has sections missing, it should be
removedorreplaced.CallyourlocalVermontCastings
Authorized Dealer for a replacement cataylist.
3.Ifthecataylistisingoodconditionandclean,re-installit
in the stove and replace the refractory access door.
Also, consider any changes in your operating routine.
Onceyouhaveruledoutanyotherpossible causes for a
decline in performance, inspect and clean the combustor if
necessary.Besuretoprotectanysurfaceyouuseforsetting
the stove parts aside.
Inspecting the Combustor
Removeaccessdoorandinnerreback.Removethecatalytic
combustor by lifting up and pulling towards you. (Figure 3.7)
Catalyst
Access Door
InnerFireback
Figure 3.7-Inspectthecatalyticcombustor.
NOTE
Burning“green”(insucientlyseasoned)woodwillresult
in poorer performance than burning properly seasoned
fuel.Reloadingwithgreenwoodcanalsothermalshock
thecatalyst,resultingincracking,ortheeventualfallout,
ofthe ceramichoneycombsubstrate.Youmayhaveto
run your stove hotter (more air) to achieve acceptable
performance using green or wet wood.
When to Suspect a Combustor Problem
ThebestwaytoevaluatetheperformanceofyourIntrepid
FlexBurn’scombustor is to observe the amount of smoke
leavingthechimney—bothwhenthecombustorhas“lighted-
o”andwhenithasnot.Followthesesteps:
• Witharegoingandthecombustorproperlyactivatedand
thedamperclosedtoroutesmokethroughitasdescribed
in the Operation Section, go outside and observe the
smokeleavingthechimney.
• Then,openthestovedamperandonceagaincheckthe
smokeleavingthechimney.
You should see signicantly more smoke when the stove
damper is open and exhaust does not pass through the
combustor.However,becarefulnottoconfusesmokewith
steamfromwetwood.Steamdissipatesintheairquickly;
smokedoes not. Remember that a hot stovewitha 2”-3”
established coal bed is required for catalytic combustion to
occur.
Ifthistestindicatesaproblem,considerotherpossiblefactors
as well, such as the weather or a change in the quality of
yourfuel.Inwarmweather,draftisweakerthanitisincolder
winterweather,andrescanburnsluggishly.Small,hotres
are a good solution under these conditions.
/