Page is loading ...

INDOOR COOKING
All-Gas Range
KRG
Use & Care Manual

SAFETY DEFINITIONS
THIS INDICATES THAT DEATH OR SERIOUS INJURY MAY OCCUR
AS A RESULT OF NOT OBSERVING THIS WARNING.
THIS INDICATES THAT MINOR OR MODERATE INJURY MAY
OCCUR AS A RESULT OF NOT OBSERVING THIS WARNING.
THIS INDICATES THAT DAMAGE TO THE APPLIANCE OR
PROPERTY MAY OCCUR AS A RESULT OF NOT OBSERVING THIS
WARNING.
READ THESE INSTRUCTIONS CAREFULLY AND COMPLETELY BEFORE
INSTALLING OR USING YOUR APPLIANCE TO REDUCE THE RISK OF FIRE,
BURN HAZARD, OR OTHER INJURY. KEEP THIS MANUAL FOR FUTURE
REFERENCE.
CAUTION
NOTICE
Do not store or use gasoline or other flammable vapors and liquids in the vicinity of
this or any other appliance.
WHAT TO DO IF YOU SMELL GAS:
1. Do not try and light any appliance.
2. Do not touch any electrical switch.
3. Do not use any phone in your building.
4. Immediately call your gas supplier from a neighbor’s phone. Follow the gas
supplier’s instructions.
5. If you cannot reach your gas supplier, call the fire department.
Installation and service must be performed by a qualified installer, service agency, or
the gas supplier.
IF THE INFORMATION IN THIS MANUAL IS NOT FOLLOWED
EXACTLY, A FIRE OR EXPLOSION MAY RESULT CAUSING
PROPERTY DAMAGE, PERSONAL INJURY, OR DEATH.
INSTALLER: LEAVE THIS MANUAL WITH THE OWNER OF THE APPLIANCE.
HOMEOWNER: RETAIN THIS MANUAL FOR FUTURE REFERENCE.
TIP OVER HAZARDTIP OVER HAZARD
A child or adult can tip over a range and be killed.
Check installation of the anti-tip device per the Installation Manual.
Do not operate the range without this device in place.
Check engagement of anti-tip device if range is moved, such as when
cleaning behind the unit.
To check engagement, carefully tip the range forward while pulling from the rear of the unit. The
range should not move more that 1 inch [2.5cm].
Failure to follow these instructions can result in death or serious burns to children and adults.
To reduce the risk of burns, do not move this appliance while hot.

©2020 Hestan Commercial Corporation
1
EN
Message from HestanMessage from Hestan
Hestan’s award-winning culinary innovations and purpose-built features reinvented
the restaurant kitchen and redefined culinary experience in some of America’s most
acclaimed restaurants. Hestan now takes this performance from the back of the
house and puts it front and center in yours. Thoughtfully designed and meticulously
built, Hestan will serve you beautifully for years to come.
Hestan is the only residential brand born from the dreams and demands of
professional chefs. From ranges to refrigeration, every detail is designed to deliver
the performance and reliability expected in a restaurant – now available for you.
We appreciate you choosing Hestan, and we promise to deliver the very best to you.
Welcome to HestanWelcome to Hestan


©2020 Hestan Commercial Corporation
3
EN
When properly cared for, your Hestan appliance will provide safe, reliable service for many years.
When using this appliance, basic safety practices must be followed as outlined below.
INSTALLER: Please leave these Installation Instructions with the owner.
OWNER: Please retain these Installation Instructions for future reference.
This range is designed for residential use only. It is NOT designed for installation in manufactured
(mobile) homes or recreational park trailers. Do NOT install this range outdoors.
SAFETY PRECAUTIONS - BEFORE YOU BEGIN
ELECTRICAL SHOCK HAZARDELECTRICAL SHOCK HAZARD
Disconnect power before installing or servicing appliance. Before turning
power ON, be sure all controls are in the OFF position. Failure to do so can
result in electrical shock or death.
ELECTRICAL GROUNDINGELECTRICAL GROUNDING
This appliance must be grounded. Grounding reduces the risk of electric shock in the event of
a short circuit. Read the ELECTRICAL CONNECTIONS section of the Installation Manual for
complete instructions.
This appliance is equipped with a 3-prong grounding plug for your protection against shock hazard
and should be directly plugged into a properly grounded receptacle. Do not cut or remove the
grounding prong from this plug.
TABLE OF CONTENTS
3 SAFETY PRECAUTIONS - BEFORE YOU BEGIN
8 MODEL NUMBERS
9 RATING LABEL
9 REGULATORY / CODE REQUIREMENTS
10 GETTING STARTED WITH YOUR APPLIANCE
16 USING THE RANGETOP
18 USING THE GRIDDLE
(SOME MODELS)
19 USING THE OVEN
22 OVEN CONTROLS
28 ADDITIONAL ITEMS
29 CARE & MAINTENANCE
33 TROUBLESHOOTING GUIDE
34 PARTS LIST
34 SERVICE
34 LIMITED WARRANTY

©2020 Hestan Commercial Corporation
4
EN
SAFETY PRECAUTIONS - BEFORE YOU BEGIN
(CONTINUED)
ELECTRICAL SUPPLYELECTRICAL SUPPLY
This appliance must be connected to a dedicated circuit, 120 VAC, Single Phase, 60 Hz, with a current
rating as shown in the model number listing on page 8. Have the installer show you where the
electric circuit breaker is located so you know how to shut off the power to this appliance. It is the
responsibility of the user to have the appliance connected by a licensed electrician in accordance
with all local codes, or in the absence of local codes, in accordance with the National Electrical Code.
Read the ELECTRICAL CONNECTIONS section of the Installation Manual for complete details.
GAS SUPPLYGAS SUPPLY
A gas shut-off valve must be located in an easily accessible location for servicing of the range. Make
sure all users of the range know where this shut-off is located, and how to shut off the gas.
The type of gas should be verified prior to installation and
operation of this appliance. It is the responsibility of the
user to have the appliance connected by a licensed plumber
in accordance with all local codes, or in the absence of local
codes, in accordance with the National Fuel Gas Code.
When connecting to LP gas, verify the tank is equipped with
its own high pressure regulator. The pressure of the gas
supplied to the appliance must be 11-14 inch WC [2.74-3.48
kPa]. Consult the Installation Manual for details on gas type,
gas pressure, connection and leak testing instructions, etc.
Read the GAS CONNECTIONS section of the Installation
Manual for complete details.
CONVERSION KITSCONVERSION KITS
In the event your Hestan appliance needs to be converted from NG to LP, or vice-versa, you will
need to contact Hestan Customer Service to arrange a service call. This conversion should only be
performed by a qualified technician.
HIGH ALTITUDE KITSHIGH ALTITUDE KITS
If you live in a high altitude area, 2,000 ft. [610 m] or more above sea level, your appliance may
require different orifices for proper combustion and performance. You will need to contact Hestan
Customer Service to arrange a service call. High Altitude kits must be installed by a qualified
technician. Please have your model and serial number information ready when you call.
BACKGUARDBACKGUARD
Your Hestan range is supplied at the factory with an Island Trim backguard. See Table 1 in the
APPENDIX section of the Installation Manual for other backguard options available from your
Hestan dealer, or visit www.hestanhome.com. Selection of the appropriate backguard depends on
the installation location and adjacent materials, and the type of vent hood to be used. Installation
instructions are included with the backguard kit. A LOW OR TALL BACKGUARD IS REQUIRED
WHEN INSTALLING THE RANGE AGAINST A COMBUSTIBLE SURFACE - THE ISLAND TRIM IS
NOT SUITABLE.
CAUTION
The top of the backguard serves as an exhaust for the oven when in operation, and as an exhaust vent
to remove heat from under the rangetop section of the range as well. DO NOT BLOCK or obstruct
the top of the backguard. DO NOT touch the top of the backguard during appliance operation as it
may get hot. Allow sufficient time to cool before touching or cleaning this area. DO NOT position
plastic or other heat-sensitive items nearby which could melt or burn.
GAS
SUPPLY
TO
APPLIANCE
SHUTOFF VALVE
IN OPEN POSITION

©2020 Hestan Commercial Corporation
5
EN
SAFETY PRECAUTIONS - BEFORE YOU BEGIN
(CONTINUED)
VENTILATION REQUIREMENTSVENTILATION REQUIREMENTS
It is strongly recommended that this appliance be installed with a Hestan vent hood. Hestan vent
hoods have been matched up to the BTU output of the range. Due to the high heat output of this
range, it is very important that the hood and ductwork installation meets local building codes and is
installed by a qualified technician.
Do not use a down-draft style ventilation system.
Do not mount a microwave oven/ventilator combination above the range. These types of units do
not have sufficient airflow to remove the high heat output of this range and were not tested with
this type of appliance.
Consult the Installation Manual for further details.
CONSULT WITH YOUR HESTAN DEALER ON SELECTING THE APPROPRIATE
VENT HOOD FOR YOUR HESTAN APPLIANCE.
IN CASE OF POWER OUTAGEIN CASE OF POWER OUTAGE
All the control knobs must be in the OFF position to prevent unintended operation at power up.
To ensure customer safety in the event of a power failure, the range will signal an error by blinking
the backlights of one or more knobs when the power is restored unless all the knobs are in the OFF
position. Set all the knobs to OFF, then resume operation.
DO NOT ATTEMPT TO USE THE RANGE DURING A PROLONGED POWER FAILURE. Although
the top burners can be manually lit, they should be used ONLY WHILE BEING ATTENDED BY THE
USER. On low burner settings, if the flame were to go out, a dangerous accumulation of gas could
result in an explosion.
CAUTION
CHILD SAFETYCHILD SAFETY
IT IS THE RESPONSIBILITY OF THE PARENTS OR GUARDIANS TO ENSURE CHILDREN ARE
INSTRUCTED IN THE SAFE USE OF THIS APPLIANCE. Do not allow children to use this appliance
without adult supervision. Do not allow children to play in or around the appliance, even when not
in use. Items of interest to children should not be stored in or on the appliance, in cabinets above, or
on the backguard of the appliance. Children climbing on the appliance could be seriously injured.
BURN HAZARD - All parts of the range can get very hot during operation. The oven door glass
and areas surrounding the door get especially hot. Do not let children touch the appliance while in
operation. Failure to observe these instructions may result in severe burns or injury.
TECHNICAL SAFETYTECHNICAL SAFETY
Installation and service on this appliance must be performed by a qualified appliance installer, or
a Hestan authorized service technician. Do not repair or replace any part of the appliance unless
specifically instructed to do so. Defective parts must only be replaced with genuine Hestan parts.
Contact Hestan Customer Service for inquiries or to arrange a service call.
The appliance must be disconnected from the power and gas supply during any service or
maintenance work.
Do not carry or lift the range by the oven handle. The range can only lifted from the sides.

©2020 Hestan Commercial Corporation
6
EN
SAFETY PRECAUTIONS - BEFORE YOU BEGIN
(CONTINUED)
USER SAFETYUSER SAFETY
BURN HAZARD - All parts of the range can get very hot during operation, especially the oven door
glass and areas surrounding the door. Do not touch the appliance while in operation. Failure to
observe these instructions may result in severe burns or injury. Use pot holders / gloves to protect
yourself when placing food in the oven, adjusting the racks, etc.
The broil burner is in the top of the oven cavity, and the bake burner is hidden beneath the floor
of the oven cavity. These burners may be hot, even though they are not glowing. During or after
cooking, allow sufficient time for all surfaces to cool.
Use only dry or heat-resistant pot holders / gloves. Using moist or damp potholders can result in
steam burns. Do not substitute dish towels or similar items for potholders. These items could come
in contact with hot surfaces and ignite.
Avoid wearing loose-fitting garments or long sleeves while cooking. They could ignite. For personal
safety, wear proper apparel while using the appliance. Some synthetic fabrics are highly flammable
and should not be worn while cooking.
Open the oven door slowly to allow heat and steam to escape before placing or removing food from
the oven. Keep your face away from the opening to avoid injury.
For safety considerations, NEVER use this appliance as a space heater to heat or warm the room.
Doing so may result in carbon monoxide poisoning and overheating of the oven.
Do not use the oven as a storage space. The high temperatures could also ignite flammable objects
nearby.
NEVER cover any slots, holes, or passages in the oven bottom or cover an entire oven rack with
materials such as aluminum foil. Doing so blocks air flow through the oven and may cause carbon
monoxide poisoning. Aluminum foil linings may also trap heat, causing a fire hazard. Do not use
aluminum foil to line the surface burners. Doing so may result in a risk of electric shock, or fire.
Do not allow anyone to climb, stand, step on, lean against, or sit on any part of the appliance,
especially the oven door. This may result in damage to the appliance, or personal injury.
FIRE SAFETYFIRE SAFETY
To reduce the risk of a fire, do not leave surface burners unattended at high settings. Boil-overs could
smother the flames and igniter, which would allow un-burned gas to escape into the room, which
could result in an explosion.
Always turn on the ventilation hood when cooking. Clean vent hood grease filters frequently -
grease should not be allowed to accumulate on the fan or filters.
Use the appropriate pan size for the burner being used. For safety considerations, adjust the flame
size so they do not travel up the sides of the pan.
Keep the appliance area clear and free from combustible materials, gasoline, and other flammable
vapors and liquids. NEVER store flammable liquids and materials in, above, or on the range, or near
cooking surfaces. Do not obstruct the flow of combustion and ventilation air of the appliance.
ALWAYS have a working smoke detector near the kitchen.

©2020 Hestan Commercial Corporation
7
EN
ALWAYS have an appropriate dry-chemical fire extinguisher nearby. Smother fire or flames using
the lid of the utensil (pot or pan), a cookie sheet or metal tray. Then shut off the burner. Use an
extinguisher, or baking soda if the fire is small and relatively contained. DO NOT USE WATER ON A
GREASE FIRE. Doing so may result in spreading the fire elsewhere.
NEVER pick up a flaming pan. You may spill the grease on yourself and be severely burned.
If accessible, turn off the ventilation hood during a fire, but do not reach through the flames to do
this.
In the event of personal clothing or hair catching fire, drop and roll immediately to smother the
flames. Seek medical attention if necessary.
Do not hang articles from any part of the appliance or place anything against the oven door. Some
fabrics are highly flammable and could ignite.
IF THE FLAMES DO NOT GO OUT - EVACUATE AND CALL THE FIRE
DEPARTMENT.
SAFETY DURING CLEANINGSAFETY DURING CLEANING
Only clean the appliance as directed in the CLEANING & MAINTENANCE section of this manual.
Do not use a steam cleaner to clean the oven or any part of the range. Steam could penetrate into
electrical components and cause a short circuit and/or shock hazard.
Do not use abrasive cleaners, hard objects such as brushes or scrapers, or sharp metal tools to clean
the door glass. Scratches could cause the glass to shatter.
Do not rub, disturb or damage the cloth-braided door gasket. If the gasket is damaged, it will need to
be replaced.
Do not pour cold water onto hot surfaces inside the oven. The steam could cause serious burns. The
sudden temperature change could also distort the metal surfaces inside the oven resulting in cracks in
the enamel.
Use only a small toothbrush to clean the burner ports and igniter of the surface burners. Do not
insert sharp objects or scratch the burner ports.
Wait until the appliance is completely cool before using any aerosol-type cleaners. Many of these
cleaners use flammable propellants which could ignite in the presence of heat.
PROPER USAGEPROPER USAGE
Do not let food sit in the oven for more than one hour before or after cooking. Doing so may result
in food poisoning or illness.
Do not heat unopened containers (cans or jars) in the oven. Pressure may build up causing the
container to explode, resulting in damage to the oven or personal injury.
Always place the oven racks at the desired height before cooking. If the racks must be moved when
hot, use potholders to move them and use caution to avoid touching any heating elements.
Only certain types of glass, heatproof glass-ceramic, earthenware, or other glazed utensils are
suitable for use on the surface burners. However, these types of materials may break with
sudden temperature changes. Use only on low or medium heat settings, and according to their
manufacturers’ directions.
Bakeware, such as large casserole pans, cookie sheets, etc. should not be used on the surface burners.
Large griddle plates that span across 2 burners should be used with care and on medium to low flame
settings to avoid a build-up of heat which could distort the grates or the burner bowl.
Always position the handles of pot and pans so they do not extend over adjacent work areas or over
the edge of the rangetop. This is to avoid knocking over hot contents which could burn you, or
result in a fire.
Do not use pots or pans on the griddle (if equipped).
SAFETY PRECAUTIONS - BEFORE YOU BEGIN
(CONTINUED)

©2020 Hestan Commercial Corporation
8
EN
MODEL NUMBERS
RANGE MODELSRANGE MODELS
MODEL NO.MODEL NO. DESCRIPTIONDESCRIPTION
CIRCUIT BREAKER CIRCUIT BREAKER
REQUIREDREQUIRED
KRG304-NG / -LP 30” GAS RANGE WITH 4 BURNERS 15 Amp
KRG365-NG / -LP 36” GAS RANGE WITH 5 BURNERS 15 Amp
KRG364GD-NG / -LP 36” GAS RANGE WITH 4 BURNERS & GRIDDLE 15 Amp
KRG485-NG / -LP 48” GAS RANGE WITH 5 BURNERS & 12” GRIDDLE 15 Amp
KRG484GD-NG / -LP 48” GAS RANGE WITH 4 BURNERS & 24” GRIDDLE 15 Amp
KRG365KRG365
KRG304KRG304
KRG485GDKRG485GD
KRG484GDKRG484GDKRG364GDKRG364GD

©2020 Hestan Commercial Corporation
9
EN
REGULATORY / CODE REQUIREMENTS
Installation of this cooking appliance must be made in accordance with local codes. In the absence
of local codes, this unit should be installed in accordance with the National Fuel Gas Code
ANSI
Z223.1/NFPA 54
, Natural Gas and Propane Installation code
CSA B149.1
, or Propane Storage and
Handling Code
B149.2
.
All Electrical Components must be electrically grounded in accordance with local codes or in the
absence of local codes with the National Electrical Code
ANSI/NFPA 70
, or Canadian Electrical code
CSA C22.1
.
STATE OF MASSACHUSETTS
Massachusetts requires all gas be installed using a plumber or gas fitter carrying the appropriate
Massachusetts license. All permanently installed natural gas or propane installations require a
T-handle type manual gas valve be installed in the gas supply line to this appliance. Flexible gas
connector must not be longer than 48” [1.2 m].
CALIFORNIA PROPOSITION 65 - WARNINGCALIFORNIA PROPOSITION 65 - WARNING
WARNING:WARNING: This product can expose you to chemicals including carbon monoxide, which is
known to the State of California to cause birth defects or other reproductive harm.
For more information, go to www.P65Warnings.ca.gov.
RATING
LABEL
RATING LABEL
The rating label contains important information about your
Hestan appliance such as the model and serial number, gas type
and manifold pressure, electrical rating, the BTU rating for each
burner type, and the minimum installation clearances.
The rating label is located on the right side of the oven cavity
opening near the door hinge.
If service is necessary, contact Hestan Customer Care with the
model and serial number information shown on the label.

©2020 Hestan Commercial Corporation
10
EN
GETTING STARTED WITH YOUR APPLIANCE
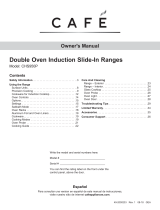
COMPONENT IDENTIFICATION COMPONENT IDENTIFICATION
Use the images below to familiarize yourself with the various parts of the rangetop and oven.
KRG30, KRG36KRG30, KRG36
1. Island Trim Backguard (included)*
2. Sealed Burner
3. Burner Grate
4. Griddle (GD models)
5. Control Knobs
6. Oven
7. Oven Light Switch
8. Kick Plate
3
5
8
6
7
2
4
1
1
6
7
54
2
3
* Low or Tall Backguard ordered
separately.
MODEL KRG364GD SHOWN
Oven cavity of 30” range, 36”
range, main oven cavity of 48”
range
1. Interior Light (2)
2. 6 Position Ladder Rack
3. Oven Rack (3 included)
4. Fan Cover
5. Broil Burner
6. Bake Burner (hidden)
7. Temperature Sensor

©2020 Hestan Commercial Corporation
11
EN
COMPONENT IDENTIFICATION (CONTINUED) COMPONENT IDENTIFICATION (CONTINUED)
Use the images below to familiarize yourself with the various parts of the rangetop and oven.
KRG48KRG48
1. Island Trim Backguard
(included)*
2. Griddle
3. Sealed Burner - Dual
Flow
4. Sealed Burner - Single
Flow
5. Burner Grate
6. Control Knobs
7. Oven Light Switch -
Companion Oven
8. Oven Light Switch -
Main Oven
9. Companion Oven
10. Main Oven
11. Kick Plate
3
5
8
9
10
11
6
7
2
4
1
MODEL KRG485GD SHOWN
Companion Oven cavity of 48” range
1. 6 Position Ladder Rack
2. Oven Rack (3 included)
3. Fan Cover
4. Bake Burner (hidden)
5. Temperature Sensor
6. Interior Light
1
3
4
6
2
5

©2020 Hestan Commercial Corporation
12
EN
GETTING STARTED WITH YOUR APPLIANCE
(CONTINUED)
DUAL-FLOW DUAL-FLOW
BURNERBURNER
SINGLE-FLOW SINGLE-FLOW
BURNERBURNER
OVEN MODE OVEN MODE
SELECTORSELECTOR
OVEN OVEN
TEMPERATURETEMPERATURE
GRIDDLE GRIDDLE
TEMPERATURETEMPERATURE
ROTATE LEFTLEFT TO HI
TO IGNITE BURNER.
ADJUST FLAME AS
NEEDED. THERE ARE
3 DETENT POSITIONS
AT HI, LOW, AND HI
SIMMER FOR EASE OF
USE.
ROTATE LEFTLEFT TO
MAX TO IGNITE
BURNER. ADJUST
FLAME AS NEEDED.
THERE IS A DETENT
AT THE MAX
POSITION ONLY.
ROTATE
LEFTLEFT OR
RIGHTRIGHT TO SELECT
OVEN MODE
ROTATE LEFTLEFT OR
RIGHTRIGHT TO SELECT
OVEN TEMPERATURE
LED indicates one or
both oven burners
are active.
ROTATE RIGHTRIGHT TO
SELECT GRIDDLE
TEMPERATURE

©2020 Hestan Commercial Corporation
13
EN
GETTING STARTED WITH YOUR APPLIANCE
(CONTINUED)
OVEN RACKSOVEN RACKS
BURN HAZARD - To help prevent burns, never remove or reposition the oven racks when the oven is
in operation, or is cooling.
For safety considerations, NEVER cover any slots, holes, or passages in the oven bottom or cover an
entire oven rack with materials such as aluminum foil. Doing so blocks air flow through the oven
and may cause carbon monoxide poisoning. Aluminum foil linings may also trap heat, causing a fire
hazard.
PLACING THE OVEN RACKSPLACING THE OVEN RACKS
The oven features ladder racks on the left and right side of the oven with 6 positions. Choose
the rack position(s) that result in the best baking, roasting, etc. for your recipe. Rack position #3
(counting from the bottom-up) is the most popular position (vertical center location).
1. While raising the front of the rack slightly,
place the rear lower hooks under the
desired side ladder, then slide the rack
back approximately 5” [13 cm].
2. Lower the rack until it is level.
3. Continue sliding the rack back into the
oven until it is fully inside.
2
1
3

©2020 Hestan Commercial Corporation
14
EN
GETTING STARTED WITH YOUR APPLIANCE
(CONTINUED)
SEALED BURNERSSEALED BURNERS
Ensure the sealed burner heads are properly installed and seated on the burner base as shown below.
There are notches on the burner base and cross ring to help with alignment. The outer burner head
features a long slot on the top of the head which aligns with the spark igniter. Assembly of the
single-flow burner head is similar.
FIRST TIME OPERATIONFIRST TIME OPERATION
Ensure there are no packaging materials inside the oven. Remove any labels or plastic film from the
outside of the appliance. Before using your oven for the first time, it will be necessary to run a bake
cycle to burn off any manufacturing oils and residues from the oven cavity. This may produce a little
smoke and some odor. This is normal and is typical of any new oven when first used. If the smell
is strong, remove persons and animals from the kitchen during this period. Open any windows to
further vent the odor from the room.
Install all the oven racks. Turn on your vent hood, and run the oven on BAKE at 500°F [260°C] for
1-1/2 hours. Allow to cool completely before attempting to cook.
DUAL FLOW
BURNER
SINGLE FLOW
BURNER
BURNER
RING
BURNER
HEAD
BURNER
BASE
IGNITER
INNER
BURNER
HEAD
OUTER
BURNER
HEAD
BEAUTY
RING
CROSS
RING
BURNER
BASE

©2020 Hestan Commercial Corporation
15
EN
GETTING STARTED WITH YOUR APPLIANCE
(CONTINUED)
BURNER HEADSBURNER HEADS
If the burner head is not properly positioned, one or more of the following issues may occur:
• Flames too high
• Flames shoot out of the burners
• Burners do not ignite
• Flames are uneven
• Burner emits a gas odor
BURN HAZARD - To prevent burns, do not touch the burner heads or cooking grates when hot.
Allow to cool completely. To prevent flare-ups, do not use the burner without all the burner heads in
place and properly positioned. Do not use aluminum foil to line the surface burners. Doing so may
result in a risk of electric shock, or fire.
BURNER GRATESBURNER GRATES
See image for proper placement
of the burner grates. There are
small round embosses at the
front and rear of the burner
bowl to help align the grates
and keep them in position
relative to one-another.
GRIDDLE PLATEGRIDDLE PLATE
(GD models)
See image for proper placement
of the Griddle Plate and Grease
Tray.
CAUTION
Be sure to remove the cover
before turning the griddle on.
The plate is made of stainless-
steel and requires no seasoning.
The grease tray has a non-stick
coating for easy cleaning.
GREASE
TRAY
GRIDDLE
PLATE
COVER

©2020 Hestan Commercial Corporation
16
EN
USING THE RANGETOP
BURNER CONTROL KNOBSBURNER CONTROL KNOBS
Each sealed burner has its own control knob. The symbol below each knob indicates which burner is
controlled by each knob. Push and turn LEFT (counter-clockwise) to HI to ignite the flame, then turn
to the desired flame setting.
BURNER TYPES & OUTPUTBURNER TYPES & OUTPUT
This table below indicates the type and output of each sealed burner. Dual-flow burners have an
inner and outer row of ports, with a simmer function. The single-flow burner (some models) is
similar to a commercial burner and features very high output, and a low, but no simmer function.
RE-IGNITIONRE-IGNITION
Each sealed burner has its own electronic spark-ignition module with flame-sensing technology and
automatic re-ignition capability. If any burner should blow out, the igniter automatically re-lights the
burner.
Each burner should light in less than 4 seconds. Once lit, the sparking will stop. On very low simmer,
an occasional sparking may occur. This is usually due to a breeze in the room. If an igniter continues
to spark even with a flame present, there could be an electrical wiring issue, or some other problem.
See the TROUBLESHOOTING section of this manual for more information.
DO NOT touch the burner or the igniters while sparking is occurring. A shock hazard or burns could
occur.
MANUAL LIGHTING / POWER FAILUREMANUAL LIGHTING / POWER FAILURE
THE OVEN AND GRIDDLE CANNOT BE USED DURING A POWER FAILURE.
Each sealed burner can be manually lit in the event of a power failure. It is necessary to light each
burner individually.
If a power failure occurs WHILE you are using the sealed burners, turn all the knobs to the OFF
position - then light manually with a match or fireplace lighter.
Position the match or fireplace lighter at the port nearest the igniter, then turn the knob to HI until
the flame is lit. Wait until the flame has lit all the way around the burner before adjusting the knob
to LOW or SIMMER.
IF YOU SMELL GAS, turn all control knobs to OFF - check the precautions listed in the SAFETY
section of this manual.
DUAL-FLOW
(FRONT)
OUTPUT
(BTU/hr)
DUAL-FLOW
(REAR)
OUTPUT
(BTU/hr)
SINGLE
FLOW
OUTPUT
(BTU/hr)
HI
23000
HI
15500
MAX
30000
LOW
4200
LOW
4200
LOW
4200
SIMMER HI
1500
SIMMER HI
1500
SIMMER LOW
500
SIMMER LOW
500
DUAL-FLOW
(FRONT)
OUTPUT
(BTU/hr)
DUAL-FLOW
(REAR)
OUTPUT
(BTU/hr)
SINGLE
FLOW
OUTPUT
(BTU/hr)
HI
23000
HI
15500
MAX
22000
LOW
4200
LOW
4200
LOW
SIMMER HI
1500
SIMMER HI
1500
SIMMER LOW
600
SIMMER LOW
600
BURNER OUTPUT - PROPANE
4200
BURNER OUTPUT - NATURAL GAS

©2020 Hestan Commercial Corporation
17
EN
USING THE RANGETOP
(CONTINUED)
FLAME HEIGHTFLAME HEIGHT
Proper flame height depends on the size of the pan being used, and the amount of food or liquid in
the pan. In other words, don’t use a small pan over a large flame. For safety reasons, control the flame
height so that it doesn’t go beyond, or curl up the sides of your pot or pan. This behavior results in
poor heating of the contents of the pan, burnt food on the sides of the pan, wasted fuel, etc.
Use a low or medium flame on items that heat slowly, such as glass-ceramic pots.
FLAME CHARACTERISTICSFLAME CHARACTERISTICS
Light blue flame - Natural gas normal flame
Light blue flame with yellow tips - LP gas normal flame
Yellow flame - Needs adjustment
If the flame is mostly or completely yellow, check the
position of the burner heads again for proper installation,
and/or review the FINAL SETUP section of the installation
manual for more details.
HOW TO USE YOUR RANGETOPHOW TO USE YOUR RANGETOP
DUAL FLOW BURNERSDUAL FLOW BURNERS
The benefit of the dual-flow burner is the amount of control and precision the burners give you,
allowing for the best results possible.
Simmer-Low is ideal for heating delicate foods without having the fear of burning, scalding, or boiling
over. Some suggestions include:
• Melting chocolate
• Heating milk or cream
• Melting sugar
• Slow cooking or braising
SINGLE FLOW BURNER (some models)SINGLE FLOW BURNER (some models)
Ideal Uses:
• Searing
• Boiling water
• Large stock pots – will allow for even heat distribution under larger surface areas
• Wok Cooking: We suggest a 14-16 inch [36-41 cm] wok for the best results.
COOKWARE RECOMMENDATIONSCOOKWARE RECOMMENDATIONS
As previously stated in “PROPER USAGE” on page7, bakeware such as large casserole pans, cookie
sheets, etc. should not be used on the surface burners. Large griddle plates that span across 2 burners
should be used with care and on medium to low flame settings to avoid a build-up of heat which could
distort the grates or the burner bowl.
Large stock pots should be staggered when used on the rangetop (see below).
Do not cook on aluminum foil or thin, disposable aluminum pans. These can melt.
Never let a pot boil dry. If left too long, the pan could melt, or damage the appliance.
Use only high-quality pans with metal handles. Some plastic handles could melt from the intense heat
of the burners.

©2020 Hestan Commercial Corporation
18
EN
USING THE GRIDDLE
(SOME MODELS)
GRIDDLE CONTROL KNOBGRIDDLE CONTROL KNOB
The griddle is electronically controlled with a temperature range of 120°F - MAX (approx. 500°F) [49
- 260°C]. Push and turn RIGHT (clockwise) to select the desired temperature for the food you are
cooking.
To avoid injury DO NOT operate the griddle without the griddle plate and grease tray in place.
Remove the cover before use.
CAUTION
The griddle is very hot after use. Allow sufficient time to cool down before cleaning.
DO NOT use metal utensils (pots, pans, etc.) on the griddle plate surface. Be careful not to gouge or
cause deep scratches in the griddle plate surface. DO NOT cut directly on the griddle plate.
FIRST TIME OPERATIONFIRST TIME OPERATION
Before using your griddle for the first time, the griddle plate and the grease tray should be cleaned
with warm, soapy water and thoroughly rinsed and dried. When you first heat the plate, a little
smoke and some odor may be present as any remaining manufacturing oils are burned off. The
stainless-steel plate will discolor from a straw color, to a very dark brown or black, depending on
what foods you cook on the surface.
USING THE RANGETOP
(CONTINUED)
/