Page is loading ...

Write the model and serial
numbers here:
Model # _________________
Serial # _________________
You can find them on a label
behind the door or drawer.
ESPAÑOL
Para consultar una version en
español de este manual de
instrucciones, visite nuestro sitio de
internet GEAppliances.com.
OWNER’S MANUAL
RANGES
Electric Induction Front Control
49-2000876 Rev. 1 04-21 GEA
30" Induction Range
PHS93X
GE is a trademark of the General Electric Company. Manufactured under trademark license.
SAFETY INFORMATION .......... 3
USING THE RANGE
Surface Units ........................... 8
Cookware for Induction Cooktop .........10
Precision Cooking ......................12
Oven Controls ..........................18
Settings ...............................19
Sabbath ...............................21
Oven Racks ........................... 22
Aluminum Foil and Oven Liners .......... 23
Cookware ............................. 23
Cooking Modes ........................ 23
Oven Door Camera ....................24
Oven Probe ........................... 25
Cooking Guide ........................26
Air Fry Cooking Guide .................. 27
CARE AND CLEANING
Cleaning the Range – Exterior ........... 28
Cleaning the Range – Interior ...........29
Cleaning the Glass Cooktop .............30
Oven Probe ............................31
Oven Light ............................ 32
Oven Door ............................ 33
Soft Close Drawer ..................... 33
TROUBLESHOOTING TIPS .......34
LIMITED WARRANTY ............ 38
ACCESSORIES ....................39
CONSUMER SUPPORT ...........40

2 49-2000876 Rev. 1
THANK YOU FOR MAKING GE APPLIANCES A PART OF YOUR HOME.
Whether you grew up with GE Appliances, or this is your first, we’re happy to have you in the family.
We take pride in the craftsmanship, innovation and design that goes into every GE Appliances
product, and we think you will too. Among other things, registration of your appliance ensures that we
can deliver important product information and warranty details when you need them.
Register your GE appliance now online. Helpful websites and phone numbers are available in the
Consumer Support section of this Owner’s Manual. You may also mail in the pre-printed registration
card included in the packing material.

49-2000876 Rev. 1 3
READ AND SAVE THESE INSTRUCTIONS
IMPORTANT SAFETY INFORMATION
READ ALL INSTRUCTIONS BEFORE USING THE APPLIANCE
SAFETY INFORMATION
ANTI-TIP DEVICE
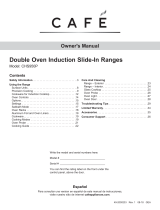
To reduce the risk of tipping the range,
the range must be secured by a properly
installed anti-tip bracket. See installation
instructions shipped with the bracket for
complete details before attempting to install.
For Free-Standing and Slide-In Ranges
To check if the bracket is installed and
engaged properly, look underneath the
range to see that the rear leveling leg is
engaged in the bracket. On some models, the storage drawer or kick panel
can be removed for easy inspection. If visual inspection is not possible,
slide the range forward, confirm the anti-tip bracket is securely attached to
the floor or wall, and slide the range back so the rear leveling leg is under
the anti-tip bracket.
If the range is pulled from the wall for any reason, always repeat this
procedure to verify the range is properly secured by the anti-tip bracket.
Never completely remove the leveling legs or the range will not be secured
to the anti-tip device properly.
WARNING
Read all safety instructions before using the product. Failure to follow these instructions may result
in fire, electrical shock, serious injury or death.
• A child or adult can tip the range and be killed.
• Install the anti-tip bracket to the wall or floor.
• Engage the range to the anti-tip bracket by sliding the
range back such that the foot is engaged.
• Re-engage the anti-tip bracket if the range is moved.
• Failure to do so can result in death or serious burns
to children or adults.
Tip-Over Hazard
WARNING
Anti-Tip
Bracket
Leveling Leg
Free-Standing and Slide-In Ranges
WARNING
GENERAL SAFETY INSTRUCTIONS
This unit has been tested and found to comply with the
limits for a class B digital device, pursuant to Part 18
of the FCC rules. These limits are designed to provide
reasonable protection against harmful interference in
a residential installation. This unit generates, uses and
can radiate radio frequency energy and, if not installed
and used in accordance with the instructions, may
cause harmful interference to radio communications.
However, there is no guarantee that interference
will not occur in a particular installation. If this unit
does cause harmful interference to radio or television
reception, which can be determined by turning the unit
off and on, the user is encouraged to try to correct the
interference by one or more of the following measures:
Ŷ 5HRULHQWRUUHORFDWHWKHUHFHLYLQJDQWHQQDH
Ŷ ,QFUHDVHWKHGLVWDQFHEHWZHHQWKHXQLWDQG
receiver.
Ŷ &RQQHFWWKHXQLWLQWRDQRXWOHWRUDFLUFXLWGLIIHUHQW
from that to which the receiver is connected.
Ŷ 8VHWKLVDSSOLDQFHRQO\IRULWVLQWHQGHGSXUSRVHDV
described in this Owner’s Manual.
Ŷ +DYH\RXUUDQJHLQVWDOOHGDQGSURSHUO\JURXQGHGE\
a qualified installer in accordance with the provided
installation instructions.
Ŷ $Q\DGMXVWPHQWDQGVHUYLFHVKRXOGEHSHUIRUPHG
only by a qualified installer or service technician.
Do not attempt to repair or replace any part of your
range unless it is specifically recommended in this
manual.
Ŷ %HIRUHSHUIRUPLQJDQ\VHUYLFHXQSOXJWKHUDQJH
or disconnect the power supply at the household
distribution panel by removing the fuse or switching
off the circuit breaker.
Ŷ 'RQRWOHDYHFKLOGUHQDORQHRUXQDWWHQGHGLQDQ
area where an appliance is in use. They should
never be allowed to climb, sit or stand on any part
of the appliance.
CAUTION
Persons with a pacemaker or similar medical device should exercise caution when using or
standing near an induction unit while it is in operation. The electromagnetic field may affect the working of the
pacemaker or similar medical device. It is advisable to consult your doctor or the pacemaker manufacturer
about your particular situation.

4 49-2000876 Rev. 1
WARNING
KEEP FLAMMABLE MATERIALS AWAY FROM THE RANGE
Failure to do so may result in fire or personal injury.
Ŷ 'RQRWVWRUHRUXVHIODPPDEOHPDWHULDOVLQDQRYHQ
or near the cooktop, including paper, plastic, pot
holders, linens, wall coverings, curtains, drapes and
gasoline or other flammable vapors and liquids.
Ŷ 1HYHUZHDUORRVHILWWLQJRUKDQJLQJJDUPHQWVZKLOH
using the appliance. These garments may ignite if
they contact hot surfaces causing severe burns.
Ŷ 'RQRWOHWFRRNLQJJUHDVHRURWKHUIODPPDEOH
materials accumulate in or near the range. Grease
in the oven or on the cooktop may ignite.
SAFETY INFORMATION
READ AND SAVE THESE INSTRUCTIONS
IMPORTANT SAFETY INFORMATION
READ ALL INSTRUCTIONS BEFORE USING THE APPLIANCE
WARNING
GENERAL SAFETY INSTRUCTIONS (Cont.)
Ŷ
CAUTION
Do not store items of interest to
children above a range or on the backguard of a
range—children climbing on the range to reach
items could be seriously injured.
Ŷ 8VHRQO\GU\SRWKROGHUV²PRLVWRUGDPSSRW
holders on hot surfaces may result in burns from
steam. Do not let pot holders touch hot surface
units or heating elements. Do not use a towel or
other bulky cloth in place of pot holders.
Ŷ 1HYHUXVH\RXUDSSOLDQFHIRUZDUPLQJRUKHDWLQJ
the room.
Ŷ %HVXUHDOOSDFNLQJPDWHULDOVDUHUHPRYHGIURPWKH
range before operating to prevent ignition of these
materials.
Ŷ 'RQRWXVHDQ\W\SHRIIRLORUOLQHUWRFRYHUWKH
oven bottom or anywhere in the oven, except as
described in this manual. Oven liners can trap heat
or melt, resulting in damage to the product and risk
of shock, smoke or fire.
Ŷ Do not use the oven if a heating element develops
a glowing spot during use or shows other signs of
damage. A glowing spot indicates the surface unit
may fail and present a potential burn, fire, or shock
hazard. Turn the heating element off immediately
and have it replaced by a qualified service
technician.
Ŷ 'RQRWWRXFKWKHVXUIDFHXQLWVWKHKHDWLQJHOHPHQWV
or the interior surface of the oven. These surfaces
may be hot enough to burn even though they are
dark in color. During and after use, do not touch,
or let clothing or other flammable materials contact
the surface units, areas nearby the surface units or
any interior area of the oven; allow sufficient time
for cooling first. Other surfaces of the appliance
may become hot enough to cause burns. Potentially
hot surfaces include the cooktop, areas facing the
cooktop, oven vent opening, surfaces near the
opening and crevices around the oven door.
Ŷ 'RQRWKHDWXQRSHQHGIRRGFRQWDLQHUV3UHVVXUH
could build up and the container could burst,
causing an injury.
Ŷ $YRLGVFUDWFKLQJRULPSDFWLQJJODVVGRRUVFRRNWRSV
or control panels. Doing so may lead to glass
breakage. Do not cook on a product with broken
glass. Shock, fire or cuts may occur. Contact a
qualified technician immediately.
Ŷ &RRNIRRGWKRURXJKO\WRKHOSSURWHFWDJDLQVW
foodborne illness. Minimum safe food temperature
recommendations can be found at IsItDoneYet.gov
and fsis.usda.gov8VHDIRRGWKHUPRPHWHUWRWDNH
food temperatures and check several locations.
Ŷ 'RQRWDOORZDQ\RQHWRFOLPEVWDQGRUKDQJRQWKH
oven door, drawer, or cooktop. They could damage
the range or tip it over, causing severe injury or
death.

49-2000876 Rev. 1 5
SAFETY INFORMATION
READ AND SAVE THESE INSTRUCTIONS
IMPORTANT SAFETY INFORMATION
READ ALL INSTRUCTIONS BEFORE USING THE APPLIANCE
WARNING
IN THE EVENT OF A FIRE, TAKE THE FOLLOWING
STEPS TO PREVENT INJURY AND FIRE SPREADING
Ŷ 'RQRWXVHZDWHURQJUHDVHILUHV1HYHUSLFNXSD
flaming pan. Turn the controls off. Smother a flaming
pan on a surface unit by covering the pan completely
with a well-fitting lid, cookie sheet or flat tray. If
necessary, use a multi-purpose dry chemical or
foam-type fire extinguisher.
Ŷ ,IWKHUHLVDILUHLQWKHRYHQGXULQJEDNLQJVPRWKHU
the fire by closing the oven door and turning the
oven off or by using a multi-purpose dry chemical or
foam-type fire extinguisher.
Ŷ ,IWKHUHLVDILUHLQWKHRYHQGXULQJVHOIFOHDQWXUQ
the oven off and wait for the fire to go out. Do not
force the door open. Introduction of fresh air at self-
clean temperatures may lead to a burst of flame
from the oven. Failure to follow this instruction may
result in severe burns.
WARNING
COOKTOP SAFETY INSTRUCTIONS
Ŷ 1HYHUOHDYHWKHVXUIDFHXQLWVXQDWWHQGHG%RLORYHUV
cause smoking and greasy spillovers that may ignite.
Ŷ 1HYHUOHDYHRLOXQDWWHQGHGZKLOHIU\LQJ,IDOORZHG
to heat beyond its smoking point, oil may ignite
resulting in fire that may spread to surrounding
FDELQHWV8VHDGHHSIDWWKHUPRPHWHUZKHQHYHU
possible to monitor oil temperature.
Ŷ 7RDYRLGRLOVSLOORYHUDQGILUHXVHDPLQLPXP
amount of oil when shallow pan-frying and avoid
cooking frozen foods with excessive amounts of ice.
Ŷ 8VHSDQVWKDWILWWKHHOHPHQWVL]H7KHSDQPXVWEH
large enough for the element to detect the pan and
be able to deliver full power.
Ŷ 7RPLQLPL]HWKHSRVVLELOLW\RIEXUQVLJQLWLRQRI
flammable materials and spillage, the handle of a
container should be turned toward the center of the
range without extending over nearby surface units.
Ŷ :KHQSUHSDULQJIODPLQJIRRGVXQGHUDKRRGWXUQWKH
fan on.
Ŷ $YRLGVFUDWFKLQJWKHJODVVFRRNWRS7KHFRRNWRS
can be scratched with items such as knives, sharp
instruments, rings or other jewelry, and rivets on
clothing
Ŷ 8VHFHUDPLFFRRNWRSFOHDQHUDQGDQRQVFUDWFK
cleaning pad to clean the cooktop. Wait until the
cooktop cools and the indicator light goes out before
cleaning. A wet sponge or cloth on a hot surface can
cause steam burns. Some cleaners can produce
noxious fumes if applied to a hot surface.
NOTE: Sugar spills are an exception. They should
be scraped off while still hot using an oven mitt and a
scraper. See the Cleaning the glass cooktop section
for detailed instructions.
Ŷ 8VHFDUHZKHQWRXFKLQJWKHFRRNWRS7KHJODVV
surface of the cooktop will retain heat after the
controls have been turned off.
Ŷ 'RQRWFRRNRQDEURNHQFRRNWRS,IJODVVFRRNWRS
should break, cleaning solutions and spillovers
may penetrate the broken cooktop and create a
risk of electric shock. Contact a qualified technician
immediately.
Ŷ 'RQRWSODFHPHWDOOLFREMHFWVVXFKDVNQLYHVIRUNV
spoons and lids on the cooktop surface since they
can get hot.
CAUTION
The induction cooking elements may
appear to be cool while turned ON and after they have
been turned OFF. The glass surface may be HOT from
residual heat transferred from the cookware and burns
may occur.
WARNING
OVEN SAFETY INSTRUCTIONS
Ŷ .HHSRYHQYHQWXQREVWUXFWHG
Ŷ 6WDQGDZD\IURPWKHUDQJHZKHQRSHQLQJWKHRYHQ
door. Hot air or steam which escapes can cause
burns to hands, face and/or eyes.
Ŷ 3ODFHRYHQUDFNVLQGHVLUHGORFDWLRQZKLOHRYHQLV
cool. If rack must be moved while oven is hot, do not
let pot holder contact hot heating element in oven.
Ŷ 1HYHUSODFHFRRNLQJXWHQVLOVSL]]DRUEDNLQJVWRQHV
or any type of foil or liner on the oven floor. These
items can trap heat or melt, resulting in damage to
the product and risk of shock, smoke or fire.
Ŷ 'RQRWOHDYHLWHPVVXFKDVSDSHUFRRNLQJXWHQVLOV
or food in the oven when not in use. Items stored in
an oven can ignite.

6 49-2000876 Rev. 1
SAFETY INFORMATION
READ AND SAVE THESE INSTRUCTIONS
IMPORTANT SAFETY INFORMATION
READ ALL INSTRUCTIONS BEFORE USING THE APPLIANCE
WARNING
SELF-CLEANING OVEN SAFETY INSTRUCTIONS
The self-cleaning feature operates the oven at temperatures high enough to burn away food soils in the oven.
Follow these instructions for safe operation.
Ŷ 'RQRWWRXFKRYHQVXUIDFHVGXULQJVHOIFOHDQ
RSHUDWLRQ.HHSFKLOGUHQDZD\IURPWKHRYHQGXULQJ
self-cleaning. Failure to follow these instructions
may cause burns.
Ŷ %HIRUHRSHUDWLQJWKHVHOIFOHDQF\FOHUHPRYHSDQV
shiny metal oven racks and other utensils from the
oven. Only enameled (not shiny) oven racks may be
left in the oven. Do not use self-clean to clean other
parts, such as drip pans or bowls.
Ŷ %HIRUHRSHUDWLQJWKHVHOIFOHDQF\FOHZLSHJUHDVH
and food soils from the oven. Excessive amount of
grease may ignite leading to smoke damage to your
home.
Ŷ ,IWKHVHOIFOHDQLQJPRGHPDOIXQFWLRQVWXUQWKH
oven off and disconnect the power supply. Have it
serviced by a qualified technician.
Ŷ 'RQRWFOHDQWKHGRRUJDVNHW7KHGRRUJDVNHWLV
essential for a good seal. Care should be taken not
to rub, damage or move the gasket.
Ŷ 'RQRWXVHDSURWHFWLYHFRDWLQJWROLQHWKHRYHQDQG
do not use commercial oven cleaner unless certified
for use in a self-cleaning oven.
Ŷ IMPORTANT: The health of some birds is
extremely sensitive to the fumes given off during
the self-cleaning cycle of any range. Move birds to
another well-ventilated room.

49-2000876 Rev. 1 7
SAFETY INFORMATION
READ AND SAVE THESE INSTRUCTIONS
IMPORTANT SAFETY INFORMATION
READ ALL INSTRUCTIONS BEFORE USING THE APPLIANCE
How to Remove Protective Shipping Film and Packaging Tape
Carefully grasp a corner of the protective shipping film
with your fingers and slowly peel it from the appliance
surface. Do not use any sharp items to remove the film.
Remove all of the film before using the appliance for the
first time.
To assure no damage is done to the finish of the
product, the safest way to remove the adhesive from
packaging tape on new appliances is an application of
a household liquid dishwashing detergent. Apply with a
soft cloth and allow to soak.
NOTE: The adhesive must be removed from all parts. It
cannot be removed if it is baked on.
Radio Frequency Interference
This unit has been tested and found to comply with the
limits for a class B digital device, pursuant to Part 18
of the FCC rules. These limits are designed to provide
reasonable protection against harmful interference in
a residential installation. This unit generates, uses and
can radiate radio frequency energy and, if not installed
and used in accordance with the instructions, may cause
harmful interference to radio communications. However,
there is no guarantee that interference will not occur in
a particular installation. If this unit does cause harmful
interference to radio or television reception, which can
be determined by turning the unit off and on, the user is
encouraged to try to correct the interference by one or
more of the following measures:
Ŷ 5HRULHQWRUUHORFDWHWKHUHFHLYLQJDQWHQQDH
Ŷ ,QFUHDVHWKHGLVWDQFHEHWZHHQWKHXQLWDQGUHFHLYHU
Ŷ &RQQHFWWKHXQLWLQWRDQRXWOHWRUDFLUFXLWGLIIHUHQW
from that to which the receiver is connected.
CAUTION
Persons with a pacemaker or
similar medical device should exercise caution when
using or standing near an induction unit while it is in
operation. The electromagnetic field may affect the
working of the pacemaker or similar medical device. It
is advisable to consult your doctor or the pacemaker
manufacturer about your particular situation.
Ŷ8VHWKLVDSSOLDQFHRQO\IRULWVLQWHQGHGSXUSRVHDV
described in this Owner’s Manual.
Ŷ%HVXUH\RXUDSSOLDQFHLVSURSHUO\LQVWDOOHGDQG
grounded by a qualified installer in accordance with the
provided installation instructions.
Ŷ'RQRWDWWHPSWWRUHSDLURUUHSODFHDQ\SDUWRI\RXU
range unless it is specifically recommended in this
manual. All other servicing should be transferred to a
qualified technician.
Remote Enable Equipment
This device complies with part 15 of the FCC Rules.
Operation is subject to the following two conditions: (1)
This device may not cause harmful interference, and
(2) this device must accept any interference received,
including interference that may cause undesired operation.
The wireless communication equipment installed on this
range has been tested and found to comply with the
limits for a Class B digital device, pursuant to part 15 of
the FCC Rules. These limits are designed to:
(a) provide reasonable protection against harmful
interference in a residential installation. This equipment
generates, uses, and can radiate radio frequency energy
and, if not installed and used in accordance with the
instructions, may cause harmful interference to radio
communications. However, there is no guarantee that
interference will not occur in a particular installation. If
this equipment does cause harmful interference to radio
or television reception, which can be determined by
turning the equipment off and on, the user is encouraged
to try to correct the interference by one or more of the
following measures:
Ŷ5HRULHQWRUUHORFDWHWKHUHFHLYLQJDQWHQQD
Ŷ,QFUHDVHWKHVHSDUDWLRQEHWZHHQWKHHTXLSPHQWDQG
receiver.
Ŷ&RQQHFWWKHHTXLSPHQWLQWRDQRXWOHWRQDFLUFXLW
different from that to which the receiver is connected.
Ŷ&RQVXOWWKHGHDOHURUDQH[SHULHQFHGUDGLR79
technician for help.
(b) accept any interference received, including interference
that may cause undesired operation of the device.
Note that any changes or modifications to the wireless
communication device installed on this oven that are not
expressly approved by the manufacturer could void the
user’s authority to operate the equipment.

8 49-2000876 Rev. 1
USING THE RANGE:6XUIDFH8QLWV
Surface Units
How Induction Surface Cooking Works
The magnetic fields induce a small current in the pan.
The pan acts as a resistor, which produces heat, much
like a radiant coil.
The cooking surface itself does not heat. Heat is
produced in the cooking pan, and cannot be generated
until a pan is placed on the cooking surface.
When the element is activated, the pan begins to heat
immediately and in turn heats the contents of the pan.
Magnetic induction cooking requires the use of cookware
made of ferrous metals—metals to which magnets will
stick, such as iron or steel.
8VHSDQVWKDWILWWKHHOHPHQWVL]H7KHSDQPXVWEHODUJH
enough for the element to detect the pan and be able to
deliver full power.
The cooktop will not operate if a very small steel or iron
utensil, such as a steel spatula, cooking spoon, knife
or other small utensil, is placed on the cooking surface
when the unit is turned on.
CAUTION
Ŷ 7KHLQGXFWLRQFRRNLQJHOHPHQWVPD\DSSHDUWREHFRRO
while turned ON and after they have been turned OFF.
The glass surface may be HOT from residual heat
transferred from the cookware and burns may occur.
Ŷ '2127728&++27&22.:$5(RU3$16GLUHFWO\
with hands. Always use mitts or pot holders to protect
hands from burns.
Ŷ '21276/,'(FRRNZDUHDFURVVWKHFRRNWRSVXUIDFH
Doing so may permanently damage the appearance of
the ceramic cooktop.
Operating the Cooktop Elements
WARNING
FIRE HAZARD: Never leave the
range unattended with the cooktop on. Keep
flammable items away from the cooktop. Turn off all
controls when done cooking. Failure to follow these
instructions can result in fire, serious injury or death.
Before using the cooktop for the first time, clean it with
ceramic cooktop cleaner. This helps protect the top and
makes cleanup easier.
Turn element(s) On: Touch and hold On/Off pad about
half a second. A chime can be heard with each touch to
any pad.
Power level can be selected in any of the following ways:
1. Swipe the gray arc (on the graphics) to the desired
power level. There is no sensor on the LEDs, or;
2. Touch Anywhere along the gray arc, or;
3. Touch + or - pads to adjust power level, or;
4. Shortcut to Hi: Immediately after turning unit on, touch
the + pad, or;
5. Shortcut to Low: Immediately after turning unit on,
touch the - pad.
8VHWKHPLQLPXPVL]HSDQIRUWKHHOHPHQW7KH
pan material is correct if a magnet sticks to the
bottom.
Min. Size
Min. Size
Gray Arc
Swipe Area
LED
Lights
Gray Arc
Swipe Area
OR

49-2000876 Rev. 1 9
USING THE RANGE:6XUIDFH8QLWV
Surface Units (Cont.)
Using the Warming Zone
WARNING
FOOD POISON HAZARD: Bacteria may grow in food at
temperatures below 140°F.
Ŷ Always start with hot food. Do not use warm setting to
heat cold food.
Ŷ Do not use warm setting for more than 2 hours.
The WARMING ZONE, located in the back center of
the glass surface, will keep hot, cooked food at serving
temperature. Always start with hot food. Do not use to
heat cold food. Placing uncooked or cold food on the
WARMING ZONE could result in foodborne illness.
To use the WARMING ZONE:
Press the WARMING ZONE pad, select the desired level
(Low, Medium or High).
To turn off the WARMING ZONE:
Press the WARMING ZONE pad.
NOTE: Cancel/Off will NOT turn off the warming zone.
For best results, all foods on the WARMING ZONE
should be covered with a lid or aluminum foil. When
warming pastries or breads, the cover should be vented
to allow moisture to escape.
The initial temperature, type and amount of food, type of
pan, and the time held will affect the quality of the food.
Always use pot holders or oven mitts when removing
food from the WARMING ZONE, since cookware and
plates will be hot.
NOTE: The surface warmer will not glow red.
How To Synchronize Left Elements
To Turn On
Hold the Sync Burners pad for about half a second to
connect the two elements. Operate either element as
described in Operating the Cooktop Elements to adjust
power level.
To Turn Off
1. Touch the On/Off pad on either element to turn off
the Sync Burners.
or
2. Touch the Sync Burners to turn both elements off.

10 49-2000876 Rev. 1
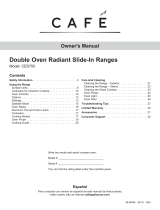
Cookware for Induction Cooktop
Suitable Cookware
8VHTXDOLW\FRRNZDUHZLWKKHDYLHUERWWRPVIRUEHWWHU
heat distribution and even cooking results. Choose
cookware made of magnetic stainless steel, enamel
coated cast iron, enameled steel or combinations of
these materials.
Some cookware is specifically identified by the
PDQXIDFWXUHUIRUXVHZLWKLQGXFWLRQFRRNWRSV8VHD
magnet to test if the cookware will work.
Flat-bottomed pans give best results. Pans with rims or
slight ridges can be used.
Round pans give best results. Pans with warped or
curved bottoms will not heat evenly.
For wok cooking, use a flat-bottomed wok. Do not use a
wok with a support ring.
NOTE: The warming zone is NOT an induction element
and will work with flat bottomed cookware that is NOT
ferrous.
Using the Correct Size Cookware
The induction coils require a minimum pan size to
function properly. Pans that are not ferrous or are too
small will not allow the induction elements to turn on, and
the ON indicator for that element location will flash for 25
seconds and then turn off. If a pan is removed from or not
centered on the induction coil for more than 30 seconds,
the power for that element will be shut off.
Cookware larger than the element ring may be used;
however, heat will only occur above the element.
)RUEHVWUHVXOWVWKHFRRNZDUHPXVWPDNH)8//FRQWDFW
with the glass surface. Cookware that is small may be
too light to compress the Precision Cooktop Sensor on
models with sensor on left front burner and should not
be used on that burner. Small pans with heavy handles
are likely to be incompatible with the Precision Cooktop
Sensor.
Do not allow the bottom of the pan or cookware to touch
the surrounding metal cooktop trim.
For best performance, match the pan size to the element
VL]H8VLQJDVPDOOHUSRWRQDODUJHUEXUQHUZLOOJHQHUDWH
less power at any given setting.
Cookware “Sounds”
Slight sounds may be produced by different types of
cookware. Heavier pans such as enameled cast iron
produce less sound than a lighter weight multi-ply
stainless steel pan. The size of the pan, and the amount
of contents, can also contribute to the sound level.
When using adjacent elements that are set at certain
power level settings, magnetic fields may interact and
produce a high pitch whistle or intermittent “hum”. These
sounds can be reduced or eliminated by lowering or
raising the power level settings of one or both of the
elements. Pans that completely cover the element ring
will produce less sound.
A low “humming” sound is normal particularly on high
settings.
Sounds you may here: You may hear a slight “Buzz”
when cooking with Hi mode. This is normal. The sound
depends on the type of pot being used. Some pots will
“Buzz” louder depending on the material. A “Buzz” sound
may be heard if the pan contents are cold. As the pan
heats, the sound will decrease. If the power level is
reduced, the sound level will go down.
Power Control
If a surface unit is on power level H (high), for an
extended period of time or if multiple surface units are
on, there may be a slight reduction in power to the
surface unit. Water under pans may also cause the
controls to reduce the power delivered to the cookware.
8VHDJULGGOH
8VHDIODWERWWRPHGZRN
8VHIODWERWWRPHGSDQV
8VHWKHPLQLPXPVL]HSDQVKRZQ
for each cooking element.
5” Min. Dia.
Pan Size
5” Min. Dia.
Pan Size
4-1/2”
Min. Dia.
Pan Size
7” Min. Dia.
Pan Size
Min. Size
8VHWKHPLQLPXPVL]H
pan for the element. The
pan material is correct
if a magnet sticks to the
bottom.
Min. Size
USING THE RANGE: Cookware for Induction Cooktop

49-2000876 Rev. 1 11
USING THE RANGE: Cookware for Induction Cooktop
Cookware for Induction Cooktop
Cookware not centered on
cooking element surface.
Curved or warped pan bottoms
or sides.
Pan does not meet the minimum
size required for the cooking
element used.
Cookware centered correctly
on cooking element surface.
Flat pan bottom.
Pan size meets or exceeds the
recommended minimum size
for the cooking element used.
INCORRECT
CORRECT
Pan bottom rests on cooktop
trim or does not rest completely
on the cooktop surface.
Heavy handle tilts pan.
Pan is partially magnetic
on the bottom.
Pan is completely magnetic
on the bottom.
Pan bottom rests completely on
the cooktop surface.
Pan is properly balanced.
Cookware recommendations
The induction coils require a minimum pan size to
function properly. Cookware must fully contact the
surface of the cooking element.
8VHIODWERWWRPHGSDQVVL]HGWRILWWKHFRRNLQJHOHPHQW
and also to the amount of food being prepared.
Induction interface disks are NOT recommended.

12 49-2000876 Rev. 1
USING THE RANGE: Precision Cooking
Precision Cooking
The Precision Cooking feature allows precise
temperature control for improved results. This feature
may be used with the Precision Cooktop Sensor on
the front left burner or with compatible Bluetooth paired
cooking devices on any burner. Only one burner may
operate in precision cook mode at a time.
Pairing a Bluetooth
®
Device
To pair a Bluetooth device, refer to Settings section.
For WiFi Connected Ranges
If the range is Wi-Fi connected, then the Precision
Cooktop temperature may be set from the SmartHQ
mobile app instead of the burner control. At any time,
controls on the range may be used to turn Off or override
a temperature setting. See Settings - Wi-Fi & Remote
Enable
Device Works on. . . How it works. . . Use this for. . . Temperature
range.
Additional information
Precision
Cooking
Cooktop
Sensor
Front left burner
only
Controls cookware
temperature based
on the temperature
of the cooktop
sensor. Cookware
must be in good
contact with the
sensor
Precise control
of cookware
temperature
100°F-425°F Can be set with the range
controls or through the
SmartHQ app. See SmartHQ
App for recommended food/
technique temperature settings.
Good for pan frying, sauteing,
and searing. For boiling,
simmering and similar liquid
based cooking, traditional
power control settings are
recommended rather than
temperature based control
(temperature of a large liquid
load will be lower than the
temperature of the cookware).
Hestan Cue
Cookware
All burners except
the warming
zone. NOTE:
only one burner
may operate in
precision cook
mode at a time
Controls cookware
temperature based
on a sensor in the
cookware
Precise control
of cookware
temperature
and Hestan Cue
Guided Cooking
recipes
Small to medium
elements (A):
100°F-500°F
Large elements
(B): 150°F-500°F
Left front element:
100°F-425°F
Can be set with the range
controls, with the SmartHQ app,
or with the Hestan Cue app.
Precision
Cooktop
Probe
All burners except
the warming
zone. NOTE:
only one burner
may operate in
precision cook
mode at a time
Controls the
temperature of
liquid loads based
on a sensor in the
probe. The probe
tip must be in good
contact with the
liquid load
Precise control
of liquid load
temperature
for sous-vide
cooking or other
low temperature
liquid cooking
Small to medium
element (A):
100°F-200°F
Large element
(B): 100°F-200°F
See the Smart HQ app for
recommended settings food/
technique temperature settings
If you are experiencing
trouble maintaining lower set
temperatures try changing your
set up by:
• Remove the lid from the pot.
8VHDODUJHUGLDPHWHUSRW
8VHDVPDOOHUEXUQHUZLWKD
pot larger than the burner.
Can also be used to hold
foods at a specific temperature
for applications like melted
chocolate for dipping or fondue.
If using for these scenarios,
use traditional power control
settings to bring the item to the
target temperature first, then
use the precision probe to hold.
NOTE: only one precision cooking device may operate at a time

49-2000876 Rev. 1 13
Precision Cooking (Cont.)
Precision Cooking Control Modes
There are two control modes available:
ŶApp Control - the user interacts with SmartHQ or
Hestan Cue mobile app.
ŶLocal Control - the user interacts with the burner to
set a target temperature and no App use is required.
App Control
After activating your device on your selected burner,
open the SmartHQ mobile app designed to control
the selected device. Depending on the device and
application, the set temperature may be shown in the
unit display, in the SmartHQ mobile app, or hidden from
view. NOTE: 8VHRI/RFDO&RQWUROPRGHLVEORFNHGXSRQ
entering App Control mode.
Local Control
After activating your device on your selected burner,
use glide touch control to set temperature. The set
temperature will be shown in the display. To use Hestan
Cue
®
for temperature control and recipes, open the
Hestan Cue
®
app and follow on screen instructions.
NOTE: 8VHRI$SS&RQWUROPRGHLVEORFNHGXSRQ
entering Local Control mode
Precision Cooktop Sensor
Cookware needs to make contact with the sensor for
proper operation of the left front burner on models
with the precision cooktop sensor. Cookware will
bow naturally during heating therefore cookware with
recessed bottoms including griddles should not be used
due to risk of not having proper contact with sensor.
Bowed cookware is at risk of improper contact with the
sensor and poor cooking performance and damage to
the sensor are likely.
USING THE RANGE: Precision Cooking

14 49-2000876 Rev. 1
Precision Cooking (Cont.)
Use Precision Cooking with the Conventional Precision Cooktop Sensor
1. The front left burner should be turned OFF to begin
2. Touch the TO COOKTOP banner at the top of the
display.
3. Touch Start.
4. When prompted, touch the On/Off button on the left
front burner.
5. If the range has a Bluetooth pan or probe paired, it will
prompt for you to choose which type of cookware you
wish to use. To use the Precision Cooktop Sensor,
choose CONVENTIONAL.
6. For optimal cooking performance, choose the type that
best matches the cookware you are using.
7. Touch the (i) icon for help selecting the closest match.
8.
When screen below shows, you adjust the temperature
level at the burner control, the desired temperature will
appear on the display. Temperature level can also be
adjusted in the SmartHQ app by selecting Precision
Cooking and typing in the desired temperature. See
VHFWLRQ6XUIDFH8QLWV±2SHUDWLQJWKH&RRNWRS(OHPHQWV
When the burner is On, the LCD display shows an
orange outline.
When the display shows “PREHEATING” the
cookware temperature is increasing. When it reaches
the desired set temperature, the word “PREHEATING”
will disappear.
TO COOKTOP 10:35 AM
OVEN
Bake Broil Convection
Precision
Cooking
More
Smart
Home
GET CONNECTED
TO OVEN
START
Perfectly prepare a
gourmet recipe with
confidence using
Precision Cooking
10:35 AM
OFF OFF
OFF
OFF
Warming
Zone
OFF
CANCEL
SELECT BURNER
Press On/O button on desired burner or press Sync
Burners button to join the two left burners.
10:35 AM
SELECT COOKWARE TYPE
The selected burner may be used with conventional
cookware or with Precision Cooking compatible
Bluetooth cookware.
BLUETOOTH COOKWARE/PROBECONVENTIONAL
10:35 AM
TO OVEN
STAINLESS
CAST IRON
OTHER
For optimal performance,
select material that best
describes your cookware.
COOKTOP 10:35 AM
OFF OFF
OFF
OFF
Warming
Zone
READY
10:35 AM
COOKWARE MATERIAL
Stainless Steel
Typically shiny. May
have non-stick coating.
Cast Iron
Typically black and
rough or enamel coated.
Other
Cookware that does
not fit either category.
DISMISS
COOKTOP 10:35 AM
TO OVEN
Use burner controls or
mobile app to to set the
Precision Cooking
temperature.
OFF OFF
OFF
OFF
Warming
Zone
READY
OFF OFF
OFF
OFF
Warming
Zone
COOKTOP 10:35 AM
TO OVEN
Use burner controls to
update Precision Cooking
temperature
Optimized for:
Cast iron cookware
175
°F
PREHEA TING
USING THE RANGE: Precision Cooking

49-2000876 Rev. 1 15
USING THE RANGE: Precision Cooking
Precision Cooking (Cont.)
Precision Cooking with Compatible Bluetooth Devices
The range is able to communicate via Bluetooth with
smart accessories such as Hestan Cue
®
cookware or the
Precision Probe. Each smart accessory must be paired
with the range to establish the Bluetooth connection.
6HH6HWWLQJV±%OXHWRRWK
Once paired, the Hestan Cue
®
cookware and Precision
probe becomes available as a Precision Cooking option
for any burner. Multiple smart accessories may be
paired. You will be prompted to choose one to activate
each time you use Precision cooking.
(Precision cooking is not available on the warming zone.)
Hestan Cue
®
Cookware or Precision
Probe
1. The burner desired for use should be turned OFF to
begin.
2. Touch the TO COOKTOP banner at the top of the
display.
3. Touch Start.
4. When prompted, touch the On/Off button of the
desired burner.
5. If you choose the rear burners or front right, the range
will search for your paired smart accessory.
6. On some models, if you choose the front left burner,
the LCD will prompt for you to choose which type
of cookware you wish to use. To use Hestan Cue
®
cookware or Precision Probe, choose BLUETOOTH
COOKWARE/PROBE.
7. When your paired cookware or probe is detected, you
will be prompted to activate it. This turns it on so it is
ready for cooking.
8. If no paired accessories are found, Precision Cooking
ZLOOFDQFHO5HIHUWR6HWWLQJV±%OXHWRRWKWRSDLU
Hestan Cue
®
cookware or Precision probe.
TO COOKTOP 10:35 AM
OVEN
Bake Broil Convection
Precision
Cooking
More
Smart
Home
GET CONNECTED
TO OVEN
START
Perfectly prepare a
gourmet recipe with
confidence using
Precision Cooking
10:35 AM
OFF OFF
OFF
OFF
Warming
Zone
OFF
SELECT COOKWARE TYPE
The selected burner may be used with conventional
cookware or with Precision Cooking compatible
Bluetooth cookware.
BLUETOOTH COOKWARE/PROBECONVENTIONAL
10:35 AM
CANCEL
SELECT BURNER
Press On/O button on desired burner or press Sync
Burners button to join the two left burners.
10:35 AM
CANCEL
10:35 AM
NO COOKWARE PAIRED
This burner works only with compatible Bluetooth
cookware or probe.
10:35 AM
CANCEL
ACTIVATE COOKWARE
Activate Precision Cooking compatible cookware or
Precision Cooking probe. Cookware should be large
enough to span both burners.

16 49-2000876 Rev. 1
Precision Cooking (Cont.)
USING THE RANGE: Precision Cooking
Hestan Cue
®
Cookware or Precision Probe (Cont.)
9. Activate your Hestan Cue
®
cookware or Precision
Probe. Refer to the table for instructions for each
device.
If it is not activated within 2 minutes, the Precision
Cook mode will timeout.
10. When this screen shows, your Hestan Cue
®
cookware or Precision probe is ready to select the
cooking temperature. As you adjust the temperature
level at the burner control or in the SmartHQ app,
the desired temperature will appear on the display.
6HHVHFWLRQ6XUIDFH8QLWV±2SHUDWLQJWKH&RRNWRS
Elements. To use Hestan Cue for temperature
control and recipes, open the Hestan Cue app and
follow on screen instructions.
When the burner is On, the LCD display shows an
orange outline.
When the display shows “PREHEATING” the
cookware temperature is increasing. When it reaches
the desired set temperature, the word “PREHEATING”
will disappear.
10:35 AM
OK
NO COOKWARE ACTIVATED
Unable to detect active Bluetooth cookware or
Precision Cooking probe.
COOKTOP 10:35 AM
TO OVEN
Use burner controls or
mobile app to to set the
Precision Cooking
temperature.
OFF OFF
OFF
OFF
Warming
Zone
READY
OFF OFF
OFF
OFF
Warmin
g
Zone
COOKTOP 10:35 AM
TO OVEN
Use burner controls to
update Precision Cooking
temperature
175
°F
PREHEATING
Precision Device Minimum Temperatures
Device temperature ranges are dependent on burner size:
Using the Precision Probe at low temperatures
If you are experiencing trouble maintaining lower set
temperatures with a precision probe, try changing your
set-up by:
Ŷ 5HPRYHWKHOLGIURPWKHSRW
Ŷ 8VHDODUJHUGLDPHWHUSRW
Ŷ 8VHDVPDOOHUEXUQHUZLWKDSRWODUJHUWKDQWKH
burner.
A
A
B
A
Device
Small to Medium
Burners (A) Large Burners (B)
Hestan Cue
®
cookware )±) )±)
Precision Probe )±) )±)
Supported
Devices How to Activate Control with this App
Hestan
Cue
®
cookware
Firmly double tap the
black plastic endcap
Hestan Cue®
(by Hestan Smart Cooking)
Precision
Probe Press side button once
Hestan Cue®
(by Hestan Smart Cooking)
or SmartHQ

49-2000876 Rev. 1 17
Precision Cooking (Cont.)
USING THE RANGE: Precision Cooking
Food Variation
Temp. (F)
Butter Melt 240
Melt and Hold 150
Brown 350
Clarify 240
Chocolate Melt and Hold 115
Crepes 375
Eggs Fried - white and
tender
250
Fried - browned and
crispy
350
Omelette 275
Scrambled 275
French Toast - 0.5-
0.875” thick
375
French Toast - 1-1.5”
thick
350
Grilled Sandwiches -
0.5-1” thick
375
Grilled Sandwiches -
1.125-2.5” thick
350
Pancakes 375
Potatoes Diced - 0.5-1” thick 375
Patties 375
Shredded 375
Food Thickness
(in)
Temp. (F)
Bacon 375
Beef - ground 350
Beef - patties 0.5 - 0.875
375
1 - 1.5 350
Beef - steak (rare) 0.5 - 0.875 400
1 - 1.5 375
Beef - steak (medium rare) 0.5 - 0.875 400
1 - 1.5 375
Beef - steak (medium) 0.5 - 0.875 375
1 - 1.5 350
Beef - steak (medium well) 0.5 - 0.875 375
1 - 1.5 350
Beef - steak (well) 0.5 - 0.875 375
1 - 1.5 350
Chicken - breasts 0.5 - 0.875 375
1 - 1.5 350
Chicken - thighs 0.5 - 0.875 375
1 - 1.5 350
Chicken - ground 350
Pork - chops 0.5 - 0.875 375
1 - 1.5 350
Pork - ground 350
Sausage - ground 350
Sausage - links 0.25 - 0.875 350
1 - 1.5 325
Sausage - patties 0.25 - 0.875 375
Seafood - fish fillet or steak 0.25 - 0.875 425
1 - 1.5 400
Seafood - scallops 425
Suggested Cooking Temperatures for Common Foods

18 49-2000876 Rev. 1
USING THE RANGE: Oven Controls
Oven Controls
Bake
This option allows the user to access traditional the
traditional bake mode.
Broil
Broil can be selected to access Broil Low and Broil High.
See the Cooking Modes section for more information.
Convection
This option allows you to utilize the convection system
to cook in a variety of modes. See the Cooking Modes
section for more information.
Convection Bake is enabled on your oven. Use WiFi
Connect to enable the Convect Roast feature.
Precision Cooking
Precision Cooking is a suite of customized cooking
cycles that have been designed for specific foods. The
display will guide you through setting the oven and food
appropriately for the cycle selected. Precision cooking
cycles vary based on food type; see the Cooking Modes
section for more detailed information.
Use WiFi Connect to enable the Precision Cooking
feature.
Smart Home
This option connects you to resources detailing GE
Appliances Smart Home solutions and connected
partners. Life’s more convenient when you’re connected.
It enables you to manage everyday tasks with ease
when you can control your appliances from your smart
device. With our WiFi Connect appliances and our
SmartHQ mobile app, among other things you can:
ƒ3UHKHDW\RXURYHQRQ\RXUZD\KRPHIURPZRUN
ƒ&KDQJHWKHRYHQWHPSHUDWXUHZKLOH\RXKHOSZLWK
homework.
ƒ6HWDQGDGMXVWFRRNLQJWLPHUVGXULQJ\RXUIDYRULWH79
show.
See the WiFi Connect section for instructions on
connecting your smart device.
More
Select this option to access the Proof, Warm, Self Clean,
and Steam Clean options.
Oven Light
To turn on or off the oven cavity lights, press the . Both
cavity lights will be illuminated if using a double oven.
Settings
Press the to access the Settings. See the Settings
section for more information.
Favorite
This option allows the user to save their favorite cycles
for easy access in the future. After selecting a cooking
mode and setting the temperature and any timers, press
the to save it as a favorite for future use. After saving
a cycle, press the on the main menu to quickly access
the saved mode.
Kitchen Timer
This feature works as a countdown timer. Press the
, select the amount of time for the timer to operate, and
press Start. The oven will continue to operate once the
timer countdown is complete. To turn off the timer, select
the and press Clear.
Cook Time
This function counts down cooking time and turns off the
oven when the cooking time is complete. Press the
during a cycle, select the amount of cooking time, and
press Start.
Delay Time
7KLVIHDWXUHGHOD\VWKH VWDUWWLPHIRUDQRYHQF\FOH8VH
this feature to set a time when you want the oven to
start. Select a cycle, then press the . Select the time of
day for the oven to turn on and press Start. A cook time
can also be programmed if desired.
NOTE: Foods that spoil easily—such as milk, eggs, fish,
stuffings, poultry and pork—should not be allowed to
sit for more than 1 hour before or after cooking. Room
temperature promotes the growth of harmful bacteria. Be
sure that the oven light is off because heat from the bulb
will speed harmful bacteria growth.
Wi-Fi & Remote Enable
Press
GET CONNECTED
to connect your oven to Wi-Fi.
This option allows you to download content to your
oven and control it remotely. The oven must be
connected to Wi-Fi before Remote Enable can be
activated. For instructions on how to connect your oven,
see the Wi-Fi Connect/Remote Enable section under
Settings in this manual.
Air Fry
Air Fry is a special, no-preheat, cooking mode that is
designed to produce foods with a crispier exterior than
traditional oven cooking. The Air Fry mode is intended
for single rack cooking only.
Use WiFi Connect to enable the Air Fry feature.
TO COOKTOP 10:35 AM
OVEN
Bake Broil Convection
Precision
Cooking
More
Smart
Home
GET CONNECTED

49-2000876 Rev. 1 19
Settings
* Compatible Apple or Android devices and home WiFi network required.
There are numerous settings that are accessed by pressing in the top right corner of the main screen.
Wi-Fi & Remote Enable
This appliance is configurable to allow remote operation
at any time. Do not store any flammable materials or
temperature sensitive items inside or on top of this
appliance. By using the Wi-Fi Connect feature, you will
be able to control essential oven operations such as
temperature settings, timers and cooking modes using
your smart device.*
Select the then Wi-Fi & Remote Enable - follow the
instructions on your oven display and smart device app.
It is necessary to turn on Wi-Fi before using Remote
Enable on your oven.
Connecting your Wi-Fi Connect Enabled oven
1. Have your smart device ready with the ability to
access the internet and download apps.
2. You will need to know the password of your home
Wi-Fi router. Have this password ready while you are
setting up your GE Appliances oven.
3. On your smart device, visit
GEAppliances.com/connect to learn more about
connected appliance features and to download the
SmartHQ mobile app to connect to your oven.
4. Follow the onscreen instructions in the SmartHQ
mobile app to connect your GE Appliances oven.
When connected, your oven should show that it is
connected to your home Wi-Fi network.
5. If there are issues connecting wirelessly to your oven,
please call 800.220.6899 and ask for assistance
regarding oven wireless connectivity.
To connect additional smart devices, repeat steps 3 and 4.
Remote Starting your Oven
To be able to start the oven remotely once connected
to Wi-Fi, press Remote Enable on the main menu or
access Wi-Fi & Remote Enable in the settings menu
and turn Remote Enable on. The oven can now be
started remotely using a connected device. The icon
must be active to start the oven remotely.
To disconnect your smart device from Remote Enable,
access the Wi-Fi & Remote Enable settings and turn
Remote Enable off.
NOTE: Foods that spoil easily—such as milk, eggs, fish,
stuffings, poultry and pork—should not be allowed to
sit for more than 1 hour before or after cooking. Room
temperature promotes the growth of harmful bacteria. Be
sure that the oven light is off because heat from the bulb
will speed harmful bacteria growth.
Set Clock
This feature allows you to set the clock and specifies
how the time of day will be displayed. Options are for a
standard 12-hour clock with AM and PM selections or
24-hour military time display.
Lock Control
Select this option in order to lock the LCD from any
undesired screen selections. To unlock the screen, press
and press Unlock on the next screen.
Sabbath
Sabbath mode disables the oven lights (the oven light
will not turn on when the door is opened), all sounds
(the control will not beep when the screen is pressed),
Convection modes, Broil modes, Warm, Proof, and all
time functions. Sabbath mode can only be used with
WUDGLWLRQDO%DNH7KLVIHDWXUHFRQIRUPVWRWKH6WDU.
Jewish Sabbath requirements. Please reference the
Sabbath Mode section for more information.
Sound
This setting screen allows you to change the volume, the
end of cycle tone, and turn on or off the touch sound.
Slide up and down to access all the settings
COOKING
SYSTEM
SETTINGS
SABBATH
SOUND
DISPLAY
12:30 PM
SETTINGS
12:30 PM
Wi-Fi & REMOTE ENABLE
BLUETOOTH
SET CLOCK
SABBATH
LOCK CONTROL
USING THE RANGE: Settings

20 49-2000876 Rev. 1
Bluetooth
®
Pairing
Connected features such as the Precision Cooking Probe
and Chef Connect enabled products like an over-the-range
microwave oven or range hood can be paired using the
Bluetooth
®
feature. To pair those products to the range,
press the Settings pad and select Bluetooth
®
. Select
Pair and follow the corresponding instructions included
with the mating Bluetooth
®
enabled product. The range will
cancel pairing mode after two minutes if no mating device is
detected. Select Remove to confirm product is paired or to
un-pair from range.
1. Touch Gear for Settings Menu.
2. Touch Bluetooth in Settings Menu.
When no device is paired, the range will search
automatically. This will timeout after 2 minutes if no device is
found.
3. Follow the instructions for device you wish to pair.
a. For Chef Connect - Follow the instructions on the
mating Chef Connect enabled product. When a Chef
Connect product is paired, the Clock time of day will
sync automatically across products.
b. For Precision Probe - Press side button once.
c. For Hestan Cue
®
cookware Firmly double tap the
black plastic endcap.
When devices are paired, they appear in a list that scrolls.
To pair a new Bluetooth device:
6FUROOGRZQWKHOLVWWR3$,51(:'(9,&(WRDGG
another.
To remove a Bluetooth device:
1. Touch the device name.
2. Touch FORGET THIS DEVICE.
Display
This screen shows the options for brightness, clock off,
and energy saver. Clock off will remove the clock from
the display when the screen is inactive, but it will be
shown after pressing the screen.
Cooking
Ŷ The oven is set to Fahrenheit, however, in this setting
the cooking unit can be changed to Celsius.
Ŷ Auto Recipe Conversion can be turned on in order
to automatically reduce the programmed cooking
temperature for Convection Bake or Convection Bake
Multi. Note that this will only reduce the cooking
temperature, not the baking time. When the 12 Hour
Shut Off option is turned on, it will automatically shut
off the oven after 12 hours of continuous use.
Ŷ Adjust Temperature allows the oven temperature to
be adjusted up to 35°F hotter or down to 35°F cooler.
8VHWKLVIHDWXUHLI\RXEHOLHYH\RXURYHQWHPSHUDWXUH
is too hot or cold and wish to change it. For double
ovens, the upper and lower oven temperatures are
adjusted separately.
System
This screen allows you to clear your saved user data and
shows the current software version.
Settings (Cont.)
CANCEL
BLUETOOTH
10:35 AM
Scannning for compatiable bluetooth devices…
Turn device on and put it in pairing mode.
PROBE
PAN 1
PAN 2
MWO_VENT 1
BLUETOOTH
10:35 AM
BLUETOOTH
10:35 AM
PAIR NEW DEVICES
MWO_VENT 1
PAN 2
MWO_VENT 2
MWO_VENT 2
10:35 AM
FORGET THIS DEVICE
USING THE RANGE: Settings
/