1
8
6
7
5
9
10
3
1 3 8
11
7
10
92
6
5
4
2 Krell Vanguard Krell Vanguard 3
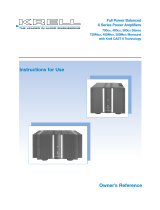
Figure 1 The Vanguard Front Panel
Figure 2
The Vanguard
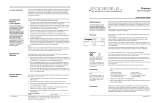
Remote Control
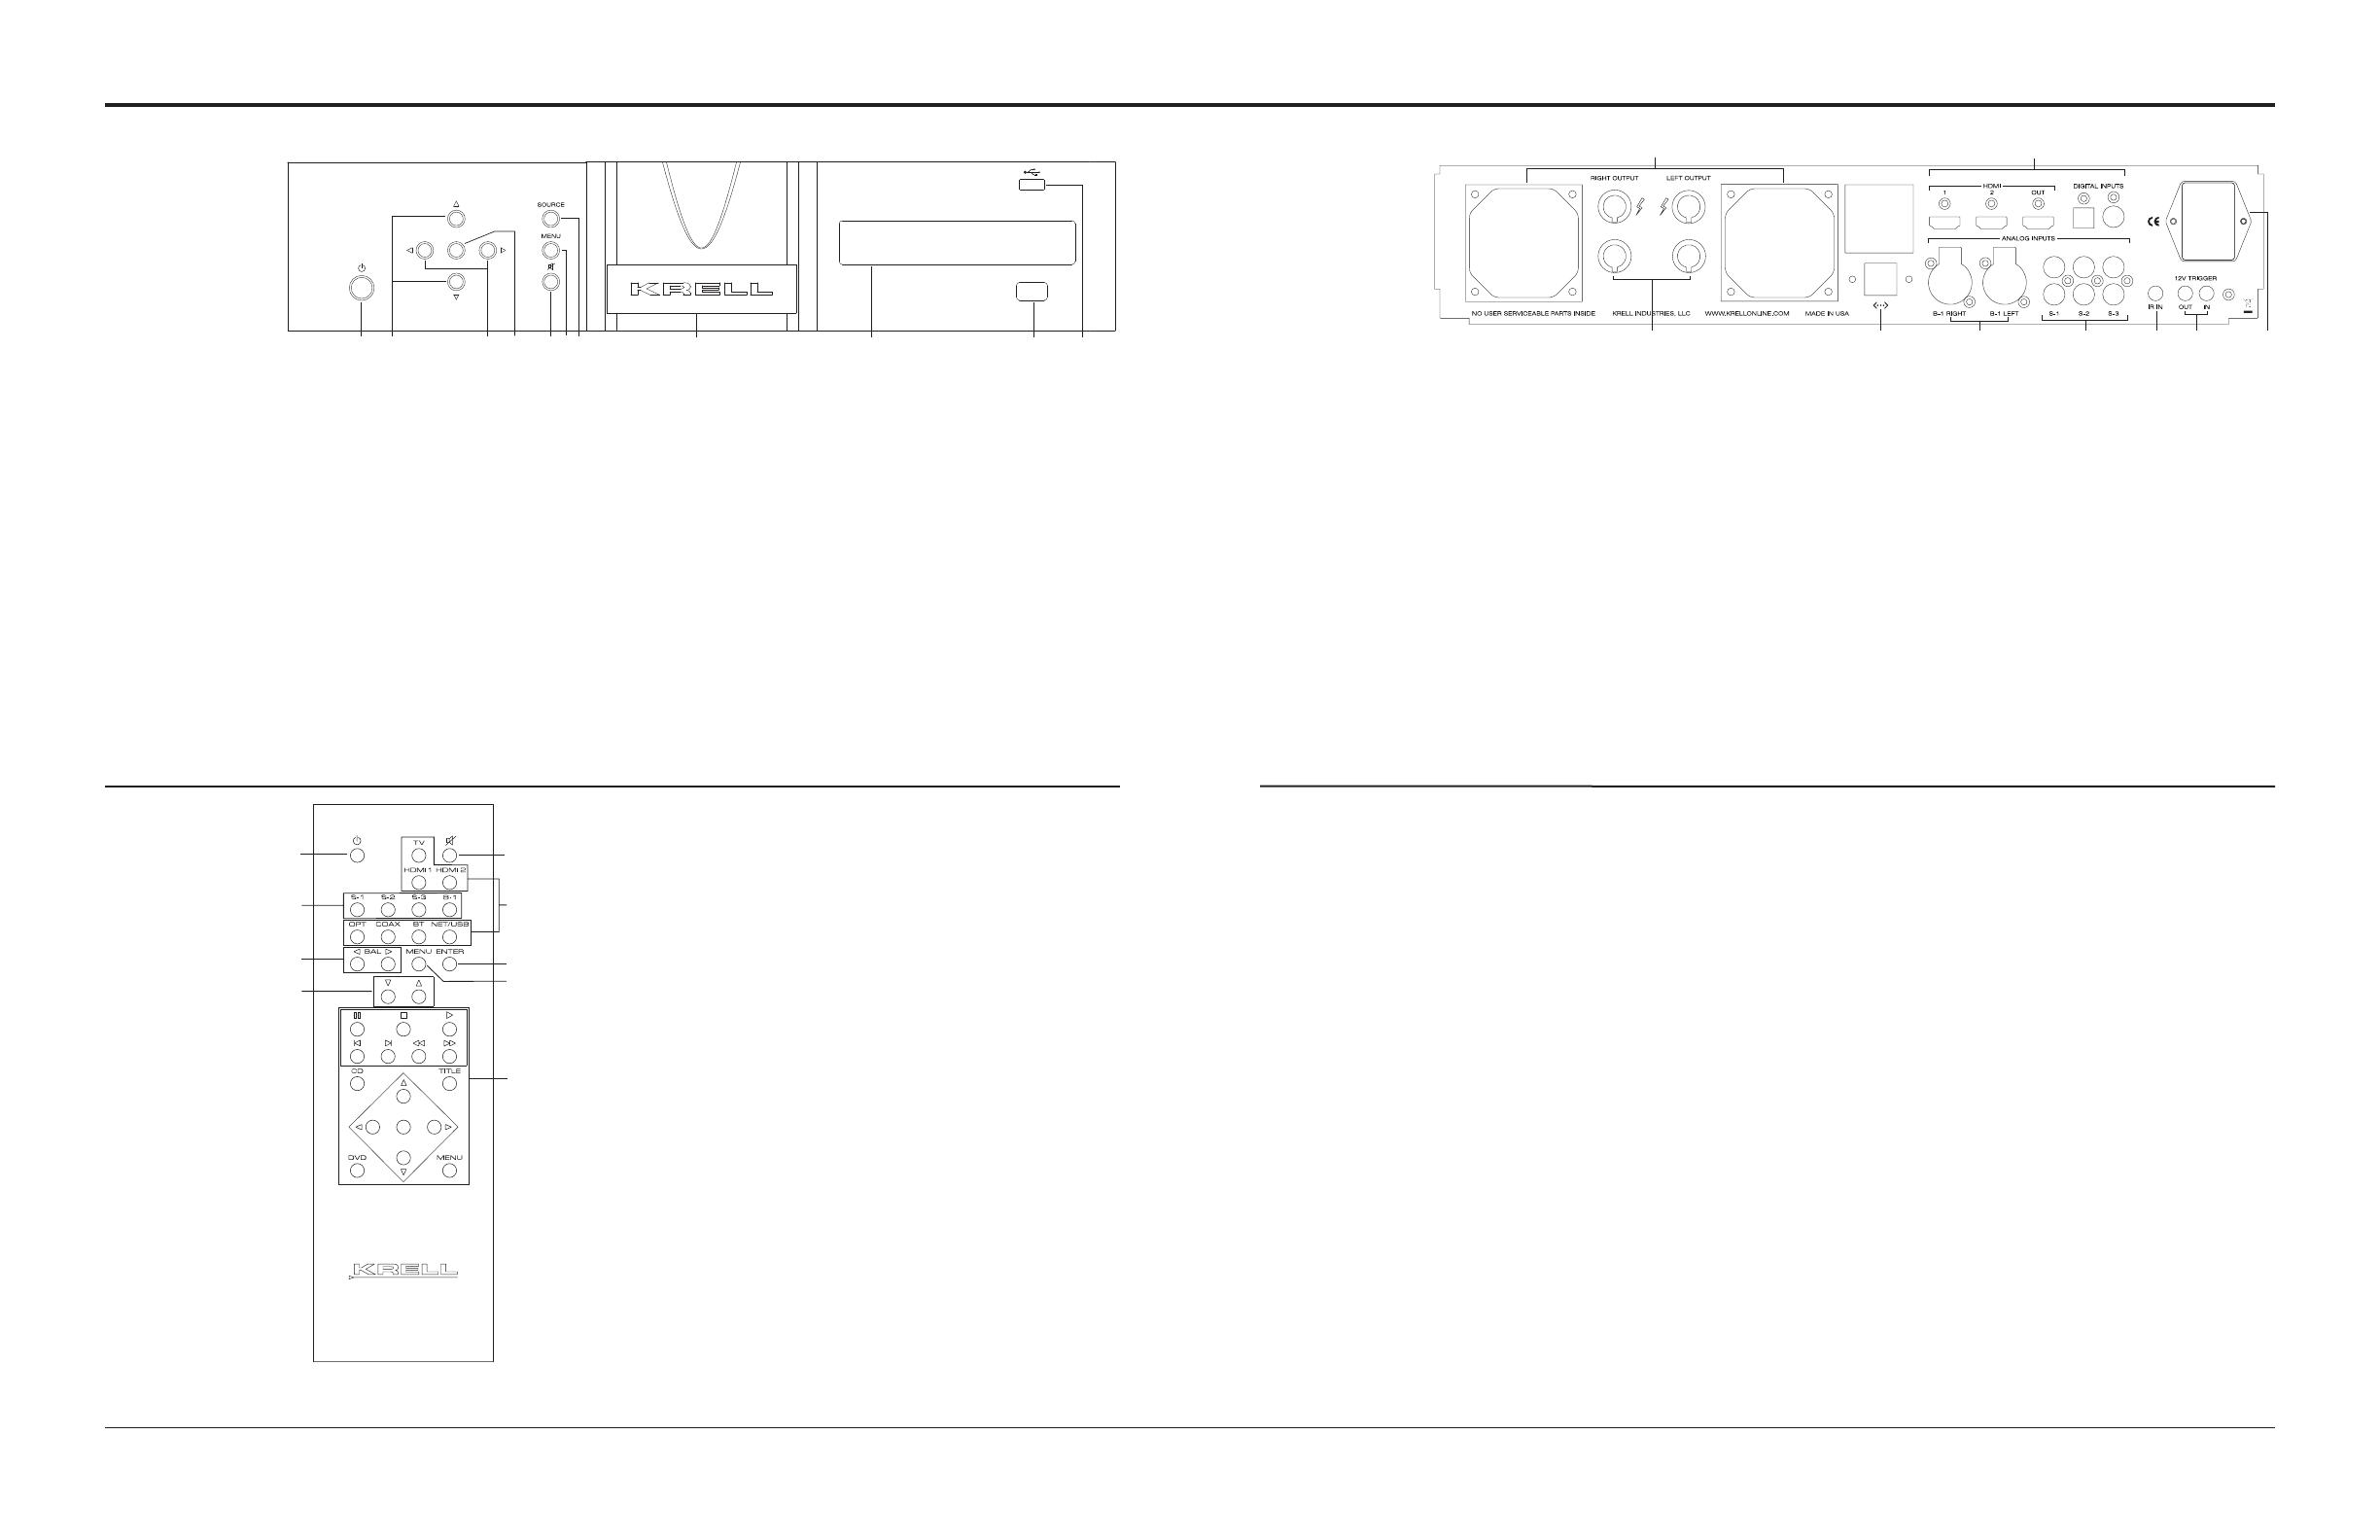
Figure 3 The Vanguard Back Panel
1813 1514
12
17
20
16 19
This product is manufactured in the United States of America. Krell
®
is a registered trademark of Krell Industries, LLC., and is restricted for
use by Krell Industries, LLC. its subsidiaries, and authorized agents. Krell Current Mode™ and CAST™ are trademarks of Krell Industries,
LLC. All other trademarks and trade names are registered to their respective companies.
© 2014 by Krell Industries, LLC., All rights reserved.
Front Panel
12 Fans
The Vanguard is equipped with two
cooling fans. Be sure to leave them
unobstructed for proper ventilation.
13 Loudspeaker Outputs
The Vanguard is equipped with
standard binding posts for each
amplifier channel.
14 Ethernet
The Ethernet port connects the
Vanguard to a home network for
contol and firmware updates.
15 Balanced Analog Inputs
The Vanguard is equipped with one
pair of balanced (B-1) inputs via
XLR connectors.
16 Single-Ended Analog Inputs
The Vanguard is equipped with three
pairs of single-ended (S-1, S-2, or
S-3) inputs via RCA connectors.
17 IR In
The Vanguard is equipped with
an RC-5 input that makes custom
installation easy and secure by
accepting baseband RC-5 input
commands from a remote IR detec-
tor or hardwired remote controllers.
18 12 VDC In/Out (12 V trigger)
The 12 V Trigger input allows you to
place the Vanguard into the stand-
by or operational mode from other
components. The 12 V trigger output
allows the Vanguard to turn other
components on or off.
19 IEC Connector/AC Power Breaker
The connector is for use with
the provided IEC standard 15
amp power cord. This connector
and power cord must remain
unobstructed for easy removal in
case of emergency.Use this power
switch to change the Vanguard from
off to the stand-by mode.
20 Optional Digital module
The optional digital module adds
one coaxial, one optical, two HDMI
inputs and one HDMI output.
Additionally, the USB input on the
front panel is activated. Bluetooth
and Ethernet streaming are also
added input sources.
1 Power
Use this button to switch the
Vanguard between stand-by and
operational modes.
2 Stand-by Indicator
The stand-by indicator illuminates
red when the Vanguard is plugged
into a standard AC wall receptacle
and the rear panel power switch
is in the 1 position. The indicator
illuminates blue when the Vanguard
is in operational mode.
3 Volume/Navigation Up/Down
Buttons
Use these buttons on the front panel
to adjust the amplifier output level
and navigate through the menu
system. The output level is indicated
numerically on the front panel
display, with a range from 0-150.
4 Left/Right Navigation Buttons
Use these buttons on the front panel
or on the remote control to navigate
through the menu system.
5 Enter Button
Press the enter button or use
the enter key to confirm menu
selections.
6 Mute Button
Use this to mute the Vanguard
output. To unmute, press the mute
button again.
7 Menu Button
Use this button to access the menu
functions of the Vanguard.
8 Source button
Use this button to access the source
menu.
9 Front Panel Display
The front panel display shows the
input selected, volume, balance,
and Theater Throughput status.
10 Infrared sensor
Receives commands from the
remote control. Make sure this is
not obstructed.
11 USB input
Only active when optional digital
module is installed.
Keys labeled 1 to 7
have the same function (and
callout number) as the front panel
controls.
8 Analog Input Keys
Use these keys to select analog
inputs on the Vanguard.
9 Digital Input Keys
Use these keys to select digital
inputs on the Vanguard. Note:
These keys are only active when
the optional digital module is
installed.
10 BAL (Balance) Keys
Use these keys to shift the balance
to the left or the right channel: In
menu mode, the balance keys are
used for left and right navigation.
11 CD / DVD Transport Control
Used to control basic CD / DVD
functions on other current Krell
products.
Note
The remote comes with two AAA
batteries that have to be installed.
Use the supplied Torx wrench to
remove the battery panel, then
install the batteries.
Remote
Control
Back Panel
The Vanguard menu system offers a number of options and
information. Main selections include Source Setup, Serial Number,
Save Settings, Restore Settings, Display Setup, Software Update,
Software Version, Diagnostic Mode, and Network Setup. Press the
Vanguard's menu button (7), then use the navigation buttons or keys
to highlight one of the menu options. Press the Enter button or key
to select.
Network Setup
Press the up or down button to view the various network parameters.
Press the Enter button to see the value for the displayed parameter.
IP Address: The default network discovery is DHCP. If the Vanguard
is connected to an active network, it automatically acquires an IP
address. To enter an IP address manually, change the Vanguard to
Static IP operation. To change to Static IP operation, press the Enter
button at the IP Address sub menu. Press the Up or Down button to
change the setting to Static. Press the Enter button to display the IP
address. Press the Right button to move the cursor to number to be
edited. Press the Enter button again and the selected number of the
IP Address will begin blinking. Use the Up or Down button to edit the
IP Address value. Press the Enter button to confirm change. Press
the Left or Right button to move the cursor to another number in the
IP address and repeat editing process. Use the same process to edit
the other network settings.
Note: the MAC Address is a factory set value and is not user
editable.
Source Setup
Press the Enter Button and use the Up or Down button to highlight
the desired parameter to edit. Press the Enter button to select.
Assign Names: The first input, BAL : BALANCED is displayed.
Press the Up or Down button to select a different source. To edit
the currently displayed source, press the Enter button and the
cursor will begin flashing at the first character field. Use the Up or
Down button to change character. Use the Right or Left button to
move the blinking cursor to another character and repeat editing
procedure. Press Enter to confirm change. Press the Up or Down
button to select a different source and repeat editing process. The
edited name will appear when the Source button is pressed on the
remote or front panel. The new source name will also appear on a
web connected device. Press the Left button to return to the
Source Setup Menu.
Theater Mode: Theater Mode bypasses the Vanguard volume
control and passes the left and right output of a surround processor
directly to the Vanguard left and right amplifiers. Use the Left
and Right button to highlight the input that is connected to the
surround processor. Press the Enter button and the cursor will
begin flashing in the Disabled field. Press the Up or Down button to
change to Enabled and press the Enter button to select.
Level Trim
The level trim allows for output adjustment between sources. Press
the Enter button and the source field will start flashing. Press the Up
or Down button to select a different source to edit. Press the Enter
and the dB field will begin flashing. Press the Up or Down button to
increase or decrease output. Press the Up or Down button to select
a different source to edit and repeat the editing process. When
finished, press the Enter button and then the Left button to return the
Source Setup sub menu.
Menu Options