No Drilling Required GB38012-POL-NDR User manual

Type
User manual
1
GRIPP Grab Bar Installation, Warranty, Safety and Care Instruction Guide
GRIPP Grab Bar Installation, Warranty, Safety and Care Instruction GuideGRIPP Grab Bar Installation, Warranty, Safety and Care Instruction Guide
GRIPP Grab Bar Installation, Warranty, Safety and Care Instruction Guide
GB3200 (1
GB3200 (1GB3200 (1
GB3200 (1-
--
-1/4” diameter) and GB3800 Series (1
1/4” diameter) and GB3800 Series (11/4” diameter) and GB3800 Series (1
1/4” diameter) and GB3800 Series (1-
--
-1/2” diamet
1/2” diamet1/2” diamet
1/2” diameter)
er) er)
er)
Thank you for purchasing the
nie wieder bohren
(German for “no drilling required”) heavy duty grab bars.
nie wieder bohren
-
Germany is an innovation leader in fastening technology. These bars have been engineered to exceed ASTM (American Society for
Testing and Materials) requirements and offer the ability to mount using the internationally patented
nie wieder bohren
- no
drilling required -technology on premium surfaces such as tile, stone, glass and metal. The
nie wieder bohren
no drilling
required -adapter system allows for ease of installation, durability, performance and no holes in the walls! Another advantage of
this innovative approach on fastening technology is that the system can be removed, if needed, with no damage to the surface.
Moreover, with an additional set of adapters, the bar can be re-installed in minutes anywhere you like as long as the surface is
suitable for the
nie wieder bohren
– no drilling required -system.
Choosing and Positioning a Wall Mounted Grab Bar
Choosing and Positioning a Wall Mounted Grab BarChoosing and Positioning a Wall Mounted Grab Bar
Choosing and Positioning a Wall Mounted Grab Bar
Wall mounted grab bars come in several lengths. Deciding which length to install depends on how the grab bar will be used. If you
are planning to put a main grab bar on the side wall of a bathroom tub enclosure, the National Kitchen and Bath Association
recommends using a grab bar of at least 24 inches. If you also want to add a second grab bar for further support on the shower
head wall, it should be at least 12 inches long. Before deciding whether to install a grab bar horizontally, diagonally or vertically
the following needs to be taken into consideration: Horizontal grab bars offer better leverage to a person getting up from the
bathtub or up and down from a toilet, whereas a grab bar placed at a 45 degree angle to the toilet or bathtub rim is easier for
people of differing heights to reach. Horizontal grab bars should be located 33 to 36 inches above the finished floor around toilets,
33 to 36 inches above the floor of the bathtub and close enough to the shower head wall in order to support a person adjusting
water temperature. Vertical mount is ideally wall mounted on the entrance to the tub and directly under the shower head to assist
with safe entry and to prevent from falling while showering. The
nie wieder bohren
grab bars are also ideal to mount directly to the
tub edge to aid children in safe entry and exit from the bathtub.
2
Mounting:
Mounting:Mounting:
Mounting:
nie wieder bohren
nie wieder bohrennie wieder bohren
nie wieder bohren
-
--
-
no drilling required
no drilling requiredno drilling required
no drilling required technology mounting system: (r
technology mounting system: (r technology mounting system: (r
technology mounting system: (recommended
ecommended ecommended
ecommended for Tile, Natural Stone, Glass
for Tile, Natural Stone, Glassfor Tile, Natural Stone, Glass
for Tile, Natural Stone, Glass, Metal and
, Metal and , Metal and
, Metal and
Most Plastics*)
Most Plastics*)Most Plastics*)
Most Plastics*)
Components:
Components:Components:
Components: Tools required:
Tools required:Tools required:
Tools required:
-Grab bar -Level
-GB00002-NDR (mounting kit) -Clean dry cloth
Note: Failure to follow the instruction sheet completely may result in a product failure and will void the warranty. Please be sure
to carefully read and follow the instructions for optimum results and safety.
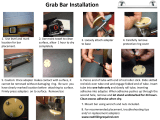
1. GB00002-NDR Adapter Set: 2 Adapters, 3 Adhesive Tubes, 3 Red Tube Keys, 6 Stainless Steel Machine Screws, 6 Spacers,
1 Allen Wrench, 1 Alcohol Cleaning Cloth (see pic. 1)
2. Clean Surface with alcohol cleaning cloth; allow to dry completely. After surface is completely dry, wipe area thoroughly
with a clean dry cloth to remove any residue from the alcohol wipe. Do not
Do notDo not
Do not use household cleaners as they can leave a
use household cleaners as they can leave a use household cleaners as they can leave a
use household cleaners as they can leave a
residue and be sure surface has completely dried prior to installation. If tiles had been waxed or treated with a sealant,
residue and be sure surface has completely dried prior to installation. If tiles had been waxed or treated with a sealant, residue and be sure surface has completely dried prior to installation. If tiles had been waxed or treated with a sealant,
residue and be sure surface has completely dried prior to installation. If tiles had been waxed or treated with a sealant,
any residue needs to be removed prior to installation by using
any residue needs to be removed prior to installation by usingany residue needs to be removed prior to installation by using
any residue needs to be removed prior to installation by using pure acetone
pure acetone pure acetone
pure acetone (see pic. 2).
3. Slide grab bar end cover ring away to expose the three hole base plate. Slide a spacer over each machine screw and pre-
attach the adapters to the grab bar by using the allen wrench (see pic. 3 and 4). If the wall cover ring cannot be easily
removed from the grab bar, simply tap bar end in the cup of your hand to pop it loose.
4. Identify desired location of bar. If needed, use level and mark location for bar placement.
5. Carefully remove the adapters’ protective film from foam rings on both sides. Be careful not to tear the foam ring and do
not touch the adhesive on foam rings! Carefully press the grab bar into place in the desired location for 5 seconds. The
foam adhesive rings are meant to only temporarily hold the adapters in place to ensure safe insertion of the special
adhesive. Therefore, do not apply too much pressure on the grab bar!
Therefore, do not apply too much pressure on the grab bar!Therefore, do not apply too much pressure on the grab bar!
Therefore, do not apply too much pressure on the grab bar! Once the adapter makes contact with surface, it
cannot be removed without damaging ring. Be sure you have clearly marked location before attaching to surface. (See pic.
5 and 6)
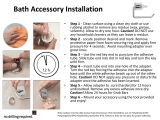
6. Remove the grab bar from the adapters again by removing the screws and spacers. If you are mounting horizontally or
vertically, remove the screws and spacers on the lower end first to prevent potential injury. After removal of all screws
and spacers, the adapters are now fixed to the wall in the proper location location (see pic. 7).
7. To open the black adhesive tube, carefully pierce the seal with the pointed end of the red tube key (see pic. 8).
8. Slide the slotted portion of the red tube key over tube end and engage folded end of tube. It may be easier to slightly
unfold the tube end before inserting into the red tube key (see pic. 9). Be careful not to squeeze or advance the glue from
tube before next step.
9. Put tube into the center hole of the adapter and very slowly
very slowlyvery slowly
very slowly turn the tube key to insert the adhesive. Continue to insert
until the adhesive beads up from each of the three vent holes. Do not disturb or apply pressure on the adpater after
Do not disturb or apply pressure on the adpater after Do not disturb or apply pressure on the adpater after
Do not disturb or apply pressure on the adpater after
inserting the adhesive for 24 hours!
inserting the adhesive for 24 hours!inserting the adhesive for 24 hours!
inserting the adhesive for 24 hours! (See pics. 10, 11 and 12) Should adhesive tube be empty before it beads up from each
vent hole, please open another tube and continue insertion as described. Do not attempt to wipe off any excess adhesive
right after insertion into the adapter. The beads can be easily removed once adhesive has dried completely.
10. After adhesive has cured (hardened) for 24 hours, remove the excess vent hole beads as shown in picture 13. There is no
need to remove the excess from the center hole as it will not affect the mounting.
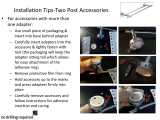
11. Reattach grab bar to the adapters using the machine screws and spacers (see pic. 4). If holes do not line up, flip grab bar
over as this proper orientation is key to alignment. Loosely attach all screws first before tightening.
12. Slide cover ring over mounting flange after having ensured tightness of all screws. Turn in one direction until the ring is
properly aligned and assure a snug fit. Please make sure that there is a small, even gap between the wall and the end
make sure that there is a small, even gap between the wall and the end make sure that there is a small, even gap between the wall and the end
make sure that there is a small, even gap between the wall and the end
cover ring to assure proper drainage of water.
cover ring to assure proper drainage of water.cover ring to assure proper drainage of water.
cover ring to assure proper drainage of water. Pointer: the plate is easily attached if it is turned to the proper position and
then snapped on. The ring is concentric and works best when "dialed in place”(see pic. 14).
13. Test for proper installation to be sure bar is firmly mounted by applying some pressure.
3
Adapter Removal:
Adapter Removal:Adapter Removal:
Adapter Removal:
The
The The
The
nie wieder bohren
nie wieder bohrennie wieder bohren
nie wieder bohren
adapter system can be removed from any hard surface by applying torsion
adapter system can be removed from any hard surface by applying torsion adapter system can be removed from any hard surface by applying torsion
adapter system can be removed from any hard surface by applying torsion
I 1. Remove grab bar from the adapters by taking out the screws and spacers (see pic. 7).
2. Use channel locks and firmly turn the adapter applying consistent pressure (see pic. 15).
3. Remove residual adhesive from surface using a razor knife and wipe with acetone remover as needed. For rough
surfaces, a coarse brush can also be used. When using a coarse brush, please wear protective goggles to protect
your eyes (see pic. 17)
II 1. You can also remove the adapters without adjustable pliers by taking advantage of the leverage effect of the grib
bar itself. The first step is to unscrew one end of the grab bar.
2. Grab the grab bar and carefully turn it applying consistent pressure in order to remove the adapter still attached
to the grab bar and surface (see pic. 16).
3. After you have removed the first adapter, reattach the other side of the grab bar to the second adapter still
attached to the surface.
4. Grab the grab bar and carefully turn it in order to remove the adapter as described in step II.2.
5. Remove residual adhesive from surface using a razor knife and wipe with acetone remover as needed. For rough
surfaces, a coarse brush can also be used. When using a coarse brush, please wear protective goggles to protect
your eyes (see pic. 17)
Caution!
Caution!Caution!
Caution! Use care not to scar the surface with the grips or razor knife when removing the adapter.
2
22
2
5
55
5
6
66
6
3
33
3
7
77
7
8
88
8
10
1010
10
11
1111
11
12
1212
12
13
1313
13
4
44
4
9
99
9
14
1414
14
17
1717
17
16
1616
16
15
1515
15
4
Safety Warning:
Safety Warning:Safety Warning:
Safety Warning:
-
Follow instructions carefully to ensure proper performance as well as to reduce the chance of injury.
-
If you have purchased the
nie wieder bohren
adapter, be sure to check the stability of the wall prior to mounting. If the
existing wall is old or has any visible water damage or weakness, the performance of the grab bar could be affected
negatively.
-
When installed properly on a sturdy surface, the
nie wieder bohren
system exceeds the ADA (Americans with Disabilities
Act) requirements for a weight capacity of 250lbs.However, grab bars are not designed to support a person’s total weight
and rather to provide for stability and assistance. Do not stand or sit on the grab bar!
-
It is recommended to routinely check your grab bar in order to make sure it is properly secured and no looseness or wall
damage noted.
-
The GB00002-NDR adapter kit contains small parts which should be kept out of reach of CHILDREN, PETS and those NOT
APPRISED in the use of this product at all times in order to avoid injuries such as from swallowing or eye contact.
-
Do not substitute any other adhesive for use with the
nie wieder bohren
system. This is a professional grade adhesive
which was especially designed for this adapter.
-
Dispose of adhesive tube directly into trash after use.
-
The alcohol cleaning cloth should only be used for its intended purpose. It can only perform sufficiently if opened directly
before use.
-
When using cleaners and chemicals like acetone, please observe the manufacturer’s specific safety regulations.
-
First Aid:
Skin: Avoid long term contact with the skin. Rinse with running water and soap. Apply replenishing cream. Change all
contaminated clothing.
Eyes: Avoid contact with the eyes as well as with other mucous membranes. Wash with plenty of water immediately and
continue for several minutes, holding eyelid open. Consult a doctor.
If ingested, Seek medical advice immediately and show this container or label and/or contact poison control
For further information call 800-961-5804 or go to
http://www.niewiederbohren.de/media/raw/Safety_Data_Sheet_nwb2011_en.pdf
for a copy of the MSDS (Material
Safety Data Sheet)
Lifeti
LifetiLifeti
Lifetime Limited Warranty
me Limited Warrantyme Limited Warranty
me Limited Warranty:
-
If this product fails in form, finish or function due to materials or workmanship at any time during the life of the product,
Innovative Product Sales International LLC will replace this free of charge. This does not include any claim arising from
installation error, abuse, damage, alteration, misuse or normal wear. Contact us at 7345 West Friendly Ave Suite C,
Greensboro, NC 27410
Limitation of Liability
Limitation of LiabilityLimitation of Liability
Limitation of Liability
-
OTHER THAN THE LIFETIME LIMITED WARRRANY STATED ABOVE, TO THE EXTENT PERMITTED BY LAW, IPSI DISCLAIMS
ALL OTHER IMPLIED OR EXPRESS WARRANTIES, INCLUDING ALL WARRANTIES OF MERCHANTABILITLY AND/OR FITNESS
FOR A PARTICULAR PURPOSE. THIS WARRANTY IS YOUR SOLE REMEDY AND IPSI SHALL NOT BE LIABLE FOR ANY
DAMAGES, WHETHER DIRECT, INDIRECT, INCIDENTAL, SPECIAL, CONSEQUENTIAL, EXEMPLARY, OR OTHERWISE,
INCLUDING LOST REVENUES ARISING OUT OF ANY THEORY OR RECOVERY, INCLUDING STATUTORY, CONTRACT OR TORT.
NOTWITHSTANDING THE TERM OF ANY LIMITED OR IMPLIED WARRANTY, OR IN THE EVENT THAT ANY LIMITED
WARRANTY FAILS OF ITS ESSENTIAL PURPOSE, IN NO EVENT WILL IPSI’s ENTIRE LIABILITY EXCEED THE PURCHASE
PRICE OF THIS PRODUCT. SOME STATES AND PROVINCES DO NOT ALLOW THE EXCLUSION OR LIMITATION OF
INCIDENTAL OR CONSEQUENTIAL DAMAGES SO THE ABOVE LIMITATIONS OR EXCLUSIONS MAY NOT APPLY TO YOU. THIS
LIMITED WARRANTY GIVES YOU SPECIFIC LEGAL RIGHTS, AND YOU MAY ALSO HAVE OTHER RIGHTS WHICH VARY FROM
STATE TO STATE AND PROVINCE TO PROVINCE.
Care and Maintenance
Care and MaintenanceCare and Maintenance
Care and Maintenance
1. Use mild soap and water to clean the grab bars. Do not use abrasive materials as they could damage the finish and void
the warranty.
2. Check routinely that the grab bar is secure and tighten as necessary.
5
Frequently Asked Questions
Frequently Asked Questions Frequently Asked Questions
Frequently Asked Questions
>What kind of surfaces is the
What kind of surfaces is the What kind of surfaces is the
What kind of surfaces is the
nie wieder bohren
nie wieder bohrennie wieder bohren
nie wieder bohren
system suitable for?
system suitable for? system suitable for?
system suitable for?
Almost any smooth or rough surface is suitable if it is firm and able to bear the load in question. The
nie wieder bohren
system is
perfect for high-quality materials that one does not want to damage by drilling.
nie wieder bohren
is suitable with ceramic
(tiles), stone, marble, granite, glass, concrete, metal, wood and many plastics. Based on load bearing for grab bars, it is
recommended that you use this only on tile, stone and heavy duty glass. Unsuitable surfaces, on the other hand, include soft
plaster, wallpaper, sheetrock and textiles (such as carpets), which do not provide sufficient firmness and support for surface
attachments. There is no adhesion to polyethylene (PE), polypropylene (PP) and
polytetrafluoroethylene (PTFE, Teflon). These surfaces are rarely found in tub surrounds or bath enclosures.
Although we have described as many examples as possible, our instructions can cover only some of the many surfaces and
surface treatments that are suitable. The user is therefore advised to make preliminary tests when considering other types
of surface. Although the system will work on most plastics and fiberglass, the actual load capacity will vary based on
plastic material type, manufacture and wall thickness. For this reason we can not guarantee 250lb load capacity for these
surfaces. We do not offer lifetime guarantee for these surfaces.
>Will the system work on rough surfaces too?
Will the system work on rough surfaces too?Will the system work on rough surfaces too?
Will the system work on rough surfaces too?
Surface texture is not a factor that affects the bonding strength of the
nie wieder bohren
adhesive. However, the surface must
be flat to match the adapter and should not have any large gaps that would let adhesive escape from underneath the adapter
ring. In fact, a slightly roughened surface affords even better adhesion owing to the improved mechanical contact. To
completely remove the silicone-like adhesive from the gaps and pores of rough surfaces, it is necessary to use a silicone
remover, pure alcohol and a coarse brush.
>Can I use the system outdoors as well?
Can I use the system outdoors as well?Can I use the system outdoors as well?
Can I use the system outdoors as well?
Yes! The adhesive will not decay, withstands UV radiation, is water-resistant and not damaged by freezing (however, it should
be applied at a temperature between 41 and 104°F (+5 and +40°C).
>Will the system fail over time?
Will the system fail over time?Will the system fail over time?
Will the system fail over time?
Absolutely not! Once the
nie wieder bohren
system has been properly attached, its special single-component adhesive will
ensure a permanent bond. Moreover, it will retain its elasticity and not fray the way many textile adhesive tapes do after only a
few weeks. Moreover, short impact loads will not cause the adhesive surface to crack, as often happens with two-component
adhesives that harden to form a crystalline connection. The
nie wieder bohren
system is a totally new experience in bonding
technology!
>I followed the instructions carefully, but the adapter still fell from the wall. Why did t
I followed the instructions carefully, but the adapter still fell from the wall. Why did tI followed the instructions carefully, but the adapter still fell from the wall. Why did t
I followed the instructions carefully, but the adapter still fell from the wall. Why did that happen?
hat happen? hat happen?
hat happen?
According to our experience, if the
nie wieder bohren
system fails to deliver what we promise, it is usually for one of the three
reasons listed below. Each of these reasons is caused by improper conditions for bonding. From the so-called fracture pattern
of the adhesive on the back of the adapter, one can easily determine what the problem is.
1. Cavities in the adhesive - caused by disturbing (e.g. pressing down) the adapter after inserting adhesive which
causes air pockets and limits the bond.
2. Insufficient curing time - caused by trying to mount the accessory prior to the suggested curing time of 12 hours
(Grab bars recommend 24 hours).
3. Separation at surface - caused by not cleaning surface properly prior to installation. Be sure to use rubbing alcohol
only and allow to dry completely to be sure the surface is free of all household cleaners, grease, soap deposits etc.
>Can the adhesive cause damage to surfaces?
Can the adhesive cause damage to surfaces?Can the adhesive cause damage to surfaces?
Can the adhesive cause damage to surfaces?
No. We know of no load-bearing material that would be harmed by the chemical substances in the
nie wieder bohren
adhesive.
6
>Is the adhesive toxic?
Is the adhesive toxic? Is the adhesive toxic?
Is the adhesive toxic?
No. Contact with skin is harmless. After use, rinse off with soap and water. In case of contact with eyes, rinse thoroughly with
water for several minutes, keeping the eyelid open. If adhesive is swallowed consult a doctor immediately.
>Is the adhesive free of formaldehyde?
Is the adhesive free of formaldehyde?Is the adhesive free of formaldehyde?
Is the adhesive free of formaldehyde?
Yes.
>How should I dispose of the adhesive?
How should I dispose of the adhesive?How should I dispose of the adhesive?
How should I dispose of the adhesive?
You can put hardened or dried adhesive remnants right into the household trash. The same applies to the adapter after
dismantling.
>How long will the adhesive keep in the tube?
How long will the adhesive keep in the tube?How long will the adhesive keep in the tube?
How long will the adhesive keep in the tube?
The adhesive itself is non-decaying, so theoretically it keeps forever. However, since it is difficult to process the adhesive and
put it in storage without bringing it into contact with air, it may gradually harden in the tube over a long time. We therefore
guarantee a minimum durability of 18 months. The end date of this 18 month-period is imprinted on the top fold of the tube in
the format DD/MM/YY. If you find you have a tube which has expired, contact us for a replacement.
>Is the adapter reusable?
Is the adapter reusable?Is the adapter reusable?
Is the adapter reusable?
No. The adapter is designed to be used only one time based on the patented “pass through” technology needed for curing. To
remount your accessories it will be necessary to purchase another adapter kit.
>Can one use the system to attach objects other than those that are supplied together with the
Can one use the system to attach objects other than those that are supplied together with the Can one use the system to attach objects other than those that are supplied together with the
Can one use the system to attach objects other than those that are supplied together with the
nie wieder bohren
nie wieder bohrennie wieder bohren
nie wieder bohren
system?
system? system?
system?
The system is designed to be used only with the
nie wieder bohren
accessories. We now carry many different types of products
which offer this technology. These include bath accessories, grab bars, hooks, kitchen rail accessories and door stops.
For recommended placement, troubleshooting tips and/ or replacement adapters: www.nodrillingrequired.com
Failure to follow the instructions could lead to adhesion failure and cause injury
Failure to follow the instructions could lead to adhesion failure and cause injuryFailure to follow the instructions could lead to adhesion failure and cause injury
Failure to follow the instructions could lead to adhesion failure and cause injury
Innovative Product Sales International LLC
7345 West Friendly Ave. Suite C
Greensboro, NC 27410
800-961-5804
www.innovativeproductsinc.com
*Actual performance varies on plastics and fiberglass and does not meet ADA specifications for load bearing. Lifetime guarantee
does not apply if used on these surfaces.
The nie wieder bohren system will work on most plastics but the actual load capacity is less than ADA requirements and has
varied in testing. Lifetime performance is not guaranteed if used on plastics
  • Page 1 1
  • Page 2 2
  • Page 3 3
  • Page 4 4
  • Page 5 5
  • Page 6 6
  • Page 7 7
  • Page 8 8
  • Page 9 9
  • Page 10 10
  • Page 11 11
  • Page 12 12

No Drilling Required GB38012-POL-NDR User manual

Type
User manual

Ask a question and I''ll find the answer in the document

Finding information in a document is now easier with AI