Ham-Let Valves & Fittings 3002394 Installation guide

Type
Installation guide
INSTALLATION INSTRUCTIONS
476
LET-LOK TUBE
FITTINGS
1/16" THROUGH - INCH
2 MM THROUGH 25 MM -
METRIC
483
SCREWED BONNET
NEEDLE VALVES
H-99 / H-99HP
487
H-900 SERIES
RELIEF VALVES
493
ONE-LOK TUBE
FITTINGS
1/4",3/8", 1/2", 3/4" 1"
484
H-400 SERIES
CHECK VALVES
488
H900-HP SERIES
HIGH PRESSURE
RELIEF VALVES
497
PIPE LINE
PRECISION
INSTRUMENTATION
PIPE FITTING
485
H-500 SERIES
3-Piece ball valves
489
H600 SERIES
T-TYPE & IN-LINE
FILTERS
501
HTC
HI-TECH COMPONENTS
485
H-700 SERIES
BALL VALVES WITH
LOCKING DEVICE
491
PRESSURE GAUGES
INSTALLATION &
OPERATION
INSTRUCTIONS
502
H300U SERIES
.
Needle valves
486
H-6800 SERIES
INSTRUMENTATION
BALL VALVES
492
INDEX
INSTALLATION INSTRUCTIONS
477
HAM-LET ADVANCED CONTROL TECHNOLOGY
1/16" through 1" - Inch, 2 mm through 25 mm - Metric
LET-LOK
®
fittings are supplied assembled and
finger tight.
Diassembly before use can allow
the entry of dirt or other particles.
1.
Insert the tubing into the LET-LOK
®
tting.
Check that the tube rests rmly on the tting shoulder
and that the nut is nger tight.
2.
Tighten the nut.
1
1/4 turns of the nut are required for 1/4" (6 mm) and higher.
(See Figure A.) 3/4 of a turn of the nut is required for
3/16"
(4 mm) and lower. (See Figure B.)
Tube Cutter
To attain a leak-free connection, cut the tubing squarely. Use
a good quality tube cutter with the appropriate blade for the
tubing.
Do not try to reduce the time of cutting by taking deep cuts
with each turn of the cutter. This will work-harden the tube.
Deburr the end of the tube to avoid damage to the tting and
to ensure that the tube reaches the bottom of the tting.
Hacksaw Cutting
In order to cut the tube with a hacksaw and get square ends,
cut the tube with guide blocks.
If you use this method of cutting, you will need to deburr the
tube ends.
Tube Handling
Scratches on the tube might cause leaks. Therefore,
use caution in handling the tube in order to reduce the
possibility of leaks.
Some precautions to be taken:
1.
Tubes must not be dragged on the oor.
2. Tubes must not be dragged out of a tubing rack,
especially in case of large OD tubes.
Copper Tubing
If you use copper tubing on a ro, be sure to hold the end
of the tube, then, move the tubing away from you, so that
it can lie on a at surface.
Reassembly Instructions
LET-LOK
®
connections may be disconnected and remade
repeatedly without loss of the leaktight seal.
1. Before disconnecting, mark the position of the nut in
relation to the tting body.
2. To reassemble, use a wrench to tighten the nut to original
position.
3. Tighten slightly with a wrench until you feel a slight rise in
torque.
Tube Cutting
There are two ways to cut tubes:
1. Tube cutter
2. Hacksaw
Warning!
Do not hold the tube in a vise at the place where it will be
inserted into the tting (the vise will leave a mark on the
tube that may cause leaks, and might cause ovality).
1 2
INSTALLATION INSTRUCTIONS
478
1/4'', 3/8'', 1/2'', 3/4'', 1''
Warning!
Do not hold the tube in a vise at the place where it will be
inserted into the tting (the vise will leave a mark on the
tube that may cause leaks, and might cause ovality).
ONE-LOK
®
fittings are supplied assembled and
finger tight. Diassembly before use can allow the
entry of dirt or other particles.
1. Insert the tubing into the ONE-LOK
®
tting.
Check that the tube rests rmly on the tting shoulder and
that the nut is nger tight.
2. Tighten the nut.
1
1/4 turns of the nut are required.
(See Figure A.)
Tube Cutting
There are two ways to cut tubes:
1. Tube cutter
2. Hacksaw
Tube Cutter
To attain a leak-free connection, cut the tubing squarely. Use
a good quality tube cutter with the appropriate blade for the
tubing.
Do not try to reduce the time of cutting by taking deep cuts with
each turn of the cutter. This will work-harden the tube.
Deburr the end of the tube to avoid damage to the tting and to
ensure that the tube reaches the bottom of the tting.
Hacksaw Cutting
In order to cut the tube with a hacksaw and get square ends, cut
the tube with guide blocks.
If you use this method of cutting, you will need to deburr the
tube ends.
Tube Handling
Scratches on the tube might cause leaks. Therefore, use
caution in handling the tube in order to reduce the possibility
of leaks.
Some precautions to be taken:
1. Tubes must not be dragged on the oor.
2. Tubes must not be dragged out of a tubing rack,
especially in case of large OD tubes.
Copper Tubing
If you use copper tubing on a ro, be sure to hold the end of the
tube, then, move the tubing away from you, so that it can lie on
a at surface.
Reassembly Instructions
ONE-LOK
®
connections may be disconnected and
remade repeatedly without loss of the leaktight seal.
1. Before disconnecting, mark the position of the nut
in relation to the tting body.
2. To reassemble, use a wrench to tighten the nut to
original position.
3. Tighten slightly with a wrench until you feel a slight
rise in torque.
1 2
INSTALLATION INSTRUCTIONS
479
HAM-LET ADVANCED CONTROL TECHNOLOGY
HAM-LET PRECISION INSTRUMENTATION PIPE FITTINGS
HTC
HI-TECH COMPONENTS
To ensure a leak-tight seal, HAM-LET recommends that you use a
pipe-thread sealant on all NPT threads. The most effective sealing
method is PTFE tape. Tape should be used only on male tapered
pipe threads.
Do not use tape on flared, coned or tube fitting ends!
Clean both male and female tapered threads. Wrap tape in the
direction of the male tapered thread spiral.
MAKE UP OF GLANDS
n
Glands offer a high-purity metal to metal seal for leak-free
service in high-vacuum or high-pressure assemblies.
n
The gasket is compressed by two highly polished beads
when the male and female nuts are engaged.
n
The gland bead-to-bead assembly compresses a soft-
metal gasket-to-seal. This assembly can be locked by
the HAM-LET Grip-Kit (see A below).
n
Visual test and leak testing are performed through two test
ports in opposite locations from the female nut.
ASSEMBLY INSTRUCTIONS
1. Be sure to protect all HTC face-seal ttings until
the assembly and make up. Exercise great care that the
sealing surfaces are not scratched, damaged or
contaminated in any way during handling
and assembly.
2. Always use a clean environment,
and always employ proper
clean-room protocol
for make up and assembly
of high-purity ttings and
applications.
Note: We suggest two wraps for stainless-steel tapered pipe
threads. Make sure the tape does not overhang the rst thread.
Otherwise,the tape could shred and enter the uid system.
Cut off excess tape.
The connection is now ready for proper makeup.
3. Make up instructions:
Tighten the female nut to the male nut/body until it is
nger tight.
Tighten the female nut 1/8 of a turn past the nger-tight
point.
Always torque the female nut while keeping the male
nut/body stationary.
Face seal connections are remakable - please use a
new gasket for each remake.
INSTALLATION INSTRUCTIONS
480
NEEDLE VALVES H-300U SERIES
Re-Assembly
Reverse the steps above, taking care to lubricate all parts with
an appropriate lubricant.
Note: Factory valves are tested at 1,000 psig using N2.
No leakage from the seat or the stem is allowable after 1 minute
with the valve immersed in water.
6. Threaded Valves Installation
n On tapered threads, use a conventional thread sealant such
as PTFE tape or an appropriate alternative that is compatible
with the application.
n Apply a wrench to the body and connecting nut. Do not
use the handle to tighten the connection.
LET-LOK
®
Valves
n Ensure the tubing is cut square and that it is de-burred.
n Ensure the tubing is located rmly in the connection.
n From the nger-tight position, rotate the nut a full 11/4 turn.
Note: For sizes 3/16 inch (4mm) or less, rotate the nut 3/4
turn only.
V Apply a wrench to the body and connecting nut. Do not
use the handle to tighten the connection.
1. Use
For maximum valve life, use the valve only within the
stated pressure and temperature range, and in accordance
with the corrosion resistance of the material.
2. Operation
To open the valve, rotate the handle until it comes in contact
with the lower gland. This will allow maximum ow through
the valve. To close the valve, rotate the handle until the stem
tip comes into contact with the seat.
Do not use excessive force when closing the valve.
Excessive torque applied to the handle may damage both
the seat and stem tip, particularly the soft seat option.
3. Cleaning The Valve
Liquids can be trapped within the valve. If the valve has been
used with hazardous media, it must be de-contaminated
before disassembly. All personnel involved in the removal
and disassembly of the valve should wear appropriate
protective clothing, such as face shields, aprons, gloves, etc.
4. Replacing Seat And Stem Seals
If there are signs of leakage through the stem area, and
further adjustment is not possible, replace the stem seal. If
there are signs of leakage across the seat, replace the stem.
5. Disassembly Procedures
With the valve clamped rmly in a vise:
n Remove the set screw (2) with the appropriate Allen
wrench, and remove the handle (1).
n Remove the packing bolt (3).
n Rotate stem counter clockwise until the stem is free from
the body.
Note: The stem will be complete with belleville washers
(4) gland (5) upper packing (6) and lower packing (7).
Clean and inspect all metal parts for nicks, scratches, etc.,
particularly the
stem tip and the valve seat. Discard any parts that are
damaged,
and replace them with authorized HAM-LET parts.
n Discard the stem packings and replace it with authorized
HAM-LET parts.
1
2
3
4
6
7
8
9
10
5
INSTALLATION INSTRUCTIONS
481
HAM-LET ADVANCED CONTROL TECHNOLOGY
6. Installation
Disassembly
n
On taper threads, use a conventional thread sealant such
as PTFE tape or an appropriate alternative that is
compatible with the application.
n
Apply a wrench to the body and connecting nut.
Do not use the handle to tighten the connection.
LET-LOK® Valves
n
Ensure the tubing is cut square and that it is de-burred.
n
Ensure the tubing is located rmly in the connection.
n
From the nger-tight position, rotate the nut a
full 1 1/4 turn.
Note: For sizes 3/16 inch (4mm) or less, rotate the nut
3/4 turn only.
n
Apply a wrench to the body and connecting nut. Do not
use the handle to tighten the connection.
SCREWED BONNET
NEEDLE VALVES H-99
1. Use
For maximum valve life, use the valve only within the
stated pressure and temperature range, and in accordance
with the corrosion resistance of the material.
2. Operation
To open the valve, rotate the handle until it comes in contact
with the lower gland. This will allow maximum ow through
the valve.
To close the valve, rotate the handle until the stem tip comes
into contact with the seat.
Do not use excessive force when closing the valve. Excessive
torque applied to the handle may damage both the seat and
the stem tip.
3. Cleaning The Valve
Liquids can be trapped within the valve.
If the valve has been used with hazardous media, it must be
de-contaminated before disassembly.
All personnel involved in the removal and disassembly of the
valve should wear appropriate protective clothing, such as
face shields, aprons, gloves, etc.
4. Replacing Seat and Stem Seals
If there are signs of leakage through the stem area, and
further adjustment is not possible, replace the stem seal.
If there are signs of leakage across the seat,
replace the stem.
5. Procedures Disassembly
With the valve clamped rmly in a vise:
n
Remove the set screw (1) with the appropriate Allen wrench,
and remove the handle (2).
n
Remove the packing bolt (3).
n
Rotate the stem counter clockwise until the stem is free
from the body.
Note: The stem will be complete with upper gland (4) the
packing (5).
n
Clean and inspect all metal parts for nicks, scratches, etc.,
particularly the stem tip and the valve seat. Discard any
parts that are damaged, and replace them with authorized
HAM-LET parts.
n
Discard the stem packing and replace it with authorized
HAM-LET parts.
Re-Sssembly
Reverse the steps above, taking care to lubricate all parts
with an appropriate lubricant.
Note: Factory valves are tested at 1,000 psig using N2. No
leakage from the seat or the stem is allowable after 1
minute with the valve immersed in water.
9
12
7
10
11
2
3
4
5
8
1
6
INSTALLATION INSTRUCTIONS
482
H-400 SERIES
CHECK VALVES
1. Use
For maximum valve life, use the valve only within the stated
pressure and temperature range, and in accordance with the
corrosion resistance of the material. Give particular attention
to the compatibility of the O-ring material.
2. Disassembling and Cleaning the Valve
A non-return valve can trap uids within the body. If the
valve has been used in hazardous media service, remove
with great care and take appropriate decontamination
measures.
All persons involved in the removal and disassembly of
the valve should wear proper protective clothing, such as
gloves, aprons, face shields, etc.
3. Replacing Seats, Seals and Springs
H-400 valves are designed to give optimum life. Should the
valve reveal leaks across the seat:
A. Place the body securely in a vise, holding on the hexagon
ats.
With an appropriate size wrench, unscrew the end.
Remove the upper (body) and poppet O-rings.
Clean and dry all parts, taking particular care that the seat
is not damaged.
B. To rebuild the valve:
Replace O-rings. Lubricate the threads and outer surface
of the poppet with Halocarbon 27 oil, or an alternative as
appropriate for the owing medium.
Reassemble the poppet and the spring into the body.
Reassemble the end to the body using a torque wrench
set to 33 ft. lb (45 NM).
C. Should the valve exhibit an opening at less than the stated
cracking pressure, follow steps 3A and 3B, replacing the
spring with a factory-supplied component.
4. Testing
Test all valves for functionality before placing them into
service.
Using clean, dry nitrogen, pressurize the inlet of the valve
to cracking pressure. Acceptance criterion: the valve does
not pass the nitrogen at ± 20% of cracking pressure when
immersed in water for one (1) minute.
Using clean, dry nitrogen, pressurize the outlet of the valve
to 2000 psig.
Acceptance criterion: no leakage from the body/end
connection when it is immersed in water for one (1) minute.
5. Installation
Apply wrench on the hexagon adjacent to the end being
connected. Do not grip the body with vise grips or similar
tools.
The system designer and user have the sole responsibility
for selecting products suitable for their special application
requirements, ensuring their safe and trouble-free installation,
operation, and maintenance. Application details, material
compatibility and product ratings should all be considered for
each selected product. Improper selection, installation or use of
products can cause property damage or personal injury.
Warning!
INSTALLATION INSTRUCTIONS
483
HAM-LET ADVANCED CONTROL TECHNOLOGY
H-500 SERIES
3-PIECE BALL VALVES
1. Use:
1.1 For maximum valve life, use the valve only within
the stated pressure and temperature range, and
in accordance with the corrosion resistance of the
material. Give particular attention to the compatibility
of the O-ring material.
2. Manual Operation
2.1 To open or close the valve, turn the handle 1/4
of a turn (90 degrees).
A. When the valve is in the Open Position, the handle
is parallel (in-line) with the valve or pipeline.
B. When the the valve is in the Closed Position, the
handle is perpendicular (crossed) to the valve or
pipeline.
3. Automated Operation
3.1 Check any valve with an actuator for valve-stem
alignment. Angular or linear misalignment will result in
high operational torque and unnecessary wear on the
stem seal.
4. Disassembling & Cleaning of the Valve:
A ball valve can trap uids in the ball cavity when it is in the
closed position. If the valve has been used in a hazardous
medium, decontaminate it before disassembly.
A. Relieve the line pressure.
B. Place the valve in the half-open position and ush
the line to remove any hazardous material from the valve.
C. All persons involved in the removal and disassembly
of the valve should wear proper protective clothing, such
as face shields, gloves, aprons, etc.
5. Replacing Seats, Joint Gaskets, Stem
Seal and Stem Packing
Model H-500 is designed with Belleville washers for
automatic seal wear compensation. If there is any sign
of leakage from the stem, replace the stem packing and
the stem seal. If there is any sign of internal leakage,
replace the ball seats.
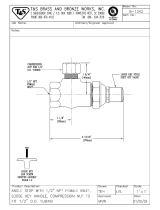
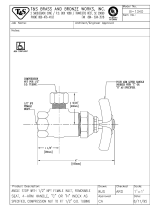
5.1 When replacing the seats and joint gaskets, refer
to the assembly diagram.
A. Follow the above Disassembling & Cleaning
Instructions (number 4, above). Make sure the
pipeline is de-pressurized.
B.
With the valve in the open position (lever parallel
to the axis of the pipe), loosen all the nuts on the
body bolting. Remove all the bolts except one. Swing
the body outside the pipe.
C.
Turn the handle to the half-open position to assist in
the removal of the seats.
D.
Replace with a new set of seats and joint gaskets.
E.
Swing the body back into position. Replace the
removed bolt, and tighten the bolts according to the
Bolt
Tight
ening Specication Table on the next page.
5.2
When replacing the stem seal and stem packing, refer to
the assembly diagram.
A.
Follow the direction for replacing the seats and joint
gaskets from 5.1.A to 5.1.C.
B.
To assist in loosening the stem nut, place a rod of
a diameter smaller than the ball orice into the ball orice.
Loosen and remove the top stem nut with a wrench.
Remove the stem washer, handle and lock saddle.
Place all removed parts in a clean and secure place.
C.
Loosen and remove the second stem nut with a
wrench.
Remove the set of Belleville washers. Place all removed
parts in a clean and secure place.
D. Remove the rod. Turn the valve to the closed position
(handle perpendicular to the pipeline). Remove the seats
and gaskets. The ball should slide out with a gentle push.
Place all removed parts in a clean and secure place.
E.
Push the stem downward. It should come out through
the center body. Remove the stem, then remove the
stem seal.
Thoroughly clean the stem. Replace it with a new stem
seal.
F.
Remove the stem packing from the center body cavity.
Thoroughly clean the center body. Insert a new stem
packing.
G.
Replace the stem, the Belleville washers and the gland.
Replace the rst stem nut. To tighten the nut, hold the
stem in place and tighten the nut with a wrench. When
tightening the stem nuts, make sure they are snug and
the Belleville washer is compressed to the maximum
extent.
Replace the lock saddle, the stem handle, the stem
washer and the top stem nut.
Tighten the top stem nut with a wrench.
H. Turn the valve to the closed position (handle
perpendicular to the pipeline). Replace the ball. Turn the
valve to the open position (handle parallel to the pipeline).
Replace the seats and joint gaskets.
I. Swing the center body back into position. Replace
the removed bolts and nuts. Tighten the nuts according
to the Bolt Tightening Specication Table.
INSTALLATION INSTRUCTIONS
484
H-500 SERIES
3-PIECE BALL VALVES
6. General Information for On-Site
Installation:
6.1 The valve may be tted in any position on the pipeline.
6.2 To prevent damage to the seats and ball surface, make
sure the pipeline is ushed, free of dirt, burrs and
welding residues before installing the valve.
7. Installation of Threaded Valves
7.1 Use a conventional sealant, such as a hemp core, PTFE, etc.
7.2 Apply a wrench to the hexagon end of the valve only.
Tightening by using the valve body or handle can
seriously damage the valve.
7.3 For applications where the screwed end valves are
back-welded on site, dismantle these valves according
to the instructions for weld end valves.
8. Installation Of Weld End Valves
8.1 Tack-weld the valve onto the pipe in four points on
both end caps.
8.2 With the valve in the open position (lever parallel to the
axis of the pipe), loosen all of the nuts on the body bolts.
Remove all of the bolts except one.
Swing the body outside the pipe.
8.3 Turn the handle to the half-open position to assist in
the removal of the seats and joint gaskets.
8.4 Turn the handle to the closed position and remove
the ball.
8.5 Place all removed parts in a clean and secure place.
8.6 Replace the body and the removed bolt. Tighten all
nuts slightly.
To prevent any leakage to the body joints after welding,
make sure that the body and the end caps remain
perfectly parallel.
8.7 Finish welding both end caps onto the pipe.
8.8 After the pipeline and valve cool, clean the end
caps, then remove the previous, and replace the bolt.
Swing out the body.
Turn the valve to the closed position, then replace
the ball. Turn the valve to the open position and
replace the seats and joint gaskets.
8.9 After you have replaced the seats, joint gaskets
and ball, swing the body into position, replace
the removed bolts and nuts, and tighten the nuts
according to the Bolt Tightening Specication Table.
Bolt Tightening
Specification Table:
Tighten the body bolts of the
valve evenly. Tighten one-side
snugly, then tighten the one
diagonally across. Repeat for
the other bolts, bringing them
all down tightly in sequence to
the torque shown up:
Valve
Size
Torque
(lb ft)
Torque
(N m)
1/4"
to
3/4"
5.9 8.0
1"
14.0 19.0
The system designer and user have the sole responsibility
for selecting products suitable for their special application
requirements, ensuring their safe and trouble-free installation,
operation, and maintenance. Application details, material
compatibility and product ratings should all be considered for
each selected product. Improper selection, installation or use of
products can cause property damage or personal injury.
Warning!
INSTALLATION INSTRUCTIONS
485
HAM-LET ADVANCED CONTROL TECHNOLOGY
H-700 SERIES
BALL VALVES WITH LOCKING DEVICE
1. Use
For maximum valve life, use the valve only within
the stated pressure and temperature range, and in
accordance with the corrosion resistance of the material.
2. Operation
To open or close the valve, turn the handle 1/4 of a turn (90°).
3. Cleaning the Valve
A ball valve can trap uids in the ball cavity when it is in the
closed position. If the valve has been used in the hazardous
medium, decontaminate it before disassembly.
All persons involved in the removal and disassembly of the
valve should wear appropriate protective clothing, such as
face shields, aprons, gloves, etc.
4. Replacing Seats and Stem Seals.
Type H-700 is designed with Belleville washers for
automatic stem-seal wear compensation. If there
are signs of leakage through the stem area, replace
the stem seals.
If there are signs of internal leakage, replace the
seat seals.
5. Procedures
Disassembly
With the valve clamped rmly in a vise:
n
Remove the nut, spring washer, handle, Belleville
washer, thrust washer and top packing. Place in a secure,
clean area.
n
Remove the end connection/internal nut and body seal.
n
Rotate the ball to the closed position and remove
the ball and seat seals. Inspect the ball for any surface
damage. If there are no nicks, scratches or other
surface damage, place the ball in a clean, secure area.
n
Remove the stem, and lower the packing from the
body cavity.
n
Scrap all plastic parts and replace them with
authorized HAM-LET parts.
n
Clean and inspect all metal parts, and replace as
necessary with authorized HAM-LET parts.
Reassembly
Reverse the steps above, taking care to lubricate all of
the parts with an appropriate lubricant.
Notes:
n
The end connection/internal nut must be rmly closed.
n
The stem nut must be closed with sufficient torque
to deflect the belleville washer.
The system designer and user have the sole responsibility
for selecting products suitable for their special application
requirements, ensuring their safe and trouble-free installation,
operation, and maintenance. Application details, material
compatibility and product ratings should all be considered for
each selected product. Improper selection, installation or use of
products can cause property damage or personal injury.
Warning!
INSTALLATION INSTRUCTIONS
486
H-6800 SERIES
INSTRUMENTATION BALL VALVES
General Note
When a ball valve is removed or installed in a tube system, a
back-up wrench (spanner) must be used on the end connector,
NOT on the valve body.
Tube Fitting Connectors (LET-LOK
®
Twin-Ferrule Compression
Fittings)
1. Insert the tubing, nesting it in the counterbore.
2. Ensure that the nut is nger tight, and mark the nut
for reference.
3. Now tighten the nut 1 1/4 turns.
Note: For sizes
1/16 to 3/16 inch (2 to 4 mm), tighten 3/4 of a turn
only from the nger tight position.
Taper Threaded Connectors
(NPT, BSPT, Male or Female)
1.
On the male thread of the connector, apply PFTE
tape or high-quality sealing compound. When PFTE tape
is used, no more than two full turns of the tape should
be applied. The tape must not overhang the end of the
connector.
2. Screw until the valve and connector together until
they are hand tight.
3. With the proper size wrench (spanner), holding both
sides of the connector (not the valve body), continue to
tighten until a leak-tight joint is achieved.
Welded Connectors
1. We recommend disassembling all valves prior to
welding in order to avoid damage to seats and seals.
2. If the valve must be welded when fully assembled,
put the valve in the full open position, and continuously
purge it with cool gas. People who have been trained in
established procedures should perform all the welding
tasks.
3. For socket weld ports: insert the tube into the
connector until it bottoms out against the stop, then pull
it back approximately 1/16 of an inch (1.5 mm) and weld.
This will help avoid excess static stress.
Packing Adjustment
Due to the varied service applications of the valve, packing
adjustment may occasionally be necessary. We recommend
initial adjustment after installation and prior to start-up.
1. Remove the handle by turning the set screw
counter clockwise using the appropriate hex-
socket tool.
2. Tighten the packing nut 1/8 to 1/4 of a turn.
3. Replace the handle and retighten the set screw.
1. Remove the handle by turning the set screw
counter -clockwise using the appropriate hex-socket tool.
2. Insert the valve though the panel hole and assemble
the panel nut.
Note: If the valve is mounted to a thin panel, it may be
necessary to t a spacer (washer) to the valve to allow
proper engagement of the panel nut.
3. If required, adjust the stem packing as explained above.
4. Replace the handle and retighten the set screw.
Maximum Allowable Working Pressures and
Temperatures
For allowable pressure at various temperatures, see the
graph in main the catalogue.
Installation of Panel-Mounted Valves
Valve Size Max. Panel
Thickness
Panel Hole
Diameter
1/4 6.5 mm 19.3 mm
1/2 6.5 mm 20.8 mm
Seat
Material
Valve Body Material
Brass Stainless Steel
Modied PTFE (PTFE) 3,000 psig@100°F 3,000 psig@100°F
PCTFE 3,000 psig@100°F 6,000 psig@100°F
PEEK 3,000 psig@100°F 6,000 psig@100°F
The system designer and user have the sole responsibility
for selecting products suitable for their special application
requirements, ensuring their safe and trouble-free installation,
operation, and maintenance. Application details, material
compatibility and product ratings should all be considered for
each selected product. Improper selection, installation or use of
products can cause property damage or personal injury.
Warning!
INSTALLATION INSTRUCTIONS
487
HAM-LET ADVANCED CONTROL TECHNOLOGY
H-900 SERIES
RELIEF VALVES
INTRODUCTION
The H-900 Series Relief Valves are designed and tested
in accordance with MSS standard SP-99-1994 (R2005) -
(Instrument Valves). This type of valves is intended for use
under relatively low operating pressures (ranging from 10 psig
to 225 psig), in unfavorable working conditions and can be
implemented in either gas or liquid applications. The valves
are manufactured from ASTM-A276 body construction and are
available in male and female NPT / BSPT pipe threads and
LET-LOK (compression) connectors.
General
H-900 series is a relief valve intended for use in low-pressure
applications. The valve is normally closed and opens when
the system pressure reaches a set level. It then returns to the
closed position when the system pressure falls bellow the set
level.
Features
n
Made from St.St 316.
n
Service pressure up to 300psig.
n
Available set pressures between 10 psig and 225 psig
(0.69 to 15.5 Bar).
n
Available in male and female NPT / BSPT pipe threads and
Let-Lok (compression) connectors.
n
Available sizes: 1/4" or 6mm.
Cleaning & Packaging
Every H-900 series Relief valve is cleaned in accordance
with Standard Cleaning and Packaging (procedure 8184).
Oxygen Clean & Lubricant Free Cleaning and packaging, in
accordance with Special Cleaning and Packaging (procedure
8185), is available as an option.
Testing
The designs of the HAM-LET H-900 Series Relief Valves have
been tested for proof, burst and leakage. Every relief valve
is factory-tested for proper set and resealing performance.
SAFETY INSTRUCTIONS
General
n
All installation and/or maintenance operations must be
obtained when the system pressure is fully relieved.
n
All installation and/or maintenance operations must
follow User Manual Instructions.
n
Use only appropriate tools, which are designed and built
for the specic operation.
n
Plan your action carefully in advance, especially when
dealing with extreme temperature, pressure and
corrosive materials.
n
Use proper protection and safety devices during
maintenance.
Volume Considerations
While evaluating the volume to be relieved, all system volumes
should be considered, i.e.: system lines, pumps, bulk tanks, etc.
The system designer and user have the sole responsibility
for selecting products suitable for their special application
requirements, ensuring their safe and trouble-free installation,
operation, and maintenance. Application details, material
compatibility and product ratings should all be considered for
each selected product. Improper selection, installation or use
of products can cause property damage or personal injury.
All safety valves which are intended to be used by 'end users'
located within the European Community must be 'CE' marked.
The distributor of the valves bears the responsibility for the
follow-up of the above-mentioned issue, in case he is not the
'end user'.
Warning!
Oxygen Applications
For oxygen applications, work shall be carried out according
to the procedures for working with oxygen. In a case where
spare kits are ordered for oxygen clean valves, such kits
have to be ordered as "oxygen clean" by adding the "- OC"
designator. Example: Z-900-SK-1/4-VI-OC
INSTALLATION INSTRUCTIONS
488
H-900 SERIES
(Cont’d)
RELIEF VALVES
H-900 - MATERIALS
No. Part Qty. Valve Body Material
1
Cap Plug 1 Polypropylene
2
Adjustment Cap
1 St.St. 316
3
Cap Lable 1 Polyester
4
Spring
1 St.St. 302
5
Locking Nut 1 St.St. 316
6
Spring Support Disc
1 St.St. 316
7
Bonnet 1 St.St. 316
8
O-Ring
1 Fluorocarbon FKM
9
Stem 1 St.St. 316
10
O-Ring
1 Fluorocarbon FKM
11
Retaining Ring 1 PH1-57 Mo
12
Poppet
1 St.St. 316
13
Seal 1 Fluorocarbon FKM
14
Insert
1 St.St. 316
15
Packing 1 PTFE
16
Ring
1 St.St. 316
17
Body 1 St.St. 316
DIMENSIONS
Description
Connection / size Dimensions mm:
inlet outlet H N S L
H900 1/4 LET-LOK
®
1/4 LET-LOK
®
37 39 50 105
H900 6MM LET-LOK
®
6MM LET-LOK
®
37 39 50 105
H985 1/4 Male NPT 1/4 Female NPT 32 30 40 100
H995 1/4 Male NPT 1/4 LET-LOK
®
32 39 50 100
1
2
3
7
11
13
16
8
9
10
12
14
15
17
4
5
6
INSTALLATION INSTRUCTIONS
489
HAM-LET ADVANCED CONTROL TECHNOLOGY
H-900 SERIES
(Cont’d)
RELIEF VALVES
MAINTENANCE
Tool Requirement
n
3/4" wrench.
n
5/16" Allen (Hex) key.
n
O-ring installation and removal tools.
n
Retaining ring installation and removal tool.
Cracking Pressure Adjustment
1. Thread the adjustment cap (3) onto the bonnet (7) - 9 full turns.
2. Tighten the locking nut (5) against the adjustment cap (2)
and test for set pressure.
3. Relieve the system pressure; unthread the adjustment
cap (2) as needed (use the manual or a
3/4" wrench). Repeat
the procedure as necessary to obtain the desired set pressure.
3.1 A clockwise rotation of the adjustment cap (2) will
increase the spring force and the cracking pressure
of the valve.
3.2 A counter-clockwise rotary of the adjustment cap (2)
will decrease the spring force and the cracking
pressure of the valve.
4. Tighten the locking nut (5) against the adjustment cap (2).
5. Lock wire the adjustment cap (2) and the valve body (17) to
maintain the relief setting.
H-900 Series -
Spring Installation / Replacement
Warning: Relieve the system pressure before any valve
maintenance.
Content:
1 x Spring (4)
1 x Label (3)
1 x Lock wire
1 x Lead
1. Select the desired spring according to the Nominal Cracking
Pressure Range as shown at the "material of construction"
section above.
2. Loosen the locking nut (5) with a
3/4" wrench (clockwise)
and remove the adjustment cap (2) with a
3/4" wrench
(counter-clockwise) from the bonnet (7).
3. Remove the spring (4).
4. Make sure all of the components are clean of burrs.
5. Insert the selected spring (4) inside the bonnet (7).
6. Replace the existing cracking pressure range label (3)
with a new one. Ensure that the pressure range, which
is written on the Label (3), is in compliance with the
installed spring (4) range.
7. Screw the adjustment cap (2) onto the bonnet (7) with a
3/4" wrench.
8. Perform the Cracking Pressure Adjustment procedure described
above.
Valve Testing Guidelines.
1. Connect the Relief Valve inlet to the pressure source.
2. Connect the Relief Valve outlet to any leak detecting device.
3. Increase the inlet pressure slowly.
4. Verify that an initial ow from the outlet will occur at the
pre-set pressure.
5. Repeat the adjustment procedure as necessary to set the
desired cracking pressure.
Note:
For proper maintenance of the H-900 Series Relief Valves, a
service cycle and setting validation of at least once each 1/2
year is recommended. The inspection, maintenance and testing
can be incorporated into the annual inspection procedure to
ensure proper operation and many years of trouble-free service.
The life span of the main valve seal depends upon varied
factors, such as:
n
Chemical resistance of the seal to the system medium
n
The volume of uid, passed through the valve.
n
The operating pressure
n
The quantity of dirt and other foreign particles present.
H-900 SERIES SEAL KIT REPLACEMENT.
Content:
1 x O-ring (8)
1 x O-ring (10)
1 x Retaining ring (11)
1 x Bonded poppet (12)
Oxygen Applications
For oxygen applications, work shall be carried out according
to the procedures for working with oxygen. In a case where
spare kits are ordered for "oxygen clean" valves, such kits
have to be ordered as oxygen clean by adding the "-OC"
designator. Example: Z-900-SK-1/4-VI-OC
INSTALLATION INSTRUCTIONS
490
H-900 SERIES
(Cont’d)
RELIEF VALVES
Disassembly and Seal Removal
Warning: Relieve the system pressure before any valve
maintenance.
1. Clamp the valve body in a wise.
2. Remove the adjustment cap (2).
3. Remove the bonnet (7) from the body (17) - use a
3/4"
wrench and rotate counter-clockwise for opening.
4. Remove stem (9) by pulling it from the bonnet (7) bore.
5. Remove the O-ring (8) from the bonnet (7).
6. Remove carefully the retaining ring (11) from the bonnet (7).
Caution: The retaining ring is a spring stainless clip.
Do not direct it at a person.
7. Remove the O-ring (10) from the bonnet (7).
8. Remove the bonded poppet (12) by turning the valve upside
down.
9. Discard all soft (wetted) parts.
10. Inspect all parts for nicks, scratches and dents. Discard
as appropriate. Replace with HAM-LETparts only.
Reassembly And Seal Installation
1. Clamp the valve body in a wise.
2. Make sure all parts are clean before installation.
3. Install a new bonded poppet (12) in the body (7) (upright
position), when the seal of the bonded poppet is
faced downward.
4. Install a new O-ring (10) (lubricate with system compatible
lubricant) into the bonnet (7).
5. Install new retaining ring (11) (make sure the teeth
are pointing away from the quad-ring).
6. Insert the stem (9) into the bonnet (7) through o-ring
(9) until it bottoms.
7. Install new o-ring (8) on the bonnet (7) (Lubricate
with system compatible lubricant).
8. Install the bonnet (7) into the body (17) and tighten
the bonnet to 68N*m (600lb.*in).
9. Perform the adjustment procedure before installing
in the system.
Troubleshooting
Warning: Relieve system pressure before any valve maintenance.
Symptom Possible Causes Corrective Action
Relief valve remains open
Leakage through bonded poppet seal (13) Replace bonded poppet (12)
Relief valve opens below set
pressure
Loss of spring force/Mechanical grip. Remove adjustment cap (2). Clean spring (4),
bonnet (7) and adjustment cap (2) from particles.
Relief valve opens above set
pressure
Friction on the mechanical working mechanism.
Leakage through any attached auxiliary system
such as emergency shutdown system, remote
operators, etc.
Check auxiliary systems for leaks, and readjust
pressure.
Disassemble, clean parts and perform cracking
pressure adjustment procedure.
Unable to control the valve for
shut-off
The spring range is too low. Choose H-900HP Series valve with higher-
pressure range spring.
Unable to relieve the pressure from
the system after cracking
Relief valve too small.
Too much gas capacity to complete cycle.
Choose a larger size of Relief valve.
For oxygen applications, work shall be carried out according
to the procedures for working with oxygen. In a case where
spare kits are ordered for "oxygen clean" valves, such kits
have to be ordered as oxygen clean.
INSTALLATION INSTRUCTIONS
491
HAM-LET ADVANCED CONTROL TECHNOLOGY
H-900 HP SERIES
HIGH-PRESSURE RELIEF VALVES
INTRODUCTION
The H-900HP Series Relief Valves are designed and tested
in accordance with MSS standard SP-99-1994 (R2005) -
(Instrument Valves).This type of valves is intended for use under
extremely high operating pressures (ranging from 50 psig to
6000 psig) and in unfavorable working conditions, and can be
implemented in either gas or liquid applications. The valves are
manufactured from ASTM-A276 body construction, and are
available in male and female NPT / BSPT pipe threads and
LET-LOK (compression) connectors.
General
H-900HP series is a relief valve intended for use in high-pressure
applications. The valve is normally closed and opens when the
system pressure reaches a set level. It then returns to the closed
position when the system pressure falls bellow the set level.
Features
n
Made from St.St 316.
n
Service pressure up to 6000 psig.
n
Available set pressures between 50 psig and 6,000
psig (3.44 to 413.8 Bar).
n
Color-coded springs for each pressure range
n
Replaceable springs for a wide range of pressures
n
Available in male and female NPT / BSPT pipe threads and
LET-LOK (compression) connectors.
n
Available sizes: 1/4" or 6mm.
Cleaning & Packaging
Every H-900HP series Relief valve is cleaned in accordance
with Standard Cleaning and Packaging (procedure 8184).
Oxygen Clean & Lubricant Free Cleaning and packaging, in
accordance with Special Cleaning and Packaging (procedure
8185), is available as an option.
Testing
The designs of the HAM-LET H-900HP Series Relief Valves have
been tested for proof, burst and leakage. Every relief valve is
factory-tested for proper set and resealing performance.
SAFETY INSTRUCTIONS
General
n
All installation and/or maintenance operations must be obtained
when the system pressure is fully relieved.
n
All installation and/or maintenance operations must
follow User Manual Instructions.
n
Use only appropriate tools, which are designed and built for
the specic operation.
n
Plan your action carefully in advance, especially when dealing
with extreme temperature, pressure and corrosive materials.
n
Use proper protection and safety devices during maintenance.
Volume considerations
While evaluating the volume to be relieved, all system volumes
should be considered, i.e.: system lines, pumps, bulk tanks, etc.
The system designer and user have the sole responsibility for
selecting products suitable for their special application requirements,
ensuring their safe and trouble-free installation, operation, and
maintenance. Application details, material compatibility and product
ratings should all be considered for each selected product. Improper
selection, installation or use of products can cause property damage
or personal injury.
All safety valves which are intended to be used by 'end users' located
within the European Community must be 'CE' marked.
The distributor of the valves bears the responsibility for the follow-up
of the above-mentioned issue, in case he is not the 'end user'.
Warning!
INSTALLATION INSTRUCTIONS
492
H-900 HP MATERIALS
No. Part Qty. Valve Body Material
1
Cap Plug 1 PTFE
2
Label
1 PVC
3
Adjustment Cap 1 St.St 316
4
Spring
1 St.St. 302,17-7PH
5
Lower Spring Button 1 St.St 316
6
Locking Nut
1 St.St 316
7
Bonnet 1 St.St 316
8
O-Ring
1 Fluorocarbon FKM
9
Quad Ring 1 Fluorocarbon FKM
10
Retaining Ring
1 PH15-7Mo
11
Poppet 1 St.St 316
12
Clamps Screw
1 St.St 316
13
O-Ring 1 Fluorocarbon FKM
14
Insert
1 St.St 316
15
Body 1 St.St 316
DIMENSIONS
Description
Connection / size Dimensions mm:
inlet outlet H N S L
H900-HP 1/4 LET-LOK
®
1/4 LET-LOK
®
37 39 50 105
H900-HP
6MM LET-LOK
®
6MM LET-LOK
®
37 39 50 105
H985-HP 1/4 Male NPT 1/4 Female NPT 32 30 40 100
H995-HP
1/4 Male NPT 1/4 LET-LOK
®
32 39 50 100
NOMINAL CRACKING - PRESSURE RANGE
psig Bars
Spring
Designator
Color
50-350 24 - 3.4 A White
350-750 24 - 51.5 B Blue
750-1500 103 - 51.5 C Gold
1500-2250 103 - 155 D Turquoise
2250-3000 206 - 155 E Green
3000-4000 206 - 275 F Red
4000-5000 344 - 275 G Silver
5000-6000 344 - 413 H Black
H-900 HP SERIES
(Cont’d)
HIGH-PRESSURE RELIEF VALVES
1
12
13
14
15
2
3
4
5
6
7
8
11
10
9
INSTALLATION INSTRUCTIONS
493
HAM-LET ADVANCED CONTROL TECHNOLOGY
H-900 HP SERIES
(Cont’d)
HIGH-PRESSURE RELIEF VALVES
6. Replace the existing cracking pressure range label (2),
with a new one. Ensure that the pressure range, which
is written on the Label (2), is in compliance with the
installed spring (4) range.
7.
Screw the adjustment cap (3) onto the bonnet (7) with a 3/4"
wrench.
8. Perform the Cracking Pressure Adjustment procedure described
above.
Valve Testing Guidelines.
1. Connect the Relief valve's inlet to the pressure source.
2. Connect the Relief valve's outlet to any leak detecting device.
3. Increase the inlet pressure slowly.
4. Verify that an initial ow from the outlet will occur at the
pre-set pressure.
5. Repeat the adjustment procedure as necessary to set the
desired cracking pressure.
Note:
For proper maintenance of the H-900HP Series Relief Valves,
a service cycle and setting validation of at least once each 1/2
year is recommended. The inspection, maintenance and testing
can be incorporated into the annual inspection procedure to
ensure proper operation and many years of trouble-free service.
The life span of the main valve seal depends upon varied
factors, such as:
n
Chemical resistance of the seal to the system medium
n
The volume of uid, passed through the valve.
n
The operating pressure
n
The quantity of dirt and other foreign particles present.
H-900 HP SERIES SEAL KIT
REPLACEMENT.
Content:
1 x O-Ring (8)
1 x Quad-ring (9)
1 x Retaining ring (10)
1 x O-Ring (13)
Oxygen Applications
For oxygen applications, work shall be carried out according to
the procedures for working with oxygen. In a case where spare
kits are ordered for "oxygen clean" valves, such kits have to be
ordered as "oxygen clean" by adding "-OC" designator.
Example: Z-900-HP-SK-1/4-VI-OC
MAINTENANCE
Tool Requirement
n
3/4" wrench.
n
1/4" Allen (Hex) key.
n
O-Ring installation and removal tools.
n
Retaining ring installation and removal tool.
Cracking Pressure Adjustment
1. Thread the adjustment cap (3) onto the bonnet (7) - 9 full turns.
2. Tighten the locking nut (6) against the adjustment cap (3)
and test for set pressure.
3.Relieve the system pressure; unthread the adjustment
cap (3) as needed (use the manual or a 3/4" wrench). Repeat
the procedure as necessary to obtain the desired set pressure.
3.1 A clockwise rotation of the adjustment cap (3) will
increase the spring force and the cracking pressure
of the valve.
3.2 A counter-clockwise rotation of the adjustment cap (3)
will decrease the spring force and the cracking
pressure of the valve.
4. Tighten the locking nut (6) against the adjustment cap (3).
5. Lock wire the adjustment cap (3) and the valve body (15) to
maintain the relief setting.
H-900 HP Series
Spring Installation / Replacement
Warning: Relieve the system pressure before any valve
maintenance.
Content:
1 x Spring (4)
1 x Label (3)
1 x Lock wire
1 x Lead
1. Select the desired spring according to the Nominal Cracking
Pressure Range as shown at the "material of construction"
section above.
2. Loosen the locking nut (6) with a
3/4" wrench (clockwise)
and remove the adjustment cap (3) with a
3/4" wrench
(counter-clockwise) from the bonnet (7).
3. Remove the spring (4).
4. Make sure all of the components are clean of burrs.
5. Insert the selected spring (4) inside the bonnet (7).
INSTALLATION INSTRUCTIONS
494
Disassembly and Seal Removal
Warning: Relieve the system pressure before any
valve maintenance.
1. Clamp the valve body in a wise.
2. Remove the adjustment cap (3).
3. Remove the bonnet (7) from the body (15) - use a 3/4"
wrench and rotate counter-clockwise for opening.
4. Remove the poppet (11) by pulling it from the bonnet (7) bore.
5. Remove the O-ring (8) from the bonnet (7).
6. Remove carefully the retaining ring (10) from the bonnet (7).
Caution: The retaining ring is a spring stainless clip.
Do not direct it at a person.
7. Remove the Quad-ring (9) from the bonnet (7).
8. Remove the clamp screw (12) from the body (15). Rotate
the clamp screw counter-clockwise for opening. Use a
1/4" Allen (hex) key.
9. Remove the O-ring (13) from the body (7).
10. Discard all soft (wetted) parts.
11. Inspect all parts for nicks, scratches and dents.
Discard as appropriate. Replace with HAM-LET parts only
Reassembly And Seal Installation
1. Clamp the valve body in a wise.
2. Make sure all parts are clean before installation.
3. Install a new O-ring (13) in the body (7) (lubricate with system
compatible lubricant).
4. Thread clamp screw (12) in the body (15). Tight permanently
with
1/4"
Allen (hex) key.
5. Install new quad-ring (9) (Lubricate with system compatible
lubricant) into the bonnet (7).
6. Install new retaining ring (10) (make sure the teeth are
pointing away from the quad-ring).
7. Insert the poppet (11) into the bonnet (7) through the quadring
(9) until it bottoms.
8. Install new o-ring (8) on the bonnet (7) (Lubricate with system
compatible lubricant).
9. Install the bonnet (7) into body (15) and tighten bonnet to 68N*m
(600lb.*in).
10. Perform the adjustment procedure before installing in
the system.
Troubleshooting
Warning:
Relieve system pressure before any valve maintenance.
Symptom Possible Causes Corrective Action
Relief valve remains open
Leakage through O-Ring seal (13) Replace O-Ring (13)
Relief valve opens below set pressure
Loss of spring force/
Mechanical grip.
Remove adjustment cap (3). Clean spring (4),
bonnet (7) and adjustment cap (3) from particles.
Relief valve opens above set pressure
Friction on the mechanical working mechanism.
Leakage through any attached auxiliary system
such as emergency shutdown system, remote
operators, etc.
Check auxiliary systems for leaks, and readjust
pressure.
Disassemble, clean parts and perform cracking
pressure adjustment procedure.
Unable to control the valve for cracking
The spring range is too high. Choose a spring with lower pressure range.
Unable to control the valve for shut-off The spring range is too low. Choose a spring with higher-pressure range.
Unable to relieve the pressure from the
system after cracking
Relief valve too small.
Too much gas capacity to complete cycle.
Choose a larger size of Relief valve.
n
For oxygen applications, work should be carried out
according to the procedures for working with oxygen. In a
case where spare kits are ordered for "oxygen clean" valves,
such kits have to be ordered as oxygen clean.
H-900 HP SERIES
(Cont’d)
HIGH-PRESSURE RELIEF VALVES
  • Page 1 1
  • Page 2 2
  • Page 3 3
  • Page 4 4
  • Page 5 5
  • Page 6 6
  • Page 7 7
  • Page 8 8
  • Page 9 9
  • Page 10 10
  • Page 11 11
  • Page 12 12
  • Page 13 13
  • Page 14 14
  • Page 15 15
  • Page 16 16
  • Page 17 17
  • Page 18 18
  • Page 19 19
  • Page 20 20
  • Page 21 21
  • Page 22 22
  • Page 23 23
  • Page 24 24
  • Page 25 25
  • Page 26 26
  • Page 27 27
  • Page 28 28
  • Page 29 29
  • Page 30 30
  • Page 31 31
  • Page 32 32

Ham-Let Valves & Fittings 3002394 Installation guide

Type
Installation guide

Ask a question and I''ll find the answer in the document

Finding information in a document is now easier with AI