
C
-
1
D
-
150
C
-
1
D
-
150
Before using your camera, read this manual carefully to ensure correct use.
We recommend that you take test shots to get accustomed to your camera before taking
important photographs.
These instructions are only for quick reference. For more details on the functions described
here, refer to the Reference Manual on the provided CD-ROM.
Avant d’utiliser votre appareil photo, veuillez lire attentivement ce mode d’emploi, de
manière à obtenir les meilleurs résultats possibles.
Avant d’effectuer des prises de vues importantes, nous vous conseillons par ailleurs de
faire quelques essais afin de vous familiariser avec le maniement de l’appareil photo.
Ces instructions ne sont que pour une référence rapide. Pour plus de détails sur les
fonctions décrites ici, se référer au Manuel de référence du CD-ROM fourni.
Bitte lesen Sie vor Gebrauch dieser Kamera sorgfältig diese Bedienungsanleitung, um optimale
Ergebnisse beim Fotografieren zu erzielen.
Wir empfehlen, vor wichtigen Aufnahmen Probeaufnahmen durchzuführen, um sich mit der
Bedienung und den Funktionen der Kamera vertraut zu machen.
Diese Anleitung enthält nur grundsätzliche Angaben zur Verwendung der Kamera. Näheres zu den
hier beschriebenen Funktionen finden Sie im Referenzhandbuch der mitgelieferten CD-ROM.
Antes de usar su cámara lea este manual detalladamente para asegurar el uso correcto.
Nosotros le recomendamos que tome fotografías de prueba para familiarizarse con su
cámara antes de tomar fotografías importantes.
Estas instrucciones son solamente para una referencia rápida. Para más detalles sobre las
funciones que se describen aquí, refiérase al Manual de consulta en el CD-ROM provisto.
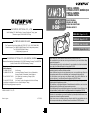
ENGLISH
( Pages 2 to 37 )
BASIC MANUAL
MANUEL DE BASE
EINFACHE ANLEITUNG
MANUAL BÁSICO
DIGITAL CAMERA
APPAREIL PHOTO NUMÉRIQUE
DIGITAL-KAMERA
CAMARA DIGITAL
FRANÇAIS
( Pages 38
à
73 )
DEUTSCH
( Seite 74 bis 109 )
ESPAÑOL
( Pàginas 110 a 144 )
C
-
1
D
-
150
C
-
1
Zoom
D
-
150
Zoom
VT277502Printed in Japan
For customers in Europe
(Hotline Numbers)
Tel. 01805-67 10 83 for Germany
Tel. 00800-67 10 83 00 for Austria, Belgium, Denmark, France, Netherlands,
Norway, Sweden, Switzerland, United Kingdom
Tel. +49 180 5-67 10 83 for Finland, Italy, Luxemburg, Portugal, Spain,
Czech Republic
Tel. +49 40-237 73 899 for Greece, Croatia, Hungaria and the Rest of Europe
Our Hotline is available from 9 am to 6 pm (Monday to Friday)
(E-Mail) [email protected]
OLYMPUS OPTICAL CO. (EUROPA) GMBH.
(Premises/Goods delivery) Wendenstraße 14-18, 20097 Hamburg, Germany Tel. 040-237730
(Letters) Postfach 10 49 08, 20034 Hamburg, Germany
OLYMPUS AMERICA INC.
Two Corporate Center Drive, Melville, NY 11747-3157, U.S.A. Tel. 631-844-5000
(Technical support) Tel. 1-888-553-4448 (Toll-free) (First 30 days after purchase)
Tel. 1-631-844-5520 (After 30 days)
(E-Mail) [email protected]
OLYMPUS OPTICAL CO., LTD.
San-Ei Building, 22-2, Nishi Shinjuku 1-chome, Shinjuku-ku, Tokyo, Japan
(Customer support) Tel. 0426-42-7499 Tokyo
http://www.olympus.com
© 2001 OLYMPUS CO., LTD.

2
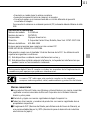
Read the Following Before Use
This section provides important information about using this digital camera. Before using
the camera, please be sure to read the following.
About this manual
The information contained in this manual may be subject to change
without notice. For the latest information on the product names, model numbers,
etc., please consult authorized Olympus service center.
The information contained in this manual has been compiled by taking all possible
measures to ensure its accuracy. However, if you find any errors or incomplete
information, please contact authorized Olympus service center.
It is prohibited by copyright laws to duplicate in part or in whole the
information contained in this manual, except for personal use. Reproduction
without permission of the copyright owner is prohibited.
Olympus will not assume any liability for damages, loss of profit or claim from a
third party due to improper use of this product.
Olympus will not assume any liability for damages and loss of profit due to loss of
image data resulting from servicing by a third party who is not designated by
Olympus or from other causes.
The quality of the images shot with this product differs from that of the images shot
with ordinary film-based cameras.
Radio and Television Interference
Change or modifications not expressly approved by the manufacturer may void the
user’s authority to operate this equipment. This equipment has been tested and
found to comply with the limits for a Class B digital device, pursuant to Part 15 of
the FCC Rules. These limits are designed to provide reasonable protection against
harmful interference in a residential installation. This equipment generates, uses,
and can radiate radio frequency energy and, if not installed and used in accordance
with the instructions, may cause harmful interference to radio communications.
However, there is no guarantee that interference will not occur in a particular installation.
If this equipment does cause harmful interference to radio or television reception, which
can be determined by turning the equipment off and on, the user is encouraged to try to
correct the interference by one or more of the following measures:
• Adjust or relocate the receiving antenna.
• Increase the distance between the camera and receiver.
• Connect the equipment to an outlet on a circuit different from that to which the
receiver is connected.
Only the USB cable should be used to connect the camera to a personal computer (PC).
147

3
Declaration of Conformity
Model Number: D-150Zoom
Trade Name: OLYMPUS
Responsible Party: Olympus America Inc.
Address: 2 Corporate Center Drive, Melville, New York 11747-3157 USA
Telephone Number: 631-844-5000
Tested To Comply With FCC Standards
FOR HOME OR OFFICE USE
This device complies with Part 15 of the FCC rules. Operation is subject to the
following two conditions:
(1) This device may not cause harmful interference, and
(2) This device must accept any interference received, including interference that may
cause undesired operation.
Trademarks
Microsoft products, such as Windows and Internet Explorer, are registered trademarks or
trademarks of Microsoft Corporation in the United States of America and in other countries.
Macintosh and Apple are registered trademarks of Apple Computers, Inc.
Other brand names and product names mentioned in this manual are trademarks or
registered trademarks of their respective owners.
The DCF (Design rule for Camera File system) is a standard established by JEITA
(Japan Electronics and Information Technology Association).
“CE” mark indicates that this product complies with the European
requirements for safety, health, environment and customer protection.
This Class B digital apparatus meets all requirements of the Canadian
Interference-Causing Equipment Regulations.

4
CONTENTS
Read the Following Before Use 2
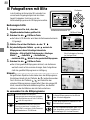
PREPARATION
Names of Parts 5
Attaching the Provided Strap 7
Inserting the Memory Card (SmartMedia) 7
Loading the Battery 8
Setting the Date and Time 9
SHOOTING OPERATIONS
Shooting Pictures 10
Shooting Using the Monitor 11
Deciding Whether to Use the Viewfinder or Monitor According to Working Distance
11
Checking the Camera Status Indication Next to the Viewfinder or on the Monitor (in Shooting Mode)
12
Selecting the Image Quality
(Record Mode)
15
Using the Flash 16
Magnifying the Subject (Zooming) 17
Shooting a Close Subject (Macro Shooting) 19
Using the Self-Timer 20
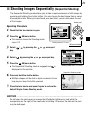
Shooting Images Sequentially (Sequential Shooting) 21
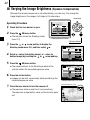
Varying the Image Brightness (Exposure Compensation) 22
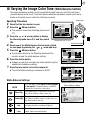
Varying the Image Color Tone (White Balance Control) 23
Muting the Beep Tones 24
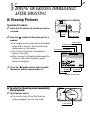
VIEWING OR ERASING IMMEDIATELY AFTER SHOOTING
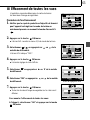
Viewing Pictures 25
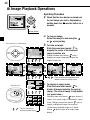
Image Playback Operations 26
Erasing Pictures (One-Frame Erase) 28
Erasing All Pictures (All-Frame Erase) 29
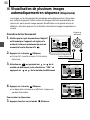
Viewing Multiple Images Automatically in Sequence (Slide Show) 30
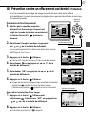
Preventing Accidental Erasure (Protection) 31
Adjusting the Monitor Brightness 32
VIEWING OPTIONS
If an Alarm Message Is Displayed 33
Making the Most of Your Digital Camera 34
Specifications 36

5
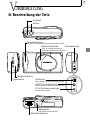
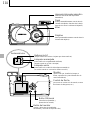
REPARATION
Card cover
(For insertion and removal of the SmartMedia card)
Shutter button
Zoom lever
Lens barrier
(Open this to turn the camera on
in the Shooting mode)
DC IN jack
(Connect the AC adapter)
Video output jack
(Connect to a TV with a video cable)
USB connector
(Connect to a PC with a USB cable)
Tripod socket
(Attach the tripod here)
Connector cover
Battery compartment cover
Card cover
Strap eyelet
Names of Parts
P

6
Flash
(Pops up automatically when you
open the lens barrier. Push it down
after you close the lens barrier)
Lens
(Comes out automatically when you
open the lens barrier)
Viewfinder eyepiece
Arrow pad
(For use in menu selection, frame number
advance, etc.)
Monitor
(LCD panel displaying the image to be shot,
played-back image and other various menu
information)
Green lamp
(For checking autofocus status)
(Turns on the camera is connected to a PC)
Orange lamp
(For checking flash charging/emission)
(Blinks while the card is being accessed)
AF target mark
(Position this over the subject you want to focus on)
Monitor button
(Switches the monitor display and
the Playback mode ON/OFF)
OK/menu button
(Switches the menu screens
or settings)
Self-timer lamp
(Indicates activation of the self-timer)
Viewfinder

7
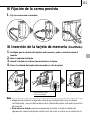
Attaching the Provided Strap
1. Attach the strap as shown.
Inserting the Memory Card (SmartMedia)
1. Make sure the lens barrier is closed and nothing is displayed on the monitor.
2. Open the card cover.
3. Insert the card in the direction shown in the figure.
4. Close the card cover until it clicks.
Card insertion direction marking
CAUTION ..................................................................................
Be sure to hold the card so that the cut corner is positioned correctly. There is an
arrow inside the card cover, indicating the insertion direction.
To remove the card, press the card gently. When the card ejects slightly, pull out the
card straight out as shown in the direction of A.

8
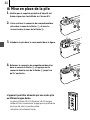
Loading the Battery
1. Make sure the lens barrier is closed and nothing is
displayed on the monitor.
2. Slide the battery compartment cover in the
direction of the arrow , and lift the cover in the
direction of the arrow .
3. Insert the battery in the direction shown in the
figure.
4. Close the battery compartment cover in the
direction of the arrow , and press the cover in
the direction of the arrow until it clicks.
This camera can be powered by a single long-life
lithium battery pack.
The CR-V3 lithium battery pack (Olympus LB-01)
features a long service life, lasting many times longer
than conventional batteries, offering great convinience
when traveling.
Insert the battery pack correctly.

9
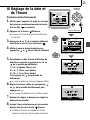
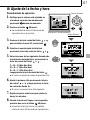
SET
OK
SELECT
.1.11
Date/time setup screen
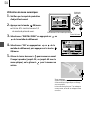
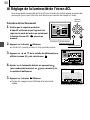
Setting the Date and
Time
Operating Procedure
1. Check that the camera is set to the
Playback mode by holding down the
monitor button for a moment.
2. Press the OK/menu button.
The Playback mode menu 1/3 is displayed on
the monitor.
3. Press the or arrow pad key to
display the menu 3/3, and select .
4. Display the date/time setting menu by
pressing the or arrow pad key.
5. Select one of the following date/time display
formats by pressing the or arrow pad
key.
Y—M—D (Year·Month·Day)
M—D—Y (Month·Day·Year)
D—M—Y (Day·Month·Year)
Then press the arrow pad key.
The cursor moves to the figure setting field.
6. Set the first figure by pressing the or
arrow pad key, and then press the arrow
pad key.
The cursor moves to the next figure.
7. Repeat the above steps to set the hour and
minutes.
8. When the actual time reaches zero seconds,
press the OK/menu button.
The date and time are set and the screen
returns to the Playback mode menu 3/3.
Arrow pad
OK/menu button
Playback mode menu 1/3 screen
1/3
SET
OK
SELECT
NO
OFF
NO
NO
SET
OK
SELECT END
OK
SELECT
Y
M
D
Date/time setup screen
3/3
END
OK
SELECT
Playback mode menu 3/3 screen

10
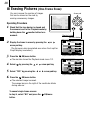
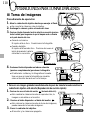
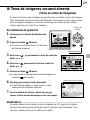
Shooting Pictures
Operating Procedure
1. Open the lens barrier until the flash pops up.
The camera turns on, and the lens comes out.
2. Hold the camera, and look through the viewfinder.
3. Press the shutter button halfway (half-press) to make
sure the green lamp on the right of the viewfinder
lights.
When lights : The subject is in focus. You can shoot.
When blinking : The subject is out of focus. Half-press
the shutter button again.
To view a recorded image immedlately after it has been shot while the
lens barrier is open (Quick-View Playback):
1. Press the monitor button twice (double clicking).
This switches the camera to the Playback mode; the
image is displayed on the monitor.
2. Press the shutter button or monitor button.
This returns the camera to the Shooting mode; you can
resume shooting.
3. Close the lens barrier.
The monitor and camera turn off.
HOOTING OPERATIONS
S
4. Press the shutter button all the way (full-press)
to take the picture.
The shutter is released and the picture is taken.
Once the picture has been taken, it is displayed
on the monitor for a short time.
Green lamp
Double clicking

11
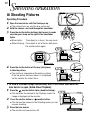
Shooting Using the Monitor
Operating Procedure
1. Check that the lens barrier is open.
2. Press the monitor button.
The monitor turns on.
3. Determine the image composition by observing
your subject in the monitor.
4. Half-press the shutter button to focus on the subject,
and then press it all the way to take the picture.
(This operation is identical to the Shooting Using
the Viewfinder).
The orange lamp on the right of the viewfinder blinks for a
moment while the image is being written to the card, and
then goes out.
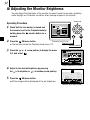
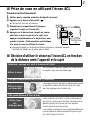
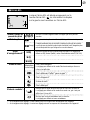
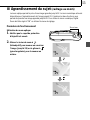
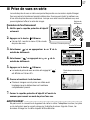
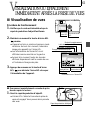
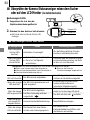
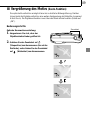
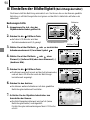
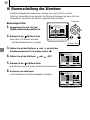
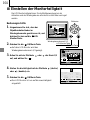
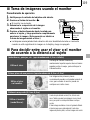
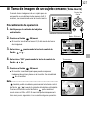
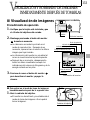
Deciding Whether to Use the Viewfinder or
Monitor According to Working Distance
Monitor
Monitor button
Snapshot, landscape, etc. (approx. 1.5 m/4.9 ft. to infinity)
Hold the camera securely, keeping your upper arms
pressed close to your body, to prevent camera shake.
Use the
viewfinder
Close-up of a person (approx. 0.5 m to 1.5 m/1.6 ft. to 4.9 ft.)
Close-up images can usually be shot using the
viewfinder, but using the monitor may be
advantageous in certain cases.
Use either the
viewfinder or
monitor
Very short distance (0.2 m to 0.5 m/8 in. to 1.6 ft.)
When the subject is closer than 0.5 m/1.6 ft., use the Macro
mode. Shooting without using the Macro mode is also
possible, but correct focus may not be possible.
The image area shown in the viewfinder is slightly different
from the image area that is actually recorded. When shooting
a close-up, confirm the image on the monitor.
Use the
monitor
(Macro mode)

12
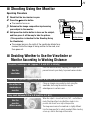
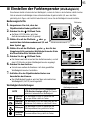
Checking the Camera Status Indication Next to the
Viewfinder or on the Monitor
(in Shooting Mode)
Orange lamp
Operating Procedure
1. Check that the lens barrier is open.
2. Half-press the shutter button.
The lamps on the right of the viewfinder
light or blink.
Green lamp
Viewfinder
1
Indication lamps on the right of the viewfinder
Lamp Status
When the green
lamp is lit
Autofocus is locked.
Press the shutter button all
the way to take the picture.
The camera cannot focus on the
subject.
This may be due to one of the
following.
You can press the shutter
button and take picture, but
the subject may not be in
focus.
When the green
lamp is blinking
rapidly
Camera Status Meaning/Note
When the orange
lamp is not lit
The flash has been recharged.
Shooting is possible by pressing
the shutter button all the way.
The flash is ready and will fire.
Press the shutter button all the
way to start shooting with
automatic flash.
When the orange
lamp is lit
The flash is being charged.
Release your finger from the
shutter button, and wait until
the orange lamp goes out.
When the orange
lamp blinks slowly
Battery power is exhausted.
Replace the batteries with
new ones.
The flash is necessary, but it is set off ( ).
Set the flash to Auto or .
When both green
and orange
lamps blink slowly
<Check> The card is not ready in the following cases:
When no card is inserted in the camera.
When the write protect seal is attached to the card.
When the card cover is open.
When the card does not have
enough space to store the image.
The camera is writing to or reading from
the card.
Do not open the card cover
or remove the battery.
When the orange
lamp blinks rapidly

13
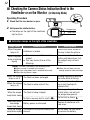
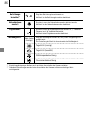
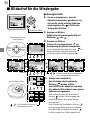
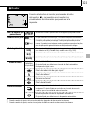
HQ
T
W
When the monitor is turned by pressing the
monitor button, the information displays on the
left are shown on the monitor.
No. of images that
can be shot
Battery status
Record mode*
1
Flash mode
Drive mode*
2
(Green)
(Red)
Shows the approximate number of images you can shoot.
Remaining battery power is insufficient. (The display goes out automatically.)
The remaining battery power is too low. Replace the batteries with
new ones. Shooting is possible when the batteries are low, but
battery power could run out while the image is being processed.
Shows the quality of the next image to be shot. The default
setting is HQ (High Quality), middle of SQ and SHQ.
Auto-Flash*
1
The default setting is the Auto-Flash mode. No icon is displayed.
Red-Eye Reduction Flash*
1
Fill-In Flash*
2
Night Scene*
2
Flash Off*
2
Shows that the Sequential Shooting mode is switched on.
The default setting is the Single-Frame mode, which is not
displayed on the monitor.
Shows that the Self-Timer mode is switched on.
The default setting is no self-timer.
HQ
SQ
SHQ
Auto
(No display)
2
Monitor
*
1
When you change the setting, it remains effective after the camera is turned off.
*
2
When you change the setting, it returns to the factory setting when the camera is turned off.

14
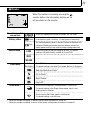
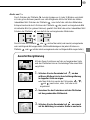
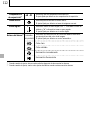
Exposure
compensation*
2
Macro mode*
2
Digital zoom*
2
White balance*
2
Shows the amount of exposure compensation.
The default setting is no exposure compensation.
Shows that the Macro mode is switched on.
The default setting is normal shooting.
Shows the Digital Zoom mode, with “T” indicating telephoto
zoom and “W” indicating wide-angle shooting.
The default setting is no digital zooming.
Shows the use of the white balance control feature which adjusts
the color tone of the image.
The default setting is Auto control.
Clear Sky
Cloudy Sky
Incandescent Lighting
Fluorescent Lighting
+
1.0
T
W
Auto
(No display)
*
1
When you change the setting, it remains effective after the camera is turned off.
*
2
When you change the setting, it returns to the factory setting when the camera is turned off.

15
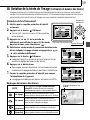
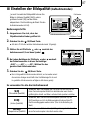
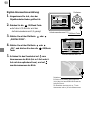
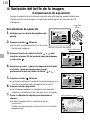
Selecting the Image Quality (Record Mode)
Operating Procedure
1. Check that the lens barrier is open.
2. Press the OK/menu button.
The monitor shows the Shooting mode menu 1/3.
3. Press the or arrow pad key to display the
Shooting menu 2/3, and then select .
4. Each time you press the or arrow pad key, the
Record mode is switched in the following sequence:
“SHQ”p[“HQ”p[“SQ”. Select one of these
modes.
5. Press the OK/menu button.
The Record mode is set, the shooting screen re-
appears and the number of images you can shoot in
current Record mode is displayed.
The Record modes allow you to shoot images
with higher quality (SHQ) or larger number of
images per card (SQ). The default setting of the
Record mode is HQ.
2/3
END
OK
SELECT
HQ
AUTO
ON
Shooting mode menu 2/3 screen
Using the Three Record Modes
Select this mode when you want to attach the image to
e-mail, simply view it on your PC screen or want to
shoot more images per card.
Select this mode when you need image quality in
between SQ and SHQ. This mode is ideal when you
need to print out images or view them on your PC
screen. (This is the default recording mode.)
Select this mode when you want to print the image with
high quality or a large size or to retouch it on your PC.
Arrow pad
Shooting mode menu 1/3 screen
1/3
AUTO
OFF
OFF
DIGITAL ZOOM
END
OK
SELECT
OK/menu button
SQ
(Standard Quality)
HQ
(High Quality)
SHQ
(Super-High Quality)

16
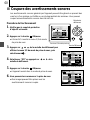
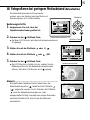
Using the Flash
Operating Procedure
1. Check that the lens barrier is open.
2. Press the OK/menu button.
The monitor shows the Shooting mode menu 1/3.
3. Select by pressing the or arrow pad key.
4. Each time you press the or arrow pad key, the
Flash mode is switched in the sequence:
Auto-Flash[ Red-Eye Reduction Flash[
Fill-In Flash[ Night Scene[ Flash Off.
Select one of these modes.
5. Press the OK/menu button.
The Flash mode is set and the shooting screen re-
appears. Now you can shoot images with the selected
Flash mode.
1/3
AUTO
OFF
OFF
DIGITAL ZOOM
END
OK
SELECT
Shooting mode menu 1/3 screen
HQ
Note..........................................................
The Flash mode setting menu can also be displayed by
simply pressing the
(
) arrow pad key when the lens
barrier is open. Pressing the
(
) arrow pad key changes
a Flash mode to another. The setting menu disappears after
a moment if no operation is performed.
Using the Flash Modes
AUTO
AUTO
Red-Eye Reduction Flash
The flash fires automatically in low light or back light
conditions.
To shoot a subject with back light, position the AF
target mark ( ) over the subject in the viewfinder.
Use this mode to fire the flash with every image.
Use this mode when shooting a subject against a
night background.
Use this mode for shooting in locations where
flashes are prohibited (such as a museum).
The light from the flash may make the subject’s
eyes appear red in pictures. The Red-Eye
Reduction Flash mode reduces this phenomenon.
The flash has been designed to fire automatically
when shooting under low light or against strong
back light. You can select one of the 5 flash
modes according to different shooting situations.
Arrow pad
Shooting mode menu 1/3 screen
1/3
AUTO
OFF
OFF
DIGITAL ZOOM
END
OK
SELECT
OK/menu button

17
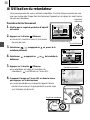
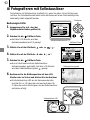
Magnifying the Subject (Zooming)
Operating Procedure
To use the optical zoom:
1. Check that the lens barrier is open.
2. Slide the zoom lever to (Telephoto) to
zoom in the image (up to 3X), and slide to
(Wide angle) to zoom out the image.
The optical zoom allows you to shoot an image magnifying up to 3X. The digital zoom
is also available to magnify an image up to 2X. If you use both functions, you can shoot
an image zoomed by up to 6X. To use the digital zoom, you need to set the Digital
Zoom to “ON” using the setting menu display.
Zoom lever

18
1/3
AUTO
OFF
OFF
DIGITAL ZOOM
END
OK
SELECT
T
W
Shooting mode menu 1/3 screen
Arrow pad
Digital Zoom
Appears only when using digital zooming
(and does not appear when using only optical
zooming).
The zoom bar slides toward T when zooming-
in, and toward W when zooming-out.
1/3
AUTO
OFF
OFF
END
OK
SELECT
DIGITAL ZOOM
Shooting mode menu 1/3 screen
To use the digital zoom:
1. Check that the lens barrier is open.
2. Press the OK/menu button.
The monitor shows the Shooting
mode menu 1/3.
3. Select “DIGITAL ZOOM” by pressing
the or arrow pad key.
4. Select “ON” by pressing the or arrow pad key,
then press the OK/menu button.
5. Slide the zoom lever to to zoom in the image (up to
2X, or up to 6X with the optical zoom), and slide to
to zoom out the image.
OK/menu button

19
Shooting a Close Subject (Macro Shooting)
Operating Procedure
1. Check that the lens barrier is open.
2. Press the OK/menu button.
The monitor shows the Shooting mode menu 1/3.
3. Select by pressing the or arrow pad key.
4. Select “ON” by pressing the or arrow pad key.
5. Press the OK/menu button.
The monitor turns on so you can compose close-up
images in the monitor. is displayed on the monitor.
It is recommended to use the Macro mode
when shooting a subject at a distance of less
than 0.5 m/1.6 ft.
1/3
AUTO
OFF
OFF
END
OK
SELECT
DIGITAL ZOOM
Shooting mode menu 1/3 screen
Note..........................................................
can also be displayed by pressing the ( ) arrow
pad key when the lens barrier is open. Pressing the
arrow pad key switches the Macro mode to On or Off.
The setting menu disappears after a moment when no
operation is performed.
OFF
Macro mark
Arrow pad
Shooting mode menu 1/3 screen
1/3
AUTO
OFF
OFF
DIGITAL ZOOM
END
OK
SELECT
OK/menu button

20
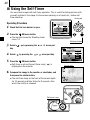
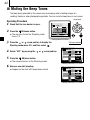
Using the Self-Timer
Operating Procedure
1. Check that the lens barrier is open.
2. Press the OK/menu button.
The monitor shows the Shooting mode
menu 1/3.
3. Select / by pressing the or arrow pad
key.
4. Select by pressing the or arrow pad key.
5. Press the OK/menu button.
Self-timer is set and the self-timer mark ( ) is
displayed on the monitor.
6. Compose the image in the monitor or viewfinder, and
then press the shutter button.
The self-timer lamp on the front of the camera lights
for 10 seconds and then blinks for 2 seconds, after
which the shutter is released.
You can shoot images with self-timer operation. This is useful for taking pictures with
yourself included in the image. Fix the camera securely on a tripod, etc., before self-
timer shooting.
1/3
END
OK
SELECT
AUTO
OFF
OFF
DIGITAL ZOOM
Shooting mode menu 1/3 screen
Self-timer mark
Arrow pad
Shooting mode menu 1/3 screen
1/3
AUTO
OFF
OFF
DIGITAL ZOOM
END
OK
SELECT
Self-timer Lamp
OK/menu button
Page is loading ...
Page is loading ...
Page is loading ...
Page is loading ...
Page is loading ...
Page is loading ...
Page is loading ...
Page is loading ...
Page is loading ...
Page is loading ...
Page is loading ...
Page is loading ...
Page is loading ...
Page is loading ...
Page is loading ...
Page is loading ...
Page is loading ...
Page is loading ...
Page is loading ...
Page is loading ...
Page is loading ...
Page is loading ...
Page is loading ...
Page is loading ...
Page is loading ...
Page is loading ...
Page is loading ...
Page is loading ...
Page is loading ...
Page is loading ...
Page is loading ...
Page is loading ...
Page is loading ...
Page is loading ...
Page is loading ...
Page is loading ...
Page is loading ...
Page is loading ...
Page is loading ...
Page is loading ...
Page is loading ...
Page is loading ...
Page is loading ...
Page is loading ...
Page is loading ...
Page is loading ...
Page is loading ...
Page is loading ...
Page is loading ...
Page is loading ...
Page is loading ...
Page is loading ...
Page is loading ...
Page is loading ...
Page is loading ...
Page is loading ...
Page is loading ...
Page is loading ...
Page is loading ...
Page is loading ...
Page is loading ...
Page is loading ...
Page is loading ...
Page is loading ...
Page is loading ...
Page is loading ...
Page is loading ...
Page is loading ...
Page is loading ...
Page is loading ...
Page is loading ...
Page is loading ...
Page is loading ...
Page is loading ...
Page is loading ...
Page is loading ...
Page is loading ...
Page is loading ...
Page is loading ...
Page is loading ...
Page is loading ...
Page is loading ...
Page is loading ...
Page is loading ...
Page is loading ...
Page is loading ...
Page is loading ...
Page is loading ...
Page is loading ...
Page is loading ...
Page is loading ...
Page is loading ...
Page is loading ...
Page is loading ...
Page is loading ...
Page is loading ...
Page is loading ...
Page is loading ...
Page is loading ...
Page is loading ...
Page is loading ...
Page is loading ...
Page is loading ...
Page is loading ...
Page is loading ...
Page is loading ...
Page is loading ...
Page is loading ...
Page is loading ...
Page is loading ...
Page is loading ...
Page is loading ...
Page is loading ...
Page is loading ...
Page is loading ...
Page is loading ...
Page is loading ...
Page is loading ...
Page is loading ...
Page is loading ...
Page is loading ...
Page is loading ...
Page is loading ...
Page is loading ...
Page is loading ...
Page is loading ...
-
 1
1
-
 2
2
-
 3
3
-
 4
4
-
 5
5
-
 6
6
-
 7
7
-
 8
8
-
 9
9
-
 10
10
-
 11
11
-
 12
12
-
 13
13
-
 14
14
-
 15
15
-
 16
16
-
 17
17
-
 18
18
-
 19
19
-
 20
20
-
 21
21
-
 22
22
-
 23
23
-
 24
24
-
 25
25
-
 26
26
-
 27
27
-
 28
28
-
 29
29
-
 30
30
-
 31
31
-
 32
32
-
 33
33
-
 34
34
-
 35
35
-
 36
36
-
 37
37
-
 38
38
-
 39
39
-
 40
40
-
 41
41
-
 42
42
-
 43
43
-
 44
44
-
 45
45
-
 46
46
-
 47
47
-
 48
48
-
 49
49
-
 50
50
-
 51
51
-
 52
52
-
 53
53
-
 54
54
-
 55
55
-
 56
56
-
 57
57
-
 58
58
-
 59
59
-
 60
60
-
 61
61
-
 62
62
-
 63
63
-
 64
64
-
 65
65
-
 66
66
-
 67
67
-
 68
68
-
 69
69
-
 70
70
-
 71
71
-
 72
72
-
 73
73
-
 74
74
-
 75
75
-
 76
76
-
 77
77
-
 78
78
-
 79
79
-
 80
80
-
 81
81
-
 82
82
-
 83
83
-
 84
84
-
 85
85
-
 86
86
-
 87
87
-
 88
88
-
 89
89
-
 90
90
-
 91
91
-
 92
92
-
 93
93
-
 94
94
-
 95
95
-
 96
96
-
 97
97
-
 98
98
-
 99
99
-
 100
100
-
 101
101
-
 102
102
-
 103
103
-
 104
104
-
 105
105
-
 106
106
-
 107
107
-
 108
108
-
 109
109
-
 110
110
-
 111
111
-
 112
112
-
 113
113
-
 114
114
-
 115
115
-
 116
116
-
 117
117
-
 118
118
-
 119
119
-
 120
120
-
 121
121
-
 122
122
-
 123
123
-
 124
124
-
 125
125
-
 126
126
-
 127
127
-
 128
128
-
 129
129
-
 130
130
-
 131
131
-
 132
132
-
 133
133
-
 134
134
-
 135
135
-
 136
136
-
 137
137
-
 138
138
-
 139
139
-
 140
140
-
 141
141
-
 142
142
-
 143
143
-
 144
144
-
 145
145
-
 146
146


Ask a question and I''ll find the answer in the document
Finding information in a document is now easier with AI
in other languages
Related papers
-
Olympus Stylus 400 DIGITAL User manual
-
-
-
-
-
-
-
-
-
Other documents
-
Medion S42008 MD86852 Owner's manual
-
Asahi Pentax PC-30 DATE User manual
-
Concord Camera 4340z Quick start guide
-
Easypix DVC 5007 Owner's manual
-
-
-
Minolta Q-Mini Operating instructions
-
 X-Micro Tech. 100 User manual
-
iON S1000 User manual
-
 Cool-Icam S1000 Quick User Manual

