Page is loading ...

Operating Instructions
Mode d’emploi
Manual de instrucciones
1-796-509-13(1)
Macintosh
© 2002 Sony Corporation
Artisan™ Color
Reference System
US
FR
ES
GDM-C520K

2
Regulatory Information
To prevent fire or shock hazard, do not expose the
unit to rain or moisture.
FCC Notice
This equipment has been tested and found to comply with the limits
for a Class B digital device, pursuant to Part 15 of the FCC Rules.
These limits are designed to provide reasonable protection against
harmful interference in a residential installation. This equipment
generates, uses, and can radiate radio frequency energy and, if not
installed and used in accordance with the instructions, may cause
harmful interference to radio communications. However, there is no
guarantee that interference will not occur in a particular installation.
If this equipment does cause harmful interference to radio or
television reception, which can be determined by turning the
equipment off and on, the user is encouraged to try to correct the
interference by one or more of the following measures:
– Reorient or relocate the receiving antenna.
– Increase the separation between the equipment and receiver.
– Connect the equipment into an outlet on a circuit different from
that to which the receiver is connected.
– Consult the dealer or an experienced radio/TV technician for help.
You are cautioned that any changes or modifications not expressly
approved in this manual could void your authority to operate this
equipment.
Artisan™ Color Reference System, Artisan™ Color Reference
Sensor, Trinitron, Active Signal Correction, and Smart Cable
are trademarks of Sony Corporation.
Macintosh and ColorSync are registered trademarks of Apple
Computers, Inc.
WARNING
IMPORTANTE
Para prevenir cualquier mal funcionamiento y evitar daños, por
favor, lea detalladamente este manual de instrucciones antes de
conectar y operar este equipo.
The number below is for FCC related matters only.
Declaration of Conformity
Trade Name: SONY
Model No.: GDM-C520K
Responsible Party: Sony Electronics Inc.
Address: 680 Kinderkamack Road, Oradell,
NJ 07649 USA
Telephone No.: 201-930-6972
This device complies with Part 15 of the FCC Rules. Operation
is subject to the following two conditions: (1) This device may
not cause harmful interference, and (2) this device must accept
any interference received, including interference that may
cause undesired operation.

3
Precautions
Installation
When connecting the Artisan™ Color Reference System, be sure that the Artisan™ Signal Cable (which connects the GDM-
C520 display to your computer) is properly connected, according to page 12 of this manual.
The Artisan™ Sensor can be connected to a USB hub (such as the Macintosh keyboard) instead of directly into the computer.
Calibration
The suction cups used in the Artisan™ Sensor, if pressed forcefully against the display screen, may scratch the screen glass.
When beginning calibration, press the sensor against the screen firmly, exerting even pressure in order to attach all suction
cups.
Remove the sensor by peeling one edge of the sensor off first, and then continuing the peeling motion until all suction cups
have been dislodged.

4
Maintenance
Cleaning the Artisan™ Sensor
The Artisan™ Sensor may not adhere to the screen well if the suction cups have dirt or oil on them. Clean the sensor’s suction
cups with a lint-free cloth slightly moistened with water.
Cleanliness of the sensor window (located in the center of the underside of the sensor) is crucial to proper calibration results.
If it becomes necessary to clean this window, do so with a lint-free cloth slightly moistened with water.
When the sensor is not in use, keep it stored in its carrying case.
Transportation
When transporting, use the original carton and packing materials.

5
Table of Contents
Introducing the Artisan™ Color Reference System
Overview........................................................................................................................................................ 6
Presenting the Artisan™ Color Reference System........................................................................................ 7
Features......................................................................................................................................................... 8
Installing the Artisan™ Color Reference System
Overview........................................................................................................................................................ 9
Package Contents........................................................................................................................................ 10
Minimum System Requirements.................................................................................................................. 11
Connecting the Artisan™ Color Reference System..................................................................................... 12
Operation
Overview...................................................................................................................................................... 17
Calibrating the System................................................................................................................................. 18
Expert Mode--Creating a Custom Target Colorspace.................................................................................. 23
Tips for Calibration and Use of this System................................................................................................. 25
Other Information
Overview...................................................................................................................................................... 26
Troubleshooting ........................................................................................................................................... 27
Contacting Sony........................................................................................................................................... 29
Glossary....................................................................................................................................................... 30
Specifications............................................................................................................................................... 31

6
Introducing the Artisan™ Color Reference System
Overview
This chapter provides an overview of the features of your Artisan™ Color Reference System.

7
Welcome
Presenting the Artisan™ Color Reference System
Sony’s Artisan™ Color Reference System is the premiere display solution for prepress, digital photography, and computer
graphics imaging. Three components—the GDM-C520 display, the Artisan™ Sensor, and the Artisan™ Software—allow
your system to produce accurate color for all processes, from image capture and editing through soft proof and final output.
Technically Superior Display
The GDM-C520 display is built around an FD Trinitron virtually flat CRT, supporting resolutions of up to 2048 x 1536 at
80Hz and boasting a narrow aperture grill pitch of 0.24 mm. Advanced Active Signal Correction (ASC) circuitry
automatically sizes and centers the screen image, while Display Mouse image control provides precise digital control over
display settings and image adjustments.
Details that Make a Difference
The GDM-C520 has been designed to provide a consistent viewing environment; the achromatic gray display bezel ensures
that the colors your eyes perceive are not affected by the frame in which they are viewed. The display hood controls ambient
light and color, reducing the impact of environmental variables on the display image. The display’s Smart Cable design
maximizes desktop space, and dual inputs support multiple PC usage.
Industry Standard Calibration Software
The Artisan™ Software is compatible with all major color management systems, including Apple ColorSync, and Color
Matching Methods (CMMs) from Adobe, Agfa, Apple, Heidelberg, and Kodak. Installation of the Artisan™ Color Reference
System also includes industry-standard proofing profiles from Sony and Fuji for standardization of colors throughout
the printing process.

8
Features
Some of the features of your Artisan™ Color Reference System include:
❑ A one-button approach to color calibration that focuses on ease and simplicity.
❑ Ability to adjust RGB gains and biases, contrast, and brightness to calibrate the GDM-C520 display and your computer
to a fixed color space.
❑ Automatic adjustment of gamma through the video board Digital to Analog Converter (DAC).
❑ A sensor designed to eliminate fingerprints on the display surface and to provide orderly cable management for the USB
cable.
❑ Ability to add and save multiple target colorspaces based on color temperature, luminance, gamma values, and screen
resolution.
❑ Inclusion of output profiles available in ColorSync for use in programs such as Adobe Photoshop.

9
Installing the Artisan™ Color Reference System
Overview
This chapter shows the different parts of your Artisan™ Color Reference System, how to connect it to your display and
computer, and how to install the software necessary to calibrate your system.

10
Package Contents
Carefully unpack the various components of the Artisan™ Color Reference System. Use the list and the illustrations to make
sure that you have received all of the contents. If something is missing, contact your authorized Sony dealer.
You will connect this display to your computer using the Artisan™ Signal Cable.
You will use this power cord to connect your display to a power source.
You will use this cable to connect the GDM-C520 display to your computer. This
cable must be connected before your Artisan™ Color Reference System will
work correctly.
This sensor will measure the output of your display screen and transmit
information to the Artisan™ Software.
You will install the software on this CD onto your computer in order to begin
using the Artisan™ Color Reference System.
You can use this guide to set up the Artisan™ Color Reference System.
You will mount the display hood on your display in order to reduce ambient light
around the display screen.
GDM-C520 Display:
Power cord:
Artisan™ Signal Cable:
Artisan™ Sensor:
Artisan™ System CD:
Quick Setup Guide:
Display Hood:

11
Installation
Minimum System Requirements
❑ Macintosh G3
❑ 16-bit color
❑ 800 x 600 resolution
❑ System 9.2.2, OS X 10.1.3, OS 10.2
❑ 96 MB of RAM
❑ 2 open USB ports

12
Connecting the Artisan™ Color Reference System
I. Display and Computer
1 Connect the GDM-C520 display's power cord with the display, and plug the cord into a nearby outlet.
Press the power button on the front of the display to verify that the display powers up; then, press the power button
again to power down the display before moving to Step 2.
2 Connect the HD15 connector located on the Artisan™ Signal Cable to an HD15 port on the rear of the display.
3 Connect and secure the USB connector on the other end of the signal cable to a USB port on the back of your computer.
4 Connect the other HD15 connector to the HD15 port on the back of your computer.
5 Plug your computer's power cable back into an electrical outlet.
Turn on your display and computer. If the display does not show an image, refer to the troubleshooting section of this guide.
Before Connecting
❑ To complete the connection between the display and your computer, make sure you have a free USB port at the back of
your computer, or on a USB hub placed near the back of your computer.
❑ The HD15 connector that is closer to the USB connector on the Artisan™ Signal Cable must be connected to the VGA port
on the back of your computer.
✍ Before connecting your GDM-C520 display, turn off your computer and unplug its power cable.
Rear of Computer
to HD15
port
Artisan™
Signal Cable
(Supplied)
to HD15 port
to USB port
AC IN
2
1
Rear of Display
23
4
1 5

13
Installation
Connecting the Artisan™ Color Reference System----cont.
II. Artisan™ Sensor
This device measures the chromaticity and luminance of your display. It should be connected to any free USB port on or
connected to your computer through a peripheral device.
1 Connect the USB end of the Artisan™ Sensor to an open USB port on your computer, or connect it through a peripheral
device such as a keyboard or USB hub.
✍
Make sure that the sensor can be placed easily over the center of your display screen, without stretching the sensor's cord.
USB jack
Artisan™ Sensor
1
USB port

14
Connecting the Artisan™ Color Reference System----cont.
III. Mounting the Display Hood
This hood will help to reduce unwanted ambient light reflections on your display's screen.
1 Unfold the hood.
2 Attach the hook and loop tabs to the underside of the display hood, as shown above.
3 Remove the liners protecting the adhesive on each hook and loop tab.
4 Wrap the display hood around the display as shown below. Align the hood carefully with your display, matching the
raised portion in the middle of the hood to the front edge of the top of the display.
✍ Be careful not to let the adhesive tabs touch the display or your fingers, as this may lessen the tabs’ adhesive properties.
1
2
hook and loop tabs
INPUT
1
2
P
IC
T
U
R
E
EF
F
E
C
T
MENU
OK
IN
P
UT
1
2
PIC
TU
RE
E
F
FE
C
T
MENU
OK
4

15
Installation
Connecting the Artisan™ Color Reference System----cont.
Mounting the Display Hood—cont.
5 Fold the adhesive tabs inward toward the display as shown above, pressing firmly to ensure proper adhesion of the tabs
to the underside of the display chassis.
6 Check again to make sure that the hood fits snugly against the display, and the hook and loop fasteners are securely
fastened to the display.
Notes on Mounting the Display Hood
❑ Once the adhesive tabs have been attached to the display, do not remove them, as they will not adhere properly to the
display if detached and then reapplied.
❑ To readjust the display hood, detach the hook and loop fasteners on the hood from the adhesive tabs attached to your
display.
INPUT
1
2
PICTURE EFFECT
MENU
OK
IN
PU
T
1
2
PIC
TU
RE
E
F
FE
C
T
MENU
OK

16
Connecting the Artisan™ Color Reference System----cont.
IV. Installing the Software
1 Locate and insert the Artisan™ System CD into your computer's CD-ROM drive.
2 Double-click on the Artisan™ System icon that appears on your computer’s desktop.
3 Double-click on the Artisan™ System installer icon.
4 Follow the screen prompts for software installation.
5 Restart your computer.

17
Operation
Operation
Overview
This chapter covers the operations of your Artisan™ Color Reference System: how to calibrate your system, how to create
custom target colorspaces, and how to use the system’s advanced features.

18
Calibrating the System
The first time you launch the Artisan™ Color Reference Software, it will identify your system’s capabilities and ensure that
the display is correctly connected to your computer. It will identify the display as “Not Calibrated.”
To calibrate your display to one of the standard target colorspaces, continue to the next page. To create custom target
colorspaces, turn to “Expert Mode - Creating a Custom Target Colorspace” on page 24.

19
Operation
Calibrating the System----cont.
When you first start the Artisan™ Software, you will see the following screen:
1 Select the preset colorspace to which you want your display to be calibrated by clicking on the “Target Colorspace”
drop-down menu. You can calibrate your display to any one of the following standard target colorspaces:
2 Click on the desired target colorspace.
3 Click on the “Calibrate” button to continue.
Before Calibrating
❑ Make sure that your display is set to “millions” or at least 16-bit color.
❑ Make sure your display is set to "Professional" mode. To do this, press the "Picture Effect" button on the front of your GDM-
C520 display until the on-screen display shows "Professional".
❑ Warm the display up by leaving the display turned on and displaying a relatively bright screen (over 50% white) for at least
an hour before calibration.
❑ Make sure that the Artisan™ Sensor is connected to one of your computer’s USB ports.
❑ Make sure that the display and sensor are clean before beginning calibration. If necessary, the suction cups can be cleaned
with a damp, lint-free cloth. The display screen should be cleaned according to the instructions titled “Notes On Cleaning
the Screen’s Surface” on page 3 of the display manual.
❑ Turn the light in the room down to approximately 16 lux. The calibration process works best when there is little light in the
room.
Name x
value
y
value
Y value
(White)
Y value
(Black)
TRC
CRS Print RGB-D50 .3457 .3587 85.0 cd/m^2 0.28 cd/m^2 Gamma 1.80
CRS Print RGB-D65 .3128 .3292 85.0 cd/m^2 0.28 cd/m^2 Gamma 1.80
CRS Web RGB (sRGB) .3128 .3292 85.0 cd/m^2 0.28 cd/m^2 Gamma 2.20
modified per ITU
initial slope

20
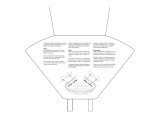
Calibrating the System----cont.
After you click on the “Calibrate” button, you will see this screen:
1 Center the Artisan™ Sensor over the large circle shown in the display screen. Press firmly on the sensor until the
suction cups have been secured to the glass of the display's screen.
2 Click on the “Start” button to begin calibration.
✍Once started, the calibration process will take approximately ten minutes to complete. If you are simply updating your
display's calibration data, this process will take approximately 3 minutes.
Make sure that both the display and sensor are dry before calibration. Dampness on the sensor or on the display screen
may lead to inaccurate calibration.
✍
/