Page is loading ...

Distribution of this manual is intended for
trained Champion service technicians
and other qualified service personnel.
Reproduction or other use of this manual,
without the express written consent of
Champion Industries, Inc. is prohibited
Destroy this manual only after receipt of
a revised edition.
8.25.10
F
3765 Champion Boulevard
Winston-Salem, North Carolina 27105
336/661-1556 Fax: 336/661-1660
www.championindustries.com

Equipment Information - Darlene Ehrenfried [email protected]
Parts Information HQ - Lori Hicks [email protected]
Service Information HQ - Jim Luther [email protected]
U.S. Navy POC - Judy Lowman, HQ [email protected]
U.S. Navy POC - Ken Height, San Diego, CA [email protected]
U.S. Navy POC - Tony Cox, Mayport, FL [email protected]

i
TECHNICAL PUBLICATION SHEET
TECHNICAL PUBLICATION SHEET

ii
TECHNICAL MANUAL VALIDATION CERTIFICATE
TECHNICAL MANUAL VALIDATION CERTIFICATE

iii
APPROVAL AND PROCUREMENT RECORD
APPROVAL AND PROCUREMENT RECORD

iv
TECHNICAL MANUAL DEFICIENCY/EVALUATION REPORT (TMDER)
TECHNICAL MANUAL
DEFICIENCY/EVALUATION REPORT (TMDER)
(Form - NAVSEA 9086/10, REV. 6/85)

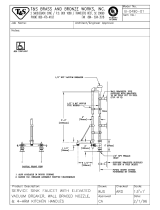
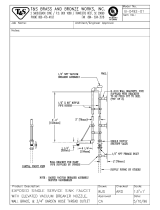
8/25/10 50-51 U2769 Revised illustration added note for
supersession of overflow tube and screen

vi
SAFETY SUMMARY
SAFETY SUMMARY
General Safety Rules
• The following general safety rules must be observed in addition to the specific cautions and warnings
presented in this manual.
• Your Champion dishwasher may be an electric or steam heated machine using hot water
to clean and sanitize a variety of wares. Machine surfaces and wares become hot during and immedi-
ately following normal operations. Consult your supervisor and wear protective gear as directed to
avoid possible injury.
• Your dishwasher contains rotating spray arms.
Use caution when working around the dishwasher especially when loading or unloading wares.
• Operators must NOT bypass a safety interlock or control to operate the dishwasher.
• The service and maintenance instructions contained in this manual are intended for qualified service
personnel. These instructions assume that you are trained in basic electricity and mechanical theory.
If you are not a trained technician, then do not attempt to adjust or repair the dishwasher as serious
personal injury or damage to the dishwasher may result.
!
CAUTION:
Caution statements indicate any condition or practice which, if not strictly
observed or remedied, could result in damage to or destruction of the
dishwasher.
WARNING:
Warning statements indicate any condition or practice that could result in
result in personal injury or possible loss of life.
NOTE:
Note statements indicate any condition or practice which,
if observed, will help in the safe completion of a task.
Safety Symbols
• The following symbols appear throughout this manual alerting you to potential hazards. Statements
associated with each symbol are printed in italics.

vii
SAFETY SUMMARY
Warning and Caution Statement Listing
• The following listing gives the page number and text of all the warning and caution statements that appear
in this manual.
Warning Statements
Pg. 6- The installation of this unit must conform to local codes or, in the absence of local codes, to the National
Electrical Code and all National Codes governing plumbing, sanitation, safety and good trade practices.
Pg. 8- The installation of water supplies must conform to local codes or, in the absence of local code, all National
Codes governing plumbing, sanitation, safety and good trade practices.
Pg. 8- The installation of steam supplies must conform to local codes or, in the absence of local code, all National
Codes governing plumbing, sanitation, safety and good trade practices.
Pg. 10- The installation of drains must conform to local codes or, in the absence of local code, all National Codes
governing plumbing, sanitation, safety and good trade practices.
Pg. 10- The installation of ventilation must conform to local codes or, in the absence of local code, all National Codes
governing plumbing, sanitation, safety and good trade practices.
Pg. 11- The installation of electrical supplies and controls must conform to local codes or, in the absence of local
codes, the National Electrical Code and good trade practices.
Pg. 11- Dangerous voltages are present at the local electrical distribution system.
Dangerous voltages are present at the dishwasher when it is connected to the local electrical distribution
system.
Pg. 11- When working on the dishwasher, disconnect the electric service and place a red tag at the disconnect switch
to indicate work is being done on that circuit.
Pg. 12- The installation of electrical supplies and controls must conform to local codes or, in the absence of local
codes, the National Electrical Code and good trade practices.
Pg. 12- Dangerous voltages are present at the local electrical distribution system.
Dangerous voltages are present at the dishwasher when it is connected to the local electrical distribution
system.
Pg. 12- When working on the dishwasher, disconnect the electric service and place a red tag at the disconnect switch
to indicate work is being done on that circuit.
Pg. 19- Dangerous voltages are present at the local electrical distribution system.
Dangerous voltages are present at the dishwasher when it is connected to the local electrical distribution
system.
Pg. 19- When working on the dishwasher, disconnect the electric service and place a red tag at the disconnect switch
to indicate work is being done on that circuit.
Pg. 20- Perform the following checks before placing the machine into service for normal operation.
Pg. 20- Never bypass a safety device in order to operate the dishwasher for normal operation.
Pg. 22- Perform the following checks before placing the machine into service for normal operation.

viii
SAFETY SUMMARY (Cont.)
SAFETY SUMMARY
Warning Statements (Cont.)
Pg. 22- Never bypass a safety device in order to operate the dishwasher for normal operation.
Pg. 23- Dishwasher surfaces, dishracks and wares become hot during and immediately after washing operations.
Wear protective gear per your supervisor's directions.
Pg. 24- Dishwasher surfaces, dishracks and wares become hot during and immediately after washing operations.
Wear protective gear per your supervisor's directions.
Pg. 27- Deliming solutions or other acids must not come in contact with household bleach (sodium hypochlorite) or
any chemicals containing chlorine, iodine, bromine, or fluorine.
Mixing will cause hazardous gases to form.
Skin contact with deliming solutions can cause severe irritation and possible chemical burns.
Pg. 27- Consult your chemical supplier for an appropriate deliming solution, protective gear and safety procedures.
Pg. 28- When working on the dishwasher, disconnect the electric service and place a red tag at the disconnect switch
to indicate work is being done on that circuit.
Pg. 29- When working on the dishwasher, disconnect the electric service and place a red tag at the disconnect switch
to indicate work is being done on that circuit..
Pg. 35- When working on the dishwasher, disconnect the electric service and place a red tag at the disconnect switch
to indicate work is being done on that circuit
Pg. 35- Use Extreme Caution when performing tests on energized circuits.

ix
SAFETY SUMMARY
Caution Statements
Pg. 5- Check piping mounted underneath dishwasher before lifting to avoid damaging the machine.
Pg. 6- Check piping mounted underneath dishwasher before lifting to avoid damaging the machine.
Pg. 18- Perform the following checks before placing the machine into service.
Pg. 26- Do not hose down the exterior of the machine with water.
Pg. 28- Only qualified service personnel should perform preventive maintenance on the dishwasher.
Pg. 29- Only qualified service personnel should perform preventive maintenance on the dishwasher.
Pg. 35- Only qualified service personnel should perform preventive maintenance on the dishwasher.
-
SAFETY SUMMARY (Cont.)

x
LIMITED WARRANTY
Champion Industries Inc. (herein referred to as Champion), P.O. Box 4149, Winston-Salem, North Carolina 27115,
warrants machines, and parts, as set out below.
Warranty of Machines: Champion warrants all new machines of its manufacture bearing the name
"Champion" and installed within the United States to be free from defects in material and workman
ship for a period of one (1) year after the date of installation or fifteen (15) months after the date of shipment by
Champion, whichever occurs first. [See below for special provisions relating to glasswashers.] The warranty
registration card must be returned to Champion within ten (10) days after installation. If warranty card is not
returned to Champion within such period, the warranty will expire after one year from the date of shipment.
Champion will not assume any responsibility for extra costs for installation in any area where there are
jurisdictional problems with local trades or unions.
If a defect in workmanship or material is found to exist within the warranty period, Champion, at its election,
will either repair or replace the defective machine or accept return of the machine for full credit; provided, how
ever, as to glasswashers, Champion's obligation with respect to labor associated with any repairs shall end
(a) 120 days after shipment, or (b) 90 days after installation, whichever occurs first. In the event that Champion
elects to repair, the labor and work to be performed in connection with the warranty shall be done during regular
working hours by a Champion authorized service technician at a ship's homeport located within the continental
United States. Defective parts become the property of Champion. Use of replacement parts not authorized by
Champion will relieve Champion of all further liability in connection with its warranty. In no event will
Champion's warranty obligation exceed Champion's charge for the machine. The following are not covered by
Champion's warranty:
a. Lighting of gas pilots or burners.
b. Cleaning of gas lines.
c. Replacement of fuses or resetting of overload breakers.
d. Adjustment of thermostats.
e. Adjustment of clutches.
f. Opening or closing of utility supply valves or switching of electrical supply current.
g. Cleaning of valves, strainers, screens, nozzles, or spray pipes.
h. Performance of regular maintenance and cleaning as outlined in operator’s guide.
i. Damages resulting from water conditions, accidents, alterations, improper use, abuse,
tampering, improper installation, or failure to follow maintenance and operation procedures.
j. Wear on Pulper cutter blocks, pulse vanes, and auger brush.
Examples of the defects not covered by warranty include, but are not limited to: (1) Damage to the exterior or
interior finish as a result of the above, (2) Use with utility service other than that designated on the rating plate,
(3) Improper connection to utility service, (4) Inadequate or excessive water pressure, (5) Corrosion from
chemicals dispensed in excess of recommended concentrations, (6) Failure of electrical components due to
connection of chemical dispensing equipment installed by others, (7) Leaks or damage resulting from such
leaks caused by the installer, including those at machine table connections or by connection of chemical
dispensing equipment installed by others, (8) Failure to comply with local building codes, (9) Damage caused by
labor dispute.
Warranty of Parts: Champion warrants all new machine parts produced or authorized by Champion to be free
from defects in material and workmanship for a period of 90 days from date of invoice. If any defect in
material and workmanship is found to exist within the warranty period Champion will replace the defective
part without charge.
DISCLAIMER OF WARRANTIES AND LIMITATIONS OF LIABILITY. CHAMPION'S WARRANTY
IS ONLY TO THE EXTENT REFLECTED ABOVE. CHAMPION MAKES NO OTHER WARRANTIES,
EXPRESS OR IMPLIED, INCLUDING, BUT NOT LIMITED, TO ANY WARRANTY OF
MERCHANTABILITY, OR FITNESS OF PURPOSE. CHAMPION SHALL NOT BE LIABLE FOR
INCIDENTAL OR CONSEQUENTIAL DAMAGES. THE REMEDIES SET OUT ABOVE ARE
THE EXCLUSIVE REMEDIES FOR ANY DEFECTS FOUND TO EXIST IN CHAMPION DISHWASHING
MACHINES AND CHAMPION PARTS, AND ALL OTHER REMEDIES ARE EXCLUDED,
INCLUDING ANY LIABILITY FOR INCIDENTALS OR CONSEQUENTIAL DAMAGES.
Champion does not authorize any other person, including persons who deal in Champion dishwashing
machines to change this warranty or create any other obligation in connection with Champion Dishwashing Machines.
UNITED STATES NAVY LIMITED WARRANTY

xi
Revision Record........................................................................................................... v
Safety Summary .......................................................................................................... vi
Limited Warranty......................................................................................................... x
PP
PP
P
ARAR
ARAR
AR
T 1:T 1:
T 1:T 1:
T 1:
GENERAL SPECIFICAGENERAL SPECIFICA
GENERAL SPECIFICAGENERAL SPECIFICA
GENERAL SPECIFICA
TIONSTIONS
TIONSTIONS
TIONS
..............................................................................
..............................................................................
.......................................
11
11
1
1.1 About this Manual ............................................................................................... 1
1.2 Model Numbers ................................................................................................... 1
1.3 Standard Equipment............................................................................................. 2
1.4 Dimensions, Capacities, Ventilation, and Utilities............................................... 3
1.5 Electrical Power Requirements............................................................................ 4
PART 2: INSTALLATION .............................................................. 5
2.1 Unpack the Dishwasher ....................................................................................... 5
2.2 Permanent Placement........................................................................................... 6
2.3 Connections Between Dishwasher and Booster (Steam)..................................... 6
2.4 Water Connections .............................................................................................. 8
2.5 Steam and Condensate Connections (Steam) ...................................................... 8
2.6 Drain Connections ............................................................................................... 10
2.7 Ventilation Connections ....................................................................................... 10
2.8 Electrical Connections ......................................................................................... 11
2.9 Chemical Connections ......................................................................................... 12
PART 3: OPERATION ...................................................................14
3.1 Theory of Operation............................................................................................. 14
3.2 Description of Operator Controls and Indicators................................................. 15
3.2.2 Dishwasher................................................................................................. 16
3.3 Start up Procedure................................................................................................ 18
3.4 Safety and Operation Checks............................................................................... 20
3.5 Shutdown Procedure ............................................................................................ 24
3.6 Operation Summary ............................................................................................. 25
TABLE OF CONTENTS
TABLE OF CONTENTS

xii
PART 4: MAINTENANCE AND CLEANING ...................................26
4.1 Introduction.......................................................................................................... 26
4.2 Daily Cleaning Schedules .................................................................................... 26
4.3 Deliming Schedule............................................................................................... 27
4.4 Preventive Maintenance Schedules...................................................................... 28
4.5 Lubrication Schedules.......................................................................................... 30
PART 5: BASIC SERVICE .............................................................32
5.1 Introduction.......................................................................................................... 32
5.2 General Troubleshooting...................................................................................... 33
5.3 Component Repair and Replacement .................................................................. 35
5.3.1 Pressure Reducing Valve, (PRV), Adjustment ....................................... 35
5.3.2 Water Line Strainers ............................................................................... 36
5.3.3 Vacuum Breaker Repair .......................................................................... 36
5.3.4 Water Solenoid Valve Repair .................................................................. 36
5.3.5 Float Switch Replacement ...................................................................... 37
5.3.6 Drain Valve and Overflow Assembly ..................................................... 37
5.3.7 Thermometer Replacement..................................................................... 37
5.3.8 Tank Heat Thermostat Adjustment and Replacement............................. 38
5.3.9 Tank Heat High Limit Adjustment and Replacement ............................. 38
5.3.10 Final Rinse Thermostat Adjustment and Replacement........................... 38
5.3.11 Steam Solenoid Valve Service ................................................................ 39
5.3.12 Steam Trap Replacement ........................................................................ 40
5.3.13 Steam Booster Service ............................................................................ 41
5.3.14 Pump Seal Replacement ......................................................................... 42
5.3.15 Door Safety Switch Assembly................................................................ 42
5.3.16 Fuse and Fuse Block Replacement ......................................................... 43
5.3.17 Motor Overload Adjustment and Replacement ...................................... 43
TABLE OF CONTENTS

xiii
TABLE OF CONTENTS
LIST OF FIGURES
Figure 6.1 – Doors, Gauges, Switches ........................................................................... 46
Figure 6.2 – Wash and Rinse Spray System................................................................... 48
Figure 6.3 – Scrap Screen, Pump strainer, and Overflow .............................................. 50
Figure 6.4 – Tank Heat Assembly (Prior to S/N G3599) ............................................... 52
Figure 6.5 – Tank Heat Assembly (After S/N G3600) ................................................... 54
Figure 6.6 – Tank Heat Assembly (After S/N U2769) ................................................... 56
Figure 6.7 – Steam Tank Heat Assembly (After S/N U2769) ........................................ 58
Figure 6.8 – Pump and Motor Assembly ....................................................................... 60
Figure 6.9 – Control Cabinet (Prior to S/N G3600)....................................................... 62
Figure 6.10 – Control Cabinet (After S/N G3600)........................................................... 64
Figure 6.11 – Control Cabinet (After S/N U2769)........................................................... 66
Figure 6.12 – Water Solenoid Valve and PRV.................................................................. 68
Figure 6.13 – Electric Booster (Prior to S/N G3599)....................................................... 70
Figure 6.14 – Electric Booster (After S/N G3600)........................................................... 72
Figure 6.15 – Electric Booster (After S/N U2769............................................................ 74
Figure 6.16 – No. 180 Steam Booster and Steam piping assembly ................................. 76
Figure 6.17 – Tank Piping with Steam Booster ............................................................... 80
Figure 6.18 – Dishracks.................................................................................................... 82
PART 6: REPLACEMENT PARTS .................................................45
6.1 Introduction.......................................................................................................... 45
6.2 Parts Procurement ................................................................................................ 45
PART 7: ELECTRICAL SCHEMATICS ...........................................85
PART 8: SPECIAL INSERTS .........................................................89

xiv
TABLE OF CONTENTS
This
Page
Intentionally
Left
Blank

1
PART 1: GENERAL SPECIFICATIONS
Welcome to Champion...
and thank you for allowing us to take care of your dishwashing needs.
1.1 About this Manual
All information, illustrations and specifications contained in this manual are based upon the
latest product information available at the time of publication. Champion constantly im-
proves its products and reserves the right to make changes at any time or to change specifica-
tions or design without notice and without incurring any obligation.
Manual Organization
This manual is divided into eight parts:
→ Part 1, General Specifications, introduces this manual and the dishwasher in general.
→ Part 2, Installation, discusses the installation of the dishwasher and describes the
connection of utilities and services.
→ Part 3, Operation, discusses theory of operation, operator controls, initial start up and
shutdown procedures.
→ Part 4, Maintenance and Cleaning, discusses lubrication, preventive maintenance,
cleaning and deliming.
→ Part 5, discusses basic troubleshooting and service procedures.
→ Part 6, discusses replacement parts procurement and provides parts diagrams and
parts lists.
→ Part 7, contains the dishwasher electrical schematic.
→ Part 8, contains special inserts and late breaking information.
1.2 Model Numbers
USN-10
The USN-10 series is a undercounter high temperature (180°F/82°C rinse) sanitizing dish-
washer. This model features electric or steam heat with booster.
The USN-10 is as front loading door model.
The USN-10 comes in the following model::
USN-10: 440V/60/3 Electric heat or Steam heat @ 15 PSI flow pressure
PART 1: GENERAL SPECIFICATIONS

Two electrical connections


Single Point Electrical Connection:
USN-10 440/60/3 70°F (E) 26 Amps 40 Amps
Two-Point Electrical Connection: Machine
USN-10 440/60/3 6 Amps 15 Amps
Two-Point Electrical Connection: Booster
USN-10 440/60/3 70°F (E) 20 Amps 25 Amps
/