Page is loading ...

MY SP ACE MY TIME
®
TROJAN
#
1
H
O
M
E
F
IT
N
E
S
S
SOUT
H
A
FRICA
’
S
S
I
N
C
E
198
1
CAUTION
READ ALL PRECAUTIONS AND
INSTRUCTIONS IN THIS MANUAL
BEFORE USING THIS EQUIPMENT
KEEP THIS MANUAL FOR
FUTURE REFERENCE
1 YEAR
w
a
r
r
a
n
t
y
CALL
0861 8765
26
0
8 6 1
T
R
O
J A
N
INFERNO 300
SPINNER
SPINNER CARE INSTRUCTIONS
AND ASSEMBLY MANUAL

INDEX
1. SAFETY INSTRUCTIONS 4
2. PRE ASSEMBLY CHECKLIST 5
3. HARDWARE LIST 6
4. ASSEMBLY STEPS 7
5. MONITOR’S INSTALLATION INSTRUCTION 8
6. OPERATING INSTRUCTIONS 9
7. FITNESSTIPS AND TECHNIQUES 11
8. CONDITIONING GUIDELINES 12
9. WARM UP AND COOL DOWN 13
10. FREQUENTLY ASKED QUESTIONS 14
11. PARTS LIST 15
12. EXPLODED VIEW 16
13. TROJAN I YEAR LIMITED WARRANTY 17
14. TROJAN REPAIRS PROCEDURE 19

1377-4
1. SAFETY INSTRUCTIONS
WARNING :
Safety Instruction before using the TROJAN INFERNO 300 SPIN BIKE.
To reduce the risk of serious injury, read the following.
1. Use the TROJAN INFERNO 300 SPIN BIKE only on a level surface.
2. Keep children and pets away from this equipment at all times.
3. The TROJAN INFERNO 300 SPIN BIKE should not be used by persons weighing more than 100kgs.
4. The TROJAN INFERNO 300 SPIN BIKE should be used by only one person at a time.
5. Be careful to maintain your balance while using, mounting, dismounting, folding, unfolding or assembling
the TROJAN INFERNO 300 SPIN BIKE, loss of balance may result in a fall and serious bodily injury.
6. Use the TROJAN INFERNO 300 SPIN BIKE only as described in the manual.
7. Before using this equipment to exercise, always do stretching exercises to properly warm up.
8. Always make sure all bolts and nuts are tightened prior to each use.
WARNING
Before starting any exercise or conditioning program you should consult with your personal physician to see
if you require a complete physical exam. This is especially important if you are over the age of 35, have never
exercised before, are pregnant, or suffer from any illness.

1377-5
2. PRE ASSMEBLY CHECK LIST
Thank you for choosing the TROJAN INFERNO 300 SPIN BIKE. We take great pride in producing this quality
product and hope it will provide many hours of quality exercise to make you feel better, look better and enjoy
life to its fullest.
Yes, it’s a proven fact that a regular exercise program can improve your physical and mental health. Too often,
our busy lifestyles limit our time and opportunity to exercise. The TROJAN INFERNO 300 SPIN BIKE provides
a convenient and simple method to begin your assault on getting your body in shape and achieving a healthier
lifestyle.
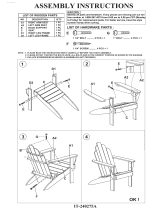
Before reading further, please review the drawing below and familiarize yourself with the parts that are labeled.
• Read this manual carefully before using the TROJAN INFERNO 300 SPIN BIKE.
Console (23)
Handlebar (5)
Adjustable Knob (6-2)
Brake Pad (9)
Flywheel (1)
Front Stabilizer (4)
Transportation Wheel (4-1)
Adjustable Knob (6-2)
Rear Stabilizer (2)
Transportation Wheel (4-1)

1377-6
3. HARDWARE LIST
No Description Q’ty Specification
1. Handlebar 1 Racing Style
2. Seat Post 1 With seats lider
3. Left Pedal 1 Deluxe
4. Right Pedal 1 Deluxe
5. Adjustable Wrench 1
6. Front Stabilizer 1 With transportation wheels
7. Rear Stabilizer 1 ø25 x ø5 x 2T x 450mm L
8. Allen Bolt 4
9. Washer 4
10. Allen Wrench 1
NOTE :
The described parts are all you need to assemble this machine.
Before starting assembly, please check the hardware packing to make sure they are included.

1377-7
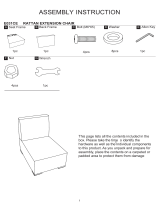
4. ASSEMBLY STEP
STEP 01
• Prior to assembly of this product, remove all components
from the package and verify all the listed parts are supplied.
Once certain, begin with the first assembly step.
1-1 Pull the pop pin and insert the handlebar (1) into the
handlebar receptor and secure with the pop pin.
1-2 Pull the pop pin and insert the seat post (2) into the
receptor and secure with the pop pin.
STEP 02
2-1 Attach the left pedal (3) and the right pedal (4) to
the bike with adjustable wrench(5).
2-2 Tighten the pedals with the adjustable wrench sup-
plied in your package.
Note : The pedals are marked L and R on the flat face
of the threaded area and are referenced from a
seated position on the bike. The left pedal must
be tightened counterclockwise, and the right pedal
must be tightened clockwise.
STEP 03
3-1 Mount the front stabilizer (6) using two allen bolts(8)
and two washers (9) . Then tighten clockwise using
the allen wrench included in your package.
3-2 Mount the rear stabilizer (7) using two allen bolts(8)
and two washers (9) .Then tighten clockwise using
the allen wrench included in your package.
3-3 Attach the console to the handlebar as described in
console packaging

1377-8
5. MONITOR’S INSTALLATION INSTRUCTION
STEP 01
Before installing the two clamps onto the handle-
bar, please orient Clamp A & Clamp B as shown at
photos.
STEP 02
Fasten the top of the 2 clamps using a Hex Nut & a
Philip Screw of 20mm long.
STEP 03
Turn back the handlebar, and using a Self-Tapping
Screw of 20mmsing a long to fasten the bottoms of
two clamps.
STEP 04
Slide the monitor into the monitor clamps as illus-
trated.
STEP 05
Slide the RPM sensor into the sensor housing ,
please make sure the front endof the RPM sensor
to be 1-2mm away from the magnet to enable the
good induction.
STEP 06
Guide the sensor wire through the white plastic
holder, and bind it.
Congratulations !
You’ve installed the monitor successfully !

1377-9
6. OPERATING INSTRUCTIONS
1. Emergency BrakeThis bike can be stopped immediately by pushing
down on the tension knob. (Fig1)
2. Resistance Adjustment
• Pedaling resistance is controlled by the tension control knob. (Fig
1)
• To increase resistance, turn the tension control knob clockwise (+).
• To decrease resistance, turn the tension control knob counter-
clockwise (-).
• Resistance adjustment can be easily made at any time.
3. Leveling the Bike
• This bike can be leveled to compensate for uneven surfaces.
• To level the bike, please raise or lower the four leveler feet located
on the underside of the front and rear stabilizers. (Fig 2)
4. Seat Adjustment
• Appropriate seat height helps improve your exercise effi ciency &
reduce the risk of injury
• Adjusting the seat forward or backward helps you work on differ-
ent lower body muscle groups.
4.1 Place your foot in the toe clip, then get on the bike.
4.2 If your leg is bent too much, you should move the seat up. If
your foot can not touch the pedal or your leg is too straight,
you should move the seat down.
4.3 Dismount the bike. Loosen and pull the pop pin (Fig 3-1), then
raise or lower the seat post to the desired position.
4.4 Loosen and pull the pop pin (Fig 3-2), then move the seat
slider forward or backward to the desired position. When the
seat slider is in the desired position, secure the pop pin fi rmly.

1377-10
6. OPERATING INSTRUCTIONS
5. Handlebar Adjustment
• Loosen and pull the pop pin (Fig. 4), then raise or lower the
handlebar to the desired position for a more effi cient & com-
fortable ride.
• Make sure the pop pin settles into the desired hole and then
secure it fi rmly.
6. Pedal Strap Adjustment
• Place the ball of each foot in the toe clip until the front of
the shoe fi ts snugly in the toe clip cage. Rotate one foot to
within arm’s reach, then pull up the strap until the toe clip
cage fi ts the shoe snugly. (Fig 5).
• Repeat for the other foot.
7. Workout
• Once you are sitting comfortably, begin pedaling slowly, with
your hands resting comfortably on the handlebar.
• After you feel comfortable, you can change seat positions,
hand positions and resistance levels for added enjoyment and
variety during your workout.
8. Dismounting the Bike
• Increase the resistance by turning the tension control knob
clockwise until the fl ywheel stops, or pedal slower until you
come to a complete stop.
• Warning Do not dismount the bike or remove your feet
from the pedals until the pedals have completely stopped.
9. Moving the Bike
• Carefully lift the rear stabilizer to move the bike to another
location. (Fig 8)
• Gently move the bike as any sudden impact may affect the
operation of the machine.

1377-11
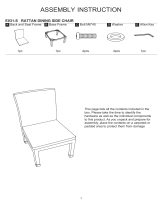
Trapezius
Posterior
Tricep
Latissimus Dorsi
Gluteal s
Hamstrings
Gastroenemius
Trapezius
Anterior
Pectoralis Major
Serratus Anterior
Biceps
Abdominal
Sartorius
Quadriceps
Tibialis
7. FITNESS TIPS AND TECHNIQUES
AEROBIC EXERCISE
Aerobic exercise is any sustained activity that sends oxygen to your muscles via your heart and lungs. Aerobic
exercise improves the fitness of your lungs and heart - your body’s most important muscle. Aerobic exercise
fitness is promoted by any activity that uses your large muscleS -arms, legs, or buttock, for example. Your heart
beats quickly and you breathe deeply. An aerobic exercise should be part of your entire exercise routine.
WEIGHT TRAINING
Along with aerobic exercising which helps get rid of and keep off the excess fat that our bodies can store,
weight training is an essential part of the exercise routine process. Weight training helps tone, build and
strengthen muscle. If you are working above your target zone, you may want to do a less amount of reps. And
as always consult your physician before beginning any exercise program.
MUSCLE CHART
SPINNER
The exercise routine that is performed on the spinner will develop the lower body muscle group as well as
condition the circulatory system and provide a good aerobic workout . These muscle groups are highlighted on
the muscle chart below.

1377-12
8. CONDITIONING GUIDELINES
How you begin your exercise program depends on your physical condition. If you have been inactive for sev-
eral years, or are severely overweight, you must start slowly and increase your time on the equipment; a few
minutes per workout.
Initially, you may be able to exercise only for a few minutes in your target zone, however, your aerobic fitness
will improve over the next six to eight weeks. Don’t be discouraged if it takes longer. It’s important to work
at your own pace. Ultimately, you’ll be able to exercise continuously for 30 minutes. The better your aerobic
fitness, the harder you will have to work to stay in your target zone. Please remember these essentials :• Have
your doctor review your training and diet programs to advise you of a workout routine you should adopt.
• Begin your training program slowly with realistic goals that have been set by you and your doctor.
• Monitor your pulse frequently. Establish your target heart rate based on your age and condition.
• Set up your equipment on a flat, even surface at least 3 feet from walls and furniture.
EXERCISE INTENSITY
To maximize the benefits of exercising, it is important to exercise with
the proper intensity. The proper intensity level can be found by using
your heart rate as a guide. For effective aerobic exercise, your heart rate
should be maintained at a level between 65% and 85% of your maxi-
mum heart rate as you exercise. This is known as your target zone. You
can find your target zone in the table below.
During the first few months of your exercise program, keep your heart
rate near the low end of your target zone as you exercise. After a few months, your heart rate can be in-
creased gradually until it is near the middle of your target zone as you exercise.
To measure your heart rate, stop exercising but continue moving your legs or walking around and place two
fingers on your wrist. Take a six-second heartbeat count and multiply the results by 10 to find your heart rate.
For example, if your six-second heartbeat count is 14, your heart rate is 140 beats per minute. (A six-seconds
count is used because your heart rate will
drop rapidly when you stop exercising.)
Adjust the intensity of your exercise until
your heart rate is at the proper level.
For more information on dieting and
training visit www.trojanhealth.co.za

1377-13
1
2
3
4
5
9. WARM-UP AND COOL-DOWN
WORKOUT GUIDELINES
Each workout should include the following three parts:
A warm-up, consisting of 5 to 10 minutes of stretching and light exercise. A proper warm-up increases your
body temperature, heart rate, and circulation in preparation for exercise.
Training zone exercise, consisting of 20 to 30 minutes of exercising with your heart rate in your training zone.
(Note: During the first few weeks of your exercise program, do not keep your heart rate in your training zone
for longer than 20 minutes.)
A cool-down, with 5 to 10 minutes of stretching. This will increase the flexibility of your muscles and will help
to prevent post-exercise problems.
EXERCISE FREQUENCY
To maintain or improve your condition, plan three workouts each week, with at least one day of rest between
workouts.
After a few months of regular exercise, you may complete up to five workouts
each week, if desired. Remember, the key to success is make exercise a regular
and enjoyable part of your everyday life.
SUGGESTED STRETCHES
The correct form for several basic stretches is shown at the right. Move slowly as
you stretch-never bounce.
1. Toe Touch Stretch
Stand with your knees bent slightly and slowly bend forward from your hips. Al-
low your back and shoulders to relax as you reach down toward your toes as
far as possible. Hold for 15 counts, then relax. Repeat 3 times. Stretches: Ham-
strings, back of knees and back.
2. Hamstring Stretch
Sit with one leg extended. Bring the sole of the opposite foot toward you and
rest it against the inner thigh of your extended leg. Reach toward your toes
as far as possible. Hold for 15 counts, then relax. Repeat 3 times for each leg.
Stretches: Hamstrings, lower back and groin.
3. Calf/Achilles Stretch
With one leg in front of the other, reach forward and place your hands against
a wall. Keep your back leg straight and your back foot flat on the floor. Bend
your front leg, lean forward and move your hips toward the wall. Hold for 15
counts, then relax. Repeat 3 times for each leg. To cause further stretching of
the achilles tendons, bend your back leg as well. Stretches: Calves, achilles ten-
dons and ankles.
4. Quadriceps Stretch
With one hand against a wall for balance, reach back and grasp one foot with
your other hand. Bring your heel as close to your buttocks as possible. Hold for
15 counts, then relax. Repeat 3 times for each leg. Stretches: Quadriceps and
hip muscles.
5. Inner Thigh Stretch
Sit with the soles of your feet together and your knees outward. Pull your feet
toward your groin area as far as possible. Hold for 15 counts, then relax. Repeat
3 times. Stretches: Quadriceps and hip muscles.
For more information on dieting and training visit www.trojanhealth.co.za

1377-14
10. FREQUENTLY ASKED QUESTIONS
How do I maintain the cosmetics of my bike?
1. Polish the entire exercise bike, including all painted and chrome areas. Make sure to purchase a
good quality polish for your bike.
2. Polish the flywheel of your spinner bike very carefully. This will ensure the brakes have a good
surface to ride on.
How do I prevent rust on the moving parts of the spinning bike?
1. Both chrome sections of the bike’s seat post
2. Chrome section of the handlebar
3. All T-handles or pop pins
4. Resistance knob threads
5. Adjustable feet threads
How do I lubricate the moving parts of the bike?
1. Using spray lubricant or liquid oil, apply four drops of oil to each of the brake springs. Make
sure you do not get lubricant on the brake pads of your indoor cycle.

1377-15
11. PARTS LIST
No. Description Q’ty No. Description Q’ty
1 Flywheel 1pc 9-7 Allen Nut 1pc
1-1 Hub Set 1set 9-8 Cap Nut 1pc
1-2 (L) Flywheel Cover (L) 1pc 9-9 Rubber Absorber 1pc
1-2 (R) Flywheel Cover R) 1pc 9-1C Beam 1pc
1-3 Sell-Tapping Screw 6pcs 9-11 Brake Pad Assembly 1set
1-4 Flange Nut 2pcs 9-12 Round Head Screw 2pcs
2 Rear Stabilizer 1pc 9-13 Washer 4pcs
2-1 Leveling Feet 4pcs 9-14 Nylon Nut 2pcs
2-2 End Cap 4pcs 10 Water Bottle 1pc
2-3 Pan Allen Bolt 4pcs 11 Inner Chain Guard w/o Sticker 1pc
2-4 Washer 4pcs 12 Chain 1pc
3 Frame 1set 13 Outer Chain Guard w/o Sticker 1pc
4 Front Stabilizer 1set 14 Pedal Set 1set
4-1 Transportation Wheel 2pcs 15 Pan Self Tapping Screw 4 pcs
4-2 Washer 4pcs 16 Pan Self Tapping Screw 3 pcs
4-3 Allen Bolt 2pcs 17 Chain Guard Spacer 1pc
4-4 Nylon Nut 2pcs 18 Allen Bolt 2pcs
5 Handlebar 1set 19 Allen Nut 2pcs
6 Seat Post 1set 20-1 B/B‘s Cup 2pcs
6-1 Sleeve 3pcs 20-2 B/B‘s Ball 2pcs
6-2 Adjustable Knob 3pcs 20-3 B/B‘s Cone (_L) 1pc
7 Seat Slider 1set 20-4 B/B‘s Washer 1pc
7-1 End Cap (for Seat Slider) 1pc 20-5 B/B‘s Allen Nut 1pc
7-2 Saddle 1set 20-6 B/B‘s Cone (R) 1pc
8 Water Bottle Cage 1pc 20-7 B/B‘s Spacer 1pc
9 Tension Control Knob 1set 21 Chain Wheel 1pc
9-1 Spacer 1pc 22 (L) Crank (L) 1set
9-2 Upper Brake Cap 1pc 22-2 Crank Cap 2pcs
9-3 Allen Bolt (M5) 6pcs 22 (R) Crank (R) 1set
9 4 Square Nut 1pc 22-2 Crank Cap 2pcs
9-5 Helical Compression Spring 1pc 22-1 Crank Bolt 2pcs
9-6 Sensor Fixer 1pc 23 Console 1set

1377-16
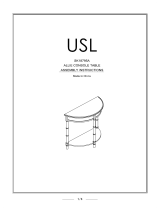
12. EXPLODED VIEW

1377-17
13. TROJAN 1 YEAR LIMITED WARRANTY
Masstores (Pty)Ltd (“the Supplier”) hereby provides a limited warranty to the original purchaser of this prod-
uct (“the Consumer”) that this product will be free of manufacturing defects in materials and workmanship
which under normal, personal, family or household use (commercial use expressly excluded) manifest them-
selves within the following stipu-lated periods from the date of purchase:
Exclusions
The warranty does not include and will not be construed to cover products damaged as a result of disaster;
misuse; commercial use; use not in accordance with the written instructions included with the product; abuse;
and/or any non-authorized modification of the product. It also does not cover replacement of the light bulbs
and other expendables. All demo models carry a 3 month warranty.
Waiver
The warranty provided herein and the obligations of the Supplier are in lieu of, and the Customer waives, all
other war-ranties, guarantees, conditions or liabilities, express or implied, arising by law or otherwise, including
without limitation, any obligation of the Supplier in respect of any injury , loss or damage (direct, indirect or
consequential) arising out of the use of, or inability to use, this product and whether or not occasioned by the
Supplier’s negligence or any act or omission on its part.
Claims under 1 Year Limited Warranty
Within 7 days of purchase:
The faulty product will be exchanged (provided that the product is in its original packaging with all accessories).
After 7 days but within 3 months of purchase:
The Supplier may in its sole discretion either replace or repair the product.
After 3 months but within 1 year of purchase:
The Supplier may in its sole discretion either replace or repair the product. The following shall not be covered:
• Treadmills: Running Decks, Running Belts, and Rubber Arm covers
• Exercise Bikes/Spinners: Pedals, Cranks, and Rubber Arm covers
• Cross Trainers/ Ellipticals/ Steppers: Foot Rests, Cranks, Shocks, and Rubber/Foam Arm covers• Home
Gyms / Benches: Pulleys, Cables, Seats and Padding
• Trampolines: Springs, Mats, and Covers
• Rowers: Rowing Strap / Rope / Arms, Pulling Handle, Grip, Moveable Seat
Parts not mentioned in the above, are covered under warranty within the 1st year of purchase

1377-18
PROOF OF PURCHASE
Any claim in terms of the warranty must be supported by a proof of purchase or a warranty number. Warranty
numbers can be issued through contacting our call centre on 0861 Trojan (0861 876 526) ,or online at
www.trojanhealth.co.za. If such proof is not available, then notwithstanding anything to thecontrary herein, the
service agent’s prevailing charges for services/repairs including call-out and/or spares willbe payable by the
Consumer upon collection or delivery of the repaired product.
The Consumer does not need to return the product to the store.
The Consumer shall phone the Trojan hotline on 0861 Trojan (0861 876 526) and the Supplier’s authorized
agent will at its discretion either repair the item at the Consumer’s residence or collect and repair the item at
their premises.
During the warranty period the product may only be serviced and/or repaired by the Supplier’s duly
authorized agent(s).
Masstores (Pty) Ltd
16 Peltier Drive, Sunninghill
Sandton, Johannesburg, South Africa

1377-19
14. TROJAN REPAIRS PROCEDURE
1. Procedure for repairs
Should you experience any faults or breakdowns on your Trojan equipment, please adhere to the following
procedure to have the fault rectified speedily and professionally.
• Do not return the product to the store*
• Call 0861 Trojan (0861 876526) to log the faulty product (under warranty or out of warranty)
• The operator or technical advisor will try identify the fault, and will book a service team call out.
• The service team will endevour to fix the problem in your home on an agreed date and time.
• Only if the fault cannot be repaired in the convenience of your home, will the service team take the
faulty product back to the service centre.
• Items repaired in our service centre will be returned to your home on an agreed date and time.
* Note:
Should you live in an outlying area, it may be neccessary to return the product to the store nearest to you.Our ser-
vice operator will advise you of your repair procedure.
2. Cost of Repairs
2.1 Under warranty
• Any items still under warranty will be repaired free of charge, as long as it complies with the terms
and conditions of the warranty. (refer to “warranties” section in this manual)
• Any items that need to be repaired that are NOT covered in the warranty will be for the consumer’s
expense. A quote for the repair/replacement of these items will be provided to the consumer for ap-
proval prior to repairs being conducted.
2.2 Out of Warranty
• Any items that need to be repaired once the warranty has expired will be for the consumer’s ex-
pense including call out fees. A quote for the repair/replacement of these items will be provided to
the consumer for approval prior to repairs being conducted.

1377-20
/