FrankeUSA FFD33B-9-18 Installation guide
- Category
- Kitchen sinks
- Type
- Installation guide
This manual is also suitable for

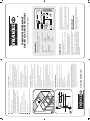
22 Finish the cut-out edge with the desired router bit (ie, chamfer, bullnose, Roman
ogee).
32 Mount a support frame to adjacent cabinets.
A) The position of the frame members (dimensions X and Y) is determined by the sink
cut-out location (see gure). Check front to back dimensions for the sink cut out to
ensure adequate clearance for the faucet and possible use of a ip tray.
B) The elevation of the support frame (dimension Z) will be determined by the
material thickness of the countertop build-up, or substrate.
42 Assemble sink strainers to sink.
52 Clean sink rim and countertop mating surface with solvent.
62 Apply a continuous (translucent color) bead of silicone around the sink rim.
72 Drop sink into opening of support members.
82 Lay countertop onto cabinets.
92 Align the sink to the cut-out so that a uniform reveal of approximately 1/4” shows
around the periphery of the cut-out.
X
Y
Y
X
32
Z
Countertop
Overhang
Approx. 1/4" Reveal
"Z" Build-up / Substrate
"Z" Elevation
Cabinet
Support Frame
1/4" Clearance
Silicone
Counter Top
92
FARMHOUSE UNDERMOUNT
SINK INSTALLATION INSTRUCTIONS
Please read these instructions before you begin installation.
GENERAL ADVICE
1. Unpack the sink and inspect for any shipping damage before starting the
installation. Do not install a damaged unit.
2. Franke accepts no liability for damage to the countertop or sink xture during
installation.
3. Installation of the Farmhouse Sink may require custom cabinetry. Franke
recommends that an experienced cabinet maker build the new cabinet, or is
responsible for modi cations to existing cabinets, for this product.
4. To ensure a proper t between the sink and the cabinet and any support framing,
Franke recommends providing the cabinet maker with the actual sink to be
installed.
5. Franke provides DXF les for the Farmhouse Sink at www .frankeUSA.com to assist
the fabricator/installer when preparing the countertop cut-out. This DFX le was
designed to reveal approximately 1/4” of the sink rim. Any variance from this standard
is certainly permissible, but must be based upon agreement between the customer
and the fabricator/installer.
6. The aesthetics of the installed product is of the utmost importance. Please
take the necessary care to ensure that any exposed silicone joints are kept to a
minimum, the sink is properly aligned to the cut-out, and excess silicone is cleaned
from the sink.
7. The Farmhouse Sink is hand fabricated, and dimensions of the product will vary
from one unit to the next. Industry accepted dimensional variance for this type of
product is within 1/8”.
8. Product speci cations are available on our website at www.frankeUSA.com.
FARMHOUSE SINK
INSTALLATION OPTIONS
With appropriate planning, Franke Farmhouse Sinks may be installed several
di erent ways. The sink ... the base cabinet unit ... and the countertop ... must be
selected with a speci c installation in mind.
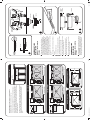
1. Pipe wrench if steel pipe
used
2. Pencil
3. Drill
4. (2) Adjustable wrenches
5. Long thin screwdriver
6. File
7. Jigsaw
2: Pencil 3: Drill
7:Jigsaw
1: Pipe Wrench
4: Adjustable Wrenches 5: Long Thin Screwdriver 6: File
8: Yardstick or tape measure
9: Hammer
12: Framing Square 13: Shims
10: Flashlight
14: Wood Braces
11: Silicone Sealant
REQUIRED TOOLS
The few tools required are not specialized or expensive. All are probably in
your tool box or your neighbors. Here is what you will need:
8. Yardstick or measuring tape
9. Hammer
10. Flashlight
11. Tube of silicone sealant for
mounting sink
12. Framing square
13. Shims
14. Wood braces
w ww.frankeUSA.com
© Copyright 2012 Franke USA.
Care Instructions: “The Do’s”
The best form of maintenance is frequent, regular cleaning. A little bit of cleaning on a regular basis is preferable to a
major cleaning on a sporadic basis.
The best method of preventative maintenance is to ensure that the sink is clean, dry and exposed to room atmosphere
when not in use. Rinse and towel dry the sink after each use in order to minimize major cleanups, keeping it shiny and
relatively free of water spots. This is particularly appropriate where water may have a high mineral content.
Keep the sink xture free of any standing water which may build up mineral deposits. The quality of your water can
a ect the sinks appearance and this water quality will vary from household to household.
Should a mineral deposit build up over time, use a weak solution of vinegar and water to remove the deposit, followed
by ushing the surface with water.
To clean sink, use the mildest cleaning procedure that will do the job e ectively.
On the mirror or silk nishes use either a liquid detergent or Peek with a soft cloth.
DO NOT USE ANY ABRASIVE MATERIALS ON A MIRROR OR SILK FINISH.
On non-mirrored nishes use a mild abrasive cleanser such as Old Dutch, Comet or Cameo. Always clean or scrub
following the direction of the grain line. Any scrubbing across the grain will show as a scratch. Scrubbing in the same
direction as the grain will blend in any surface scratches.
Always rinse the sink after using a cleaning agent, and wipe the sink dry to discourage any water spotting.
Care Instructions: “The Don’ts”
Steel wools pads should never be used to clean your sink as they will leave a residue of small iron particles. They may
not even be readily visible, but they most certainly will lead to rusting and corrosion of the sink.
For similar reasons do not leave any mild steel or cast iron cookware or implements anywhere on the sink for extended
periods of time. The combined presence of iron and moisture with stainless steel can only lead to surface corrosion and
staining of the sink.
Do not leave rubber dish mats, wet sponges or cleaning pads in the sink overnight as they will trap water underneath
which could lead to staining and discoloration of the sink surface. The unique properties of stainless steel are
dependent upon exposure of the surface to the atmosphere.
Never use abrasive pads or cleaners on the mirror or silk nishes of the sink. They will scratch the nish.
THIS INCLUDES SCOTCHBRITE® PADS!
ScotchBrite pads may be used on the radiant brushed or lustre nishes but only by scrubbing lightly and only in the
direction of the grain lines in the nish.
Don’t use chlorine bleach in your stainless steel sink, as chlorine will attack the protective layer that makes stainless
steel truly stainless. The risk of damage is proportional to the concentration of the chlorine and the duration of
exposure between the sink and the chlorine agent. Always dilute any antibacterial product used and wipe up any spills.
Note: some antibacterial soaps may contain chlorine compounds.
Any accidental contact of the sink with photographic chemicals or soldering ux should be addressed by an immediate
rinsing and cleaning of the sink.
Certain foods such as pickles, mayonnaise, mustard and salt laden foodstu s can cause pitting of the sink surface if left
unattended for prolonged periods.
LIMITED LIFETIME WARRANTY
Products are warranted to be free from defects in materials and workmanship for the following period: from the date of
sale to the user. This warranty does not cover:
1. Any obligation other than the replacement of defective parts when presented to the selling distributor, together with
proof of purchase during the warranty period.
2. Any labor charges, removal and reinstallation expense, freight or postage, or any incidental or consequential
damages resulting from any defective product.
3. Products classi ed as “accessories.”
This warranty shall be voided by any of the following:
1. Modi cation to this product.
2. Improper installation, care or maintenance of the product.
3. Use of product for any purpose other than that for which speci cally intended.
This warranty supersedes all other warranties, expressed or implied.
The foregoing warranties are exclusive and made only to the Buyer. NO OTHER WARRANTY, WHETHER EXPRESSED,
IMPLIED, OR STATUTORY INCLUDING ANY WARRANTY OF MERCHANTABILITY OF FITNESS FOR A PARTICULAR PURPOSE
SHALL EXIST IN CONNECTION WITH ANY OF THE GOODS OR SERVICES SUPPLIED HEREUNDER, AND ALL SUCH WARRANTIES
ARE HEREBY EXPRESSLY EXCLUDED. No employee, agent or other person is authorized to give any warranties in addition
to or di erent from those herein given to assume any other liability in connection with any of its products except in
writing which is signed by an o cer and expressly and intentionally gives such warranties or assumes such liability.
ScotchBrite is a registered trademark of 3M.
Farmhouse-Install-Instr-6.indd 2-3Farmhouse-Install-Instr-6.indd 2-3 7/26/12 10:17 AM7/26/12 10:17 AM

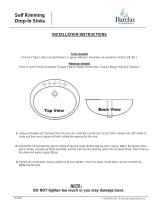
BOW FRONT SINGLE BOWL
BOW FRONT DOUBLE BOWL
FLUSH FRONT
Fig.2
xx xx
xx
24" Cabinet
Minimum
4"
Minimum
4"
Minimum
4"
X
Y
Z
Countertop
Bowl
Sink
Sink Width
Bowl Width
X
Y
Countertop
Z
Bowl Width
Bowl Width
Sink Width
Bowl
Sink
X
Y
Countertop
Z
The Franke Farmhouse Sink is designed to be installed as an
undermount sink (rim of the sink is below the countertop - Fig.1)
Franke Farmhouse Sinks may be installed with the front corners of the apron ush to adjacent
cabinets ( Fig.2,4), or alternatively, the front corners of the apron may extend out beyond the face
of adjacent cabinets ( Fig.3,5). We would caution you to make allowance for installation of the
faucet. Position the sink so that there is enough clearance behind the sink to allow for a backsplash,
and full mobility of the faucet lever.
The Farmhouse Sink has a 3/4” ange on the underside of the apron that will support the unit. Dab
silicone to the base cabinet frame that will contact the sink ange. Then position the unit either
ush with the front face of the cabinet, or extend the unit beyond the front face of the cabinet
(Fig.4,5).
Countertop
9" Sink Apron
UNDERMOUNT SINKS
Fig.1
BOW FRONT SINGLE BOWL
BOW FRONT DOUBLE BOWL
Bowl
Bowl Width
Bowl Width
EXTENDED FRONT
Fig.3
Sink
Sink Width
Bowl Width
Sink Width
Minimum
4"
X
Y
Countertop
24" Cabinet
Minimum
4"
X
Y
Z
Countertop
Z
Bowl
Sink
Minimum
4"
X
Y
Countertop
Z
xx
xxyyxxyy
24"
Cabinet
Front Face
Counter Top of Cabinet
Finished Wall
Reference Point for Location
of Masonite Template
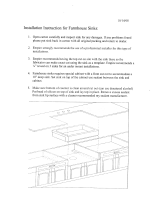
Fig.4
FLUSH FRONT INSTALLATION
4" Miniumum
X
Y
xx
Countertop
1
/4"
Reveal
Z
24"
Cabinet
Front Face
Counter Top
of Cabinet
Finished Wall
Reference Point for Location
of Masonite Template
Fig.5
EXTENDED FRONT INSTALLATION
4 Minimum
X
Y
xx
Countertop
Z
1
/4"
Reveal
Top ange of
the strainer
Silicone Sealant
Sink bottom
3
5
Countertop
1/2" Plywood
Sink Rim
Cabinet Front
1/4” Reveal
Section Detail
Silicone
6 7
UNDERMOUNT SINK
INSTALLATION
Option 1 ~ Sink Installation
Procedure
1 Prepare a plywood reinforcement sheet that is the same
material thickness as the countertop built-up and big enough to
cover the sink base cabinet frame. Franke provides DXF les for the
Farmhouse Sink on our website at www .frankeUSA.com. This
outline of the countertop cut-out is full scale and can be used to
program CNC machinery. The cut-out has been designed to reveal
approximately 1/4” of the sink rim. Cut-out the reinforcement sheet
to accept the sink. Using a router, recess the plywood by .050” to
.060” for approximately 2” back from the cut-out, to accept the sink
ange. (#4)
2 Place this plywood reinforcement sheet on top of the sink base
cabinet unit.
3 Assemble sink strainers to sink.
4 Clean sink rim and countertop mating surface with solvent.
5 Lay sink in plywood reinforcement sheet and apply a continuous
(translucent color) bead of silicone around the sink rim.
6 Lay the countertop on top of the cabinets and if necessary shift
the sink so that it is centered within the sink cut out.
7 Align the sink to the cut-out so that a uniform reveal of
approximately 1/4” shows around the periphery of the cut-out.
8 Use a non-abrasive cloth and solvent to remove excess silicone
that has squeezed out beyond the cut-out edge.
UNDERMOUNT SINK
INSTALLATION
Option 2 ~ Sink Installation
Procedure
12 Franke provides DXF les for the Farmhouse Sink on our website
at www.frankeUSA.com. This outline of the countertop cut-out is
full scale and can be used to program CNC machinery. The cut-out
has been designed to reveal approximately 1/4” of the sink rim.
1
.050" / .060"
1/2" Plywood Sheet
Section Detail
Farmhouse-Install-Instr-6.indd 4-5Farmhouse-Install-Instr-6.indd 4-5 7/26/12 10:17 AM7/26/12 10:17 AM
-
 1
1
-
 2
2


FrankeUSA FFD33B-9-18 Installation guide
- Category
- Kitchen sinks
- Type
- Installation guide
- This manual is also suitable for
Ask a question and I''ll find the answer in the document
Finding information in a document is now easier with AI
Other documents
-
Franke FHK710-30WH Installation guide
-
Y Decor HABR2116 User guide
-
 Barclay Products 4-2068WH Installation guide
-
KINWELL UC3322A1QLBR10 User manual
-
AKDY KS0066 Installation guide
-
Karran EL-84 Installation guide
-
 World Imports BF3317 Installation guide
-
Polaris Sinks P504-ENS Installation guide
-
ANZZI K-AZ258 Installation guide
-
Barclay FSSSB2042L-SS User manual

