Page is loading ...

2
Lowes.com/portfolio
SAFETY INSTRUCTIONS/CONSIGNES DE SÉCURITÉ/INSTRUCCIONES DE SEGURIDAD
Please read and understand this entire manual before attempting to assemble, operate or install the product.
WARNING
• This power pack is for use with low-voltage landscape lighting systems ONLY.
• This power pack is suitable for outdoor use ONLY.
• NOT suitable for use with submersible luminaries and pumps.
• DO NOT submerge the power pack in water.
• DO NOT use the power pack with a dimmer switch.
• DO NOT mount the power pack upon combustible material.
• Always disconnect the power pack from the electrical outlet when working on the lighting system.
• DO NOT connect two or more power suppliers in parallel.
CAUTION
•
•
•
•
•
•
•
•
•
•
•
•
•
•
Power pack MUST be installed at least 20 in. above ground level.
DO NOT mount power pack or luminaires within 10 ft. of a swimming pool or spa.
DO NOT bury the connectors or cables at depth greater than 6 in.
DO NOT exceed the maximum wattage of the power pack’s terminal.
For use only on a branch circuit protected by a Class A-type ground fault circuit interrupter (GFCI).
The supply circuit for the landscape lighting system shall be protected by a Class A-type GFCI, unless it is provided with
the landscape lighting system.
DO NOT repair or tamper with cord or plug.
A cord-connected landscape lighting system shall not be used with an extension cord.
DO NOT mount power pack indoors or in an enclosed area. NO garages, crawl spaces or beneath ground level decks.
This device is accepted as a component of a landscape lighting system where the suitability of the combination shall be
determined by UL or CSA or local inspection authorities having jurisdiction.
Risk of Do not place insulation under terminal plate.
The power pack has a 120-watt circuit that powers up to 120 watts of light.
Cable distance, total wattage and spacing of the light affects the light output of each along the run.
Lower gauge cable, such as 12 AWG (recommended for all runs), allows for the highest wattage at the beginning of
the run.
Lité de ce manuel avant de tenter d’assembler d’installer ou d’utiliser le produit.
AVERTISSEMENT
•
•
•
•
•
•
•
•
•
•
•
•
•
Ce bloc d’alimentation doit être utilisé avec des éclairages pour aménagement paysager à basse tension
UNIQUEMENT.
Ce bloc d’alimentation est conçu pour un usage à l’extérieur
SEULEMENT.
NON destiné à un usage avec des luminaires ou des pompes submersibles.
N’immergez PAS le bloc d’alimentation dans l’eau.
N’utilisez PAS le bloc d’alimentation avec un gradateur.
N’installez PAS le bloc d’alimentation sur des matériauxcombustibles.
Débranchez toujours le bloc d’alimentation de la prise de courant avant de manipuler le système d’éclairage.
Ne reliez pas deux alimentations d’énergie ou plus en parallèle.
This equipment has been tested and found to comply with the limits for a Class-B digital device, pursuan to Part 15 of the FCC
Rules. These limits are designed to provide reasonable protection against harmful interference in a residential installation. This
equipment generates, uses and can radiate radio frequency energy and, if not installed and used in accordance with the
instructions, may cause harmful interference to radio communications. However, there is no guarantee that interference will not
occur in a particular installation. If this equipment does cause harmful interference to radio or television reception, which can be
determined by turning the equipment off and on, the user is encouraged to try to correct the interference by one or more of the
following measures:
– Reorient or relocate the receiving antenna.
– Increase the separation between the equipment and receiver.
– Connect the equipment into an outlet on a circuit different from that to which the receiver is connected.
– Consult the dealer or an experienced radio/TV technician for help.
MISE EN GARDE
Le bloc d’alimentation DOIT être installé à un minimum de 50,80 cm au-dessus du sol.
N’installez PAS le bloc d’alimentation ou les luminaires à moins de 3,04 m d’une piscine ou d’un spa.
N’enterrez PAS les connecteurs et les câbles à une profondeur supérieure à 15,24 cm.
Ne dépassez PAS la puissance maximale en watts des bornes du bloc d’alimentation .
À utiliser uniquement sur un circuit de dérivation protégé par un disjoncteur différentiel de classe A.

5
Lowes.com/portfolio
ASSEMBLY INSTRUCTIONS/INSTRUCTIONS POUR L’ASSEMBLAGE/INSTRUCCIONES DE ENSAMBLAJE
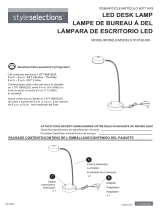
2. Drill holes using 1/4 in. drill bit (not included). Install plastic anchors (AA) and Phillips
screws (BB), leaving enough space for the power pack (A).
Percez des trous à l’aide d’un foret de 1/4 po (non inclus). Installez les chevilles d’ancrage
(AA)etlesvisPhillips(BB)enlaissantsufsammentd’espacepouryinsérerlebloc
d’alimentation (A).
Taladreoriciosconunabrocaparataladrode1/4”(noseincluye).Instaleanclasde
expansión(AA)ytornillosPhillips(BB),dejandosucienteespacioparaelbloquede
alimentación (A).
3. For low-voltage cable connections, split one end of the low-voltage cable (not included)
approximately 2 in., and then strip about 3/4 in. of insulation of each wire before twisting
strands together tightly.
Pourlebranchementdecâblesàbassetension,séparezleslsàuneextrémitéducâble
àbassetension(noninclus)surunelongueurd’environ5cm,puisdénudezchaquelsur
une longueur d’environ 2 cm et torsadez fermement les brins dénudés.
Para la conexión de cables de bajo voltaje, separe un extremo del cable de bajo voltaje
(no se incluye) de aproximadamente 5,08 cm y pele aproximadamente 1,91 cm del
aislamientodecadacableyluegoenrosqueloslamentosrmemente.
4. Loosen the preassembled cable port screws at the bottom of the power pack (A). Thread
thepre-strippedlow-voltagecablesintothecableportsandpushinrmly.Tightenthe
screws securely.
Desserrez les vis des connecteurs de câble sous le bloc d’alimentation (A). Enroulez les
câbles à basse tension dénudés autour des connecteurs de câble, puis enfoncez-les
fermement. Serrez solidement les vis.
Aojelostornillosdelpuertodecabledelaparteinferiordelbloquedealimentación(A).
Enrosque los cables de bajo voltaje pelados previamente en los puertos de cable y empuje
conrmeza.Aprietermementelostornillos.
5. Hang the power pack (A) on the Phillips screws (BB) using the keyhole slots on the back of
the power pack (A).
Accrochez le bloc d’alimentation (A) sur les vis Phillips (BB) au moyen des encoches en
trou de serrure situées à l’arrière du bloc d’alimentation (A).
Cuelgue el bloque de alimentación (A) en los tornillos Phillips (BB) mediante las ranuras
en forma de cerradura ubicadas en la parte posterior del bloque de alimentación (A).
AA
BB
2
2 in.
5,1 cm
3/4 in.
1,9 cm
3
A
4
BB
A
5

8
Lowes.com/portfolio
LANDSCAPE LIGHTING WIRE GUIDE/GUIDE-FIL DES LUMINAIRES POUR AMÉNAGEMENT
PAYSAGER /GUÍA DE CABLEADO DE LA ILUMINACIÓN PARA JARDÍN
b. Bucle: El método de cableado en bucle es un recorrido “en bucle” de cable de bajo voltaje con lámparas al bloque de
alimentación formando bucles con el cable de bajo voltaje hacia los bloques de alimentación. Es una forma fácil de eliminar
las caídas de voltaje. Asegúrese de no cruzar los cables cuando los coloque hacia los bloques terminales. El cable que sale
de un tornillo de terminal determinado debe ingresar nuevamente en ese mismo tornillo.
Nota: Solo un cable de bajo voltaje se puede conectar a los tornillos del puerto de cables en el bloque de alimentación (A)
en todo momento. No conecte dos o más cables a los tornillos del puerto de cables. Si se conecta más de un cable de bajo
voltaje, el bloque de alimentación (A) se apagará y el sistema se apagará automáticamente. El cable tiene un lado liso y
uno estriado para los lados. Siempre asegúrese de usar el cable de bajo voltaje necesario para la carga de vataje
incluso en recorridos cortos. Si cree que no tiene experiencia en cableado, solicite los servicios de un electricista
y autorizado.
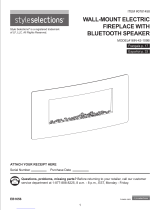
b. Looping: The looping wiring method is a “loop” run of low-voltage cable with
connected to the power pack by looping the low-voltage cable back to the terminal blocks.
This is an easy way to eliminate voltage drop. Make sure not to cross the wires when
rouging them back to the terminal blocks. The wire coming out from a particular terminal
screw must go back in the same cable port screw.
Note: Only one low-voltage cable can be connected to the cable port screws on power
pack (A) at any time. Do not connect two or more cables to the cable port screws. If more
than one low-voltage cable is connected, then the power pack (A) will shut down and
the system will turn off automatically. The wire has a smooth side and a rigged side for
Always make sure to use the low-voltage cable required for the wattage
load
even on short runs .If you feel you do not have enough electrical wiring experience, consult
the services of a licensed electrician.
b. Boucle : La méthode de câblage en boucle consiste en un réseau en boucle de câbles à basse tension dont les luminaires
sont connectés au bloc d’alimentation grâce au câble à basse tension qui fait une boucle pour rejoindre les bornes. Il s’agit
d’une manière
d’éliminer les chutes de tension. Assurez-vous de ne pas croiser les lorsque vous les ramenez aux
bornes. Le qui sort de la vis d’une borne en particulier doit revenir au même endroit.
Remarque: Un seul câble à basse tension peut être connecté aux vis des connecteurs de câble du bloc d’alimentation (A) et
ce, en tout temps. Ne connectez pas deux câbles ou plus aux vis des connecteurs de câble. Si plus d’un câble à basse tension
est connecté, le bloc d’alimentation (A) s’arrêtera et le système s’éteindra automatiquement. The wire has a smooth side and
a rigged side for possède un côté lisse et un côté nervuré pour en faciliter Assurez-vous de
toujours utiliser le câble à basse tension approprié pour la puissance en watts exigée, même sur les réseaux courts. Si vous
croyez ne pas posséder assez d’expérience en câblage électrique, faites appel à un électricien pour installer leluminaire.
10 ft.
3 m
3b

9
Lowes.com/portfolio
OPERATION INSTRUCTIONS/ MODE D’EMPLOI/ INSTRUCCIONES DE FUNCIONAMIENTO
1. After properly installing the power pack, turn on the electrical source. There are two
buttons for operation. Every time you press either button, it will turn to another working
mode. Push either button repeatedly to move to the different selections.
•“O”-- ON (lights stay on until manually turned off).
•“A” -- AUTO (lights turn on at dusk and turn off at dawn).
•“1” through “9” -- TIMING (lights turn on at dusk and turn off after the selected
number of hours.)
•“E”-- CHECK CIRCUIT. If this is displayed, power to the power pack has been
interrupted or too many lights have been installed. Immediately unplug the unit
from the outlet and check the following:
–Isthecablecorrectlyinsertedintothepowerpackterminals?
–Istheunitoverloadedorarethewirestouching?
–Arethexturescorrectlyinstalledonthecable?
Après avoir installé le bloc d’alimentation, mettez-le en marche. Il y a deux boutons pour le faire fonctionner. Chaque fois
que vous appuyez sur un de ces boutons, l’appareil passera à un autre mode de fonctionnement. Appuyez sur un bouton à
plusieursreprisespourmodierlasélection.
•« O » – ON (les lumières restent allumées jusqu’à ce qu’elles soient éteintes manuellement).
•« A » – AUTOMATIQUE (les lumières s’allument automatiquement lorsqu’il fait sombre et elles s’éteignent lorsqu’il fait
clair)
•« 1 » à « 9 » – MINUTERIE (les lumières s’allument automatiquement lorsqu’il fait sombre et s’éteignent après le
nombre d’heures choisi).
•« E » – LE CIRCUIT DOIT ÊTRE VÉRIFIÉ.Sicettelettres’afche,l’alimentationenélectricitédublocd’alimentation
est interrompue ou trop de lumières sont installées. Débranchez immédiatement l’appareil de la prise électrique et
vériezlesélémentssuivants:
–Lecâbleest-ilcorrectementinsérédanslesbornesdublocd’alimentation?
–L’appareilest-ilsurchargéoudescâblessetouchent-ils?
–Lesluminairessont-ilsbieninstalléssurlecâble?
Después de la instalación correcta del bloque de alimentación, active la fuente eléctrica. Existen dos botones de operación.
Cada vez que presione algún botón, cambiará a otro modo de funcionamiento. Presione cualquier botón repetidamente para
realizar las diversas selecciones.
•“O”: ENCENDIDO (las luces permanecen encendidas hasta que se apaguen manualmente).
•“A”: AUTOMÁTICO (las luces se encenderán al anochecer y se apagarán al amanecer).
•“1” a “9”: TEMPORIZADOR (las luces se encenderán al atardecer y se apagarán después de la cantidad de
horas seleccionadas).
•“E”: CONTROLAR EL CIRCUITO. Si se muestra esto, se interrumpió la electricidad hacia el bloque de alimentación
o se han instalado demasiadas lámparas. Inmediatamente desenchufe la unidad del tomacorriente y revise lo
siguiente:
–¿Estáelcablecorrectamenteinsertadoenlosterminalesdelbloquedealimentación?
–¿Estálaunidadsobrecargadaoestánencontactoloscables?
–¿Estánlaslámparascorrectamenteinstaladasenelcable?
1

10
Lowes.com/portfolio
CARE AND MAINTENANCE/ENTRETIEN/CUIDADO Y MANTENIMIENTO
TROUBLESHOOTING/DÉPANNAGE/SOLUCIÓN DE PROBLEMAS
PROBLEM
PROBLÈME
PROBLEMA
POSSIBLE CAUSE
CAUSE POSSIBLE
CAUSA POSIBLE
CORRECTIVE ACTION
MESURE CORRECTIVE
ACCIÓN CORRECTIVA
The light does not
turn on when needed./
Le luminaire ne
s’allume pas au
moment opportun./
La luz no se enciende
cuando es necesario.
1. The wire and the power pack aren’t in
contact./Leletleblocd’alimentationne
sont pas raccordés./El cable y el bloque de
alimentación no hacen contacto.ación.
2. No power to the power pack./ Le bloc
d’alimentation n’est pas alimenté./El bloque
de alimentación no recibe alimentación.
3. Power pack is overloaded./ Le bloc
d’alimentation est surchargé./ Bloque de
alimentación sobrecargado.
1. Check the connection between the primary wire and the power
pack./Vériezlebranchemententrelecâbleprincipaletlebloc
d’alimentation./ Revise la conexión entre el cable principal y el
bloque de alimentación.
2.Checkthepowertothepowerpack./Vériezl’alimentation
électrique du bloc d’alimentation./ Revise la alimentación que
va hacia el bloque de alimentación.
3.Checkwattageofallxtures./Vériezlapuissanceenwatts
detouslesluminaires./Veriqueelvatajedelastodaslas
lámparas.
•Beforeattemptingtocleanthexture,disconnectthepowertothexturebyunpluggingthexture.
•Tocleanthexture,useadryorslightlydampenedcleancloth.
•DO NOTuseanycleanerswithchemicals,solvents,orharshabrasivesasdamagetothexturemayoccur.
•Checkperiodicallythescrewsconnectingthecabletothepowerpackterminalsaretighttopreventoverheating.
CAUTION: Aloosewireincreasestheriskofre;tightenallconnectionssecurely.
•Avantdenettoyer,coupezl’électricitéduluminaireenplaçantledisjoncteurenpositionhorstensionouenenlevantlefusibledelaboîteà
fusible.
•Nettoyezleluminaireàl’aided’unlingepropreetsecoulégèrementhumide.
•N’utilisezPAS de nettoyants contenant des produits chimiques, des solvants ou des produits abrasifs forts; ils pourraient endomma ger
leni.
•Vériezpériodiquementsilesvisquiserventaubranchementducâbleauxbornesdublocd’alimentationsontbienserréespouréviterla
surchauffe.
MISE EN GARDE:Unldesserréaugmentelesrisquesd’incendie;serrezcomplètementtouteslesconnexions.
•Antesdeintentarlimpiarlalámpara,desconectelaalimentacióndelalámparaapagandoelinterruptordecircuitooretirandoelfusibledela
caja de fusibles.
•Paralimpiarlalámpara,useunpañolimpiosecoolevementehúmedo.
• NO utilicelimpiadoresconquímicos,solventesniabrasivosfuertesyaquepuedendañarlalámpara.
•Veriqueperiódicamentelostornillosqueseconectandelcablealosterminalesdelbloquedealimentaciónesténrmesparaevitar
sobrecalentamiento.
PRECAUCIÓN:Uncablesueltoaumentaelriesgodeincendio,aprietetodaslasconexionesconrmeza.
/