Page is loading ...

Installer: Leave this manual for homeowner.
Homeowner: Read this manual and keep for future reference.
INSTALLATION AND OPERATING INSTRUCTIONS
©2003 Jacuzzi Whirlpool Bath U961000F 12/04

IMPORTANT SAFETY INSTRUCTIONS
READ AND FOLLOW ALL INSTRUCTIONS
SAVE THESE INSTRUCTIONS
CAUTION: TEST THE GROUND FAULT CIRCUIT INTERRUPTER PROTECTING THIS APPLIANCE PERIODI-
CALLY IN ACCORDANCE WITH MANUFACTURER'S INSTRUCTIONS.
WARNING: RISK OF ACCIDENTAL INJURY OR DROWNING; CHILDREN SHOULD NOT USE HYDROMAS-
SAGE BATHTUB WITHOUT ADULT SUPERVISION.
WARNING: TO AVOID INJURY, EXERCISE CAUTION WHEN ENTERING OR EXITING THE HYDROMAS-
SAGE BATHTUB
WARNING: RISK OF ACCIDENTAL INJURY OR DROWNING; DO NOT USE HYDROMASSAGE BATHTUB
UNLESS ALL SUCTION GUARDS ARE INSTALLED TO PREVENT BODY AND HAIR ENTRAPMENT.
WARNING: KEEP BODY AND HAIR A MINIMUM OF 6" AWAY FROM SUCTION FITTING AT ALL TIMES
WHEN THE WHIRLPOOL SYSTEM IS OPERATING. HAIR LONGER THAN SHOULDER LENGTH SHOULD BE
SECURED CLOSE TO THE HEAD.
WARNING: NEVER DROP OR INSERT ANY OBJECT INTO ANY OPENING.
WARNING: RISK OF ELECTRICAL SHOCK; DO NOT PERMIT ELECTRICAL APPLIANCES (SUCH AS HAIR
DRYER, LAMP, TELEPHONE, RADIO OR TELEVISION) WITHIN 60" (1.5 M) OF THIS HYDROMASSAGE
BATHTUB.
WARNING: RISK OF ACCIDENTAL INJURY OR DROWNING; DO NOT USE DRUGS OR ALCOHOL BEFORE
OR DURING THE USE OF HYDROMASSAGE BATHTUB EQUIPPED WITH A HEATER TO AVOID UNCON-
SCIOUSNESS AND POSSIBLE DROWNING.
WARNING: RISK OF FETAL INJURY; PREGNANT OR POSSIBLY PREGNANT WOMEN SHOULD CONSULT
A PHYSICIAN BEFORE USING A HYDROMASSAGE BATHTUB EQUIPPED WITH A HEATER.
WARNING: RISK OF HYPERTHERMIA AND POSSIBLE DROWNING; DO NOT USE A HYDROMASSAGE
BATHTUB EQUIPPED WITH A HEATER IMMEDIATELY FOLLOWING STRENUOUS EXERCISE.
WARNING: RISK OF HYPERTHERMIA AND POSSIBLE DROWNING; WATER TEMPERATURE IN EXCESS
OF 104°F (40° C) MAY BE INJURIOUS TO YOUR HEALTH. CHECK AND ADJUST WATER TEMPERATURE
BEFORE USE.
WARNING: RISK OF HYPERTHERMIA; PEOPLE USING MEDICATIONS AND/OR HAVING AN ADVERSE
MEDICAL HISTORY SHOULD CONSULT A PHYSICIAN BEFORE USING A HYRDOMASSAGE BATHTUB
EQUIPPED WITH A HEATER.
AN EQUIPMENT GROUNDING TERMINAL IS PROVIDED IN THE FIELD WIRING COMPARTMENT. TO
REDUCE THE RISK OF ELECTRICAL SHOCK, THIS TERMINAL MUST BE CONNECTED TO THE GROUNDING
MEANS PROVIDED IN THE ELECTRICAL SUPPLY PANEL WITH A CONNECTOR EQUIVALENT IN SIZE TO
THE CIRCUIT CONNECTORS SUPPLYING THIS EQUIPMENT.

PRECAUTIONS
• Do not operate the whirlpool system unless the bath is filled with water to at least 2" above the highest jet.
• Never drop or insert any object into any opening.
• Do not use oil-based bath additives in your whirlpool bath.
• When cleaning your bath, do not use abrasive substances which will damage the bath's surface.
• To prevent discoloration of the acrylic finish, do not fill the bath with water in excess of 140°F (60°C).
• The whirlpool system should be purged at least twice a month. For your convenience, we have developed a
plumbing system cleaner (Systems Clean™) specifically for whirlpool baths. For availability call 1-800-288-4002.
• Use this unit only for its intended purpose as described in this manual. Do not use attachments not recom-
mended by the manufacturer.
• This unit must be connected only to a supply circuit that is protected by a ground fault circuit interrupter (GFCI).
Such a GFCI should be provided by the installer and should be tested on a routine basis. To test the GFCI, push
the test button. The GFCI should interrupt power. Push the reset button. Power should be restored. If the GFCI
fails to operate in this manner, there is a ground current flowing, indicating a possibility of an electric shock. Do
not use this unit. Disconnect the unit and have the problem corrected by a qualified electrician before using.
• A pressure wire connector is provided on the exterior of the motor to permit connection of an No. 8 AWG (8.4
mm) solid copper bonding conductor between this unit and all other electric equipment and exposed metal in the
vicinity, as needed to comply with local requirements.
• This unit should be installed by a licensed electrician and grounded.
• For built-in and drop-in units, install to permit access for servicing.
Note: This is a professional grade product. A knowledge of construction techniques, plumbing and electri-
cal installation according to codes are required for proper installation and user satisfaction. We recom-
mend that a licensed contractor perform the installation of all Jacuzzi Whirlpool Bath products. Our war-
ranty does not cover improper installation related problems.

CONTENTS
Specifications _________________________________________________________________________ 1-2
Roughing-in Reference _________________________________________________________________ 3-4
Installation ___________________________________________________________________________ 5-8
Framing and Support _________________________________________________________________ 5
Service Access _____________________________________________________________________ 6
Electrical Connections _________________________________________________________________ 7
Plumbing and Water Supply ____________________________________________________________ 8
Operation ____________________________________________________________________________ 9-10
Maintenance __________________________________________________________________________ 11
Troubleshooting _______________________________________________________________________ 12
Authorized Service _____________________________________________________________________ 13
Repair Parts __________________________________________________________________________ 14-18
BMH Jet & 1 Position Air Control ________________________________________________________ 14
2 Position Control (Air & Pump/Motor ON/OFF) _____________________________________________ 15
HTC Jet & Suction Assembly ___________________________________________________________ 16
Back Massage Jet Assembly ___________________________________________________________ 16
3 Position Control ____________________________________________________________________ 17
Pump/Motor Assembly, RapidHeat Heater, Union Repair Kit, Air Actuated Switch & Strain Relief ______ 18
Warranty _____________________________________________________________________________ 19-20
Owner's Record
Date Purchased _________________________________________________________
Purchased From _________________________________________________________
Installed By _____________________________________________________________
Serial Number __________________________________________________________
Model _________________________________________________________________
NOTE: To obtain a referral for a service agent in your area call 800-288-4002 . You may also visit our web site at
http://www.jacuzzi.com/. To find the service agent listing, click on For The Trade.
Then click on Electrical/Mechanical Service Agents.
Depending on the problem, click on Electrical/Mechanical Repairs or Finish, Surface or Shell-Related Problems or
Repair Parts or Accessories for a listing of authorized agents, contractors, or distributors.

Important: Read complete instructions before beginning installation.
Each whirlpool bath arrives ready for installation, completely equipped with motor/pump assembly and plumbing
and fittings necessary for whirlpool operation. An optional drain/overflow kit is available for installation on the bath.
Remove the bath from the carton. Retain the shipping carton until satisfactory inspection of the product has been
made. Do not lift the bath by the plumbing at any time; handle by the shell only.
Immediately upon receipt, inspect the shell before installing. Should inspection reveal any damage or defect in
the finish, do not install the bath. Damage or defect to the finish claimed after the bath is installed is excluded from
the warranty. Jacuzzi Whirlpool Bath's responsibility for shipping damage ceases upon delivery of the products in
good order to the carrier. Refer any claims for damage to the carrier. For definitions of warranty coverage and
limitations, refer to the published warranty information packed with the product.
All bath units are factory tested for proper operation and watertight connections prior to shipping. Note: Prior to
installation, the bath must be filled with water and operated to check for leaks that may have resulted from
shipping damage or mishandling. Jacuzzi Whirlpool Bath is not responsible for any defect that could have been
discovered, repaired, or avoided by following this inspection and testing procedure.
BATHS WITHOUT INTEGRAL SKIRT
END VIEW
H
W
SIDE VIEW
L
2"
51 mm
L
1"
25.4 mm
H
W
SIDE VIEW
BATHS WITH INTEGRAL SKIRT
END VIEW
SPECIFICATIONS (Rectangular)
MODEL
PRODUCT
WEIGHT
AVERAGE
OPERATING
GALLONAGE
TOTAL WEIGHT/
FLOOR LOADING
DIMENSIONS
DRAIN/OVERFLOW
DIMENSIONS
SKIRT &
MOUNTING
CUTOUT
HEATER READY
FOR FIELD
INSTALLATION
ESPREE 6032 60" (1524 mm) L
32" ( 813 mm) W
22" ( 559 mm) H
785 lb
(357 kg)/
59lb/sq. ft.
(288 kg/sq. m)
50 Min U.S. gal
(189 liters)
58 Max U.S. gal
(220 liters)
102 lb
(46 kg)
18-1/16" (459 mm) A
10-1/4" (273 mm) B
Not
Available
*Add 1/4" to this dimension when roughing-in for 3-wall niche.
ESPREE 6036 60" (1524 mm) L
36" ( 914 mm) W
20" ( 508 mm) H
825 lb
(375 kg)/
55 lb/sq. ft.
(268 kg/sq. m)
117 lb
(53 kg)
Not
Available
58" x 34"
Yes
(U395000 HEATER KIT)
ESPREE 6032
WITH INTEGRAL
SKIRT
60" (1524 mm) L*
32" ( 813 mm) W
22" ( 559 mm) H
113 lb
(51 kg)
16-7/8" (429 mm) A
10-13/16" (275 mm) B
Integral
NA
Yes
(S750000 HEATER KIT)
ESPREE 6042
60" (1524 mm) L
42" (1067 mm) W
20" ( 508 mm) H
936 lb
(425 kg)/
67 lb/sq. ft.
(326 kg/sq. m)
127 lb
(58 kg)
Not
Available
58" x 40"
Yes
(S750000 HEATER KIT)
ESPREE 7236 72" (1829 mm) L
36" ( 914 mm) W
20" ( 508 mm) H
911 lb
(414 kg)/
51 lb/sq. ft.
(249 kg/sq. m)
120 lb
(55 kg)
Not
Available
70" X 34"
Yes
(U395000 HEATER KIT)
ESPREE 6042
WITH INTEGRAL
SKIRT
60" (1524 mm) L*
42" (1067 mm) W
20" ( 508 mm) H
893 lb
(406 kg)/
51 lb/sq. ft.
(249 kg/sq. m)
127 lb
(57 kg)
Integral
NA
Yes
(S750000 HEATER KIT)
RECTANGULAR BATHS
ESPREE 7242 72" (1829 mm) L
42" (1067 mm) W
20" ( 508 mm) H
886 lb
(403 kg)/
42 lb/sq. ft.
(205 kg/sq. m)
120 lb
(55 kg)
Not
Available
70" X 40"
Yes
(U395000 HEATER KIT)
SPECIFICATIONS
16-7/8" (429 mm) A
15-5/8" (397 mm) B
16-7/8" (429 mm) A
15-5/8" (397 mm) B
16-7/8" (429 mm) A
10-13/16" (275 mm) B
16-7/8" (432 mm) A
15-5/8" (394 mm) B
16-78" (432 mm) A
15-5/8" (394 mm) B
ESPREE 542**
BACK MASSAGE
60" (1524 mm) L
42" (1067 mm) W
20" ( 508 mm) H
58" x 40"
16-7/8" (429 mm) A
15-5/8" (397 mm) B
DRAIN/OVERFLOW
A
B
Not
Available
Yes
(S750000 HEATER KIT)
936 lb
(425 kg)/
54 lb/sq. ft.
(263 kg/sq. m)
128 lb
(58 kg)
See
Page 4
785 lb
(357 kg)/
59lb/sq. ft.
(288 kg/sq. m)
50 Min U.S. gal
(189 liters)
58 Max U.S. gal
(220 liters)
Yes
(S750000 HEATER KIT)
NOTE: The overall dimensions are nominal with a tolerance of +0 and -1/4".
FOR ALL UNITS: Electrical Service Requirements: All require a dedicated GFCI protected separate circuit.
RapidHeat: 115 VAC, 15 AMP, 60 Hz. dedicated GFCI protected separate circuit.
Motor/Pump: 115 VAC, 15 Amp, 60 Hz. dedicated GFCI protected separate circuit.
**115VAC, 20AMP, 60Hz. *115VAC, 20AMP, 60Hz.
50 Min U.S. gal
(189 liters)
61 Max U.S. gal
(231 liters)
60 Min U.S. gal
(227 liters)
68 Max U.S. gal
(257 liters)
60 Min U.S. gal
(227 liters)
68 Max U.S. gal
(257 liters)
58 Min U.S. gal
(219 liters)
66 Max U.S. gal
(250 liters)
64 Min U.S. gal
(242 liters)
73 Max U.S. gal
(276 liters)
74 Min U.S. gal
(280 liters)
89 Max U.S. gal
(336 liters)
1
Jacuzzi Whirlpool Bath© U961000F 12/04

MODEL
PRODUCT
WEIGHT
OPERATING
GALLONAGE
TOTAL WEIGHT/
FLOOR LOADING
SPECIFICATIONS (Corner)
DIMENSIONS
DRAIN/OVERFLOW
DIMENSIONS
SKIRT &
MOUNTING
CUTOUT
HEATER READY
FOR FIELD
INSTALLATION
CORNER BATHS
DRAIN/OVERFLOW
A
B
ESPREE 6060
60" (1524 mm) L
60" (1524 mm) L
22" ( 559 mm) H
888 lb
(404 k/g)/
36 lb/sq. ft.
(176 kg/sq. m)
122 lb
(55 kg)
18-1/2" (470 mm) A
12-1/4" (311 mm) B
See
Page 4
Not Available
Factory Installed
(S750000 HEATER KIT)
ESPREE 6060
2"
51 mm
H
FRONT VIEW
SIDE VIEW
ESPREE 6060
WITH INTEGRAL
SKIRT
60" (1524 mm) L
60" (1524 mm) L
22" ( 559 mm) H
888 lb
(404 k/g)/
36 lb/sq. ft.
(176 kg/sq. m)
122 lb
(55 kg)
18-1/2" (470 mm) A
12-1/4" (311 mm) B
NA
Integral
Factory Installed
(U395000 HEATER KIT)
ESPREE 6060 WITH SKIRT
1"
25 mm
H
FRONT VIEW
SIDE VIEW
SPECIFICATIONS
Lamp Package 7701XXX
959 White
958 Almond
969 Oyster
Jet Trim Kit X163XXX
805 Platinum
815 Satin Nickel
826 Brushed Nickel
827 Chrome
829 PVD Brass
898 Brushed Chrome
845 Oil Rubbed Bronze
Rotary Drain/Overflow
Kit 8730XXX
805 Platinum
815 Satin Nickel
826 Brushed Nickel
827 Chrome
829 PVD Brass
898 Brushed Chrome
845 Oil Rubbed Bronze
RapidHeat™ In Line Heater
Suction Side S750000
Discharge Side U395000
OPTIONS FOR ALL UNITS
NOTE: The overall dimensions are nominal with a tolerance of +0 and -1/4".
FOR ALL UNITS: Electrical Service Requirements: All require a dedicated GFCI protected separate circuit.
RapidHeat: 115 VAC, 15 AMP, 60 Hz. dedicated GFCI protected separate circuit.
Motor/Pump: 115 VAC, 15 Amp, 60 Hz. dedicated GFCI protected separate circuit.
68 Min U.S. gal
(257 liters)
89 Max U.S. gal
(336 liters)
68 Min U.S. gal
(257 liters)
89 Max U.S. gal
(336 liters)
2
Jacuzzi Whirlpool Bath© U961000F 12/04

Note: Unless otherwise specified, units are produced with left or right-hand versions.
Note: 1. The overall dimensions are nominal with a tolerance of +0 and -1/4".
2. *Add 1/4" to this dimension when roughing-in for 3-wall niche.
3. Measurements inside each unit represent cutout in floor to allow for drain/overflow.
4. All measurements are in inches. To convert to millimeters, multiply inches by 25.4.
10-13/16"
16"
2"
32"
*60"
14" x 4"
ESPREE 6032 WITH SKIRT
(Left hand shown)
60"
18"
2"
18" x 4"
36"
15-5/8"
ESPREE 6036
(Left hand only as shown)
60"
21"
2"
18" x 4"
42"
15-5/8"
ESPREE 6042
(Left hand only as shown)
ROUGH-IN
15-5/8"
ESPREE 7236
18" x 4"
(Left hand only as shown)
2"
72"
3
6"
18"
ESPREE 7242
15-5/8"
(Left hand only as shown)
21"
42"
2"
18" x 4"
*72"
ESPREE 6042 BM
21"
42"
2"
14'' x 4''
10-13/16"
(Left hand shown)
*60"
10-13/16"
16"
2"
32"
*60"
14-1/2" x 4"
ESPREE 6032
(Left hand only)
10-1/4"
16"
2"
32"
*60"
14" x 4"
ESPREE 6032 WITH SKIRT
(Left hand shown)
3
Jacuzzi Whirlpool Bath© U961000F 12/04

Note: 1. The overall dimensions are nominal with a tolerance of +0 and -1/4".
1. Measurements inside each unit represent cutout in floor to allow for drain/overflow.
2. All measurements are in inches. To convert to millimeters, multiply inches by 25.4.
6060 CUTOUT
ESPREE 6060 WITHOUT SKIRT
57-7/8"
22-11/16"
22-11/16"
49-3/4"
90°
90°
57-7/8"
ESPREE 6060 WITH INTEGRAL SKIRT
60"
24-3/8"
24-3/8"
33-1/2"
46"
21" X 4"
6-3/4"
12-1/2"
33-1/2"
60"
50-1/8"
(Right hand only as shown)
Junction Box
ESPREE 6060 WITHOUT SKIRT
60"
24-3/8"
24-3/8"
33-1/2"
46"
21" X 4"
6-3/4"
12-1/2"
33-1/2"
60"
50-1/8"
(Right hand shown. Left hand is a mirror image
)
ROUGH-IN
6032 CUTOUT
ESPREE 6032 DROP-IN CUTOUT
30
"
58"
1/2"
2"
4"
DRAIN
4
Jacuzzi Whirlpool Bath© U961000F 12/04

Framing and Support
The drain/overflow of the bath extends below the bottom of the bath. Note that this requires a cutout in the floor.
The floor structure beneath the bath must be able to support a total weight of bath, water, and bather.
Refer to the table under total weight for your model. The unit must be supported from the bottom of the bath and
not from the bath rim or tile flange. If the subfloor is level, no other preparation is necessary. You can proceed to
install the bath. If the subfloor is not level, you MUST level the entire surface prior to installing the bath. The use of
materials that shim or provide a level installation are allowed provided the method used will insure a level bath that
is supported from the bottom. Materials that may be used are a floor leveling compound, mortar, plaster or minimal
expansion structural foam having a density of a minimum of 5 lbs./cubic ft.; however the bath must remain level in
order for it to drain properly and the foam feet must make full contact with the leveling material. Both sides of a joint
or splice of subfloor should be level to each other. When attaching baths with flanges to stud wall, use shims to
fill any gaps between the bath flange and studs.
The rim of the bath is not designed to support weight. If finish material is to overlap or contact the bath, the added
weight must be fully self-supporting.
The protective film liner inside the bath is used to prevent damage to the finish from shoes, tools, etc.
during installation. Before installation, remove liner to inspect for any defects, reapply and do not remove
until final cleanup.
Important: If a skirt is to be used, it must be installed at the time of unit installation – refer to skirt
installation instructions. Install optional trim parts when all installation has been completed.
FLUSH TO WALL
SEMI-SUNKEN
OPTIONAL TILE FLANGE KIT
TILE
1" X 4" (NOT FOR SUPPORT)
MORTAR OR ADHESIVE
FLASHING
SEALANT
SUB-FLOOR
FINISHING
MATERIAL
BATH RIM
NAIL
OR
SCREW
CEMENT
BOARD
STUD
WALL
SILICONE
SEALANT
PLASTER
FILLER
FLANGE
FLASHING
SEALANT
MORTAR OR ADHESIVE
TILE
MORTAR
TYPICAL INSTALLATIONS
1" X 4" (NOT FOR SUPPORT)
1" X 4" (NOT
FOR SUPPORT)
TYPICAL FLANGE MOUNTING DETAIL
STUD
TILE
ADHESIVE
TILE
CEMENT
BOARD
FLANGE
1/8" GAP
STUD
FLANGE
SHIM IF
NECESSARY
TO FILL GAPS
BETWEEN
STUD
AND FLANGE
CAULKING
ATTACH WITH
SCREWS
PROVIDED
INSTALLATION
5
Jacuzzi Whirlpool Bath© U961000F 12/04

MOTOR
SERVICE ACCESS (WITH INTEGRAL SKIRT)
REMOVABLE SKIRT
ACCESS PANELS
ACCESS AREA
Reinstalling Panel
Hold at an angle to the skirt and insert clip under edge
of skirt opening. Bow the panel outward and insert clip
on other side.
BOW
ACCESS
PANEL
SKIRT
ACCESS
PANEL
20"
36"
24"
18"
B
A
C
SERVICE ACCESS
(CORNER BATH WITHOUT SKIRT)
A - Preferred access
B - Acceptable alternative if access A is not possible
C - Optional access for accessory equipment
RIGHT HAND UNIT SHOWN
NOTE: Left hand unit access is on the opposite
side (mirror Image).
Service Access
For partially or fully sunken installations, allow for
access to service connections. It is the installer's re-
sponsibility to provide sufficient service access. The
recommended minimum dimensions allowable for ser-
vice to the bath are shown in the "Service Access" illus-
tration.
Provide adequate area around unit for air circulation
for cooling the motor and to supply sufficient air to the
jets. Do not insulate this area or around motor.
Service Access with Skirt
An optional skirt fits along the side of the bath for
above-floor installations and is also an access panel for
servicing. Allow a space of at least 8 inches away from
the bath for skirt removal.
The skirt is designed to accommodate the added
height of the tile, linoleum, or other floor coverings up to
1-1/4 inches above the floor, and will be flush with the
floor when installed.
More detailed instructions on skirt installation are pro-
vided with the optional skirt assembly.
Service Access with Integral Skirt
Service access is through the removable skirt panels.
INSTALLATION
MOTOR
18"
18"
12"
12"
PREFERRED
ACCESS
ALTERNATE
ACCESS
SERVICE ACCESS
(WITHOUT SKIRT)
6
Jacuzzi Whirlpool Bath© U961000F 12/04
Or slide clips over bottom lip of skirt opening and tilt
up until velcro tabs make contact.
ACCESS
PANEL
SKIRT
ACCESS
PANEL

Electrical Connection 6060 With Heater
On the 6060 with integral skirt, one junction box has
been provided for the pump/motor and one for the heater.
To access, remove skirt access panel. See top view for
location.
A separate GFCI protected outlet (not provided) is re-
quired for pump/motor and is to be installed in the junc-
tion box. The junction box is to be hard wired. The
motor is bonded to the junction box at the factory.
Install a separate 120 VAC 15 AMP dedicated circuit
with GFCI protection. With a #8 solid copper wire, bond
the heater to the house electrical panel or approved lo-
cal bond. A bonding lug is provided on the heater.
At initial start-up and before each use thereafter with
power ON, push the GFCI test button. The reset button
should pop out. Push this button in to reset. If the inter-
rupter fails to operate in this manner, there is a ground
current flowing or a device malfunction, indicating the
possibility of electrical shock. Turn off power and do
not use the bath until the source of the problem has
been identified and corrected.
Electrical Connections
A separate circuit, which must be protected by a
Ground Fault Circuit Interrupter (GFCI), is required.
Install a duplex outlet to the studwall underneath the
bathtub, at least 4 inches above the floor. The duplex
outlet is not provided. Because these units are manu-
factured with a safe, convenient Magic Touch whirlpool
ON/OFF switch on the bath itself, no remote switch or
timer is necessary. If an optional timer is desired, one
is available from Jacuzzi Whirlpool Bath for 115 VAC
operation.
DANGER: RISK OF ELECTRIC SHOCK. Connect
only to a circuit protected by a Ground Fault Circuit
Interrupter.
CAUTION: Operating the motor/pump without
enough water in the bath can cause leaking and per-
manent damage to the pump. Before power is ap-
plied to the installation, make sure the switch is in
the OFF position to avoid pump damage.
ELECTRICAL CONNECTION
(FOR SIDE/END DRAIN BATHS)
DUPLEX
RECEPT.
*
3 PRONG
PLUG
4" MIN.
*(NOT PROVIDED)
FLOOR
INSTALLATION
ELECTRICAL CONNECTION
(FOR MOTOR PUMP ON DRAIN SIDE)
3 PRONG
PLUG
DUPLEX
RECEPT.*
*(NOT PROVIDED)
FLOOR
4" MIN.
OR IN
ACCORDANCE
WITH LOCAL
BUILDING OR
ELECTRICAL
CODES
GFCI
BONDING TO PUMP/MOTOR
POWER CORD
TO MOTOR
60x60 WITH INTEGRAL SKIRT
MOTOR JUNCTION BOX
GFCI
BONDING TO RAPIDHEAT
POWER CORD
TO RAPIDHEAT
60x60 WITH INTEGRAL SKIRT
RAPIDHEAT JUNCTION BOX
PUSH TO RESET
OVER HEAT
PROTECTION
HEATER ON
7
Jacuzzi Whirlpool Bath© U961000F 12/04

Drain Information
A drain/overflow assembly (sold separately) must be
installed on the bath, water tested, and connected to
the sanitary system of the house. After opening the
carton, inspect for damage and verify that the kit is of
the proper finish. In the Jacuzzi Whirlpool Bath drain/
overflow kit, note that the waste flange, strainer, over-
flow cover and cover screws are packaged in a sepa-
rate package within the kit to protect the trim finish.
Follow the installation instructions provided with the
drain/overflow kit. After the drain is fully installed, test
for proper drainage. If the unit does not drain properly,
rectify this condition before proceeding with the instal-
lation. Jacuzzi Whirlpool Bath is not responsible for
removal and or reinstallation costs.
NOTE: Watertight installation of the drain is the
installer's responsibility. Drain leakage is excluded
from the Jacuzzi Whirlpool Bath warranty of this
product.
Plumbing
Pump, jets, and suction fittings for the whirlpool sys-
tem are factory plumbed in schedule 40 PVC piping.
All Jacuzzi Whirlpool Bath products are factory tested
for proper operation and watertight connections prior to
shipping. If leaks are detected, notify your Jacuzzi Whirl-
pool Bath Dealer. Do not install the unit.
Water Supply
Consult local authorities for plumbing code require-
ments in your area.
IMPORTANT: Proper installation of the fill spout
plumbing and compliance with local codes are the
responsibility of the installer. Jacuzzi Whirlpool
Bath does not warrant connections of water supply
fittings and piping, fill systems, or drain/overflow
systems. Nor is it responsible for damage to the
bath which occurs during installation.
CAUTION: A nonflammable protective barrier must
be placed between soldering work and bath unit to
prevent damage to the bath.
Clean-Up After Installation
To avoid dulling and scratching the surface of the bath,
never use abrasive cleaners. A mild liquid detergent
and warm water will clean soiled surfaces.
Remove spilled plaster with a wood or plastic edge.
Metal tools will scratch the surface. Spots left by plas-
ter or grout can be removed if lightly rubbed with deter-
gent on a damp cloth or sponge.
Paint, tar, or other difficult stains can be removed with
paint thinner, turpentine, or isopropyl alcohol (rubbing
alcohol).
Minor scratches which do not penetrate the color fin-
ish can be removed by lightly sanding with 600-grit wet/
dry sandpaper. You can restore the glossy finish to the
acrylic surface of the bath with a special compound,
Meguiar's #10 Mirror Glaze. If that is not available, use
automotive rubbing compound followed by an applica-
tion of automotive paste wax.
Major scratches and gouges which penetrate the
acrylic surface will require refinishing. Ask your Jacuzzi
Whirlpool Bath dealer for special instructions.
INSTALLATION
8
Jacuzzi Whirlpool Bath© U961000F 12/04

Magic Touch
®
Whirlpool Switch
The Magic Touch whirlpool ON/OFF switch, conven-
iently located on the bath, allows you to turn the whirl-
pool system on and off while in the bath. Simply push
down on the switch button to turn on the whirlpool sys-
tem. To turn the system off, push down on the button
again.
If your bath has an optional Jacuzzi Whirlpool Bath
wall mounted timer, set it for the amount of time you
wish the whirlpool to operate. Note: when you desire
less than 10 minutes of whirlpool action, it is necessary
to turn the timer knob clockwise past the number 10
and then back to the desired amount. If the whirlpool
action does not begin when the timer is correctly set, it
is necessary to push the Magic Touch switch button.
All baths manufactured by Jacuzzi Whirlpool Bath are
designed for "fill and drain," which means the bath should
be drained after each use and filled with fresh water by
the next bather. This is a health precaution, as these
baths are not designed to hold water continuously like
pools or spas. If you want a unit designed to continu-
ously hold water, see your Jacuzzi Whirlpool Bath dealer
for the complete line of whirlpool spas available.
Once the bath is installed, remove any residue or for-
eign materials left over from construction. Use turpen-
tine or paint thinner to remove stubborn stains, paint or
tar. Other dirt can be cleaned off with a mild liquid de-
tergent on a damp cloth. Scrape off plaster with a
wooden or plastic edge; do not use metal scrapers,
wire brushes or other metal tools, as they will dam-
age the bath's surface.
Water Level
Close the drain and fill the bath until water is at least
2" above the highest jet (see water line indicated in the
illustration). Do not turn on the whirlpool system at
any time if the jets are not completely immersed in
water. Running the whirlpool system when there is in-
sufficient water in the bath could result in water spray-
ing outside the bath area. Running the whirlpool sys-
tem without water will damage the recirculating pump.
MAGIC TOUCH
¨
WHIRLPOOL
ON/OFF SWITCH
AIR
CONTROL
KNOBS (2)
DRAIN/OVERFLOW
FULLY ADJUSTABLE JETS
TYPICAL BATH FITTINGS
SUCTION
COVER
W
H
I
R
L
P
O
O
L
DEPRESS CENTER ON/OFF
MAGIC TOUCH SWITCH
PUSH
ON/OFF
OPERATION
2"
FILL TO AT LEAST
2" ABOVE HIGHEST JET
9
Jacuzzi Whirlpool Bath© U961000F 12/04

RapidHeat Operation
Once the heater is installed and the whirlpool pump
is operating, the heating function is totally automatic.
The heater will help maintain the temperature of the
water in the bath.
Vacuum Switch
The heater is equipped with a preset vacuum switch
which will not allow the heater to turn ON if the pump is
not running with water flowing through the whirlpool
system.
High-Limit Switch
The heater includes an exclusive High-Limit switch.
This safety circuit will not false trip from hot tap water. It
will only turn off the heater if the thermostat fails. To
reset, press the button. If the high-limit trips frequently,
contact your dealer.
Heater On Indicator
The light will be illuminated any time the heater is
operating
Controlling Whirlpool Action
The whirlpool action in your bath is influenced by three
factors – direction of flow, force of water, and force of
air. All baths manufactured by Jacuzzi Whirlpool Bath
are equipped with fully adjustable PowerPro
®
jets, which
are adjustable for all three factors. Some baths have
additional directionally adjustable jets which can be
adjusted for direction and flow of air only.
Direction: To change the direction of the water flow,
swivel the jet nozzle to the desired angle. The jets can
be directed individually toward any location on your body
to provide a hydromassage. The jets can also be ad-
justed so that they all point in the same direction (clock-
wise or counterclockwise) to circulate the water in a cir-
cular motion around the bath, causing a total whirlpool
effect.
DIRECTIONALLY
ADJUSTABLE
FULLY
ADJUSTABLE
JETS
TURN CLOCKWISE TO
REDUCE AIR FLOW
TURN COUNTER-CLOCKWISE
TO INCREASE AIR FLOW
AIR INDUCTION CONTROLS
Water Force: The high volume, fully adjustable jets
can be adjusted to control the force of the water coming
into the bath. For robust action, increase the force of
the flow by rotating the jet handles to the left (counter-
clockwise). For a more gentle effect, rotate the handles
to the right (clockwise). Never run the whirlpool sys-
tem with all the jets closed.
Force of Air: Two knobs located on the bath serve
as controls for the air induction system. The intensity of
the hydromassage whirlpool action is determined by the
amount of air inducted into the water. As the amount of
air is increased, the hydromassage action increases.
For maximum air induction, rotate the control knobs fully
counterclockwise to the largest circles. For fewer air
bubbles, decrease the amount of air induction by rotat-
ing the control knob clockwise. When the knobs are
turned to the smallest circles, only water is being
circulated.
OPERATION
PUSH TO RESET
OVER HEAT
PROTECTION
HIGH LIMIT RESET
HEATER ON
HEATER ON
Back Massage Jet - Flow Adjustment
Open
Close
10
Jacuzzi Whirlpool Bath© U961000F 12/04

Cleaning the Bath
To clean your bath, simply use a mild, nonabrasive
liquid detergent solution. You can protect and restore
the gloss to a dulled acrylic surface by applying
Meguiar's #10 Mirror Glaze, a product specifically de-
signed for use on acrylic finishes. If Meguiar's is not
available, an acrylic polish of equal quality or automo-
tive paste wax is acceptable.
Never use abrasive household cleaners on any
Jacuzzi Whirlpool Bath product.
Repairs to the Surface
Minor scratches which do not penetrate the color fin-
ish can be removed by lightly sanding with 600-grit wet/
dry sandpaper. Restore the gloss using Meguiar's Mir-
ror Glaze or automotive paste wax.
Major scratches and gouges which penetrate the
acrylic surface will require refinishing. Ask your Jacuzzi
Whirlpool Bath dealer for special instructions.
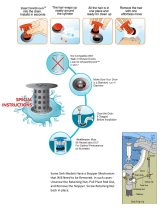
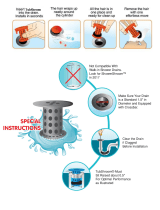
Purging the Whirlpool System
NOTE: THE WHIRLPOOL SYSTEM SHOULD BE
PURGED AT LEAST TWICE A MONTH
To remove accumulations of bath residue from the
whirlpool system, it is recommended that a whirlpool
bath be purged at least twice a month. For best results,
however, we recommend that you purge your whirlpool
bath after each use using our exclusive two-part plum-
bing system cleaner made specifically for whirlpool
baths. Systems Clean ™ is available through an autho-
rized Jacuzzi Whirlpool Bath Distributor or by calling us
direct at 1-800-288-4002. Instructions for use: Imme-
diately after bathing and exiting the whirlpool bath, leave
the bath water in the tub and add hot water, if necessary,
so the water is at least 2" above the highest jet. Turn on
the unit without the aerator. Pour the contents of the
Systems Clean Packet 1 (taking care not to get the
material on yourself) into the bath near the intake for the
circulation pump. Repeat same process with Systems
Clean Packet 2. It is important to use Packet 1 before
Packet 2 to avoid a strong odor. Run the bath for 5 to
10 minutes. Drain completely and rinse any residue.
If you have followed the standard purging instructions
above and still have an excess accumulation of bath
residue and desire an alternative cleaning mechanism,
we recommend SUPER SYSTEMS CLEAN PLUS manu-
factured by Stearns Packaging to rectify this condition.
This may be obtained by contacting us at l-800-288-
4002. It is recommended that you follow the instructions
provided by the manufacturer with the product. Re-
peated use may be necessary. SUPER SYSTEMS
CLEAN PLUS does not replace the necessity to regu-
larly purge your whirlpool system with Systems Clean as
recommended.
(For additional information about water content, contact
us for a copy of the Jacuzzi Water Quality Primer.)
Lamp
An optional lamp kit is available from your Jacuzzi
Whirlpool Bath dealer for installation on your bath.
When the bulb burns out, replace it from the back of
the lamp fitting, on the underside of the shell, by pulling
out the bulb receptacle. Replacement bulbs (12V, 7W)
are available from your Jacuzzi Whirlpool Bath dealer.
Bath Additives
NOTE: DO NOT USE OIL OR OIL BASED BATH
ADDITIVES.
If you want to use any kind of bath additive, use only a
small amount of low-foaming powder or crystal sub-
stance; the whirlpool action intensifies the foaming prop-
erties of soaps.
The use of certain bath oils, bubble baths and bath
additives may increase the level of accumulations of
bath residue in the whirlpool system. If excess accumu-
lations persist, you should discontinue use of these
products.
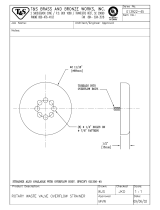
Suction Cover/Strainer Maintenance
Clean the suction cover/strainer of hair and debris
when necessary. To do this, remove the center screw
and detach the square cover. Clean the cover by back-
flushing debris from the holes. Replace the suction cover
immediately after cleaning. When reinstalling, orient
the cover/strainer with the small notch at the bottom.
The gasket must be inserted into the groove of the cover/
strainer before reinstalling onto the suction fitting.
CAUTION: Keep hair a minimum of 6 inches away
from the suction fitting at all times when the whirl-
pool system is operating. Hair longer than shoul-
der length should be secured close to the head, or
a bathing cap should be worn. Do not operate the
whirlpool system with the suction cover removed!
It is a safety device and must always be in place on
the suction fitting to minimize the potential hazard
of hair and body entrapment.
NOTCH
GASKET
COVER STRAINER
SCREW
SUCTION
FITTING
SUCTION COVER/STRAINER ASSEMBLY
MAINTENANCE
LIGHT BULB REPLACEMENT
LIGHT BULB
LIGHT BEZEL
BATH SHELL
BULB RECEPTACLE
LOCKING NUT
11
Jacuzzi Whirlpool Bath© U961000F 12/04

General Whirlpool Bath Troubleshooting Guide
PROBABLE CAUSES PROBLEM REMEDY
Pump/Motor does not start.
Pump/Motor operates but no fully
adjustable jets are functioning.
Pump/Motor operates but air is not
injected into water.
Pump/motor does not shutoff.
Water leakage from pump unions.
Pump/motor shuts off by itself or with
wall timer, before set time elapses.
No power to pump/motor.
Pump/motor not plugged in.
Magic Touch switch - air tube not
connected to switch or to air switch
on pump/motor.
Pump/motor faulty.
Jets are closed.
Suction cover may be clogged.
Air entrapment.
Air valves closed.
Magic Touch switch - air tube not
connected to switch or to air switch
on pump/motor.
If a wall timer is used, the timer is
defective
Overtightened, O-ring may be
pinched or improperly seated, under
tightened.
Motor thermal protection has deacti-
vated pump/motor due to overheat-
ing. (Supply voltage low.)
GFCI tripped.
Inadequate supply wiring.
Reset GFCI.
Insert plug fully into outlet.
Reconnect tube to Magic Touch
switch or to air switch pump/motor.
Replace pump/motor assembly.
Open jets by rotate counterclockwise.
With motor turned off, remove safety
cover and remove any debris.
Replace suction cover before
operating.
Ensure that water level is at least 2"
above the highest jet.
Open air control valves.
Reconnect tube to Magic Touch
switch or to air switch pump/motor.
Replace timer.
Untighten unions check and reseat O-
ring. If O-ring has been pinched out
of shape, replace (refer to Service
Support number below). When
tightening union nuts, hand tighten
only.
Let motor cool; thermal protection will
reset. Check for proper ventilation.
(Check supply voltage.)
Reset GFCI. If it continues to trip do
not use this unit. Disconnect the unit
and have the problem corrected by a
licensed electrician before using.
Consult a licensed electrician to
correct wiring to unit.
Note: If unit is within the warranty period, contact Jacuzzi Whirlpool Bath Service Support at (866) 905-2289 with bath's serial
number before work is started. The Serial Number is located on the Specification/Serial Number Plate. See page 13.
12
Jacuzzi Whirlpool Bath© U961000F 12/04

Authorized Service
If you need a referral for a service company near you, or need assistance with operation or maintenance related
questions, please call our Service Support Department at 1-866-905-2289. For service agent listing, visit our web
site at http://www.jacuzzi.com/. To find the service agent listings, click on “For The Trade”. Then click on Electrical/
Mechanical Service Agents. Depending on the problem, click on “Electrical/Mechanical Repairs” or “Finish, Surface
or Shell-Related Problems”.
When requesting service or technical assistance please have available both the model and serial number of your
unit. This information can be obtained from the product registration card provided with your unit. If the card has
been misplaced, this information can be obtained from the specification/serial number label on the unit itself (for
location of specification/serial number label see below).
BATH PRODUCTS
Whirlpool baths: The label is located on the wall of the bath near the pump/motor.
Non-jetted baths: The label is located next to the overflow.
MODEL # XXXXXXX
NAME XXXXX
COLOR XXXXX
MFG # XXXXX
SER # XXXXXX
MADE IN
USA
THIS PRODUCT MEETS OR EXCEED
THE FOLLOWING STANDARDS
BATH & SPA ANSI Z124.1
SHOWER BASES ANSI Z124.2
SPECIFICATION/SERIAL NUMBER PLATE
YOU WILL FIND YOUR
SERIAL NUMBER HERE.
13
Jacuzzi Whirlpool Bath© U961000F 12/04

REPAIR PARTS
NOTE: When a part number has 3 Xs, substitute the appropriate color code for the Xs:
940 White
914 Almond
969 Oyster
GRAPHIC RING AIR 8263000
BMH JET
BMH JET ASSEMBLY 8489XXX
PANEL, 1 POSITION D851XX
X
AIR CONTROL ASSEMBLY
U767000
1 POSITION AIR CONTROL
KNOB 8267XXX
RETAINER NOZZLE 8412XXX
NOZZLE BHM 8413XXX
O RING 8488000
INTERNAL O RING SEAT 8487XXX
JET BODY 8411XXX
LOCK NUT 8415000
SCREWS (2) 7514000
SCREWS (4) 9724000
14
Jacuzzi Whirlpool Bath© U961000F 12/04

REPAIR PARTS
GRAPHIC RING AIR 8263000
AIR CONTROL ASSEMBLY U767000
KNOB 8267XXX
PANEL 2 POSITION 8241XXX
BUTTON AIR ACTUATOR 8246XX
X
(MOTOR/PUMP ON/OFF)
BEZEL 8247XXX
GRAPHIC RING ON/OFF 8262XXX
BELLOWS C377000
CUP C841000
2 POSITION CONTROLLER
(AIR & PUMP/MOTOR ON/OFF)
SCREWS (8) 9724000
15
Jacuzzi Whirlpool Bath© U961000F 12/04

REPAIR PARTS
SUCTION
ASSEMBLY
SCREW #10-24/2 3959000
RING BACK-UP SUCTION 213600
0
HTC JET
SUCTION COVER/GASKET
ASSEMBLY 6651XXX
LOCKNUT 1643000
SUCTION FITTING 1958000
LOCKNUT 1835000
HTC ASSEMBLY B785XXX
SCREWS (3) 9356000
CLAMPING RING B788XXX
SWIVEL HTC B786XXX
GASKET 1840000
HTC BODY A320XXX
BACKUP RING 1836000
Jet Body
BG15000
Stop
(Part of Jet Body)
Nozzle
Fitting
BG00XXX
Adjustable
Handle
BM01XXX
Back Massage Jet Assy
(Part of Jet Body)
16
Jacuzzi Whirlpool Bath© U961000F 12/04
/