JVC LT 32EX19 User manual

Category
LCD TVs
Type
User manual

This manual is also suitable for

WIDE LCD PANEL TV
INSTRUCTIONS
LT - 32EX19
LT - 32BX19
GGT0303-001A-H
Safety precautions ............................... 2
Remote control buttons and functions
... 3
Set up and connections ....................... 4
Initial settings ....................................... 6
Registering / Editing channels ............. 6
PREPARATION
Picture setting ...................................... 7
Sound setting ...................................... 9
Useful functions ................................. 10
Viewing Teletext ................................. 12
Watching Video or DVDs ................... 12
Troubleshooting ................................. 13
Technical information ......................... 14
CH/CC List ......................................... 15
Speci cation ...................................... 16
FUNCTIONS
REFERENCE
Contents
ENGLISH
This illustration shows LT-32EX19.
The illustrations of LT-32EX19 is used in this instruction manual
for explanation purpose. Your TV may not look exactly the same
as illustrated.
GGT0303-001A-H-EN.indd 1GGT0303-001A-H-EN.indd 1 3/12/09 11:14:03 AM3/12/09 11:14:03 AM
2
JVC
Follow this manual
regarding setup!
-
Connect only to a 110-240 V,
50/60Hz AC outlet.
• Make enough room for
inserting and removing
the power plug!
• Place the TV as close to
the outlet as possible!
- The main power supply
for this TV is controlled by
inserting or removing the
power plug.
• Never cut or damage the
power cord!
- If the AC plug is not the
right shape, or the power
cord is not long enough,
use an appropriate plug
adapter or extension
cable. (Consult your
retailer.)
• Unplug the power cord
when going out!
- The power buttons on the
remote control and the
TV unit cannot completely
turn off the TV. (Make
appropriate arrangements
for bedridden people.)
Thank you for buying this JVC LCD panel television.
To make sure you understand how to use your new TV, please read this manual thoroughly before you begin.
• Do not allow the TV to fall!
- Do not rest your elbows on, or allow
children to hang from the TV.
- There is a risk that the TV will fall and
cause injuries.
- Make use of the hole on the back of the
stand to prevent the TV from falling easily.
(P. 4)
For more details on installation, usage and safety Consult your retailer.
Never place anything on the TV!
- Placing liquid, naked ames, cloths, paper, etc. on the TV
may cause a re.
• Never expose to rain or moisture!
- To prevent re or electric shock, never allow liquids to enter
the unit.
• Never insert objects into the cabinet openings!
- It may cause a fatal electric shock.
- Take care when children are near.
Hold the TV so as not to scratch the screen!
- Do not touch the screen when carrying the TV.
Do not carry the TV on your own!
- In order to prevent accidents, ensure that the TV
is carried by two or more people.
When attaching the TV to the wall, use the
optional JVC wall mounting unit!
- Consult a quali ed technician.
- See the included manual on mounting
procedures.
- JVC assumes no responsibility for damage due
to improper mounting.
Never listen to headphones at high volume!
- It may damage your hearing.
Never try repair the TV yourself!
If the problem cannot be solved in “Troubleshooting”
(P. 13), unplug the power cord and contact your
retailer.
• Never dismantle the rear panel!
- It may cause an electric shock.
• Never obstruct the ventilation holes!
- It may cause overheating or a re.
• Handle LCD panel with care!
- Use a soft, dry cloth when cleaning.
If a television is not positioned in a suf ciently stable location, it can be potentially
hazardous due to falling. Many injuries, particularly to children, can be avoided by
taking simple precautions such as:
Using cabinets or stands recommended by the manufacturer of the television.
Only using furniture that can safely support the television.
Ensuring the television is not overhanging the edge of the supporting furniture.
Not placing the television on tall furniture (for example, cupboards or bookcases)
without anchoring both the furniture and the television to a suitable support.
Not standing the televisions on cloth or other materials placed between the television
and supporting furniture.
Educating children about the dangers of climbing on furniture to reach the television or
its controls.
If the TV is damaged or
behaving strangely, stop
using it at once!
Unplug the power cord and
contact your retailer.
GGT0303-001A-H-EN.indd 2GGT0303-001A-H-EN.indd 2 3/12/09 11:14:07 AM3/12/09 11:14:07 AM
3
OK
16:9 Zoom
Insert the batteries
Use two “AAA/R03” dry cell
batteries. Insert the batteries from
the · end, making sure the · and
ª polarities are correct.
“AAA/R03”
Batteries
Turn the volume off/on
Change channel/page
Channel selection
Select the desired channel number.
For Hyper Scan
PR changes without changing the
picture. Once you stop pressing
CHANNEL+ or CHANNEL - button,
picture will change to the desired PR.
Press and hold
CHANNEL
Select TV or Video input
Channel information
Turn the TV on from standby
Colour button
Turn on “Clear SD”
Turn on “Sound Meister”
Turn on “Eco Mode”
To Teletext (P. 12)
Display on-screen menu
Operate the menu
To previous screen
Adjust the volume, Turn off muting
View the Teletext (P. 12)
Change the aspect ratio (P. 8)
1. Select
2. Set
Favourite channel setting. (P. 11)
1. Register the favourite channel
2. Recall the favourite channel
If the favourite channel has not been registed
then “No Memory” will be displayed.
will be displayed.
Programmed!
Press and hold
Press
Set 1-4 ?
Favourite 1-4 ?
Press number
button (1-4 only)
Press number
button (1-4 only)
:OOM
!UTO 0ANORAMIC
2EGULAR
0ANORAMIC
:OOM
:OOM
:OOM3UBTITLE
&ULL
Move the picture with
5 or while this bar
is displayed.
V-Scroll
WARNING:
Batteries shall not be exposed
to excessive heat such as
direct sunshine, re or the like.
RETURN PLUS function
Return to the frequently viewed channel.
Choose the channel
you want to
programme
Return Plus
Programmed!
Return Plus
Canceled!
To cancel
RETURN function
If you have not set or have cancelled the RETURN PLUS
channel, this will return to the previously viewed channel.
Press and hold
RETURN +
Press and hold
RETURN +
If this symbol
is shown, it is
only valid in the
European Union.
Remote control buttons and functions
GGT0303-001A-H-EN.indd 3GGT0303-001A-H-EN.indd 3 3/12/09 11:14:09 AM3/12/09 11:14:09 AM
4
TV/VIDEO
MENU/OK
CHANNEL
VOLUME
MM MM MM
MM
MM
VIDEO-2
VIDEO-2
R
L
V
1
2
Set up and connections
Care when setting
Hole for belt
Belt
(not provided)
Screw (not provided)
Power lamp
ON : Lit (Blue)
OFF : Unlit
Power lamp lights
while the TV is on.
• “Power Lamp” (P. 11)
Remote control sensor
Switch between TV / VIDEO
devices
Display on-screen menu / set
Change channel / Page /
Hyper Scan Function (P. 3)
Volume / Adjust
Power On / Off
To Headphone (P. 5)
Power requirements
Connect the power cord only to a 110-240V, 50/60Hz AC outlet.
When attaching the TV to the wall, use the optional JVC wall
mounting unit
Consult a quali ed technician.
JVC assumes no responsibility for damage due to improper mounting.
200 mm x 200 mm mount which conforms to VESA standards.
Installation requirements
To avoid overheating, ensure the unit has ample room.
After all the connections have been made, insert the plug into an
AC outlet.
Connect an aerial and VCR / DVD Player
AERIAL
OR
VCR (DVD Player)
- If you have any problem with assembly, please contact a retailer or
a dealership.
Note: 4 screws included.
Stand Assembly
- Insert the stand into the panel at the position where the screw
holes are, and fasten the screws.
To prevent the TV from falling thread
the belt through the hole on the back of
the stand and secure it to the TV rack.
LT-32EX19
LT-32EX19
LT-32EX19
LT-32EX19
GGT0303-001A-H-EN.indd 4GGT0303-001A-H-EN.indd 4 3/12/09 11:14:11 AM3/12/09 11:14:11 AM
5
OUTPUT
VIDEO-2
VIDEO-1
PC
PC AUDIO
HDMI-1
( DVI ANALOG AUDIO )
R
L
V
R
L
R
L
V
Pr
Pb
Y
PC IN
(D-SUB)
R
L
V
J
VC
(L) (R)
VIDEO-1
R
L
V
Pr
Pb
Y
VIDEO-1
R
L
V
Pr
Pb
Y
JV
C
HDMI-1 HDMI-2 HDMI-3
DIGITAL VIDEO/AUDIO
You can connect many different devices to the rear panel of the TV.
Please read the user manuals of each device before setup.
(Connecting cables are not supplied with this TV.)
Component input
Game consoles Video camera
PC
VIDEO-1 Watching videos
Output Input
Composite signal /
Component signal
(P. 16)
Sound L / R
Use Component signal
“Video - 1 Setting” (P. 12)
VIDEO-2 Watching videos
Output Input
• Composite signal
Sound L / R
HDMI-1
HDMI-2
Connecting HDMI devices
HDMI-3
Output Input
HDMI signal (P. 16)
“HDMI Setting” (P. 12)
HDMI-2 and HDMI-3 inputs do not
support analogue sound.
Connect a “DVI” device to
“HDMI-1” (P.14)
Please use a High Speed HDMI
TM
Cable. High Speed HDMI
TM
Cables
are tested to carry an HD signal up
to 1080p and higher.
OUT
Video and sound signal of a TV
channel you are viewing outputs
from this terminal
Output
• Composite signal
Sound L / R
Composite input
Game Video
VCR
PC input line in
HDMI
TM
Connector.
DVD Player
Ampli er
VCR / DVD recoder
Headphones
DVD player
(HDMI compatible)
HD Video camera
Set up and connections (continued)
DVD player
(HDMI compatible)
To “HDMI-1” To “HDMI-3”
To “HDMI-2”
Check for PC compatibility.
“PC signals that can be displayed” (P. 14)
To Video-2
LT-32EX19
GGT0303-001A-H-EN.indd 5GGT0303-001A-H-EN.indd 5 3/12/09 11:14:12 AM3/12/09 11:14:12 AM
6
OK
Manual
Insert/Delete
ID
Move
OK
OK
O
O
K
K
OK
OK
O
O
K
K
O
O
K
K
Language
>
English
0YCCÅÃÄ
Castellano
Melayu
Français
ไทย
®ÅËAÈÌ×ÅA
Tieáng Vieät
Teletext Language
>
Group-1
Group-2
Group-3
Group-4
Group-5
Group-6
Auto Program
>
CH 09
12%
Edit
>
PR ID
01
05
07
08
10
09
06
02
CH 07
CH 76
CH 12
CH 09
CH 02
CH 03
CH/CC
CH 05
CH 02
CH 15
CH 28
04
03
Edit
>
PR ID
01
CH/CC
05
07
08
10
09
06
02
03
CH 07
CH 76
CH 02
CH 03
CH 12
CH 09
CH 05
CH 02
CH 15
CH 28
04
Edit
>
PR ID
01
05
07
08
10
09
06
02
04 A B C D E F
03 A
CH/CC
CH 07
CH 76
CH 02
CH 03
CH 12
CH 09
CH 05
CH 02
CH 15
CH 28
%DIT
02 )$








 ! " # $

%&
#(##
#(
#( 
#( 
#( 
#( 
#( 
#( 
#( 
#( 
#( 

Manual
>
PR ID
01
05
07
08
10
09
06
02
CH 07 (B/G)
CH 76
CH 12
CH 09
CH 02
CH 03
CH/CC
CH 05
CH 02
CH 15
CH 28
04
03
ABCD
BBC
EF
ABC
OK
OK
OK
Edit
>
PR ID
01
CH/CC
05
07
08
10
09
06
02
03
CH 07
CH 76
CH 02
CH 03
CH 12
CH 09
CH 05
CH 02
CH 15
CH 28
04
1
Turn on the TV
Show only when powering on
for the rst time.
The power on the unit can
also be used.
2
Select a language
3
Select the Teletext language group
See “Language group for Teletext” (P. 14)
4
Automatically register channels (Auto Program)
5
Check what was registered
1. Select
2. Set
Select
You can edit the channel list or register new channel manually.
Select a channel
1. Start
2. Move Finish
1. Select the character
2.
Move to the next column
3. Set
1. Select a
CH/CC
2.
Enter a
number 0-9
button then,
receives the
broadcast
signal.
2. Set
• Channel ne tunning
(Yellow)
/
(Blue)
If the picture or sound is unnatural for select a system.
(Red)
or
(Green)
From high
frequencies
From low
frequencies
Register a new channel
Insert / Delete a channel
Edit a channel name
Move a channel position
(Green)
(Red)
(Blue)
JVC logo appears
Delete a channel by press
(Yellow)
button.
1. Beginning channel search
“CH/CC List” (P. 15)
If you want to edit channel, read
the next column.
Initial Settings Registering / Editing channels
GGT0303-001A-H-EN.indd 6GGT0303-001A-H-EN.indd 6 3/12/09 11:14:13 AM3/12/09 11:14:13 AM
7
OK OK
O
O
K
K
1. Display “Picture” menu 2. Select item and setting or adjust
Picture
0ICTURE-ODE
3HARPNESS
#OLOUR
4INT
7HITE "ALANCE
&EATURES
"ACKLIGHT
"RIGHTNESS
#ONTRAST
0ICTURE
"RIGHT
#OOL
• To enter an items menu
MENU
Picture Mode
You can select a preset picture setting according to your favour.
Bright : Hightens contrast and sharpness.
Game Mode : Adjust sharpness of the picture when play the game.
Soft : Softens contrast and sharpness.
Standard : Standardize picture adjustment.
Backlight
You can change the backlight brightness.
Darker Brighter
Contrast
You can change the contrast of the picture.
Lower
Higher
Brightness
You can change the brightness of the picture.
Darker Brighter
Sharpness
You can change the sharpness of the picture.
Softer Sharper
Colour
You can change the colour of the picture.
Lighter Deeper
Tint
You can change tint only in NTSC.
Reddish Greenish
White Balance
You can change the white balance of the picture to better match the type of video being view.
Cool : Bluish white colour.
Warm : Reddish white colour.
Mid : Normal white colour.
1. Select
2. Enter
1. Select
3. Finish
1. Select
2. Enter
2. Adjust
Picture setting
GGT0303-001A-H-EN.indd 7GGT0303-001A-H-EN.indd 7 3/12/09 11:14:18 AM3/12/09 11:14:18 AM
8
16 : 9
4 : 3
14 : 9
Panoramic Regular/Slim 14:9 Zoom
!UTO
 :OOM
2EGULAR
 :OOM
0ANORAMIC
:OOM

0ANORAMIC
:OOM3UBTITLE
&ULL
#LEAR3$
3MART0ICTURE
$YNAMIC"ACKLIGHT
$IGITAL6.2
$IGI0URE
0ULL$OWN/FF
0ICTURE-ANAGEMENT
#OLOUR3YSTEM
:OOM
-0%'.OISE2EDUCTION
#OLOUR-ANAGEMENT
&EATUREA
/FF
/FF
/FF
/FF
/FF
/FF
/FF
/FF
When 720p or 1080i or 1080p signal is
received, “Full”, “Slim” and “Panoramic
Zoom” can be selected.
In PC mode, “Regular” and “Full” can
be selected.
Features
Finer Picture adjustment
: For clearly picture (Off / Mode-1 / Mode-2)
When Clear SD set to Mode-1 or Mode-2, then Digital VNR, DigiPure, Picture Management
and MPEG Noise Reduction cannot operate.
: Reduce the amount of noise in original picture. (Off / On)
: For natural - looking outlines (Off / On)
: For smooth cinema lm (Auto / Off / On)
: For natural - looking pictures (Off / On)
: Fix bright / dark pictures. (Off / On)
: Make it easier to view white areas (Off / On)
: Reduce the brightness of the backlight when the screen is dark (Off / On)
: Reduce MPEG video noise (Off / On)
:
When there is no colour, change the colour system. (PAL / SECAM / NTSC 3.58 / NTSC 4.43 / AUTO)
: Change the aspect ratio.
Clear SD
Digital VNR
DigiPure
Pull Down
Colour Management
Picture Management
Smart Picture
Dynamic Backlight
MPEG Noise
Reduction
Colour System
Zoom
Picture setting (continued)
GGT0303-001A-H-EN.indd 8GGT0303-001A-H-EN.indd 8 3/12/09 11:14:19 AM3/12/09 11:14:19 AM
9
OK
1. Select
2. Enter
Sound
Stereo/I
II
Sound
Sound Meister
Voice Enhancer
Al Volume
Treble
Surround
Bass
Balance
Off
Off
Off
D<
IIIMono
OK
1. Select
3. Finish
2. Adjust
Stereo/I
II
Select the broadcast sound stereo, mono or bilingual language (u: Mono / m : Stereo / I : SUB1 / II : SUB2 / Mono)
Sound Meister Ambience (Off / Dynamic / Pure / Living)
Treble Compensates high frequencies to widen the frequency band. (Weaker Stronger)
Bass Compensates low frequencies to widen the frequency band. (Weaker Stronger)
Surround Expands the stereo sound naturally. (Narrow Wide)
Balance Speaker balance (Left Stronger Right Stronger)
Voice Enhancer Sound enhancement technology (On/Off)
Al Volume
Prevent sudden increase or decrease of sound when changing channels. (On/Off)
MENU
1. Display “Sound” menu. 2. Select item and setting or adjust.
Sound setting
GGT0303-001A-H-EN.indd 9GGT0303-001A-H-EN.indd 9 3/12/09 11:14:20 AM3/12/09 11:14:20 AM
10
OK
1. Select
2. Enter
Features
Off
Off
Features
>
>
On Timer
>
Off
Off
Off
Child Lock
Auto Shutoff
Favourite Setting
Eco Mode
Sleep Timer
Blue Back
Channel Guard
Power Lamp
OK
1. Select PR
channel
2. Set
OK
1. Select “On
Timer”
OK
3. Set
OK
1. Select a time in minutes
2. Set
OK
1. Select a
number
OK
1. Select a
channel
Features
>
>
PR 02
On Timer 00 : 00
On Timer
>
>
>
9
1
7
2
3
4
5
6
8
0
Sleep Timer
>
Off
0
120
>
>
Set ID No.
>
0 0 0 0
PR ID CH/CC
01
05
07
08
10
09
06
02
CH 07
CH 76
CH 12
CH 02
CH 03
CH 09
CH 05
CH 02
CH 15
CH 28
04
03
Channel Guard
>>
ABCD
BBC
EF
ABC
2. Select item
2. To the next
column
3. Enter
(Blue)
Lock / Release
0
OK
• To enter an items menu
1. Select
2. Enter
OK
1. Select
3. Finish
2. Adjust
MENU
1. Display “Features” menu.
2. Select item and setting or adjust.
1. Select PR channel that you want to watch. 2. Set the On time to your desired period at time.
1. Select “Channel Guard”
Note : Press
(Blue)
for reset time setting.
• View a locked channel by use the numerical buttons to enter the channel number. When appears, press “DISPLAY”
button and enter your “ID No.”
2. Select a channel and lock it ( : locked )
Note : When the remaining elapse is one minute,
“Good Night!” appears on the screen.
Useful functions
On Timer
TV to turn on
automatically from
standby mode at
a set channel and
time.
Sleep Timer
TV to turn off
automatically to
standby mode after
a set time.
Channel Guard
Stop children from
watching speci c
channels.
GGT0303-001A-H-EN.indd 10GGT0303-001A-H-EN.indd 10 3/12/09 11:14:21 AM3/12/09 11:14:21 AM
11
Favourite Setting
>
1
2
4
3
PR 01
PR 03
PR 02
Favourite Setting
>
1
2
4
3
PR 01
PR 02
6IDEO3ETTING 6IDEO
!PPEARANCE 3IZE
4ELETEXT,ANGUAGE
($-)3ETTING
0#3ETTING
%DIT-ANUAL
,ANGUAGE
!UTO0ROGRAM
3ET5P
OK
1. Select
OK
1. Select
2. Enter
OK
1. Select
2. Adjust to
Size-1 / Size-2
MENU
(Blue)
To delete
Set Up
Useful functions (continued)
Blue Back Display a blue screen and mute the sound when the signal is weak or absent. (On / Off)
Child Lock Disables the side control buttons of the TV. (On / Off)
Auto Shutoff Set the power to turn off if no signal is received and no operation is performed for about 15 minute. (On / Off)
Favourite Setting
Delete the favourite channel that you registered.
Power Lamp Power lamp lights while the TV is on. (On / Off) (P. 4)
Eco Mode Adjust contrast of light and dark according to the brightness of your room. (Off / Eco-1 / Eco-2)
Appearance
Change the on-screen
menu size.
1. Display “Set Up” menu.
• Change the on screen menu size.
2. Select “Appearance”
GGT0303-001A-H-EN.indd 11GGT0303-001A-H-EN.indd 11 3/12/09 11:14:24 AM3/12/09 11:14:24 AM
12
Viewing Teletext Watching Video or DVDs
You can watch the Teletext broadcast channel with Text Functions.
1.
TV mode <--> TEXT mode
2. Select a Teletext page by press number button (0-9)
• Move up or down a page by
CHANNEL
MENU
Set Up
TV/VIDEO
OK
1. Select
2. Set
OK
1. Select
2. Enter
OK
1. Select item
3. Set
2. Setting or Adjust
!UTO0ROGRAM
3ET5P
!PPEARANCE 3IZE
%DIT-ANUAL
6IDEO3ETTING 6IDEO
,ANGUAGE
4ELETEXT,ANGUAGE
($-)3ETTING
0#3ETTING
PC Position
Phase
Pixel
PC Setting
>
>
!63ELECT
!6
6IDEO
6IDEO
($-)
($-)
($-)
0#
OK OK
1. Select PC Position
2. Enter
1. Adjust
2. Set
List Mode
Hold
Reveal
Size
Index
Cancel
Sub-page
Select the input Source.
• Operate the connected device and play video.
1. Select “Set Up”
2. Select item
Bookmark your favourite page.
MODE
to bookmark
Press number button for
enter the number of page
(Red) (Green) (Yellow) (Blue)
Save
Hold the current page.
• Cancel by press this button again.
Display hidden information.
• Example : answer to a quiz, etc.
Double the size of the displayed text.
Returns to page “100” or a previously
designated page.
Leave the current page open, while you switch
to watch TV.
• Useful when running a page search.
Display the number of Sub-page.
• Cancel by press this button again.
• Recall your favourite page by press the colour button.
PC Position : Adjust screen position.
Phase : Sets the focus of screen.
Pixel : Adjusts the horizontal feature of screen.
Note: TV/VIDEO
button select the
video source by
move down or
use button 0-6 for
selection.
($-)3ETTING
($-)
3IZE
!UDIO
$IGITAL

!UTO
-ODE
($-)
3IZE
!UTO
-ODE
($-)
3IZE
!UTO
-ODE
Video - 1 Setting
HDMI Setting
PC Setting
Switch between video and component signal
(Video / Component)
Setting for HDMI input
Size : Normally set to “Auto.” If wrong screen size
appears in 480p (525p), change to “1” or “2”
Audio : Normally set to “Auto.” If no sound, change to
“Analogue” or “Digital.”
Mode : If no picture, change to “1” or “2”.
Setting for PC input
GGT0303-001A-H-EN.indd 12GGT0303-001A-H-EN.indd 12 3/12/09 11:14:26 AM3/12/09 11:14:26 AM
13
Severe noise or snow Page
Check the aerial cable and TV connections . P. 4
Check the direction of the aerial. P. 4
Check the aerial or its cable damaged or not. --
Patterns, stripes or noise
Interference caused by devices such as an ampli er, personal computer,
or a hair drier, Move it away from TV.
--
Ghosting ( Doubling of images )
Interference occurs caused by signal re ection from mountains or
building. Try to adjust the aerial’s direction or use another antenna.
--
Cannot turn it on
Ensure the power cord is connected to the AC outlet correctly. --
Cannot operate the remote control.
The batteries may be exhausted. Replace with new batteries.
Ensure that you are operation the remote control at less than 7 meters
from the front of your TV.
--
Remote control stops working
Unplug TV, several minutes later plug it in again. --
Side control buttons do not work
Switch “Child Lock” to “Off”. P. 11
Aspect ratio changed unintentionally
Press “
ZOOM
” button to return to your settings.
P. 8
PC screen alignment is off
Adjust the “PC Position” in “PC Setting” of Set Up menu. P. 12
Blue screen appears on the screen
Switch “Blue Back” to “Off”. P. 11
Strange picture when using an external device
If the top of the image is distorted, check the video signal quality itself.
If movement appears unnatural when receiving a signal from a DVD
player, etc. with 625p (progressive-scanning), change the output setting
of the external device to 625i (interlace-scanning)
--
--
Poor picture quality Page
Unnatural colour >> Adjust “Colour” and “Backlight” P. 7
Check “Colour System”. If “Auto” is selected P. 8
select the speci c colour system manually.
Noise >> Set to the following functions.
Picture Mode : Standard P. 7
DigiPure : On P. 8
Dull picture >> Set to the following functions.
Picture Mode : Bright P. 7
DigiPure : On P. 8
Poor sound
Adjust the “Bass” and “Treble”. P. 9
If receiving a poor signal in “Stereo/I
II” switch to “Mono”.
P. 9
Adjust the channel reception using “Manual”. P. 6
For HDMI signal, wrong screen size in 480p (525p).
Switch “Size” in “HDMI Setting” to “1” or “2”. P. 12
For HDMI signal, green and distorted screen
Wait a little for the signal to stabilize when switching the signal format
for an “HDMI” device.
--
For HDMI signal, No picture / No sound
Use the cable marked with HDMI logo. P. 5
Check if the device is compliant with HDMI. P. 12
Switch “Audio” in “HDMI Setting” to “Digital” or “Auto” for HDMI devices,
or “Analogue” or “Auto” for DVI devices.
Some functions do not work.
It is not a malfunction. Some functions (dark background) in the menu
do not work depending on the situation.
--
Black or white dots appear on the screen.
LCD panels use ne dots (“pixels”) to display images. While more than
99.99% of these pixels function properly, a very small number of pixels
may not light, or may light all the time. It is not a malfunction.
--
No picture, No sound
Some input do not output from OUT terminal. --
Troubleshooting
If a problem occurs when you are using the TV, check the below troubleshooting guide before calling for repair.
GGT0303-001A-H-EN.indd 13GGT0303-001A-H-EN.indd 13 3/12/09 11:14:30 AM3/12/09 11:14:30 AM
14
No use "Clear SD" Use "Clear SD"
Technical information
Language group for Teletext PC Signals that can be displayed
Sound and Colour system in your country or region
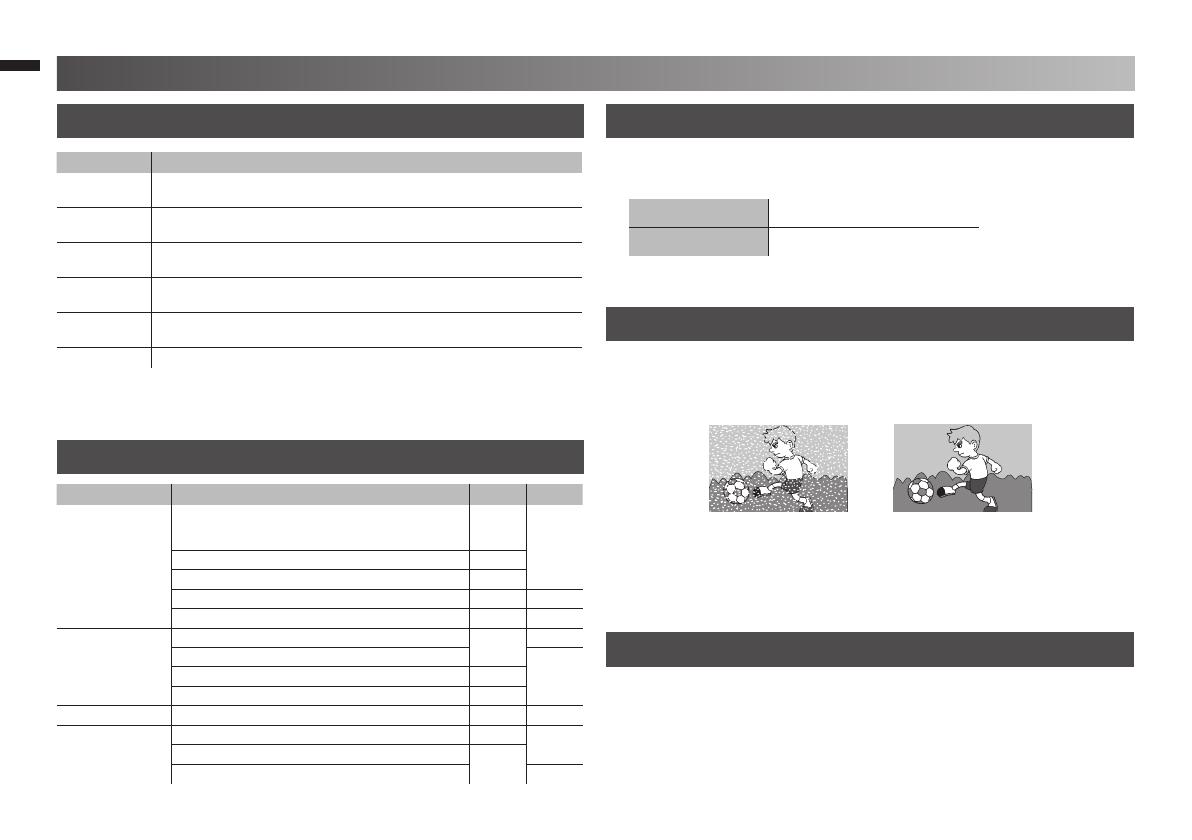
What is “Clear SD”
Connect “DVI” devices
LCD picture is unstable due to a large number of signal noise. Such noise
appears extensively especially when an LCD displays SD signals. Clear
SD mode resolves disadvantage for better picture quality.
If the signal doesn’t appear, check that the vertical frequency on the
PC is set to “60Hz”.
Resolution 640 x 480(VGA) / 1024 x 768(XGA)
Vertical frequency (Hz) 60.0
Connect a “DVI” device to “HDMI” using “DVI-HDMI” conversion cable.
Connect analogue sound output of the DVI device to L and R terminals in
HDMI-1.
Set “Audio” in “HDMI Setting” to “Analogue” or “Auto” (P. 12)
HDMI-2 and HDMI-3 input does not support analogue sound (IN HDMI-1).
HDMI-2 and HDMI-3 input does not support DVI devices.
Group Languages
Group-1 Turkish, Hungarian, English, German, French, Italian, Spanish, Portuguese,
Greek, Swedish, Finnish
Group-2 Polish, Serbian, Croatian, Slovenian, Czech, Slovak, Rumanian, Hungarian,
German, French, Italian, Swedish, Finnish
Group-3 Russian, Bulgarian, Lettish, Lithuanian, Estonian, Ukrainian, Serbian, Croatian,
Slovenian, Czech, Slovak, English, German
Group-4 Arabic, Czech, Slovak, Hungarian, English, German, French, Italian, Spanish,
Portuguese, Swedish, Finnish
Group-5 Farsi, Czech, Slovak, Hungarian, English, German, French, Italian, Spanish,
Portuguese, Swedish, Finnish
Group-6 Lettish, Lithuanian, Estonian, Ukrainian, Czech, Slovak, English, German
• If the characters are unreadable. Select different Teletext language
group. (P. 6)
Area Country or Region System System
Asia, Middle East
Bahrain, Kuwait, Oman, Qatar, United Arab Emirates,
Yemen, Indonesia, Malaysia, Singapore,
Thailand, India, etc.
B/G
PAL
China, Vietnam, etc. D/K
Hong Kong, etc. I
Islamic Republic of Iran, Lebanon, Saudi Arabia, etc. B/G SECAM
Philippines, Taiwan, Myanmar, etc. M NTSC
Europe
Russia, etc.
D/K
SECAM
Czech Republic, Poland, etc.
PALGermany, Holland, Belgium, etc. B/G
UK, etc. I
Oceania Australia, New Zealand, etc. B/G PAL
Africa
Republic of South Africa, etc. I
PAL
Nigeria, etc.
B/G
Egypt, Morocco, etc. SECAM
GGT0303-001A-H-EN.indd 14GGT0303-001A-H-EN.indd 14 3/12/09 11:14:30 AM3/12/09 11:14:30 AM
15
CH / CC List
To use the Insert function (P. 6), nd the “CH/CC” number corresponding to the TV’s channel number from this table.
US: The US channel numbers are the channel numbers used in the United States, Philippines, etc.
CCIR: The CCIR channel numbers are the channel numbers used in the Middle East, Southeast Asia, etc.
OIRT: The OIRT channel numbers are the channel numbers used in Eastern Europe, Russia, Vietnam, etc.
AUSTRALIA: The AUSTRALIA channel numbers are the channel numbers used in Australia, etc.
CC 24 K S-24
CC 25 L S-25
CC 26 M S-26
CC 27 N S-27
CC 28 O S-28
CC 29 P S-29
CC 30 Q S-30
CC 31 R S-31
CC 32 S S-32
CC 33 T S-33
CC 34 U S-34
CC 35 V S-35
CC 36 W S-36
CC 37 W+1 S-37
CC 38 W+2 S-38
CC 39 W+3 S-39
CC 40 W+4 S-40
CC 41 W+5 S-41
CC 42 W+6
CC 43 W+7
CC 44 W+8
CC 45 W+9
CC 46 W+10
CC 47 W+11
CC 48 W+12
CC 49 W+13
CC 50 W+14
CC 51 W+15
CC 52 W+16
CC 53 W+17
CC 54 W+18
CC 55 W+19
CC 56 W+20
CC 57 W+21
CC 58 W+22
CC 59 W+23
CC 60 W+24
CC 61 W+25
CC 62 W+26
CC 63 W+27
CC 64 W+28
CC 75 X
CC 76 Y R3
CC 77 Z R4 AU-3
CC 78 Z+1 R5
CC 79 Z+2 AU-4
CC 95 A-5
CC 96 A-4
CC 97 A-3
CC 98 A-2
CC 99 A-1
CH 48 US-48, W+63 E48
CH 49 US-49, W+64 E49
CH 50 US-50, W+65 E50
CH 51 US-51, W+66 E51
CH 52 US-52, W+67 E52
CH 53 US-53, W+68 E53
CH 54 US-54, W+69 E54
CH 55 US-55, W+70 E55
CH 56 US-56, W+71 E56
CH 57 US-57, W+72 E57
CH 58 US-58, W+73 E58
CH 59 US-59, W+74 E59
CH 60 US-60, W+75 E60
CH 61 US-61, W+76 E61
CH 62 US-62, W+77 E62
CH 63 US-63, W+78 E63
CH 64 US-64, W+79 E64
CH 65 US-65, W+80 E65
CH 66 US-66, W+81 E66
CH 67 US-67, W+82 E67
CH 68 US-68, W+83 E68
CH 69 US-69, W+84 E69
CC
Channel
US CCIR OIRT AUSTRALIA
CC 01 S-1 AU-5
CC 02 S-2
CC 03 S-3
CC 04 S-4
CC 05 S-5
CC 06 S-6 AU-5A
CC 07 S-7
CC 08 S-8
CC 09 S-9
CC 10 S-10
CC 11 S-11
CC 12 S-12
CC 13 S-13
CC 14 A S-14
CC 15 B S-15
CC 16 C S-16
CC 17 D S-17
CC 18 E S-18
CC 19 F S-19
CC 20 G S-20
CC 21 H S-21
CC 22 I S-22
CC 23 J S-23
CH
Channel
US CCIR OIRT AUSTRALIA
CH 02 US-02 E2 R1 AU-0
CH 03 US-03 E3 AU-1
CH 04 US-04 E4 R2 AU-2
CH 05 US-05 E5 R6 AU-6
CH 06 US-06 E6 R7 AU-7
CH 07 US-07 E7 R8 AU-8
CH 08 US-08 E8 R9 AU-9
CH 09 US-09 E9
CH 10 US-10 E10 R10 AU-10
CH 11 US-11 E11 R11 AU-11
CH 12 US-12 E12 R12
CH 13 US-13
CH 14 US-14, W+29
CH 15 US-15, W+30
CH 16 US-16, W+31
CH 17 US-17, W+32
CH 18 US-18, W+33
CH 19 US-19, W+34
CH 20 US-20, W+35
CH 21 US-21, W+36 E21
CH 22 US-22, W+37 E22
CH 23 US-23, W+38 E23
CH 24 US-24, W+39 E24
CH 25 US-25, W+40 E25
CH 26 US-26, W+41 E26
CH 27 US-27, W+42 E27
CH 28 US-28, W+43 E28
CH 29 US-29, W+44 E29
CH 30 US-30, W+45 E30
CH 31 US-31, W+46 E31
CH 32 US-32, W+47 E32
CH 33 US-33, W+48 E33
CH 34 US-34, W+49 E34
CH 35 US-35, W+50 E35
CH 36 US-36, W+51 E36
CH 37 US-37, W+52 E37
CH 38 US-38, W+53 E38
CH 39 US-39, W+54 E39
CH 40 US-40, W+55 E40
CH 41 US-41, W+56 E41
CH 42 US-42, W+57 E42
CH 43 US-43, W+58 E43
CH 44 US-44, W+59 E44
CH 45 US-45, W+60 E45
CH 46 US-46, W+61 E46
CH 47 US-47, W+62 E47
GGT0303-001A-H-EN.indd 15GGT0303-001A-H-EN.indd 15 3/12/09 11:14:31 AM3/12/09 11:14:31 AM
© 2009 Victor Company of Japan, Limited 0309NWT-NF-MT
Speci cation
Main unit Terminals / Connectors
Terminal name Terminal type Signal type (IN) Signal type (OUT)
Input
terminals
VIDEO-1
RCA connectors x 6
Composite video, Analogue
component 576i (625i) / 480i
(525i),
Progressive : 576p (625p) /
480p (525p),
HD : 1080i (1125i), 720p
(750p) / 1080p (1125p)
Audio L / R
VIDEO-2
RCA connectors x 3
Composite video, Audio L / R
HDMI-1
HDMI connector x 1
HDMI
576i (625i) / 480i (525i)
/ 576p (625p) / 480p (525p),
720p (750p) / 1080p (1125p) /
1080i (1125i)
HDMI-2
HDMI-3
IN HDMI -1
RCA connectors x 2
Audio L/R
PC INPUT
D-SUB (15 pins) x 1
Analogue PC signal
PC AUDIO
PC-IN (3.5 pinjack) x 1
Audio
Output
terminals
MONITOR OUT
RCA connectors x 3
Composite video,
Audio L / R
Headphone
Stereo mini-jack x 1
(3.5 mm in diameter)
Headphone
output
• We may change the design and speci cations without notice.
• HDMI, the HDMI Logo and High-De nition Multimedia Interface are
trademarks or registered trademarks of HDMI Licensing LLC.
Model LT-32EX19 LT-32BX19
Broadcasting systems B / G / I / D / K / M
Colour systems PAL, SECAM, NTSC 3.58 / NTSC 4.43 MHz
Channels and frequencies VHF low channel (VL) = 46.25 to 140.25 MHz
VHF high channel (VL) = 147.25 to 423.25 MHz
UHF channel (U) = 431.25 to 863.25 MHz
Receives cable channels in mid band (X to Z+2, S1 to S10),
super band (S11 to S20) and hyper band (S21 to S41).
Sound-multiplex systems NICAM (I / B / G / D / K), A2 (B / G / D / K)
Teletext systems FLOF (Fastext), WST (World System Teletext)
Power requirements AC 110 V - 240 V, 50/60Hz
Audio output
(Rated power output)
6 W + 6 W 6 W + 6 W
Speakers (4 cm x 16 cm) x 2 (4 cm x 16 cm) x 2
Power consumption
[standby]
131 W
[1.8 W]
107 W
[1.8 W]
Screen size
(visible area size measured
diagonally
80 cm 80 cm
Dimensions
(W x H x D: mm
[without stand]
791 x 571.7 x 230.5
[791 x 520.5 x 103.9]
869 x 548 x 230.5
[869 x 496.4 x 103.9]
Weights
[without stand]
12.5 kg
[11.5 kg]
12.5 kg
[11.5 kg]
Accessories Remote control unit : RW-C2020 x 1
AAA/RO3 dry cell battery x 2
Screw x 4
GGT0303-001A-H-EN.indd 16GGT0303-001A-H-EN.indd 16 3/12/09 11:14:32 AM3/12/09 11:14:32 AM
  • Page 1 1
  • Page 2 2
  • Page 3 3
  • Page 4 4
  • Page 5 5
  • Page 6 6
  • Page 7 7
  • Page 8 8
  • Page 9 9
  • Page 10 10
  • Page 11 11
  • Page 12 12
  • Page 13 13
  • Page 14 14
  • Page 15 15
  • Page 16 16

JVC LT 32EX19 User manual

Category
LCD TVs
Type
User manual
This manual is also suitable for

Ask a question and I''ll find the answer in the document

Finding information in a document is now easier with AI