ViewSonic PJ1158 User manual
- Category
- Data projectors
- Type
- User manual
This manual is also suitable for

PJ1158
LCD Projector
ViewSonic
®
Model No. : VS11459
- User Guide
- Guide de l’utilisateur
- Bedienungsanleitung
- Guía del usuario
- Guida dell’utente
- Guia do usuário
- Användarhandbok
- Käyttöopas
-Руководствопользователя
-
使用手冊
-
使用手冊

iViewSonic PJ1158
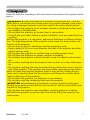
Compliance Information
For U.S.A.
This device complies with part 15 of FCC Rules. Operation is subject to the following two
conditions: (1) this device may not cause harmful interference, and (2) this device must accept any
interference received, including interference that may cause undesired operation.This equipment
has been tested and found to comply with the limits for a Class B digital device, pursuant to part
15 of the FCC Rules. These limits are designed to provide reasonable protection against harmful
interference in a residential installation. This equipment generates, uses, and can radiate radio
frequency energy, and if not installed and used in accordance with the instructions, may cause
harmful interference to radio communications. However, there is no guarantee that interference
will not occur in a particular installation. If this equipment does cause harmful interference to radio
or television reception, which can be determined by turning the equipment off and on, the user is
encouraged to try to correct the interference by one or more of the following measures:
• Reorient or relocate the receiving antenna.
• Increase the separation between the equipment and receiver.
• Connect the equipment into an outlet on a circuit different from that to which the receiver is
connected.
• Consult the dealer or an experienced radio/TV technician for help.
Warning: You are cautioned that changes or modifications not expressly approved by the party
responsible for compliance could void your authority to operate the equipment.
For Canada
• This Class B digital apparatus complies with Canadian ICES-003.
• Cet appareil numérique de la classe B est conforme
à la norme NMB-003 du Canada.
CE Conformity for European Countries
The device complies with the requirements of the EEC directive 89/336/EEC as
amended by 92/31/EEC and 93/68/EEC Art.5 with regard to “Electromagnetic
compatibility”, and 73/23/EEC as amended by 93/68/EEC Art.13 with regard to
“Safety.”
Following information is only for EU-member states:
The mark shown to the right is in compliance with the Waste Electrical and Electronic
Equipment Directive 2002/96/EC (WEEE).
The mark indicates the requirement NOT to dispose the equipment as unsorted
municipal waste, but use the return and collection systems according to local law.

iiViewSonic PJ1158
Important Safety Instructions
1. Read these instructions completely before using the equipment.
2. Keep these instructions in a safe place.
3. Heed all warnings.
4. Follow all instructions.
5. Donotusethisequipmentnearwater.Warning:Toreducetheriskofreorelectricshock,do
not expose this apparatus to rain or moisture.
6. Clean with a soft, dry cloth. If further cleaning is required, see “Cleaning the Display” in this
guide for further instructions.
7. Do not block any ventilation openings. Install the equipment in accordance with the
manufacturer’s instructions.
8. Do not install near any heat sources such as radiators, heat registers, stoves, or other devices
(includingampliers)thatproduceheat.
9. Do not attempt to circumvent the safety provisions of the polarized or grounding-type plug.
A polarized plug has two blades with one wider than the other. A grounding type plug has two
blades and a third grounding prong. The wide blade and the third prong are provided for your
safety. If the plug does not fit into your outlet, consult an electrician for replacement of the
outlet.
10. Protect the power cord from being tread upon or pinched, particularly at the plug, and the
point where if emerges from the equipment. Be sure that the power outlet is located near the
equipment so that it is easily accessible.
11. Onlyuseattachments/accessoriesspeciedbythemanufacturer.
12.
Use only with the cart, stand, tripod, bracket, or table specified by the
manufacturer, or sold with the equipment. When a cart is used, use caution when
moving the cart/equipment combination to avoid injury from tipping over.
13.
Unplug this equipment when it will be unused for long periods of time.
14. Referallservicingtoqualiedservicepersonnel.Serviceisrequiredwhentheunithasbeen
damaged in any way, such as: if the power-supply cord or plug is damaged, if liquid is spilled
onto or objects fall into the unit, if the unit is exposed to rain or moisture, or if the unit does not
operate normally or has been dropped.

iiiViewSonic PJ1158
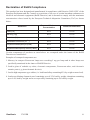
Declaration of RoHS Compliance
This product has been designed and manufactured in compliance with Directive 2002/95/EC of the
European Parliament and the Council on restriction of the use of certain hazardous substances in
electrical and electronic equipment (RoHS Directive) and is deemed to comply with the maximum
concentration values issued by the European Technical Adaptation Committee (TAC) as shown
below:
Substance
Proposed Maximum
Concentration
Actual Concentration
Lead (Pb)
0.1% < 0.1%
Mercury (Hg)
0.1% < 0.1%
Cadmium (Cd)
0.01% < 0.01%
Hexavalent Chromium (Cr
6+
) 0.1% < 0.1%
Polybrominated biphenyls (PBB)
0.1% < 0.1%
Polybrominated diphenyl ethers (PBDE)
0.1% < 0.1%
Certain components of products as stated above are exempted under the Annex of the RoHS
Directives as noted below:
Examples of exempted components are:
1. Mercury in compact fluorescent lamps not exceeding 5 mg per lamp and in other lamps not
specicallymentionedintheAnnexofRoHSDirective.
2. Lead in glass of cathode ray tubes, electronic components, fluorescent tubes, and electronic
ceramic parts (e.g. piezoelectronic devices).
3.
Lead in high temperature type solders (i.e. lead-based alloys containing 85% by weight or more lead).
4. Lead as an allotting element in steel containing up to 0.35% lead by weight, aluminium containing
up to 0.4% lead by weight and as a cooper alloy containing up to 4% lead by weight.

ivViewSonic PJ1158
Copyright Information
Copyright © ViewSonic
®
Corporation, 2006. All rights reserved.
Macintosh and Power Macintosh are registered trademarks of Apple Computer, Inc.
Microsoft, Windows, Windows NT, and the Windows logo are registered trademarks of Microsoft
Corporation in the United States and other countries.
ViewSonic, the three birds’ logo, OnView, ViewMatch, and ViewMeter are registered trademarks of
ViewSonic Corporation.
VESA is a registered trademark of the Video Electronics Standards Association. DPMS and DDC
are trademarks of VESA.
PS/2, VGA and XGA are registered trademarks of International Business Machines Corporation.
Disclaimer:ViewSonic Corporation shall not be liable for technical or editorial errors or omissions
contained herein; nor for incidental or consequential damages resulting from furnishing this material,
or the performance or use of this product.
In the interest of continuing product improvement, ViewSonic Corporation reserves the right to
change product specifications without notice. Information in this document may change without
notice.
No part of this document may be copied, reproduced, or transmitted by any means, for any purpose
without prior written permission from ViewSonic Corporation.
Product Registration
To meet your future needs, and to receive any additional product information as it becomes
available, please register your product on the Internet at: www.viewsonic.com. The ViewSonic
®
Wizard CD-ROM also provides an opportunity for you to print the registration form, which you may
mail or fax to ViewSonic.
For Your Records
Product Name:
Model Number:
Document Number:
Serial Number:
Purchase Date:
PJ1158
ViewSonic LCD Projector
VS11459
PJ1158-1_UG_ENG Rev. 1B 09-07-06
PersonalIdenticationNumber(PIN):
The lamp in this product contains mercury.
Please dispose of in accordance with local, state or federal laws.

Projector
PJ1158
User's Manual – Operating Guide
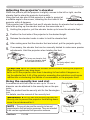
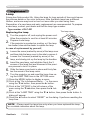
Contents of package
(1) Projector
(2) Remote control
with two AA batteries
(3) Power cord
(4) RGB cable
(5) Audio/Video cable
(6) Quick Start Guide
and ViewSonic Wizard CD
(7) Lens cover, Rivet and Strap
NOTE • Keep the original packing materials for future reshipment. For moving the
projector, be sure to use the original packing materials. Use special caution for the lens
part.
WARNING ►Before using this product, please read the "User's Manual -
Safety Guide" and related manuals to ensure the proper use of this product.
After reading them, store them in a safe place for future reference.
About this manual
Various symbols are used in this manual. The meanings of these symbols are described
below.
WARNING This symbol indicates information that, if ignored, could possibly result in
personal injury or even death due to incorrect handling.
CAUTION This symbol indicates information that, if ignored, could possibly result in
personal injury or physical damage due to incorrect handling.
Please refer to the pages written following this symbol.
NOTE • The information in this manual is subject to change without notice.
• The manufacturer assumes no responsibility for any errors that may appear in this manual.
• The reproduction, transfer or copy of all or any part of this document is not permitted
without express written consent.
Trademark acknowledgment
• Mac is registered trademarks of Apple Computer, Inc.
• VESA and SVGA are trademarks of the Video Electronics Standard Association.
• Windows is a registered trademark of Microsoft Corporation.
•
is a trademark of SRS Labs, Inc.
• WOW technology is incorporated under license from SRS Labs, Inc.
• Netscape is a registered trademark of Netscape Communications Corporation.
• JavaScript is a registered trademark of Sun Microsystems, Inc.
All other trademarks are the properties of their respective owners.
HOME
PAGE UP
PAGE DOWN
END
VIDEO
RGB
SEARCH
FREEZE
OFF
ON
MAGNIFY
ASPECT AUTO
BLANK
MUTE
VOLUME
KEYSTONE
POSITION
ESC
ENTER
MENU
RESET
(1) (2) (3)
(7)
(4)
(6)(5)
1ViewSonic PJ1158

About this manual . . . . . . . . . . . . . . . 1
Content . . . . . . . . . . . . . . . . . . . . . . . 2
Projector features . . . . . . . . . . . . . . . 3
Preparations . . . . . . . . . . . . . . . . . . . 3
Contents of package
. . . . . . . . . . . . . . . . . . 3
Fastening the lens cover
. . . . . . . . . . . . . . . 3
Part names . . . . . . . . . . . . . . . . . . . . 4
Projector . . . . . . . . . . . . . . . . . . . . . . . . . . . 4
Control panel
. . . . . . . . . . . . . . . . . . . . . . . . 5
Rear panel. . . . . . . . . . . . . . . . . . . . . . . . . .
5
Remote control
. . . . . . . . . . . . . . . . . . . . . . 6
Setting up . . . . . . . . . . . . . . . . . . . . . 7
Arrangement . . . . . . . . . . . . . . . . . . . . . . . . 8
Adjusting the projector's elevator . . . . . . . . 9
Using the security bar and slot
. . . . . . . . . . 9
Connecting your devices
. . . . . . . . . . . . . . 10
Connecting power supply
. . . . . . . . . . . . . 12
Remote control . . . . . . . . . . . . . . . . 13
Laser pointer
. . . . . . . . . . . . . . . . . . . . . . . 13
Putting batteries
. . . . . . . . . . . . . . . . . . . . 13
About the remote control signal
. . . . . . . . 14
Changing the frequency of remote
control signal
. . . . . . . . . . . . . . . . . . . . . 14
Using as a wired remote control
. . . . . . . . 15
Using as a
simple PC mouse & keyboard
. . . . . . . . 15
Power on/off . . . . . . . . . . . . . . . . . . 16
Turning on the power
. . . . . . . . . . . . . . . . 16
Turning off the power
. . . . . . . . . . . . . . . . 16
Operating . . . . . . . . . . . . . . . . . . . . 17
Adjusting the volume
. . . . . . . . . . . . . . . . . 17
Temporarily muting the sound
. . . . . . . . . . 17
Selecting an input signal
. . . . . . . . . . . . . . 17
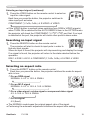
Searching an input signal
. . . . . . . . . . . . . 18
Selecting an aspect ratio
. . . . . . . . . . . . . . 18
Adjusting the zoom and focus
. . . . . . . . . . 19
Adjusting the lens shift
. . . . . . . . . . . . . . . 19
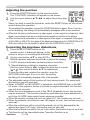
Using the automatic adjustment feature
. . 19
Adjusting the position
. . . . . . . . . . . . . . . . 20
Correcting the keystone distortions
. . . . . . 20
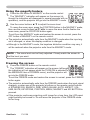
Using the magnify feature
. . . . . . . . . . . . . 21
Freezing the screen
. . . . . . . . . . . . . . . . . 21
Temporarily blanking the screen
. . . . . . . . 22
Using the menu function
. . . . . . . . . . . . . 23
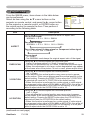
EASY MENU. . . . . . . . . . . . . . . . . . . 24
Aspect, Auto keystone execute, Keystone
, Keystone , Picture mode, Brightness,
Contrast, Color, Tint, Sharpness, Whisper,
Mirror, Reset, Filter time,
(EASY MENU continued)
Language, Go to Advanced Menu...
Content
Content
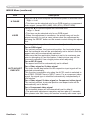
PICTURE menu . . . . . . . . . . . . . . . . 26
Brightness, Contrast, Gamma, Color temp,
Color, Tint, Sharpness, Active iris, My memory
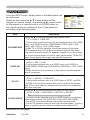
IMAGE menu . . . . . . . . . . . . . . . . . . 29
Aspect, Over scan, V position, H position,
H phase, H size, Auto adjust execute
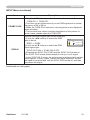
INPUT menu . . . . . . . . . . . . . . . . . . 31
Progressive, Video nr, 3d-ycs, Color space,
Component, Video format, M1-d, Frame lock,
Rgb in, Resolution
SETUP menu . . . . . . . . . . . . . . . . . . 35
Auto keystone execute, Keystone ,
Keystone , Whisper, Mirror
AUDIO menu . . . . . . . . . . . . . . . . . . 37
Volume, Treble, Bass, Srs wow, Speaker, Audio
SCREEN menu . . . . . . . . . . . . . . . . . 38
Language, Menu position, Blank, Start up,
MyScreen, MyScreen Lock, M
essage, Source
name
OPTION menu . . . . . . . . . . . . . . . . . 42
Auto search, Auto keystone , Auto on, Auto
off, Lamp time, Filter time, My button, Service,
Security
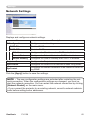
NETWORK menu . . . . . . . . . . . . . . . 53
Dhcp, Ip address, Subnet mask, Default
gateway, Time difference, Date and time, e-shot,
Information, Service
Network functions . . . . . . . . . . . . . 56
Settings . . . . . . . . . . . . . . . . . . . . . . 60
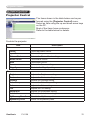
Projector Control . . . . . . . . . . . . . . 76
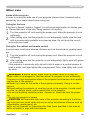
Failure & Warning Alerts via E-mail 80
Projector Management via SNMP . . 82
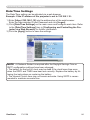
Controlling the Projector via
Scheduling . . . . . . . . . . . . . . . . . . 83
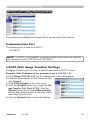
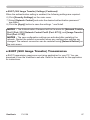
e-SHOT(Still Image Transfer) Display
. . . . . . . . . . . . . . . . . . . . . . . . . . . .
86
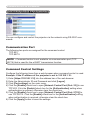
Command Control via the Network 88
Maintenance . . . . . . . . . . . . . . . . . . 93
Lamp . . . . . . . . . . . . . . . . . . . . . . . . . . . . . 93
Air lter . . . . . . . . . . . . . . . . . . . . . . . . . . . 95
Internal clock battery
. . . . . . . . . . . . . . . . . 97
Other care
. . . . . . . . . . . . . . . . . . . . . . . . . 98
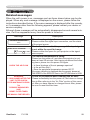
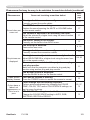
Troubleshooting . . . . . . . . . . . . . . . 99
Related messages
. . . . . . . . . . . . . . . . . . 99
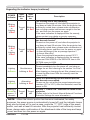
Regarding the indicator lamps
. . . . . . . . 100
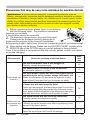
Phenomena that may be easy
to be mistaken for machine defects
. . . 102
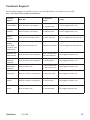
Warranty and after-service . . . . . . 105
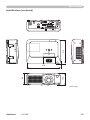
Specications . . . . . . . . . . . . . . . . 105
2ViewSonic PJ1158

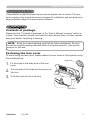
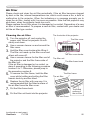
Fastening the lens cover
To avoid losing the lens cover, please fasten the lens cover to the projector using
the included strap.
1.
Fix the strap to the strap hole of the lens
cover.
2.
Put one side of the strap into the groove on
the rivet.
3.
Push the rivet into the rivet hole.
Projector features / Preparations
Projector features
This projector is used to project various picture signals onto a screen. This pro-
jector requires only a minimal amount of space for installation and can produce a
large projected image from even a short distance.
Preparations
Contents of package
Please see the “Contents of package” in the “User’s Manual (concise)” which is
a book. Your projector should come with the items shown there. Contact immedi
-
ately your dealer if anything is missing.
NOTE • Keep the original packing materials for future reshipment. Be sure
to use the original packing materials when moving the projector. Use special
caution for the lens.
Strap hole
Rivet hole
Bottom
3ViewSonic PJ1158

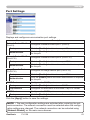
Part names
Part names
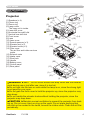
Projector
(1) Speakers (x 4).
(2) Focus ring
(3) Zoom ring
(4) Lamp cover
The lamp unit is inside.
(5) Lens shift cover
(6) Horizontal lens shift dial
(7) Vertical lens shift dial
(8) Front cover
(9) Lens
(10) Lens cover
(11) Remote sensors (x 3)
(12) Elevator feet (x 2)
(13) Elevator knobs (x 2)
(14) Filter cover
The air lter and intake vent are
inside.
(15) Exhaust vents
(16) Intake vents
(17) Rivet hole
(18) Handle
(19) Battery cover
(20) Control panel
(21) Rear panel
WARNING ►HOT! : Do not touch around the lamp cover and the exhaust
vents during use or just after use, since it is too hot.
►Do not look into the lens or vents while the lamp is on, since the strong light
is not good for your eyes.
►Do not grab the front cover to hold the projector up, since the projector may
drop down.
►Do not handle the elevator knobs without holding the projector, since the
projector may drop down.
CAUTION ►Maintain normal ventilation to prevent the projector from heat-
ing up. Do not cover, block or plug up the vents. Do not place anything that
can stick or be sucked to the vents, around the intake vents. Clean the air lter
periodically.
(12)
(12)
(13)
(17)
(19)
(16)
(20)
(11)
(1)
(1)
(21)
(18)
(2)
(3)
(1)
(8)
(15)
(12)
(10)
(9)
(11)
(12)
(13)
(14)
(11)
(1)
(20)
(4)
HOT!
HOT!
(7)
(6)
(5)
4ViewSonic PJ1158

Part names
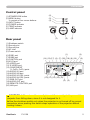
Control panel
(1) STANDBY/ON button
(2) MENU button
It consists of four cursor buttons.
(3) INPUT button
(4) POWER indicator
(5) TEMP indicator
(6) LAMP indicator
Rear panel
(1) Shutdown switch
(2) Security slot
(3) Security bar
(4) AC inlet
(5) Power switch
(6) RGB1 port
(7) RGB2 port
(8) CONTROL port
(9) M1-D port
(10) VIDEO port
(11) S-VIDEO port
(12) COMPONENT
(Y, C
B
/P
B
, C
R
/P
R
) ports
(13) AUDIO IN1 port
(14) AUDIO IN2 port
(15) AUDIO IN3 (R/L) ports
(16) AUDIO IN4 (R/L) ports
(17) RGB OUT port
(18) AUDIO OUT port
(19) REMOTE CONTROL port
(20) LAN port
CAUTION ►Do not use the security bar and the security slot to prevent the
projector from falling down, since it is not designed for it.
►Use the shutdown switch only when the projector is not turned off by normal
procedure, since pushing this switch stops operation of the projector without
cooling it down.
(6)
(5)
(4)
(1) (2) (3)
VIDEO
CONTROL
AUDIO IN 1
AUDIO IN 2
REMOTE
CONTROL
(3.5Φ)
AUX I/O
DC 5V 0.5A
S-VIDEO
LAN
AUDIO
OUT
AC IN
I O
R L R L
AUDIO IN 3 AUDIO IN 4
RGB
OUT
RGB1 RGB2 M1-D
Y CB/PB
CR/PR
SD CARD
S
D
C
A
R
D
VIDEO
CONTROL
AUDIO IN 1
AUDIO IN 2
REMOTE
CONTROL
(3.5Φ)
S-VIDEO
LAN
AUDIO
OUT
AC IN
I O
R L R L
AUDIO IN 3 AUDIO IN 4
RGB
OUT
RGB1 RGB2 M1-D
Y CB/PB
CR/PR
(14) (13) (17) (6) (7) (20) (18) (9) (19) (8)
(2)(1)
(10) (11) (15) (16) (12)
(5) (4) (3)
5ViewSonic PJ1158

Part names
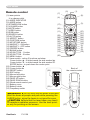
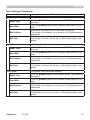
Remote control
(1) Laser pointer
It is a beam outlet.
(2) LASER INDICATOR
(3) LASER button
(4) STANDBY/ON button
(5) VOLUME button
(6) MUTE button
(7) VIDEO button
(8) RGB button
(9) SEARCH button
(10) AUTO button
(11) ASPECT button
(12) POSITION button
(13) KEYSTONE button
(14) MAGNIFY - ON button
(15) MAGNIFY - OFF button
(16) FREEZE button
(17) BLANK button
(18) MY BUTTON - 1 button
(19) MY BUTTON - 2 button
(20) MENU button
(21) Lever switch : acting 3 functions as below.
Cursor button ▲ : to slide toward the side marked ▲.
Cursor button ▼ : to slide toward the side marked ▼.
ENTER button : to push down the center point.
(22) Cursor button ◄
(23) Cursor button ►
(24) RESET button
(25) ESC button
(26) Mouse left button
(27) Mouse right button
(28) PAGE UP button
(29) PAGE DOWN button
(30) Wired remote control port
(31) Battery cover
(32) Battery holder
(33) Frequency switch
WARNING ►Do not look into the beam outlet and
point the beam at people and pets while pressing the
LASER button, since the beam is not good for eyes.
CAUTION ►Note that the laser beam may result
in hazardous radiation exposure. Use the laser point
-
er only for pointing on the screen.
BLANK LASER
ASPECT
ESC MENU RESET
POSITION AUTO
MAGNIFY
MY BUTTON
VOLUME
ON 1
MUTE
OFF 2
FREEZE KEYSTONE SEARCH
PUSH
ENTER
PAGE UP
PAGE DOWN
STANDBY/ON
VIDEO RGB
LASER
INDICATOR
(11)
(22)
(28)
(20)
(25)
(12)
(14)
(15)
(16)
(13)
(30)
(27)
(21)
(23)
(29)
(24)
(10)
(18)
(5)
(6)
(9)
(19)
(26)
(17)
(4)
(7)
(2) (1)
(3)
(8)
Back of
the remote control
(32)
(33)
(31)
6ViewSonic PJ1158

Setting up
Setting up
Install the projector according to the environment and manner the projector will be
used in.
WARNING ►Place the projector in a stable horizontal position. If the pro-
jector falls or is knocked over it could cause injury and/or damage to the projec
-
tor. Using a damaged projector could then result in re and/or electric shock.
• Do not place the projector on an unstable, slanted or vibrational surface such
as a wobbly or inclined stand.
• Do not place the projector on its side, front or rear position.
• Consult with your dealer before a special installation such as suspending from
a ceiling.
►Place the projector in a cool place, and ensure that there is sufcient ventila-
tion. The high temperature of the projector could cause re, burns and/or mal-
function of the projector.
• Do not stop-up, block or otherwise cover the projector's vents.
• Keep a space of 30 cm or more between the sides of the projector and other
objects such as walls.
• Do not place the projector on metallic thing or anything weak in heat.
• Do not place the projector on carpet, cushions or bedding.
• Do not place the projector in direct sunlight or near hot objects such as heat
-
ers.
• Do not place anything near the projector lens or vents, or on top of the projec
-
tor.
• Do not place anything that may be sucked into or stick to the vents on the bot
-
tom of the projector. This projector has some intake vents also on the bottom.
►Do not place the projector anyplace where it may get wet. Getting the pro-
jector wet or inserting liquid into the projector could cause re, electric shock
and/or malfunction of the projector.
• Do not place the projector in a bathroom or the outdoors.
• Do not place anything containing liquid near the projector.
CAUTION ►Avoid placing the projector in smoky, humid or dusty place.
Placing the projector in such places could cause re, electric shock and/or mal-
function of the projector.
• Do not place the projector near humidiers, smoking spaces or a kitchen.
►Position the projector to prevent light from directly hitting the projector's re-
mote sensor.
7ViewSonic PJ1158

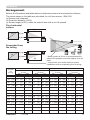
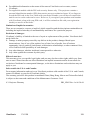
Arrangement
Refer to the illustrations and tables below to determine screen size and projection distance.
The values shown in the table are calculated for a full size screen: 1024×768
(a) Screen size (diagonal)
(b) Projection distance (±10%)
(c) Screen height (±10%), when the vertical lens shift is set full upward
Setting up
(a) Screen
size
[inch (m)]
4 : 3 screen
16 : 9 screen
(b) Projection distance
[m (inch)]
(c) Screen height
[cm (inch)]
(b) Projection distance
[m (inch)]
(c) Screen height
[cm (inch)]
min.
max. down
up
min.
max. down up
30 (0.8) 0.9 (35) 1.1 (42)
5 (2)
41 (16)
1.0 (38) 1.2 (46)
-1 (0) 39 (15)
40 (1.0) 1.2 (47) 1.4 (57) 6 (2) 55 (22) 1.3 (51) 1.6 (62) -2 (-1) 51 (20)
60 (1.5) 1.8 (71) 2.2 (86) 9 (4) 82 (32) 2.0 (78) 2.4 (94) -2 (-1) 77 (30)
70 (1.8) 2.1 (83) 2.6 (100) 11 (4) 96 (38) 2.3 (91) 2.8 (110) -3 (-1) 90 (35)
80 (2.0) 2.4 (96) 2.9 (115) 12 (5) 110 (43) 2.6 (104) 3.2 (126) -3 (-1) 103 (41)
90 (2.3) 2.7 (108) 3.3 (130) 14 (5) 123 (49) 3.0 (117) 3.6 (141) -4 (-1) 116 (46)
100 (2.5) 3.0 (120) 3.7 (144) 15 (6) 137 (54) 3.3 (131) 4.0 (157) -4 (-2) 129 (51)
120 (3.0) 3.7 (144) 4.4 (174) 18 (7) 165 (65) 4.0 (157) 4.8 (189) -5 (-2) 154 (61)
150 (3.8) 4.6 (181) 5.5 (217) 23 (9) 206 (81) 5.0 (197) 6.0 (237) -6 (-2) 193 (76)
200 (5.1) 6.1 (241) 7.4 (291) 30 (12) 274 (108) 6.7 (263) 8.0 (317) -8 (-3) 257 (101)
250 (6.4) 7.7 (302) 9.2 (364) 38 (15) 343 (135) 8.4 (329) 10.1 (396) -10 (-4) 322 (127)
300 (7.6) 9.2 (363) 11.1 (437) 46 (18)
411 (162)
10.0 (395) 12.1 (476)
-12 (-5) 386 (152)
350 (8.9) 10.8 (424) 13.0 (510) 53 (21) 480 (189) 11.7 (462) 14.1 (556) -15 (-6) 450 (177)
(a)
(b)
(a)
(c) up
(c) down
(b)
(c) up
(c) down
On a horizontal
surface
Suspended from
the ceiling
• Keep a space of 30 cm or more between the
sides of the projector and other objects such as
walls.
• Consult with your dealer before a special
installation such as suspending from a ceiling.
8ViewSonic PJ1158

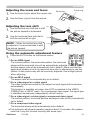
Adjusting the projector's elevator
When the place to put the projector is slightly uneven to the left or right, use the
elevator feet to place the projector horizontally.
Using the feet can also tilt the projector in order to project at
a suitable angle to the screen, elevating the front side of the
projector within 8 degrees.
This projector has 2 elevator feet and 2 elevator knobs. An elevator foot is adjust
-
able while pulling up the elevator knob on the same side as it.
1.
Holding the projector, pull the elevator knobs up to loose the elevator feet.
2.
Position the front side of the projector to the desired height.
3.
Release the elevator knobs in order to lock the elevator feet.
4.
After making sure that the elevator feet are locked, put the projector gently.
5.
If necessary, the elevator feet can be manually twisted to make more precise
adjustments. Hold the projector when twisting the feet.
Setting up
To loose an elevator foot,
pull up the elevator knob
on the same side as it.
CAUTION ►Do not handle the elevator knobs without holding the projector,
since the projector may drop down.
►Do not tilt the projector other than it elevating its front within 8 degrees us-
ing the adjuster feet. A tilt of the projector exceeding the restriction could cause
malfunction or shortening the lifetime of consumables, or the projector itself.
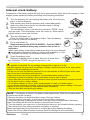
Using the security bar and slot
A commercial anti-theft chain or wire up to 10 mm in
diameter can be attached to the security bar on the pro-
jector.
Also this product has the security slot for the Kensington
lock.
For details, see the manual of the security tool.
WARNING ►Do not use the security bar and the
security slot to prevent the projector from falling down,
since it is not designed for it.
NOTE •
The security bar and the security slot are not
comprehensive theft prevention measures. They are intended
to be used as supplemental theft prevention measure.
To nely adjust, twist
the foot.
q
Security slot
Anti-theft chain or wire
Security bar
VIDEO
CONTROL
AUDIO IN 1
AUDIO IN 2
REMOTE
CONTROL
(3.5Φ)
AUX I/O
DC 5V 0.5A
S-VIDEO
LAN
AUDIO
OUT
AC IN
I O
R L R L
AUDIO IN 3 AUDIO IN 4
RGB
OUT
RGB1 RGB2 M1-D
Y CB/PB
CR/PR
SD CARD
S
D
C
A
R
D
VIDEO
CONTROL
AUDIO IN 1
AUDIO IN 2
REMOTE
CONTROL
(3.5Φ)
S-VIDEO
LAN
AUDIO
OUT
AC IN
I O
R L R L
AUDIO IN 3 AUDIO IN 4
RGB
OUT
RGB1 RGB2 M1-D
Y CB/PB
CR/PR
9ViewSonic PJ1158

Setting up
Connecting your devices
Be sure to read the manuals for devices before connecting them to the projector.
Make sure that all the devices are suitable to be connected with this product, and
prepare the cables required to connect.
Please refer to the following illustrations to connect them.
WARNING ►Do not disassemble or modify the projector.
►Be careful not to damage the cables, and do not use damaged cables.
CAUTION ►Turn off all devices and unplug their power cords prior to con-
necting them to projector. Connecting a live device to the projector may gener
-
ate extremely loud noises or other abnormalities that may result in malfunction
or damage to the device and the projector.
►Use appropriate accessory or otherwise designed cables. Ask your dealer
about non-accessory cables which may have to be of a specic length or
equipped with a core. For cables with a core only at one end, connect the end
with the core to the projector.
►Make sure that devices are connected to the correct ports. An incorrect con-
nection may result in malfunction or damage to the device and the projector.
VIDEO
CONTROL
AUDIO IN 1
AUDIO IN 2
REMOTE
CONTROL
S-VIDEO
AUDIO
OUT
R L R L
AUDIO IN 3 AUDIO IN 4
RGB
OUT
RGB1 RGB2 M1-D
CB/PB
B
L
A
N
K
L
A
S
E
R
A
S
P
E
C
T
P
U
S
H
E
N
T
E
R
L
A
S
E
R
I
N
D
I
C
A
T
O
R
AUDIO IN
Y CB/PB CR/PR
COMPONENT VIDEO OUT
R L
AUDIO IN OUT
M1-D
RGB IN
RGB OUT
AUDIO OUT
RGB OUT
AUDIO OUT
RS-232C
VIDEO OUT
R L
AUDIO IN OUT
R L
AUDIO IN OUT
S-VIDEO OUT
Y
CR/PR
LAN
LAN
Monitor
PC
M1-D
signal
source
Remote
control
Speakers
VCR/DVD player
10ViewSonic PJ1158

Setting up
NOTE • Be sure to read the manuals for devices before connecting them to the
projector, and make sure that all the devices are suitable to be connected with this
product. Before connecting to a PC, check the signal level, the signal timing, and the
resolution.
- Do not connect LAN port to any network that might have the excessive voltage.
- Some signal may need an adapter to input this projector.
- Some PCs have multiple screen display modes that may include some signals which
are not supported by this projector.
- Although the projector can display signals with resolution up to UXGA (1600X1200), the
signal will be converted to the projector’s panel resolution before being displayed. The
best display performance will be achieved if the resolutions of the input signal and the
projector panel are identical.
• While connecting, make sure that the shape of the cable's connector ts the port to
connect with. And be sure to tighten the screws on connectors with screws.
• When connecting a laptop PC to the projector, be sure to activate the PC’s external
RGB output. (Set the laptop PC to CRT display or to simultaneous LCD and CRT
display.) For details on how this is done, please refer to the instruction manual of the
corresponding laptop PC.
• When the picture resolution is changed on a computer depending on an input,
automatic adjustment function may take some time and may not be completed. In this
case, you may not be able to see a check box to select “Yes/No” for the new resolution
on Windows. Then the resolution will go back to the original. It might be recommended
to use other CRT or LCD monitors to change the resolution.
• In some cases, this projector may not display a proper picture or display any picture on
screen. For example, automatic adjustment may not function correctly with some input
signals. An input signal of composite sync or sync on G may confuse this projector, so
the projector may not display a proper picture.
• The M1-D port of this model is compatible with HDCP (High-bandwidth Digital Content
Protection) and therefore capable of displaying a video signal from HDCP compatible
DVD players or the like.
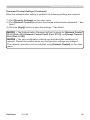
About Plug-and-Play capability
Plug-and-Play is a system composed of a computer, its operating system and peripheral
equipment (i.e. display devices). This projector is VESA DDC 2B compatible. Plug-and-
Play can be used by connecting this projector to a computer that is VESA DDC (display
data channel) compatible.
• Take advantage of this feature by connecting an RGB cable to the RGB1 port (DDC
2B compatible). Plug-and-Play may not work properly if any other type of connection is
attempted.
• Please use the standard drivers in your computer as this projector is a Plug-and-Play
monitor.
Connecting your devices (continued)
11ViewSonic PJ1158

Setting up
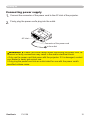
Connecting power supply
1.
Connect the connector of the power cord to the AC inlet of the projector.
2.
Firmly plug the power cord's plug into the outlet.
WARNING ►Please use extra caution when connecting the power cord, as
incorrect or faulty connections may result in re and/or electrical shock.
• Only use the power cord that came with the projector. If it is damaged, contact
your dealer to newly get correct one.
• Only plug the power cord into an outlet rated for use with the power cord's
specied voltage range.
AC inlet
to the outlet
Connector of the power cord
12ViewSonic PJ1158

Remote control
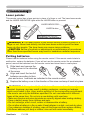
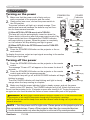
Putting batteries
Please load the batteries before using the remote control. If the remote control starts to
malfunction, replace the batteries. If you will not use the remote control for an extended
period, remove the batteries from the remote control and store them in a safe place.
1.
Slide back and remove the
battery cover in the direction
of the arrow.
2.
Align and insert the two AA
batteries according to their
plus and minus terminals as indicated in the remote control.
3.
Replace the battery cover in the direction of the arrow and snap it back into place.
Laser pointer
This remote control has a laser pointer in place of a nger or rod. The laser beam works
and the LASER INDICATOR lights while the LASER button is pressed.
Remote control
WARNING ►The laser pointer of the remote control is used in place of a
nger or rod. Never look directly into the laser beam outlet or point the laser
beam at other people. The laser beam can cause vision problems.
CAUTION ►Use of controls or adjustments or performance of procedures
other than those specied herein may result in hazardous radiation exposure.
WARNING ►Always handle the batteries with care and use them only as
directed. Improper use may result in battery explosion, cracking or leakage,
which could result in re, injury and/or pollution of the surrounding environment.
• Be sure to use only the batteries specied. Do not use batteries of different
types at the same time. Do not mix a new battery with used one.
•
Make sure the plus and minus terminals are correctly aligned when loading a battery.
• Keep a battery away from children and pets.
• Do not recharge, short circuit, solder or disassemble a battery.
•
Do not allow a battery in a re or water. Keep batteries in a dark, cool and dry place.
•
If you observe a leakage of a battery, wipe out the ower and then replace a battery.
If the ower adheres your body or clothes, rinse well with water immediately.
LASER INDICATOR
LASER button
13ViewSonic PJ1158

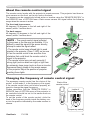
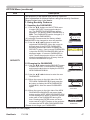
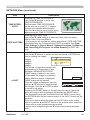
Changing the frequency of remote control signal
The accessory remote control has the choice of the
mode 1 or the mode 2, in the frequency of its signal.
If the remote control does not function properly, at
-
tempt to change the signal frequency.
Please remember that the “REMOTE FREQ.” in
SERVICE item of OPTION menu of the projector to
be controlled should be set to the same mode as
the remote control.
To set the mode of the remote control, slide the
knob of the frequency switch inside the battery cov
-
er into the position indicated by the mode number to
choose.
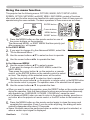
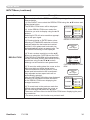
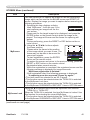
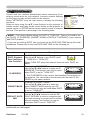
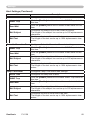
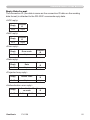
About the remote control signal
The remote control works with the projector’s remote sensors. This projector has three re-
mote sensors on the front, on the top, and on the back.
The sensors can be respectively turned active or inactive using the “REMOTE RECEIV” in
the SERVICE item of OPTION menu. Each sensor senses the signal within the following
range when the sensor is active.
The front and top sensors:
60 degrees (30 degrees to the left and right of the
sensor) within 3 meters about.
The back sensor:
40 degrees (20 degrees to the left and right of the
sensor) within 3 meters about.
Remote control
NOTE •
The remote control signal reected
in the screen or the like may be available. If it is
difcult to send the signal to the sensor directly,
attempt to make the signal reect.
• The remote control uses infrared light to send
signals to the projector (Class 1 LED), so be sure
to use the remote control in an area free from
obstacles that could block the remote control’s
signal to the projector.
• The remote control may not work correctly if
strong light (such as direct sun light) or light from
an extremely close range (such as from an inverter
uorescent lamp) shines on the remote sensor
of the projector. Adjust the position of projector
avoiding those lights.
Approx.
3 m
30º
30º
30º
30º
Approx.
3 m
20º
20º
Approx.
3 m
2 1
Back of the
remote control
Inside of
the battery cover
Frequency switch
14ViewSonic PJ1158

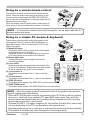
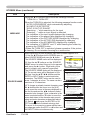
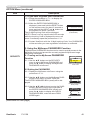
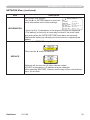
Using as a wired remote control
The accessory remote control works as a wired remote
control, when the wired control port at the bottom of the
remote control connects with the REMOTE CONTROL
port on the back of the projector via an audio cable with 3.5
diameter stereo mini plugs.
When the remote control signal is hard to reach surely to
the projector in the environment, this function is effective.
Remote control
NOTE •
To connect the remote control with the projector, use an audio cable with 3.5
diameter stereo mini plugs.
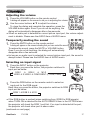
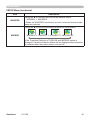
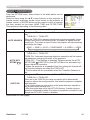
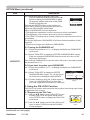
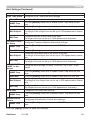
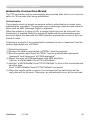
Using as a simple PC mouse & keyboard
The accessory remote control works as a simple mouse
and keyboard of the PC, when an M1-D/USB cable con-
nects this projector’s M1-D port with the PC’s DVI-D and
USB (A type) ports.
(1) Mouse left button
Pushing the button into the center point works instead
of clicking the mouse's left button.
Tilting this button to one of eight directions moves the
PC's move pointer on the screen in the direction.
(2) Mouse right button
Pressing the button works instead of clicking the
mouse’s right button.
(3) Lever switch
Sliding toward the side marked ▲ works instead of the
[↑] key on the keyboard. Sliding toward the side marked
▼ works instead of the [↓] key on the keyboard.
(4)Cursorbutton◄
This button works instead of the [←] key on the key-
board.
(5)Cursorbutton►
This button works instead of the [→] key on the keyboard.
(6) PAGE UP button
This button works instead of the PAGE UP key on the key board.
(7) PAGE DOWN button
This button works instead of the PAGE DOWN key on the key board.
NOTE •
When the simple mouse & keyboard function of this product does not work
correctly, please check the following.
- When an M1-D/USB cable connects this projector with a PC having a built-in pointing
device (e.g. track ball) like a notebook PC, open BIOS setup menu, then select the
external mouse and disable the built-in pointing device, because the built-in pointing
device may have priority to this function.
- Windows 95 OSR 2.1 or higher is required for this function. And also this function may
not work depending on the PC’s congurations and mouse drivers.
-
Operating simultaneously two or more keys is void except for mouse drag and drop operation.
- This function is activated only when the projector is working properly.
VIDEO
CONTROL
AUDIO IN 1
AUDIO IN 2
REMOTE
CONTROL
(3.5Φ)
AUX I/O
DC 5V 0.5A
S-VIDEO
LAN
AUDIO
OUT
AC IN
I O
R L R L
AUDIO IN 3 AUDIO IN 4
RGB
OUT
RGB1 RGB2 M1-D
Y CB/PB
CR/PR
SD CARD
S
D
C
A
R
D
VIDEO
CONTROL
AUDIO IN 1
AUDIO IN 2
REMOTE
CONTROL
(3.5Φ)
S-VIDEO
LAN
AUDIO
OUT
AC IN
I O
R L R L
AUDIO IN 3 AUDIO IN 4
RGB
OUT
RGB1 RGB2 M1-D
Y CB/PB
CR/PR
B
L
A
N
K
L
A
S
E
R
A
S
P
E
C
T
P
U
S
H
E
N
T
E
R
L
A
S
E
R
I
N
D
I
C
A
T
O
R
VIDEO
CONTROL
AUDIO IN 1
AUDIO IN 2
REMOTE
CONTROL
(3.5Φ)
AUX I/O
DC 5V 0.5A
S-VIDEO
LAN
AUDIO
OUT
AC IN
I O
R L R L
AUDIO IN 3 AUDIO IN 4
RGB
OUT
RGB1 RGB2 M1-D
Y CB/PB
CR/PR
SD CARD
S
D
C
A
R
D
VIDEO
CONTROL
AUDIO IN 1
AUDIO IN 2
REMOTE
CONTROL
(3.5Φ)
S-VIDEO
LAN
AUDIO
OUT
AC IN
I O
R L R L
AUDIO IN 3 AUDIO IN 4
RGB
OUT
RGB1 RGB2 M1-D
Y CB/PB
CR/PR
to a signal
source
BLANK LASER
ASPECT
ESC MENU RESET
POSITION AUTO
MAGNIFY
MY BUTTON
VOLUME
ON 1
MUTE
OFF 2
FREEZE KEYSTONE SEARCH
PUSH
ENTER
PAGE UP
PAGE DOWN
STANDBY/ON
VIDEO RGB
LASER
INDICATOR
BLANK LASER
ASPECT
ESC MENU RESET
POSITION AUTO
MAGNIFY
MY BUTTON
VOLUME
ON 1
MUTE
OFF 2
FREEZE KEYSTONE SEARCH
PUSH
ENTER
PAGE UP
PAGE DOWN
STANDBY/ON
VIDEO RGB
LASER
INDICATOR
(3)
(4)
(6)
(2)
(5)
(7)
(1)
15ViewSonic PJ1158
Page is loading ...
Page is loading ...
Page is loading ...
Page is loading ...
Page is loading ...
Page is loading ...
Page is loading ...
Page is loading ...
Page is loading ...
Page is loading ...
Page is loading ...
Page is loading ...
Page is loading ...
Page is loading ...
Page is loading ...
Page is loading ...
Page is loading ...
Page is loading ...
Page is loading ...
Page is loading ...
Page is loading ...
Page is loading ...
Page is loading ...
Page is loading ...
Page is loading ...
Page is loading ...
Page is loading ...
Page is loading ...
Page is loading ...
Page is loading ...
Page is loading ...
Page is loading ...
Page is loading ...
Page is loading ...
Page is loading ...
Page is loading ...
Page is loading ...
Page is loading ...
Page is loading ...
Page is loading ...
Page is loading ...
Page is loading ...
Page is loading ...
Page is loading ...
Page is loading ...
Page is loading ...
Page is loading ...
Page is loading ...
Page is loading ...
Page is loading ...
Page is loading ...
Page is loading ...
Page is loading ...
Page is loading ...
Page is loading ...
Page is loading ...
Page is loading ...
Page is loading ...
Page is loading ...
Page is loading ...
Page is loading ...
Page is loading ...
Page is loading ...
Page is loading ...
Page is loading ...
Page is loading ...
Page is loading ...
Page is loading ...
Page is loading ...
Page is loading ...
Page is loading ...
Page is loading ...
Page is loading ...
Page is loading ...
Page is loading ...
Page is loading ...
Page is loading ...
Page is loading ...
Page is loading ...
Page is loading ...
Page is loading ...
Page is loading ...
Page is loading ...
Page is loading ...
Page is loading ...
Page is loading ...
Page is loading ...
Page is loading ...
Page is loading ...
Page is loading ...
Page is loading ...
Page is loading ...
Page is loading ...
Page is loading ...
Page is loading ...
-
 1
1
-
 2
2
-
 3
3
-
 4
4
-
 5
5
-
 6
6
-
 7
7
-
 8
8
-
 9
9
-
 10
10
-
 11
11
-
 12
12
-
 13
13
-
 14
14
-
 15
15
-
 16
16
-
 17
17
-
 18
18
-
 19
19
-
 20
20
-
 21
21
-
 22
22
-
 23
23
-
 24
24
-
 25
25
-
 26
26
-
 27
27
-
 28
28
-
 29
29
-
 30
30
-
 31
31
-
 32
32
-
 33
33
-
 34
34
-
 35
35
-
 36
36
-
 37
37
-
 38
38
-
 39
39
-
 40
40
-
 41
41
-
 42
42
-
 43
43
-
 44
44
-
 45
45
-
 46
46
-
 47
47
-
 48
48
-
 49
49
-
 50
50
-
 51
51
-
 52
52
-
 53
53
-
 54
54
-
 55
55
-
 56
56
-
 57
57
-
 58
58
-
 59
59
-
 60
60
-
 61
61
-
 62
62
-
 63
63
-
 64
64
-
 65
65
-
 66
66
-
 67
67
-
 68
68
-
 69
69
-
 70
70
-
 71
71
-
 72
72
-
 73
73
-
 74
74
-
 75
75
-
 76
76
-
 77
77
-
 78
78
-
 79
79
-
 80
80
-
 81
81
-
 82
82
-
 83
83
-
 84
84
-
 85
85
-
 86
86
-
 87
87
-
 88
88
-
 89
89
-
 90
90
-
 91
91
-
 92
92
-
 93
93
-
 94
94
-
 95
95
-
 96
96
-
 97
97
-
 98
98
-
 99
99
-
 100
100
-
 101
101
-
 102
102
-
 103
103
-
 104
104
-
 105
105
-
 106
106
-
 107
107
-
 108
108
-
 109
109
-
 110
110
-
 111
111
-
 112
112
-
 113
113
-
 114
114
-
 115
115


ViewSonic PJ1158 User manual
- Category
- Data projectors
- Type
- User manual
- This manual is also suitable for
Ask a question and I''ll find the answer in the document
Finding information in a document is now easier with AI
Related papers
Other documents
-
Hitachi CPX505 User manual
-
Hitachi CP-X265 User manual
-
Hitachi CP-X608 User manual
-
-
Hitachi CPX600 User guide
-
-
-
Legrand DST 2007 Setup for HCLOCK User guide
-
-
Hitachi CP-X705 User manual