PRESONUS FireStudio Lightpipe Owner's manual
- Category
- Musical Equipment
- Type
- Owner's manual

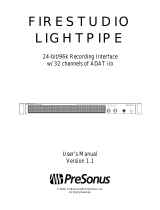
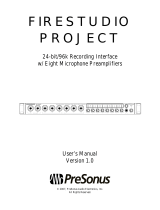
FIRESTUDIO
LIGHTPIPE
© 2009, PreSonus Audio Electronics, Inc.
All Rights Reserved.
24-bit, 96 kHz Recording Interface
with 32 channels of ADAT I/O
User’s Manual
Version 2.0

PRESONUS LIMITED WARRANTY
© 2009, PreSonus Audio Electronics, Inc.
All Rights Reserved.
PreSonus Audio Electronics Inc. warrants this product to be free of defects in material and
workmanship for a period of one year from the date of original retail purchase. This warranty
is enforceable only by the original retail purchaser. To be protected by this warranty, the
purchaser must complete and return the enclosed warranty card within 14 days of purchase.
During the warranty period, PreSonus shall, at its sole and absolute option, repair or replace,
free of charge, any product that proves to be defective on inspection by PreSonus or its
authorized service representative. To obtain warranty service, the purchaser must first call
or write PreSonus at the address and telephone number printed below to obtain a Return
Authorization Number and instructions about where to return the unit for service. All
inquiries must be accompanied by a description of the problem. All authorized returns must
be sent to the PreSonus repair facility postage prepaid, insured, and properly packaged.
PreSonus reserves the right to update any unit returned for repair. PreSonus reserves the
right to change or improve the design of the product at any time without prior notice. This
warranty does not cover claims for damage due to abuse, neglect, alteration, or attempted
repair by unauthorized personnel and is limited to failures arising during normal use that are
due to defects in material or workmanship in the product. Any implied warranties, including
implied warranties of merchantability and fitness for a particular purpose, are limited in
duration to the length of this limited warranty. Some states do not allow limitations on how
long an implied warranty lasts, so the above limitation may not apply to you. In no event will
PreSonus be liable for incidental, consequential, or other damages resulting from the breach
of any express or implied warranty, including, among other things, damage to property,
damage based on inconvenience or on loss of use of the product, and, to the extent permitted
by law, damages for personal injury. Some states do not allow the exclusion of limitation of
incidental or consequential damages, so the above limitation or exclusion may not apply to
you. This warranty gives you specific legal rights, and you may also have other rights, which
vary from state to state. This warranty only applies to products sold and used in the United
States of America. For warranty information in all other countries please refer to your local
distributor.
PreSonus Audio Electronics, Inc.
7257 Florida Blvd.
Baton Rouge, LA 70806
www.PreSonus.com

SAFE OPERATION GUIDELINES
To avoid damage to your FireStudio Lightpipe and your other audio equipment please review and adhere to the
following safety guidelines:
Follow the safety guidelines in the manual.
Do not drop your FireStudio Lightpipe.
Do not install the unit near a heat source (radiators, heat registers, amplifier heat sinks, etc.).
Do not expose your FireStudio Lightpipe to liquids. Do not place containers filled with liquids
near your FireStudio Lightpipe.
Do not allow dust particles to collect in excess on your FireStudio Lightpipe. Keeping the unit
covered when not in use is highly recommended and will extend the life of your product.
Protect the power cord from being walked on, wheeled over, or pinched. If the power cord
becomes damaged, purchase a new one.
Unplug your FireStudio Lightpipe when not in use for long periods of time and during electrical
storms, hurricanes, tornadoes, and other extreme weather.
Use only the attachments/accessories recommended or manufactured by PreSonus for your
FireStudio Lightpipe.
All domestic PreSonus products should be serviced at the PreSonus factory in Baton Rouge,
Louisiana. If your FireStudio Lightpipe requires a repair, contact techs[email protected]om
to arrange for a return-authorization number. Customers outside the U.S. should contact their
local distributor. Your distributor’s contact information is available at www.presonus.com

TABLE OF CONTENTS
1 OVERVIEW
1.1 Introduction ............................................................................................................................................ 3
1.2 Features ................................................................................................................................................. 4
1.3 What is in the Box .................................................................................................................................. 5
1.4 System Requirements .............................................................................................................................. 6
2 GETTING STARTED
2.1 Hardware Installation ............................................................................................................................. 7
2.1.1 Installation in Microsoft Windows ................................................................................................... 7
2.1.2 Installation in Mac OS X ................................................................................................................. 7
2.2 Studio One Artist ..................................................................................................................................... 8
2.2.1 Installation and Authorization ........................................................................................................... 8
2.2.2 Enabling the FireStudio Mobile Driver ............................................................................................ 9
2.2.3 Configuring Your External MIDI Devices ......................................................................................... 10
2.2.4 Configuring Your Audio I/O ............................................................................................................. 13
2.2.5 Creating a New Song....................................................................................................................... 14
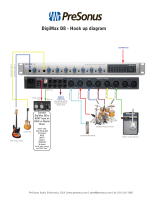
2.3 Sample Hookup Diagram ...................................................................................................................... 17
2.3.1 Connecting Your Digital Mixer ........................................................................................................ 17
2.3.2 Using the FireStudio Lightpipe with Multiple DigiMax D8 ............................................................... 18
2.3.3 Mobile Recording Rig ..................................................................................................................... 19
3 CONTROLS AND CONNECTIONS
3.1 PreSonus Universal Control Application Introduction ............................................................................ 20
3.1.1 Universal Control Application Icon ................................................................................................ 20
3.1.2 Launcher Window ........................................................................................................................... 21
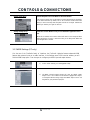
3.1.3 WDM Settings (Windows PC Only) ................................................................................................. 23
3.1.4 Device Window: FireStudio Lightpipe Mixer .................................................................................... 23
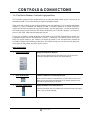
3.2 Front-Panel Layout ............................................................................................................................... 27
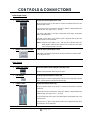
3.3 Back-Panel Layout ............................................................................................................................... 28
4 CASCADING UNITS
4.1 Using Multiple FireStudio-Family Interfaces ........................................................................................... 30
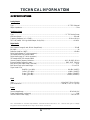
5 TECHNICAL INFORMATION
5.1 Troubleshooting .................................................................................................................................... 32
5.2 Specifications ....................................................................................................................................... 34


OVERVIEW
3 | PreSonus 2008
1.1 INTRODUCTION
Thank you for purchasing the PreSonus FireStudio Lightpipe. PreSonus Audio Electronics has designed the
FireStudio Lightpipe utilizing high-grade components to ensure optimum performance that will last a lifetime.
The PreSonus FireStudio Lightpipe is a 24-bit, 96 kHz ADAT Lightpipe-to-FireWire computer recording system
for PC and Macintosh computer systems. The FireStudio Lightpipe allows you to convert up to 32 channels of
ADAT optical (“Lightpipe”) input/output to FireWire, providing a multichannel computer interface for digital
mixers, AD and DA converters, or ADAT recorders.
FireStudio Lightpipe features JetPLL jitter-elimination technology for ultra-tight synchronization and improved
imaging and clarity. It also offers a 34x4 DSP matrix mixer, allowing you to create two zero-latency monitor
mixes. Fast-acting input LED meters are located on the front panel for quick and easy visual monitoring of all
signals. Whether you’re recording live shows with a mobile rig or an entire orchestra in a studio, the FireStudio
Lightpipe is the perfect solution for your professional recording needs.
PreSonus Audio Electronics is committed to constant product improvement, and we highly value your
suggestions. We encourage you to contact us at 225-216-7887 or techsuppo[email protected] with any questions
or comments you may have regarding your PreSonus FireStudio Lightpipe. We believe the best way to achieve
our goal of constant product improvement is by listening to the real experts: our customers. We appreciate the
support you have shown us through the purchase of this product.
We suggest you use this manual to familiarize yourself with the features, applications, and correct connection
procedure for your FireStudio Lightpipe before trying to connect it to your computer.
Thank you, once again, for buying our product. Enjoy your FireStudio Lightpipe!

OVERVIEW
4 | PreSonus 2008
1.2 FEATURES
The FireStudio Lightpipe is a powerful and affordable computer recording system. The FireStudio Lightpipe
comes complete with four ADAT/Dual SMUX ports, MIDI and word clock I/O, rock-solid drivers, expandability,
a 34X4 mixer matrix application, and powerful music-recording and -production software.
Summary of FireStudio Lightpipe features
High-speed FireWire (IEEE 1394)
24-bit, 96 kHz sampling
Word clock I/O
MIDI I/O
JetPLL jitter-elimination technology
Balanced TRS stereo main outputs with volume control
Headphone amplifier with volume control
Dual SMUX for transferring 16 channels of 96 kHz audio over ADAT
Fast-acting LED input metering
34 x 4 mixer matrix
Mac OS X and Windows compatible
The FireStudio Lightpipe includes PreSonus Studio One Artist recording software, which comes with over 4 GB
of plug-ins, loops, and samples, giving you everything you need for music recording and production.
Summary of Studio One Artist features
Unlimited track count
Unlimited inserts and sends
20 high-quality native effects plug-ins
o Amp Modeling (Ampire)
o Delay (Beat Delay)
o Distortion (Redlight Distortion)
o Dynamic Processing (Channel Strip, Compressor, Limiter, Tricomp)
o Equalizer (Channel Strip, Pro EQ)
o Modulation (Autofilter, Chorus, Flanger, Phaser, X-Trem)
o Reverbs (MixVerb, Room Reverb)
o Utility (Binaural Pan, Mixtool, Phase Meter, Spectrum Meter, Tuner)
Over 4 GB of loops, samples, and instruments, featuring:
o Presence: Virtual Sample Player
o Impact: Virtual Drum Machine
o SampleOne: Virtual Sampler
o Mojito: Virtual Analog-Modeled Subtractive Synthesizer
Innovative and intuitive MIDI mapping
Powerful drag-and-drop functionality for faster workflow
Mac OS X and Windows compatible

OVERVIEW
5 | PreSonus 2008
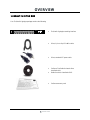
1.3 WHAT IS IN THE BOX
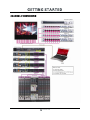
Your FireStudio Lightpipe package contains the following:
FireStudio Lightpipe recording interface
6-foot, 6-pin-to-6-pin FireWire cable
6-foot, standard IEC power cable
PreSonus FireStudio Universal driver
installation disc
Studio One Artist installation DVD
PreSonus warranty card

OVERVIEW
6 | PreSonus 2008
1.4 SYSTEM REQUIREMENTS
Here are the computer-system requirements for FireStudio Lightpipe and Studio One Artist.
Macintosh
o Operating Systems:
Mac OS X 10.4.11 or Mac OS X 10.5.2 or higher
o Hardware:
Minimum:
PowerPC G4 1.25 GHz or Intel Core Solo 1.5 GHz processor
1 GB RAM
DVD drive
Recommended:
PowerPC G5 or better or Intel Core Duo or Intel Xeon processor or better
2 GB or more RAM
DVD drive
Windows PC
o Operating Systems:
Windows XP or Vista
o Hardware:
Minimum:
Intel Pentium 4 1.6 GHz processor or AMD Athlon 64 (Turion)
1 GB RAM
DVD drive
Recommended:
Intel Pentium 4 2.8 GHz EM64T or better or AMD Athlon 64 3000+ or
better
2 GB or more RAM
DVD drive
NOTE: The speed of your processor, amount of RAM, and size and speed of your hard drives will greatly affect
the overall performance of your recording system. A more powerful system (faster processor with more RAM)
allows for lower latency (signal delay) and better overall performance.

GETTING STARTED
7 | PreSonus 2008
2.1 HARDWARE INSTALLATION
This installer and driver can be used for any interface in the FireStudio Tube family line (FireStudio Mobile,
FireStudio Tube, FireStudio Lightpipe, FireStudio, FireStudio Project, and StudioLive 16.4.2). For more
information on the Universal Control application and multiple interface integration, please review Sections 3.1
and 4.1.
2.1.1 Installation in Microsoft Windows
After you insert the installation CD into your CD or DVD drive, the FireStudio Lightpipe installer will take
you through each step of the installation process. Please read each message carefully, ensuring especially that
you do not connect your FireStudio Lightpipe until the installer has finished and you have rebooted your
computer.
The FireStudio Lightpipe Installer was designed to be as simple and easy-to-follow as possible. Please read
each message carefully to ensure that the FireStudio Lightpipe driver is properly installed.
Before continuing the FireStudio Lightpipe Installation Setup, please close all applications and disconnect
your FireStudio Lightpipe from your computer. If you see any Windows Security alerts, click “Install this
driver software anyway” (Vista) or “Continue anyway” (XP).
At the end of the installation, you will be prompted to reboot your computer to complete the installation.
Click “Finish” to automatically restart your PC. Once your computer has rebooted, connect the FireStudio
Lightpipe. When the Found New Hardware wizard launches, follow the recommended steps. When the sync
light remains solid blue, your FireStudio Lightpipe is synced to your computer and is ready to use!
2.1.2 Installation in Mac OS X
After inserting the installation CD into your disc drive, browse the disc and run the FireStudio Lightpipe
installer, which will take you through each step of the installation process. Please read each message
carefully, ensuring especially that you do not connect your FireStudio Lightpipe until the installer has
finished and you have rebooted your computer.
To begin installing the FireStudio Lightpipe driver on your Mac, double click on the FireStudio Lightpipe
logo. The FireStudio Lightpipe installer requires that your user password be entered as a security measure.
Once you have entered your password, click “OK” to proceed with the rest of the installation.
When the Installer has finished, connect your FireStudio Lightpipe to your computer with a FireWire cable.
Once the sync light is solid blue, your FireStudio Lightpipe is ready to use.

GETTING STARTED
8 | PreSonus 2008
2.2 STUDIO ONE ARTIST
Every PreSonus interface comes complete with Studio One Artist recording software. Whether you are about to
record your first album or your 50
th
, Studio One Artist provides you with all the tools necessary to capture and
mix a great performance. As a valued PreSonus customer, you are also eligible for an upgrade discount for
Studio One Pro when you are ready to master your work, create a digital version for the Web, or incorporate
third-party VST plug-ins into your recording process. For more details on the Studio One Pro upgrade program
for PreSonus customers, please visit www.presonus.com
.
2.2.1 Installation and Authorization
Once you have installed the FireStudio Lightpipe drivers and connected your FireStudio Lightpipe, you can
use the PreSonus Studio One Artist music-production software included with your FireStudio Lightpipe to
begin recording, mixing, and producing your music. To install Studio One Artist, insert your installation disc
into your computer’s DVD drive. Follow the onscreen instructions to complete the installation process.
Installing Studio One Artist
To Install Studio One Artist, insert your Studio One Artist installation DVD into
your computer’s DVD drive.
PC Users: Launch the Studio One Artist installer and follow the onscreen
instructions.
Mac Users: Simply drag the Studio One Artist application into the Applications
folder on your Macintosh HD.
Create a User Account
After installing Studio One Artist, launch the program, and the Activate Studio
One menu will appear. If you are a new Studio One user, you will need to create a
user account. Follow the Create Account link if your computer is connected to the
Internet. Once you have created your account, continue to Activating Studio One
Artist Online.
If your computer is not connected to the Internet, visit the Studio One product
page at www.presonus.com on an Internet-connected computer to create your
account. After you have created your account, skip to Activating Studio One
Artist Offline.
Activating Studio One Artist Online
Now that you have created a user account, you can activate your copy of Studio
One Artist. Launch Studio One Artist, and the Activate Studio One menu will
appear.
Click on the Activate Online link and enter your previously created account
Username, Password, and the Product Key you received with the Studio One
Artist installation disc. Click on the Activate button to finish the activation
process.

GETTING STARTED
9 | PreSonus 2008
Activating Studio One Artist Offline
Once you have created a user account, launch Studio One Artist. From the
Activate Studio One Menu, click on the Activate Offline link. Follow the
instructions to log in to your previously created user account, register the
product, and obtain a license file.
Next, copy the license file to the computer on which Studio One has been
installed, and locate the license file as instructed in the Activate Studio One
menu. The activation process is now complete.
Installing Bundled Content for Studio One Artist
Studio One Artist comes bundled with an array of demo and tutorial material,
sampled instruments, loops, samples, and unique third-party content. The Studio
One Artist bundle includes all that you need to begin producing music.
Upon completing the Studio One Artist installation and activation process, the
Studio One Content Installer will appear. If it does not appear, navigate to
Help/Studio One Installation.
At the top of the installation menu, select the source from which the content will
be installed, as well as the location where you wish to install the content. The
source of the content will be the same DVD from which you installed Studio One
Artist. By default, Studio One Artist will point to your DVD drive as the content
source. Listed in the installation menu are separate entries for each available
item. Click in the checkbox next to each item you wish to install, then click on the
Install Packets button at the bottom left of the menu to install the selected
content.
When finished installing content, click on the Done button to exit the menu.
Studio One Artist content can be installed at any time by accessing the
Help/Studio One Installation menu. If you choose not to install any portion of the
content, you can install it at a later time.
2.2.2 Enabling the FireStudio Lightpipe Driver
Studio One and Studio One Artist were designed with PreSonus interfaces in mind. Your FireStudio
Lightpipe is already integrated into Studio One Artist, so setup is quick and easy. When Studio One Artist is
launched, by default you will be taken to the Start page. On this page, you will find document-management
and device-configuration controls, as well as a customizable artist profile, a news feed, and links to demos
and tutorials from PreSonus. If you have an Internet connection on your computer, these links will be
updated as new tutorials become available on the PreSonus Web site.
Complete information on all aspects of Studio One Artist is available in the
Reference Manual
PDF located
on the Studio One Artist Installation disc. The information in this manual covers only the most basic aspects
of Studio One Artist and is intended to get you set up and recording as quickly as possible.

GETTING STARTED
10 | PreSonus 2008
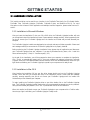
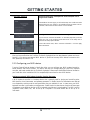
Start Page: Setup Area
Shows Active Audio Driver and Sample Rate and Provides Quick Links to
Configure Audio and MIDI
In the middle of the Start page, you will see the Setup area. Studio One Artist
automatically scans your system for all available drivers and selects a driver.
By default, it will choose a PreSonus driver if one is available.
Selecting a Different Audio Driver From the Start Page
If you do not see “PreSonus FireStudio” on the Start page when you launch
Studio One, click on the Configure Audio Devices link in the Setup area to
open the Audio Setup Options window.
In the Audio Device menu, select “PreSonus FireStudio.” Click the Apply
button and then OK.
After you have verified that the PreSonus FireStudio Lightpipe driver has been detected, please continue to
Section 2.2.3 to set up your external MIDI devices. If you do not have any MIDI devices to connect at this
time, please skip to Section 2.2.4.
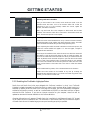
2.2.3 Configuring your MIDI devices
From the External Devices window in Studio One Artist, you can configure your MIDI keyboard controller,
sound modules, and control surfaces. This section will take you through setting up your MIDI keyboard
controller and sound module with the FireStudio Lightpipe. Please consult the Reference Manual located on
your Studio One Artist installation DVD for complete setup instructions for other MIDI devices.
Setting up an external MIDI keyboard controller from the Start page.
A MIDI keyboard controller is a hardware device that is generally used for playing and controlling other
MIDI devices, virtual instruments, and software parameters. In Studio One Artist, these devices are referred
to as Keyboards, and they must be configured before they are available for use. In some cases, your MIDI
keyboard controller is also used as a tone generator. Studio One Artist views the two functions of these types
of hardware as two different devices: a MIDI keyboard controller and a sound module. The MIDI controls
(keyboard, knobs, faders, etc.) will be set up as a Keyboard. The sound module will be set up as an
Instrument.

GETTING STARTED
11 | PreSonus 2008
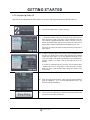
1) From the Setup area in the Start page, you can also set up your
external MIDI devices. Before we set up a new Song for recording,
let’s take a moment to configure external devices. Connect the MIDI
Out of your external MIDI controller to the MIDI In of your
FireStudio Lightpipe. Make sure the breakout cable is securely
connected to your FireStudio Lightpipe.
2) Click on the Configure External Devices link in the Setup area on the
Start page to launch the External Devices window.
Click the Add button.
3) The Add Device window will launch.
From the menu on the left, select “New Keyboard.” At this point, you
can customize the name of your keyboard by entering the
manufacturer and device names.
Specify which MIDI channels will be used to communicate with this
keyboard. For most purposes, you should select all MIDI channels. If
you are unsure of which MIDI channels to select, we suggest you select
all 16.
4) In the Receive From drop-down menu, select the MIDI interface input
from which Studio One Artist will receive MIDI data. In this case,
choose “Lightpipe MIDI.”
In the Send To drop-down menu, select the MIDI interface output
from which Studio One Artist will send MIDI data to your keyboard
(also labeled “Lightpipe MIDI”). If your keyboard controller does not
need to receive MIDI data from Studio One (say, for moving
motorized faders and the like), you can leave this unselected. If your
keyboard does need to receive MIDI date, you must connect a MIDI
cable from the MIDI output of the MIDI breakout cable to the MIDI
input of the keyboard.
5) If this is the only keyboard that you will use to control the virtual
instruments and your external synthesizers in Studio One Artist, you
should check the box next to Default Instrument Input. This will
automatically assign your keyboard to control all MIDI devices in
Studio One Artist.
Click OK.
If you have a sound module you’d like to connect, leave the External
Devices window open and proceed to the next part of this section. If
not, you can close this window and skip to Section 2.1.4.
Setting up an external MIDI sound module from the Start page:

GETTING STARTED
12 | PreSonus 2008
MIDI instrument controllers (keyboards, MIDI guitars, etc.) send musical information in the form of MIDI
data to tone modules, which respond by generating sound, as instructed. Tone modules can be standalone
sound devices or can be integrated into a controller, as with a keyboard synthesizer. Studio One Artist refers
to all tone generators as Instruments. Once you have set up your MIDI keyboard controller, take a moment to
configure your sound module.
1) Connect the MIDI In of your external sound module to the MIDI Out
of your FireStudio Lightpipe. Make sure the breakout cable is securely
connected to your FireStudio Lightpipe.
2) In the External Devices window, click the Add button.
3) The Add Device window will launch.
From the menu on the left, select “New Instrument.” At this point,
you can customize the name of your sound module by entering the
manufacturer and device names.
Specify which MIDI channels will be used to communicate with this
keyboard. For most purposes, you should select all MIDI channels. If
you are unsure of which MIDI channels to select, we suggest you select
all 16.
4) In the Send To drop-down menu, select the MIDI-interface output
from which Studio One Artist will send MIDI data to your sound
module, in this case, choose “Lightpipe MIDI.”
In the Receive From drop-down menu, select the MIDI-interface
output from which Studio One Artist will receive MIDI data from your
sound module (also labeled “Lightpipe MIDI”). In most cases, your
sound module will not need to send information to Studio One, so you
can leave this unspecified.
Click OK and close the External Devices window. You are now ready
to start recording in Studio One Artist. Sections 2.2.4 through 2.2.6
will go over how to set up a Song and will discuss some general
workflow tips for navigating through the Studio One Artist
enviroment.

GETTING STARTED
13 | PreSonus 2008
2.2.4 Configuring Audio I/O
Now that you’ve configured your MIDI devices, let’s create a new Song and set up your default Audio I/O.
1) From the Start page, select “Create a new Song.”
2) In the browser window, name your Song and choose the directory in
which you’d like it saved. You’ll notice a list of templates on the left.
The FireStudio Lightpipe template will create a Song with a track for
each of the available inputs. Every track is armed for recording, and no
further setup is required. Simply select this template and click “OK.”
The rest of this section will guide you through creating a Song from an
empty session.
3) To begin a new Song, select “Empty Song” from the Templates list. At
this point, you should give your Song a name and select your preferred
sample rate and bit depth. You can also determine the length of your
Song and the type of time format you would like to use (Notation Bars,
Seconds, Samples, or Frames). Click the OK button when you are
finished.
If you plan on importing loops into your Song, you may want to select
“Stretch Audio Loops to Song Tempo” so that any loop of a known
BPM (like those in the included content library) will import at the
correct tempo.
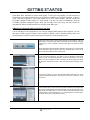
4) When the Song window launches, launch the Audio Setup window by
going to File|Options… (PC) or Studio One|Preferences (Mac), and
click on the Audio Setup button.
5) Click on the Song Setup button to open the Song Setup window, then
click on the on the Audio I/O Setup icon.

GETTING STARTED
14 | PreSonus 2008
6) Click on the Inputs tab in the Audio I/O Setup window, and you will
see all of the available inputs on your FireStudio Lightpipe. At this
time, you can add the number and type of inputs you plan to use. We
recommend that you create a mono input for each of the 32 inputs on
your FireStudio Lightpipe. If you plan on recording in stereo, you
should also create a stereo bus and assign it to the appropriate set of
inputs. You can remove any bus by simply selecting it and clicking the
remove button. To customize the name of your buses, double-click on
the default name to open a text box. When you have finished typing,
hit Enter.
If you would like the same inputs to be available every time you
launch Studio One Artist, click the “Make Default” button.
7) Click on the Outputs tab, and you will see all of the available outputs
on your FireStudio Lightpipe. At this time, you can add the number
of output buses to which you would like to have access and can give
them custom names.
In the lower right corner, you will see the Audition select menu. This
allows you to choose the ouput from which you will audition audio
files prior to importing them into Studio One Artist. In general, you
will want this to be the Main Out bus.
If you would like this output configuration available every time you
launch Studio One Artist, click the Make Default button.
2.2.5 Studio One Artist – Creating a Song
Now that you’ve configured your MIDI and Audio I/O and have created a new Song, let’s go through some of
the basics of Studio One Artist so you can start recording!
Creating Audio Tracks
In the upper left corner of the Arrange window, you will notice several buttons.
The middle button is the Add Tracks button. Click this button to bring up the
Add Tracks window.
In the Add Tracks window, you can select the number and type of Tracks you’d
like to create (Mono Audio, Stereo Audio, Instrument, or Automation) and
can customize the name and the color.

GETTING STARTED
15 | PreSonus 2008
Once you have added your Tracks, you can assign the input by simply clicking
on the input to which a Track is currently assigned. This will bring up your
inputs list. You can also access the Audio I/O Setup from here.
If you would like to add a Track for each of the available inputs and have the
routing automatically assigned, simply go to Track|Add Tracks for All Inputs.
To begin recording, create an audio track, assign it to Input 1, and connect a microphone or instrument to
Channel 1 on the A/D device (DigiMax FS, DigiMax D8, etc.) that is connected to ADAT Input 1-8 on the
FireStudio Lightpipe. Select Record Enable ( ) and Monitor ( ) on your track in Studio One Artist. Turn
up the Channel 1 gain knob on your A/D device while speaking/singing into the microphone or playing your
instrument. You should see the input meter in Studio One Artist react to the input. Adjust the gain so the
input level is near its maximum without clipping.
Connect a set of headphones to the FireStudio Lightpipe headphone output. You may also wish to connect
monitors to the FireStudio Lightpipe’s Main Outs. You are now ready to record. For complete instructions,
please consult the Studio One
Reference Manual,
which is located on your Studio One Artist Installation
DVD.
Creating MIDI Tracks
Click on the Add Tracks button. When the Add Tracks window launches, select
Instrument as the Track Format and click the OK button.
To assign your MIDI input, click on the MIDI Inputs list and select your
external sound module.
If you have added Virtual Inputs to your session, you will also see them as
available inputs.
If you selected your MIDI keyboard controller as the default keyboard, it will
already be selected. If not, choose your MIDI controller from Output menu
directly below.
To the left of the Add Track button, you will find the Inspector button. Click it
to display more parameters for the selected track.
At the bottom of the Inspector menu, you will see your Bank and Program
selections. From here, you can remotely change the patch on your sound
module.

GETTING STARTED
16 | PreSonus 2008
Please Note: MIDI data does not contain audio signals. To hear your sound module, you must connect the
audio output of the sound module either to an A/D device connected to the FireStudio Lightpipe, or directly
to the FireStudio Lightpipe (if your sound module has an ADAT optical output), and then connect the
FireStudio Lightpipe’s audio outputs to a sound system. (You also can listen on headphones, using the
FireStudio Lightpipe’s headphone output.) When you are ready to mix your Song, you must convert the
recorded MIDI data to an audio waveform by recording a new audio track.
Adding Virtual Instruments and Plug-in Effects to your Song
You can add plug-ins and Instruments to your Song by dragging-and-dropping from the browser. You can
also drag an effect or group of effects from one channel to another, drag in customized effects chains, and
instantly load your favorite virtual-instrument patch without ever scrolling through a menu.
In the lower right corner of the Arrange window are three buttons. The Edit
button opens or closes the Audio editor or the MIDI piano-roll editor, depending
on what type of track is selected. The Mix button opens and closes the mixer
window.
The Browse button opens the Browser window, which displays all of the available
virtual instruments, plug-in effects, audio files, and MIDI files, as well as the
pool of audio files loaded into the current session.
To add a virtual instrument to your session, click the Browse and Instrument
buttons to open the Instrument Browser. Select the instrument or one of its
patches from the Instrument Browser and drag it into the Arrange view. Studio
One Artist will automatically create a new track and load the Instrument as the
input.
To add a plug-in effect to a track, click the Effects button and select it or one of
its presets in the Effects Browser, then drag it over the track to which you would
like to add it.
Audio and MIDI files can also be quickly located, auditioned, and imported into
your Song by dragging them from the File Browser into the Arrange view. If you
drag the file to an empty space, a new track will be created with that file placed
at the position to which you dragged it. If you drag the file to an existing track,
the file will be placed as a new part on the track.

GETTING STARTED
17 | PreSonus 2008
2.3 SAMPLE HOOKUP DIAGRAM
With the FireStudio Lightpipe, you can simultaneously record and play back up to 32 channels. Because the
FireStudio Lightpipe can send and receive 32 channels simultaneously via its ADAT optical I/O, it is the perfect
solution to connect a 32-channel digital mixer to your computer. It is also ideal for recording live performances.
All you need are a few cables and a durable rack.
2.3.1 CONNECTING YOUR DIGITAL MIXER
Please note: In this scenario, the digital mixer would be the master clock. In the FireStudio Lightpipe Mixer
application, you will need to set the clock source to BNC so that the FireStudio Lightpipe will receive its clock
from an external source.
Page is loading ...
Page is loading ...
Page is loading ...
Page is loading ...
Page is loading ...
Page is loading ...
Page is loading ...
Page is loading ...
Page is loading ...
Page is loading ...
Page is loading ...
Page is loading ...
Page is loading ...
Page is loading ...
Page is loading ...
Page is loading ...
Page is loading ...
-
 1
1
-
 2
2
-
 3
3
-
 4
4
-
 5
5
-
 6
6
-
 7
7
-
 8
8
-
 9
9
-
 10
10
-
 11
11
-
 12
12
-
 13
13
-
 14
14
-
 15
15
-
 16
16
-
 17
17
-
 18
18
-
 19
19
-
 20
20
-
 21
21
-
 22
22
-
 23
23
-
 24
24
-
 25
25
-
 26
26
-
 27
27
-
 28
28
-
 29
29
-
 30
30
-
 31
31
-
 32
32
-
 33
33
-
 34
34
-
 35
35
-
 36
36
-
 37
37


PRESONUS FireStudio Lightpipe Owner's manual
- Category
- Musical Equipment
- Type
- Owner's manual
Ask a question and I''ll find the answer in the document
Finding information in a document is now easier with AI
Related papers
-
PRESONUS Inspire 1394 User guide
-
PRESONUS FireStudio Mobile Owner's manual
-
PRESONUS FireStudio Project User manual
-
-
-
-
-
-
PRESONUS DigiMax D8 User manual
-
PRESONUS DigiMax FS Owner's manual
Other documents
-
 Presonus Audio electronic PreSonus 2008 User manual
-
Novation Launch Control XL Mk2 User guide
-
Novation Launch Control User guide
-
ESI MIDIMate II Datasheet
-
Roland MX-1 Owner's manual
-
 Presonus Audio electronic D8 User manual
-
 Procolor 098913 Datasheet
-
 Presonus Audio electronic Microphone Preamplifier User manual
-
DoreMidi UMH-21 Operating instructions
-
M-Audio Ozonic User manual


