Page is loading ...

Instruction Manual
DE: Bedienungsanleitung - de.startech.com
FR: Guide de l'utilisateur - fr.startech.com
ES: Guía del usuario - es.startech.com
IT: Guida per l'uso - it.startech.com
NL: Gebruiksaanwijzing - nl.startech.com
PT: Guia do usuário - pt.startech.com
Manual Revision: 04/08/2011
For the most up-to-date information, please visit: www.startech.com
Packaging Contents
• 1 x Trayless Mobile Rack
• 1 x SATA Data Cable
• 1 x Set of Keys
• 1 x Package of Mounting Screws
• 1 x Installation Guide
System Requirements
• Computer chassis/case with available 5.25in external bay
• SATA enabled computer system with available SATA data/power
connections
HSB110SATBK
5.25in Trayless Hot Swap Mobile Rack for 3.5in SATA Hard Drives w/LCD and Fan
Installation
WARNING! Hard drives and storage enclosures require careful
handling, especially when being transported. If you are not careful
with your hard disk, lost data may result. Always handle your hard
drive and storage device with caution. Be sure that you are properly
grounded by wearing an anti-static strap when handling computer
components or discharge yourself of any static electricity build-up
by touching a large grounded metal surface (such as the computer
case) for several seconds.
1. Turn your computer o and any peripherals connected to the
computer (i.e. printers, external hard drives, etc.). Unplug the
power cable from the rear of the power supply on the back of the
computer and disconnect all peripheral devices.
2. Remove the cover from the computer case. Refer to
documentation for your computer system for details.
3. Remove the front cover plate for the 5.25in bay that will contain
the Mobile Rack. Refer to documentation for your computer
system for details.
4. Refer to documentation for your computer system for instructions
on how to mount 5.25in devices into the computer case.
Mounting screws are provided, if necessary.
5. Once mounted in the case, connect the 7-pin SATA data cable from
the motherboard or SATA controller card to the rear of the Mobile
Rack.
6. Connect the 15-pin SATA power cable from the computer power
supply to the rear of the Mobile Rack.
NOTE: An optional 4-pin LP4 Molex power connector is also
available if the computer power supply does not have any available
SATA power connectors.
7. Place the cover back onto the computer case.
8. Insert the power cable into the socket on the power supply and
reconnect all other connectors removed in Step 1.
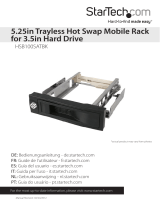
Front View
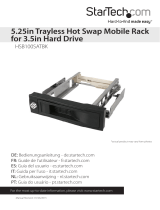
Rear View
How to Use
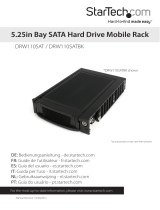
Installing A Hard Drive
1. Open the front bay of the Mobile Rack by pulling on the door
release latch. Swing the door fully open.
2. Gently slide the 3.5in SATA hard drive into the bay, connector rst,
with the label facing up.
3. Slide the hard drive at least 3/4 of the way into the bay, then close
the door to fully insert the hard drive. Make sure the door closes
fully, and the latch properly engages.
4. Use the provided key to lock the door on the Mobile Rack.
NOTE: The Mobile Rack will not power up the hard drive unless the
door is locked.

FCC Compliance Statement
This equipment has been tested and found to comply with the limits for a Class B digital device, pursuant to part 15 of the FCC Rules. These limits are designed to provide reasonable protection against
harmful interference in a residential installation. This equipment generates, uses and can radiate radio frequency energy and, if not installed and used in accordance with the instructions, may cause
harmful interference to radio communications. However, there is no guarantee that interference will not occur in a particular installation. If this equipment does cause harmful interference to radio or
television reception, which can be determined by turning the equipment o and on, the user is encouraged to try to correct the interference by one or more of the following measures:
• Reorient or relocate the receiving antenna.
• Increase the separation between the equipment and receiver.
• Connect the equipment into an outlet on a circuit dierent from that to which the receiver is connected.
• Consult the dealer or an experienced radio/TV technician for help.
Use of Trademarks, Registered Trademarks, and other Protected Names and Symbols
This manual may make reference to trademarks, registered trademarks, and other protected names and/or symbols of third-party companies not related in any way to
StarTech.com. Where they occur these references are for illustrative purposes only and do not represent an endorsement of a product or service by StarTech.com, or an endorsement of the product(s)
to which this manual applies by the third-party company in question. Regardless of any direct acknowledgement elsewhere in the body of this document, StarTech.com hereby acknowledges that all
trademarks, registered trademarks, service marks, and other protected names and/or symbols contained in this manual and related documents are the property of their respective holders.
Technical Support
StarTech.com’s lifetime technical support is an integral part of our commitment to provide industry-leading solutions. If you ever need help with your product, visit www.startech.com/support and access
our comprehensive selection of online tools, documentation, and downloads.
Warranty Information
This product is backed by a one year warranty.
In addition, StarTech.com warrants its products against defects in materials and workmanship for the periods noted, following the initial date of purchase. During this period, the products may be returned
for repair, or replacement with equivalent products at our discretion. The warranty covers parts and labor costs only. StarTech.com does not warrant its products from defects or damages arising from
misuse, abuse, alteration, or normal wear and tear.
Limitation of Liability
In no event shall the liability of StarTech.com Ltd. and StarTech.com USA LLP (or their ocers, directors, employees or agents) for any damages (whether direct or indirect, special, punitive, incidental,
consequential, or otherwise), loss of prots, loss of business, or any pecuniary loss, arising out of or related to the use of the product exceed the actual price paid for the product. Some states do not allow
the exclusion or limitation of incidental or consequential damages. If such laws apply, the limitations or exclusions contained in this statement may not apply to you.
Specications
Host Interface SATA
Connectors
1 x 7-pin SATA Data male
1 x 15-pin SATA Power male
1 x 4-pin LP4 Molex male
LEDs
1 x Power
1 x Activity
Fans 1 x 40mm
Hard Drive
Compatibility
3.5in SATA 1.0/2.0/3.0 hard drives
Key Lock Yes
Insertion Rating 15,000 cycles
Vibration/Shock
Absorbers
Yes
Enclosure Material Metal, Plastic (UL94 V-0)
Operating Temperature 5°C ~ 80°C (41°F ~ 176°F)
Storage Temperature -40°C ~ 70°C (-40°F ~ 158°F)
Humidity 8% ~ 90% RH
Dimensions
(LxWxH)
185.0mm x 149.0mm x 42.0mm
Weight 670g
LCD Operation
Button Description
Mode Change the temperature alarm threshold
Set
Toggle temperature readout between Celsius/
Fahrenheit
(Mode) Turn alarm on/o
Up
Toggle temperature readout between Celsius/
Fahrenheit
(Mode) Increase temperature alarm threshold
Down
Toggle temperature readout between Celsius/
Fahrenheit
(Mode) Decrease temperature alarm threshold
Note: Powering the Mobile Rack o will reset the temperature alarm
threshold to default (55°C/131°F).
/