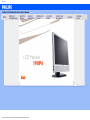
Taiwan Electrical & Electronic Manufacturers 190P6EG/00 User manual
- Category
- LED displays
- Type
- User manual
This manual is also suitable for


Safety and Troubleshooting Information
• Safety
Precautions
and
Maintenance
• FAQs
• Troubleshooting
• Regulatory
Information
• Other Related
Information
Safety and Troubleshooting Information
Safety precautions and maintenance
WARNING: Use of controls, adjustments or procedures other than
those specified in this documentation may result in exposure to shock,
electrical hazards and/or mechanical hazards.
Read and follow these instructions when connecting and using your computer monitor:
Operation:
● Keep the monitor out of direct sunlight and away from stoves or any other heat source.
● Remove any object that could fall into ventilation holes or prevent proper cooling of the
monitor’s electronics.
● Do not block the ventilation holes on the cabinet.
● When positioning the monitor, make sure the power plug and outlet are easily accessible.
● If turning off the monitor by detaching the power cable or DC power cord, wait for 6
seconds before attaching the power cable or DC power cord for normal operation.
● Please use approved power cord provided by Philips all the time. If your power cord is
missing, please contact with your local service center. (Please refer to Customer Care
Consumer Information Center)
● Do not subject the LCD monitor to severe vibration or high impact conditions during
operation.
● Do not knock or drop the monitor during operation or transportation.
Maintenance:
● To protect your display from possible damage, do not put excessive pressure on the LCD
panel. When moving your monitor, grasp the frame to lift; do not lift the monitor by
placing your hand or fingers on the LCD panel.
● Unplug the monitor if you are not going to use it for an extensive period of time.
● Unplug the monitor if you need to clean it with a slightly damp cloth. The screen may be
wiped with a dry cloth when the power is off. However, never use organic solvent, such
as, alcohol, or ammonia-based liquids to clean your monitor.
● To avoid the risk of shock or permanent damage to the set, do not expose the monitor to
dust, rain, water, or excessive moisture environment.
● If your monitor gets wet, wipe it with dry cloth as soon as possible.
● If foreign substance or water gets in your monitor, please turn the power off immediately
and disconnect the power cord. Then, remove the foreign substance or water, and send
it to the maintenance center.
● Do not store or use the LCD monitor in locations exposed to heat, direct sunlight or
extreme cold.
● In order to maintain the best performance of your monitor and use it for a longer lifetime,
please use the monitor in a location that falls within the following temperature and
humidity ranges.
❍ Temperature: 5-40°C 41-104°F
file:///D|/My%20Documents/dfu/A9/english/190p6/safety/safety.htm (1 of 2)2005-06-09 8:34:47 AM

Safety and Troubleshooting Information
❍ Humidity: 20-80% RH
Service:
● The casing cover should be opened only by qualified service personnel.
● If there is any need for any document for repair or integration, please contact with your
local service center. (please refer to the chapter of "Consumer Information Center")
● For transportation information, please refer to "Physical Specifications".
● Do not leave your monitor in a car/trunk under direct sun light.
Consult a service technician if the monitor does not operate normally, or you are
not sure what procedure to take when the operating instructions given in this
manual have been followed.
RETURN TO TOP OF THE PAGE
file:///D|/My%20Documents/dfu/A9/english/190p6/safety/safety.htm (2 of 2)2005-06-09 8:34:47 AM

About This Manual
• About This
Guide
• Notational
Descriptions
About This Manual
About This Guide
This electronic user's guide is intended for anyone who uses the Philips LCD Monitor. It
describes the LCD monitor's features, setup, operation and other important information. Its
contents are identical to the information in our printed version.
It includes the following sections:
● Safety and Troubleshooting Information provides tips and solutions for common problems
as well as other related information you may need.
● About This Electronic User's Manual gives an overview of information included, along with
notation icon descriptions and other documentation for your reference.
● Product Information gives an overview of the monitor's features as well as the technical
specifications for this monitor.
● Installing Your Monitor describes the initial setup process and gives an overview of how to
use the monitor.
● On-Screen Display provides information on adjusting the settings on your monitor.
● Customer Care and Warranty contains a list of worldwide Philips Consumer Information
Centers along with help desk phone numbers and information on the warranty applicable
to your product.
● Glossary defines technical terms.
● Download and Print Option transfers this entire manual to your hard drive for easy
reference.
RETURN TO TOP OF THE PAGE
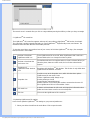
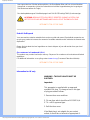
Notational Descriptions
The following subsections describe notational conventions used in this document.
Notes, Cautions and Warnings
Throughout this guide, blocks of text may be accompanied by an icon and printed in bold or italic
type. These blocks contain notes, cautions or warnings. They are used as follows:
file:///D|/My%20Documents/dfu/A9/english/190p6/about/about.htm (1 of 2)2005-06-09 8:34:48 AM

About This Manual
NOTE: This icon indicates important information and tips that help you make
better use of your computer system.
CAUTION: This icon indicates information that tells you how to avoid either
potential damage to hardware or loss of data.
WARNING: This icon indicates the potential for bodily harm and tells you how
to avoid the problem.
Some warnings may appear in alternate formats and may not be accompanied by an icon. In
such cases, the specific presentation of the warning is mandated by the relevant regulatory
authority.
RETURN TO TOP OF THE PAGE
©2005 Koninklijke Philips Electronics NV
All rights reserved. Reproduction, copying, use, modification, hiring, renting, public performance, transmission and/or
broadcasting in whole or in part is prohibited without written consent of Philips Electronics NV
file:///D|/My%20Documents/dfu/A9/english/190p6/about/about.htm (2 of 2)2005-06-09 8:34:48 AM

Product Information
• SmartManage
• Product
Features
• Lead-free
Product
• Technical
Specifications
•
LightFrame
TM
Digital Reality
• USB
connectivity
solution
• SmartBright
• Resolution &
Preset Modes
• Philips Pixel
Defect Policy
• Automatic
Power Saving
• Physical
Specification
• Pin
Assignment
• Product Views
• Physical
Function
• Perfect Panel
Warranty
• Rotating the
Monitor
Product Information
Product Features
190P6
● Outstanding front of screen performance
❍ LightFrame™ DR maximizes your on-screen experience
❍ ISO 13406-2 Class I compliant dot-defect-free display
❍ SXGA 1280 x 1024 resolution for sharper display
❍ Fast response time displays fast moving pictures better
❍ Dual input accepts both analog VGA and digital DVI signals
● Maximum comfort for maximum productivity
❍ Screen rotates for better ergonomics and cable management
❍ Four-port, high-speed USB 2.0 hub for easy connections
❍ Brightness automatically adjusts with ambient conditions
❍ Built-in speakers for audio without desktop clutter
❍ Stand-alone audio for efficient net conferencing
● Best total cost of ownership solution
❍ SmartManage provides LAN-based asset management capabilities
❍ Lead-free display safeguards our environment
RETURN TO TOP OF THE PAGE
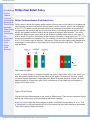
Lead-free Product
Philips eliminated toxic substances like lead from its displays. Lead-free display helps protect your
health and promotes environmentally sound recovery and disposal of waste from electrical and
electronic equipment.Philips complies with the European Community stringent RoHS Directive
mandating restrictions on hazardous substances in electrical and electronic equipment. With Philips, you
can be confident that your display device does not harm the environment.
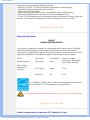
Technical Specifications*
LCD PANEL
• Type TFT LCD
• Screen size 19" / 48.26 cm diagonal
• Pixel Pitch 0.294 x 0.294 mm
• LCD Panel type
1280 x 1024 pixels
R.G.B. vertical stripe
Anti-glare polarizer, hard coated
• Effective viewing area 376.32 x 301.06 mm
• Display Colors 16.2 M colors
file:///D|/My%20Documents/dfu/A9/english/190p6/product/product.htm (1 of 13)2005-06-09 8:34:53 AM

Product Information
SCANNING
Vertical refresh rate 56 Hz-76 Hz
Horizontal Frequency 30k Hz-83 kHz
VIDEO
• Video dot rate 140 MHz
• Input impedance
- Video
75 ohm
- Sync
2.2K ohm
• Input signal levels 0.7 Vpp
• Sync input signal
Separate sync
Composite sync
Sync on green
• Sync polarities Positive and negative
• Video interface
Dual input: D-Sub (analog) and DVI-D (digital) are available
and user selectable
• USB connectivity solution USB Hub for versatile peripheral connections.
Audio
• Loudspeaker
4W Stereo Audio (2W/channel RMSx2, 300 Hz-13 kHz, 16
ohm, PMPO 32 Watts)
• Headphone connector 3.5mm mini jack
• Input signal connector 3.5mm mini jack
Optical characteristics
• Contrast ratio 600:1 (typ.)
• Brightness
250 cd/m
2
(typ.)
• Peak contrast angle 6 o'clock
• White Chromaticity
x: 0.283 y: 0.297 (at 9300°K)
x: 0.313 y: 0.329 (at 6500°K)
x: 0.313 y: 0.329 (at sRGB)
• Viewing Angle (C/R>5)
Upper >80° (typ.)
Lower >80° (typ.)
Left >80° (typ.)
Right >80° (typ.)
• Response time
< 8 ms (typ.)
* This data is subject to change without notice.
RETURN TO TOP OF THE PAGE
file:///D|/My%20Documents/dfu/A9/english/190p6/product/product.htm (2 of 13)2005-06-09 8:34:53 AM

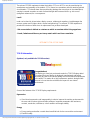
Product Information
LightFrame
TM
Digital Reality (LightFrame
TM
DR) for Windows
Introduction
Philips LightFrame
TM
DR feature enriches your photo and video experience with preset modes ideal for your favorite
applications: Internet, TV/video viewing, photos and gaming. The LightFrame
TM
DR engine optimizes brightness,
sharpness, contrast, color, JPG noise for photos and skin tone for videos.
Installation
First things first: Philips LightFrame
TM
DR only works with latest Philips LCD Monitor which is sepcially built to use this
software. That is LightFrame
TM
DR can only work on 170X5,190X5 or 170P6/190P6 or later version LCD monitor.
Earlier Philips monitors or other manufacturers' monitors will not work with this picture enhancement software. You
can identify compatible Philips monitors by the LightFrame logo on the front of the monitor.
LightFrame
TM
DR works with true Windows-based programs and DOS-based programs that operate in a Windows
environment. It does not work with DOS-based programs operating only in a DOS environment.
To control the LightFrame
TM
DR feature in your monitor, you'll want install the LightFrame
TM
DR application found on
this CD-ROM.
To install LightFrame
TM
DR, place the CD in your CD-ROM drive.
When the CD menu appears on your screen,
1) select preferred language
2) select model number (170P6 or 190P6)
3) click on Install LightFrame
TM
Digital Reality.
Follow the on-screen prompts to properly install the program. The software checks to see if you have a compatible
monitor. You must agree to the license terms in order to install the software.
After installation, the LightFrame
TM
DR shortcut icon automatically appears at your desktop, click it to load the control
bar on screen.
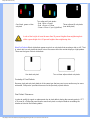
Use Tips
1. Cursor with a yellow light bulb versus a blue light bulb
Your mouse pointer takes the shape of a light bulb to indicate that LightFrame
TM
DR is ready to activate or deactivate
a target window that contains photos, videos or other content that can be enhanced. A yellow light bulb means that
you are moving over a window where LightFrame
TM
DR can be activated. Click on the window to activate
enhancement. A blue light bulb appears when moving over an activated window. Click on the window to de-activate
LightFrame
TM
DR.
Cursor examples
Here is a list of LightFrame
TM
DR cursors.
file:///D|/My%20Documents/dfu/A9/english/190p6/product/product.htm (3 of 13)2005-06-09 8:34:53 AM

Product Information
This is the default cursor displayed when you move over a non-LightFrame
TM
DR enhanced window or area. Clicking
and dragging this cursor over a window or area activates LightFrame
TM
DR enhancement.
Your cursor becomes a yellow light bulb when it passes over a non-active window to indicate that LightFrame
TM
DR
can be activated in the selected window. Click to activate LightFrame
TM
DR in the selected window. To activate
LightFrame
TM
DR simultaneously in a total of up to eight windows, click on the selected windows one-by-one while
pressing the Shift key.
Your cursor becomes a blue light bulb when it passes over an active LightFrame
TM
DR window. Click to deactivate
LightFrame
TM
DR in the selected window.
file:///D|/My%20Documents/dfu/A9/english/190p6/product/product.htm (4 of 13)2005-06-09 8:34:53 AM

Product Information
The normal cursor is restored after you click on a target without pressing the shift key or after you drag a rectangle.
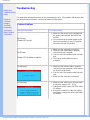
2. LightFrame
TM
DR control bar
The LightFrame
TM
DR control bar appears at the top of screen after any LightFrame
TM
DR function is activated.
The control bar is another upgrade that helps you run all LightFrame
TM
Digital Reality's neat, new features. The
illustration below describes the tasks each button performs.
To drag the control bar to any preferred area of your screen, left click the LightFrame
TM
DR logo. (See examples
below) This area is not a button.
Activate or deactivate
LightFrame
TM
DR icon
Turns LightFrame
TM
DR on and off. When LightFrame
TM
DR is active in a
selected window, the icon changes from blue to yellow.
Activate or deactivate the
mode menu icon
The default mode menu icon appears when no mode is selected. When you
select the photo, Internet or other mode, the icon for the selected mode
appears.
Deactivate all
LightFrame
TM
DR windows
icon
Deactivates all LightFrame
TM
DR windows. This function is only visible when
LightFrame
TM
DR windows are active.
Properties icon
Provides access to the Properties menu, which includes these options:
LightFrame
TM
DR auto start: Yes/no
Position: LightFrame
TM
DR Always on top
Warning messages: On/off
Target selection: Automatic/manual
Monitor selection: Chose among two monitors connected to the same PC
Place LightFrame
TM
DR icon in the taskbar: Yes/no
Info mode icon
Activates and deactivates the Info mode, which provides information about
toolbar and menu items as well as access to Help files.
Exit icon
Click to exit the LightFrame
TM
DR control bar
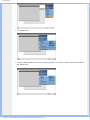
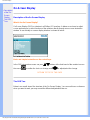
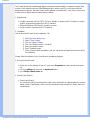
3. Optimizing LightFrame
TM
DR settings
Here's how to optimize LightFrame
TM
DR settings to your personal preferences:
1. Select your desired mode from the mode Menu. Click to open the mode.
file:///D|/My%20Documents/dfu/A9/english/190p6/product/product.htm (5 of 13)2005-06-09 8:34:53 AM

Product Information
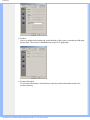
2. The settings menu
3. Change settings by pulling the color bar or pressing the plus (+) or minus (-) button to move incrementally to
the desired levels.
file:///D|/My%20Documents/dfu/A9/english/190p6/product/product.htm (6 of 13)2005-06-09 8:34:53 AM

Product Information
When you're finished, click on the Mode icon to exit the menu.
4. LightFrame
TM
Hot Key
The LightFrame
TM
Hot Key is located at front of LightFrame
TM
DR monitor. The blue LED is on when LightFrame
TM
is
activated and off when the feature is deactivated. A touch on the Hot Key quickly provides full screen enhancement in
your choice of the Internet, Photo or Video-TV mode.
When you touch the front button, a small OSD window opens on your screen directly above the button location.
Use this screen to select the best full screen mode for the application you're working with. Press continuously on the
Hot Key to scroll through the available options.
1) When you touch the LightFrame
TM
Hot Key, an OSD window opens. Touch the button continually to scroll among
the available Internet, Photo and Video-TV modes. As a mode becomes available for selection, its color changes from
blue to yellow. Once you reach the desired mode, remove your finger from the Hot Key. After three seconds, the mode
you have selected will be confirmed and the OSD window will automatically close.
2) Touch the LightFrame
TM
DR Hot Key for three seconds to enter the LightFrame
TM
demo mode. To exit the
demonstration mode, press the hot key again.
5. Language
While English is the default language of LightFrame
TM
DR, Dutch, French, German, Italian, Portuguese, Spanish,
Simplified Chinese, Traditional Chinese and Korean are supported. LightFrame
TM
DR will detect the language of
computer system OS and select the language automatically.
Notes
Philips LightFrame
TM
DR only works with monitors specially built to use this software. If LightFrame
TM
DR detects that
your monitor is not LightFrame
TM
DR-compatible, a message appears on the monitor screen. If you see this message,
you can abort or continue the installation; however, if you continue the installation, LightFrame
TM
DR will probably not
file:///D|/My%20Documents/dfu/A9/english/190p6/product/product.htm (7 of 13)2005-06-09 8:34:53 AM

Product Information
work on the monitor.
How to use LightFrame
TM
DR
After installation, LightFrame
TM
DR shortcut icon appears on your screen whenever the computer is started.
To learn more about using LightFrame
TM
Digital Reality, please refer to the help information, which is available after
installation.
Compatibility
This version of LightFrame
TM
DR is compatible with:
Windows® XP
Windows® 2000 Professional Edition with Service Pack 2
How to download your upgraded LF DR Installation file
Visit http://www.philips.com/support
RETURN TO TOP OF THE PAGE
USB Connectivity Solution
The USB (Universal Serial Bus) is a universal interface for peripherals to hot-swap with PCs. A four-port USB 2.0 hub
located on a monitor converting a monitor into an USB host not only provides additional connectivity for USB
peripherals, but also provides managed power to attached peripherals. It is a convenient and easy-to-use high-speed
interface for data transfer between your PC and up to four USB peripherals.
RETURN TO TOP OF THE PAGE
SmartBright
Ambient light is the general background light all around us that softens contrasts between brightly lighted task areas
and the surrounding portions of the room. In most rooms, ambient light changes constantly, but changes in lighting
can adversely effect display quality. Philips SmartBright automatically adjusts display brightness settings to
correspond with ambient light conditions, delivering just the right level of brightness for optimal front-of-screen
performance, maximum productivity and minimal fatigue.
How to switch the setting
1.Choose the Smart Bright via More Setting in OSD menu.
2.Select the "On" "Off" setting.(default: Off)
Note:
Do not block the sensor when using this function.
RETURN TO TOP OF THE PAGE
file:///D|/My%20Documents/dfu/A9/english/190p6/product/product.htm (8 of 13)2005-06-09 8:34:53 AM

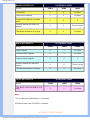
Product Information
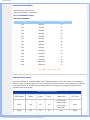
Resolution & Preset Modes
• Maximum 1280 x 1024 at 75 Hz
• Recommended 1280 x 1024 at 60 Hz
50 user definable modes
15 factory preset modes:
H. freq (kHz) Resolution V. freq (Hz)
31.5 640*350 70
31.5 720*400 70
31.5 640*480 60
35.0 640*480 67
37.5 640*480 75
35.2 800*600 56
37.9 800*600 60
46.9 800*600 75
49.7 832*624 75
48.4 1024*768 60
60.0 1024*768 75
69.0 1152*870 75
71.8 1152*900 76
63.9 1280*1024 60
80.0 1280*1024 75
RETURN TO TOP OF THE PAGE
Automatic Power Saving
If you have VESA DPMS compliance display card or software installed in your PC, the monitor can automatically
reduce its power consumption when not in use. If an input from a keyboard, mouse or other input device is detected,
the monitor will 'wake up' automatically. The following table shows the power consumption and signaling of this
automatic power saving feature:
Power Management Definition
VESA Mode Video H-sync V-sync Power Used LED color
Active ON Yes Yes
< 42.5 W (typ.)
(without USB)
< 52.5 W (typ.)
(With USB)
Green
Sleep OFF No No < 1 W Amber
file:///D|/My%20Documents/dfu/A9/english/190p6/product/product.htm (9 of 13)2005-06-09 8:34:53 AM

Product Information
Switch Off OFF - - < 1W Off
This monitor is
ENERGY STAR
®
compliant. As an ENERGY STAR
®
Partner, PHILIPS has
determined that this product meets the
ENERGY STAR
®
guidelines for energy efficiency.
RETURN TO TOP OF THE PAGE
Physical Specifications
• Dimension (WxHxD) *
425 x 432 x 210 mm
• Weight 7.3 kg
• Tilt / Swivel -5° ~ 25° / + - 65°
• Height adjustment rang 130 mm
• Power supply 100 — 240 VAC, 60 - 50 Hz
• Power consumption 42.5W (typ. without USB) / 52.5 W (typ. with USB)
• Temperature
5° C to 40° C (operating)
-20° C to 60° C (storage)
• Relative humidity 20% to 80%
• System MTBF 50K hours (excluding CCFL 40K hours)
• Cabinet color
190P6EG: Light Gray
190P6EB: Black
190P6ES: Silver
* This data is subject to change without notice.
* Resolution 1280x1024, standard size, brightness max., contrast 50%, 6500° K, full white pattern, without audio/USB.
RETURN TO TOP OF THE PAGE
Pin Assignment
The digital only connector contains 24 signal contacts organized in three rows of eight contacts. Signal pin
assignments are listed in the following table:
Pin
No.
Signal
Assignment
Pin
No.
Signal
Assignment
Pin
No.
Signal
Assignment
1
T.M.D.S. Data2-
9
T.M.D.S. Data1- 17 T.M.D.S. Data0-
2
T.M.D.S. Data2+
10
T.M.D.S. Data1+ 18 T.M.D.S. Data0+
3
T.M.D.S. Data2/4
Shield
11
T.M.D.S. Data1/3
Shield
19
T.M.D.S. Data0/5
Shield
4
No connect
12
No connect 20 No connect
5
No connect
13
No connect 21 No connect
file:///D|/My%20Documents/dfu/A9/english/190p6/product/product.htm (10 of 13)2005-06-09 8:34:53 AM

Product Information
6
DDC Clock
14
+5V Power 22
T.M.D.S. Clock
Shield
7
DDC Data
15
Ground (for +5V) 23 T.M.D.S. Clock+
8
No connect 16 Hot Plug Detect 24 T.M.D.S. Clock-
The 15-pin D-sub connector (male) of the signal cable:
Pin
No.
Assignment
Pin
No.
Assignment
1
Red video input
9
DDC +5V
2
Green video input/SOG
10
Logic ground
3
Blue video input
11
Ground
4
GND
12
Serial data line (SDA)
5
GND-Cable detect
13
H. Sync / H+V
6
Red video ground
14
V. Sync
7
Green video ground
15
Data clock line (SCL)
8
Blue video ground
RETURN TO TOP OF THE PAGE
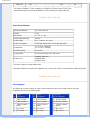
Product Views
Follow the links to see various views of the monitor and its components.
Front View Product Description
RETURN TO TOP OF THE PAGE
file:///D|/My%20Documents/dfu/A9/english/190p6/product/product.htm (11 of 13)2005-06-09 8:34:53 AM

Product Information
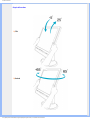
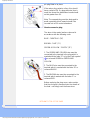
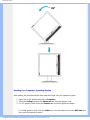
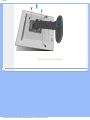
Physical Function
1) Tilt
2) Swivel
file:///D|/My%20Documents/dfu/A9/english/190p6/product/product.htm (12 of 13)2005-06-09 8:34:53 AM


Installing Your LCD Monitor
•
Front View
Produt
Description
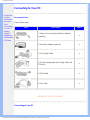
•
Connecting
to Your PC
• The Base
•
Getting
Started
•
Optimizing
Performance
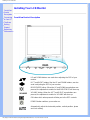
Installing Your LCD Monitor
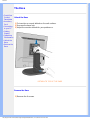
Front View Product Description
UP and DOWN buttons are used when adjusting the OSD of your
monitor.
LEFT and RIGHT buttons, like the UP and DOWN buttons, are also
used in adjusting the OSD of your monitor.
BRIGHTNESS hotkey. When the UP and DOWN arrow buttons are
pressed, the adjustment controls for the BRIGHTNESS will show up.
VOLUME
VOLUME hotkey. When the LEFT and RIGHT arrow buttons are
pressed, the adjustment controls for VOLUME will show up.
OK button which when pressed will take you to the OSD controls.
POWER button switches your monitor on.
Automatically adjust the horizontal position, vertical position, phase
and clock setting.
file:///D|/My%20Documents/dfu/A9/english/190p6/install/install.htm (1 of 3)2005-06-09 8:34:57 AM

Installing Your LCD Monitor
LightFrame
TM
hotkey for mode-switching between full-screen mode
and multi-window mode.
USB Hub for versatile peripheral connections.
RETURN TO TOP OF THE PAGE
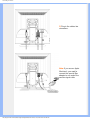
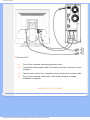
Rear View
1 Earphone jack
2 PC audio input
3 AC power input
4 DVI-D input
5 VGA input
6 USB upstream port
7 Kensington anti-thief lock
RETURN TO TOP OF THE PAGE
Optimizing Performance
file:///D|/My%20Documents/dfu/A9/english/190p6/install/install.htm (2 of 3)2005-06-09 8:34:57 AM
Page is loading ...
Page is loading ...
Page is loading ...
Page is loading ...
Page is loading ...
Page is loading ...
Page is loading ...
Page is loading ...
Page is loading ...
Page is loading ...
Page is loading ...
Page is loading ...
Page is loading ...
Page is loading ...
Page is loading ...
Page is loading ...
Page is loading ...
Page is loading ...
Page is loading ...
Page is loading ...
Page is loading ...
Page is loading ...
Page is loading ...
Page is loading ...
Page is loading ...
Page is loading ...
Page is loading ...
Page is loading ...
Page is loading ...
Page is loading ...
Page is loading ...
Page is loading ...
Page is loading ...
Page is loading ...
Page is loading ...
Page is loading ...
Page is loading ...
Page is loading ...
Page is loading ...
Page is loading ...
Page is loading ...
Page is loading ...
Page is loading ...
Page is loading ...
Page is loading ...
Page is loading ...
Page is loading ...
Page is loading ...
Page is loading ...
Page is loading ...
Page is loading ...
Page is loading ...
Page is loading ...
Page is loading ...
Page is loading ...
Page is loading ...
Page is loading ...
Page is loading ...
Page is loading ...
Page is loading ...
Page is loading ...
Page is loading ...
Page is loading ...
Page is loading ...
Page is loading ...
Page is loading ...
Page is loading ...
Page is loading ...
Page is loading ...
Page is loading ...
Page is loading ...
Page is loading ...
Page is loading ...
Page is loading ...
Page is loading ...
Page is loading ...
Page is loading ...
Page is loading ...
Page is loading ...
Page is loading ...
Page is loading ...
Page is loading ...
Page is loading ...
Page is loading ...
Page is loading ...
Page is loading ...
-
 1
1
-
 2
2
-
 3
3
-
 4
4
-
 5
5
-
 6
6
-
 7
7
-
 8
8
-
 9
9
-
 10
10
-
 11
11
-
 12
12
-
 13
13
-
 14
14
-
 15
15
-
 16
16
-
 17
17
-
 18
18
-
 19
19
-
 20
20
-
 21
21
-
 22
22
-
 23
23
-
 24
24
-
 25
25
-
 26
26
-
 27
27
-
 28
28
-
 29
29
-
 30
30
-
 31
31
-
 32
32
-
 33
33
-
 34
34
-
 35
35
-
 36
36
-
 37
37
-
 38
38
-
 39
39
-
 40
40
-
 41
41
-
 42
42
-
 43
43
-
 44
44
-
 45
45
-
 46
46
-
 47
47
-
 48
48
-
 49
49
-
 50
50
-
 51
51
-
 52
52
-
 53
53
-
 54
54
-
 55
55
-
 56
56
-
 57
57
-
 58
58
-
 59
59
-
 60
60
-
 61
61
-
 62
62
-
 63
63
-
 64
64
-
 65
65
-
 66
66
-
 67
67
-
 68
68
-
 69
69
-
 70
70
-
 71
71
-
 72
72
-
 73
73
-
 74
74
-
 75
75
-
 76
76
-
 77
77
-
 78
78
-
 79
79
-
 80
80
-
 81
81
-
 82
82
-
 83
83
-
 84
84
-
 85
85
-
 86
86
-
 87
87
-
 88
88
-
 89
89
-
 90
90
-
 91
91
-
 92
92
-
 93
93
-
 94
94
-
 95
95
-
 96
96
-
 97
97
-
 98
98
-
 99
99
-
 100
100
-
 101
101
-
 102
102
-
 103
103
-
 104
104
-
 105
105
-
 106
106


Taiwan Electrical & Electronic Manufacturers 190P6EG/00 User manual
- Category
- LED displays
- Type
- User manual
- This manual is also suitable for
Ask a question and I''ll find the answer in the document
Finding information in a document is now easier with AI