Krups IL Caffe Bistro 867 Instructions For Use Manual
- Category
- Coffee makers
- Type
- Instructions For Use Manual
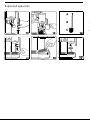
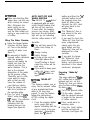
Krups IL Caffe Bistro 867 is a fully-featured combination coffee, espresso, and cappuccino maker. It incorporates the functions into a space-saving system that can be programmed to brew wake-up coffee up to 24 hours in advance. The model features an electronic programming panel which offers ease of operation and flawless performance.
Krups IL Caffe Bistro 867 is a fully-featured combination coffee, espresso, and cappuccino maker. It incorporates the functions into a space-saving system that can be programmed to brew wake-up coffee up to 24 hours in advance. The model features an electronic programming panel which offers ease of operation and flawless performance.


-
 1
1
-
 2
2
-
 3
3
-
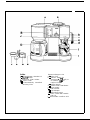 4
4
-
 5
5
-
 6
6
-
 7
7
-
 8
8
-
 9
9
-
 10
10
-
 11
11
-
 12
12
-
 13
13
-
 14
14
-
 15
15
-
 16
16
-
 17
17


Krups IL Caffe Bistro 867 Instructions For Use Manual
- Category
- Coffee makers
- Type
- Instructions For Use Manual
Krups IL Caffe Bistro 867 is a fully-featured combination coffee, espresso, and cappuccino maker. It incorporates the functions into a space-saving system that can be programmed to brew wake-up coffee up to 24 hours in advance. The model features an electronic programming panel which offers ease of operation and flawless performance.
Ask a question and I''ll find the answer in the document
Finding information in a document is now easier with AI
Related papers
Other documents
-
Newco Enterprises, Inc. 1512 User manual
-
Matsui MCE100 User manual
-
Emerson CCM901 User manual
-
 Alexander 55 cup Operating instructions
-
Toastmaster MERB10B User manual
-
-
Farberware 4 Cup Espresso User manual
-
-
 AICOK CM9101 User manual
-
 AICOK CM4329AF-GS User manual


