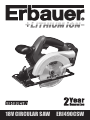
Erbauer ERI490CSW Original Instructions Manual
- Category
- Power universal cutters
- Type
- Original Instructions Manual

18V CIRCULAR SAW ERI490CSW
ERI490CSW

Original Instructions
(Version 1.1)

18V CIRCULAR SAW ERI490CSW
GUARANTEE
This product carries a 2 year guarantee. If your product develops a fault within this
period, you should in the first instance contact the retailer where the item was purchased.
This guarantee specifically excludes losses caused due to:
- Fair wear and tear
- Misuse or abuse
- Lack of routine maintenance
- Failure of consumable items (such as batteries)
- Accidental damage
- Cosmetic damage
- Failure to follow manufacturer’s guidelines
- Loss of use of the goods
This guarantee does not affect your statutory rights. This guarantee is only valid in the UK.
For further technical advice, spare parts or repair service (outside of guarantee) please contact
the customer helpline number on 0845 607 6380.
Congratulations on your purchase of a quality power tool from Erbauer (UK) Ltd. This
product should give you reliable service but for your peace of mind this
power tool does carry a 2 year guarantee, the terms of which are detailed below.
If this product develops a fault within the guarantee period contact your retailer.
Please retain this handbook in case you need to refer to safety, care or guarantee
information in the future.

GENERAL PoWER TooL SAfETy WARNINGS
Warning! Read all safety warnings and all instructions. Failure to follow the
warnings and instructions may result in electric shock, fire and/or serious injury.
Save all warnings and instructions for future reference.
The term “power tool” in the warnings refers to your mains-operated (corded) power tool or
battery-operated (cordless) power tool.
1) Work area safety
a) Keep work area clean and well lit. Cluttered or dark areas invite accidents.
b) Do not operate power tools in explosive atmospheres, such as in the
presence of flammable liquids, gases or dust. Power tools create sparks which may
ignite the dust or fumes.
c) Keep children and bystanders away while operating a power tool. Distractions
can cause you to lose control.
2) Electrical safety
a) Power tool plugs must match the outlet. Never modify the plug in any way. Do
not use any adapter plugs with earthed (grounded) power tools. Unmodified plugs
and matching outlets will reduce risk of electric shock.
b) Avoid body contact with earthed or grounded surfaces, such as pipes,
radiators, ranges and refrigerators. There is an increased risk of electric shock if your
body is earthed or grounded.
c) Do not expose power tools to rain or wet conditions. Water entering a power tool
will increase the risk of electric shock.
d) Do not abuse the cord. Never use the cord for carrying, pulling or unplugging
the power tool. Keep cord away from heat, oil, sharp edges or moving parts.
Damaged or entangled cords increase the risk of electric shock.
e) When operating a power tool outdoors, use an extension cord suitable for
outdoor use. Use of a cord suitable for outdoor use reduces the risk of electric shock.
f)
If operating a power tool in a damp location is unavoidable, use a residual current
device (RCD) protected supply. Use of an RCD reduces the risk of electric shock.
3) Personal safety
a) Stay alert, watch what you are doing and use common sense when operating
a power tool. Do not use a power tool while you are tired or under the influence
of drugs, alcohol or medication. A moment of inattention while operating power tools
may result in serious personal injury.
b) Use personal protective equipment. Always wear eye protection. Protective
equipment such as dust mask, non-skid safety shoes, hard hat, or hearing protection used
for appropriate conditions will reduce personal injuries.
c) Prevent unintentional starting. Ensure the switch is in the off-position before
connecting to power source and/or battery pack, picking up or carrying the tool.
Carrying power tools with your finger on the switch or energising power tools that have the
switch on invites accidents.
d
) Remove any adjusting key or wrench before turning the power tool on. A wrench
or a key left attached to a rotating part of the power tool may result in personal injury.

18V CIRCULAR SAW ERI490CSW
e) Do not overreach. Keep proper footing and balance at all times. This enables
better control of the power tool in unexpected situations.
f) Dress properly. Do not wear loose clothing or jewellery. Keep your hair,
clothing and gloves away from moving parts. Loose clothes, jewellery or long hair
can be caught in moving parts.
g) If devices are provided for the connection of dust extraction and collection
facilities, ensure these are connected and properly used. Use of dust collection can
reduce dust-related hazards.
4) Power tool use and care
a) Do not force the power tool. Use the correct power tool for your application. The
correct power tool will do the job better and safer at the rate for which it was designed.
b) Do not use the power tool if the switch does not turn it on and off. Any power
tool that cannot be controlled with the switch is dangerous and must be repaired.
c)
Disconnect the plug from the power source and/or the battery pack from the
power tool before making any adjustments, changing accessories, or storing power
tools. Such preventive safety measures reduce the risk of starting the power tool accidentally.
d) Store idle power tools out of the reach of children and do not allow persons
unfamiliar with the power tool or these instructions to operate the power tool.
Power tools are dangerous in the hands of untrained users.
e) Maintain power tools. Check for misalignment or binding of moving parts,
breakage of parts and any other condition that may affect the power tool’s
operation. If damaged, have the power tool repaired before use. Many accidents
are caused by poorly maintained power tools.
f) Keep cutting tools sharp and clean. Properly maintained cutting tools with sharp
cutting edges are less likely to bind and are easier to control.
g) Use the power tool, accessories and tool bits etc. in accordance with these
instructions, taking into account the working conditions and the work to be
performed. Use of the power tool for operations different from those intended could result
in a hazardous situation.
5) Battery tool use and care
a) Recharge only with the charger specified by the manufacturer. A charger that
is suitable for one type of battery pack may create a risk of fire when used with another
battery pack.
b) Use power tools only with specifically designated battery packs. Use of any
other battery packs may create a risk of injury and fire.
c) When battery pack is not in use, keep it away from other metal objects, like
paper clips, coins, keys, nails, screws or other small metal objects, that can
make a connection from one terminal to another. Shorting the battery terminals
together may cause burns or a fire.
d) Under abusive conditions, liquid may be ejected from the battery; avoid
contact. If contact accidentally occurs, flush with water. If liquid contacts eyes,
additionally seek medical help. Liquid ejected from the battery may cause irritation or burns.
6) Service
a) Have your power tool serviced by a qualified repair person using only identical
replacement parts. This will ensure that the safety of the power tool is maintained.

SAfETy WARNINGS foR ALL SAWS
a) Danger: Keep hands away from cutting area and the blade. Keep your
second hand on auxiliary handle, or motor housing. If both hands are holding
the saw, they cannot be cut by the blade.
b) Do not reach underneath the workpiece. The guard cannot protect you from the
blade below the workpiece.
c) Adjust the cutting depth to the thickness of the workpiece. Less than a full tooth of
the blade teeth should be visible below the workpiece.
d) Never hold piece being cut in your hands or across your leg. Secure the
workpiece to a stable platform. It is important to support the work properly to minimize
body exposure, blade binding, or loss of control.
e) Hold power tool by insulated gripping surfaces when performing an operation
where the cutting tool may contact hidden wiring. Contact with a “live” wire will also
make exposed metal parts of the power tool “live” and shock the operator.
f) When ripping always use a rip fence or straight edge guide. This improves the
accuracy of cut and reduces the chance of blade binding.
g) Always use blades with correct size and shape (diamond versus round) of arbour
holes. Blades that do not match the mounting hardware of the saw will run eccentrically,
causing loss of control.
h) Never use damaged or incorrect blade washers or bolt. The blade washers and bolt
were specially designed for your saw, for optimum performance and safety of operation.
fURThER SAfETy INSTRUCTIoNS foR ALL SAWS
Kickback causes and related warnings
- kickback is a sudden reaction to a pinched, bound or misaligned saw blade, causing an
uncontrolled saw to lift up and out of the workpiece toward the operator;
- when the blade is pinched or bound tightly by the kerf closing down, the blade stalls and
the motor reaction drives the unit rapidly back toward the operator;
- if the blade becomes twisted or misaligned in the cut, the teeth at the back edge of the
blade can dig into the top surface of the wood causing the blade to climb out of the kerf
and jump back toward the operator.
Kickback is the result of saw misuse and/or incorrect operating procedures or conditions and
can be avoided by taking proper precautions as given below.
a) Maintain a firm grip with both hands on the saw and position your arms to resist
kickback forces. Position your body to either side of the blade, but not in line
with the blade. Kickback could cause the saw to jump backwards, but kickback forces
can be controlled by the operator, if proper precautions are taken.
b) When blade is binding, or when interrupting a cut for any reason, release the
trigger and hold the saw motionless in the material until the blade comes to a
complete stop. Never attempt to remove the saw from the work or pull the saw
backward while the blade is in motion or kickback may occur. Investigate and take
corrective actions to eliminate the cause of blade binding.
c) When restarting a saw in the workpiece, centre the saw blade in the kerf and
check that saw teeth are not engaged into the material. If saw blade is binding, it
may walk up or kickback from the workpiece as the saw is restarted.

18V CIRCULAR SAW ERI490CSW
d) Support large panels to minimise the risk of blade pinching and kickback. Large
panels tend to sag under their own weight. Supports must be placed under the panel on
both sides, near the line of cut and near the edge of the panel.
e) Do not use dull or damaged blades. Unsharpened or improperly set blades produce
narrow kerf causing excessive friction, blade binding and kickback.
f) Blade depth and bevel adjusting locking levers must be tight and secure before
making cut. If blade adjustment shifts while cutting, it may cause binding and kickback.
g) Use extra caution when making a “plunge cut” into existing walls or other blind
areas. The protruding blade may cut objects that can cause kickback.
SAFETY INSTRUCTION FOR YOUR CIRCULAR SAW WITH INNER PENDULUM
GUARD
a) Check lower guard for proper closing before each use. Do not operate the saw
if lower guard does not move freely and close instantly. Never clamp or tie the
lower guard into the open position. If saw is accidentally dropped, lower guard may be
bent. Raise the lower guard with the retracting handle and make sure it moves freely and
does not touch the blade or any other part, in all angles and depths of cut.
b) Check the operation of the lower guard spring. If the guard and the spring are
not operating properly, they must be serviced before use. Lower guard may operate
sluggishly due to damaged parts, gummy deposits, or a build-up of debris.
c) Lower guard may be retracted manually only for special cuts such as “plunge
cuts” and “compound cuts.” Raise lower guard by retracting handle and as
soon as blade enters the material, the lower guard must be released. For all other
sawing, the lower guard should operate automatically.
d) Always observe that the lower guard is covering the blade before placing saw
down on bench or floor. An unprotected, coasting blade will cause the saw to walk
backwards, cutting whatever is in its path. Be aware of the time it takes for the blade to
stop after switch is released.
ADDITIoNAL SAfETy RULES foR yoUR CIRCULAR SAW
1. Always wear a dust mask, hearing protection and eye protection.
2. Only use saw blades recommended in the specification.
3. Do not use any abrasive wheels.
4. Use only blade diameter(s) in accordance with the markings.
5. Always wear gloves when handling saw blades and rough material. Saw blades shall be
carried in a holder whenever practicable.
6. Fully unwind cable drum extension to avoid potential overheating.
7. Before cutting, check the cutting line is free of nails, screws, etc.
8. Only make cuts with the blade direction downwards, never upwards or at the side.
9. Do not use a blade unless the rated blade speed exceeds the saw no load speed.
10. Never remove the guard system. Never use the saw if the guard system does not function
correctly. Never lock the moving guard open. The guard must move freely.
11. Never use saw blades made from high speed steel (HSS).
12. Always check walls, floors and ceilings to avoid hidden power cable and pipes.
13. Do not cut material containing asbestos.
14. Do not use circular saw to cut tree limbs or logs.

FOR CHARGER
1. This appliance is not intended for use by persons (including children) with reduced
physical,sensory or mental capabilities, or lack of experience and knowledge, unless they
have been given supervision or instruction concerning use of the appliance by a person
responsible for their safety. Children should be supervised to ensure that they do not play
with the appliance.
2. Charger is double insulated for additional electrical safety.
3. Charger is for indoor use only.
4. If the charger supply cord is damaged, it must be replaced by the manufacturer, its service
agent or similarly qualified persons in order to avoid a hazard.
5. Never charge damaged batteries as these can short circuit and over heat.
6. When the charger is in use it MUST be supervised , if there is any evidence of overheating
then IMMEDIATELY disconnect the charger from the power supply.
7. If gas or smoke is emitted from the battery during charging switch off the power supply ,
and move to a well vented area to allow the fumes to vent to atmosphere.
Caution is there is leaking liquid from the battery wear protective clothing, glasses and
clothes as this can be acidic.
8.
Always disconnect battery charger and remove battery from charger when the charging is complete.
9. Only use the battery charger specifically stated on the base of the battery.
FOR BATTERY
1. Always remove the battery pack from the charger immediately after re-charging is
completed.
2. When not in use, remove a charged battery pack from the charger.
3. Do not charge a damaged battery pack.
4. Do not charge non-rechargeable batteries.
5. Do not install the battery backwards so the polarity is reversed.
6. Do not connect the positive terminal and negative terminal of the battery to each other with
any metal object (such as wire).
7. Do not carry or store battery together with necklaces, hairpins or other metal objects.
8. Do not pierce the battery with nails, strike the battery with a hammer, step on the battery or
otherwise subject it to strong impacts or shocks.
9. Do not solder directly onto the battery.
10. Do not expose battery to water or salt water, or allow the battery to get wet.
11. Do not disassemble or modify the battery. The battery contains safety and protection
devices, which, if damaged, may cause the battery to generate heat, explode or ignite. The
protection circuit module provided with battery packs is not to be used as a substitute for a
shut-off switch.
12. Do not place the battery in or near fire, on stoves or other high temperature locations. Do
not place the battery in direct sunlight, or use or store the battery inside cars in hot weather.
Heating the battery can damage the safety circuitry, which can cause additional heating,
rupture or ignition of the battery. Using the battery in this manner may also result in a loss of
performance and a shortened life expectancy.
13. Do not place the battery in microwave ovens, high-pressure containers or on induction
cookware.
14. If you intend to store a battery for a period without use then store battery at room
temperature (19°C to 25°C), charged to about 30 – 50% of capacity. When storing for very
long periods boost-charge the battery once per year to prevent over discharge.
15. Always charge the battery in a temperature range of 0°C to 30°C and discharge in a
temperature range of 0°C to 75°C.
16. The battery pack and charger will be warm during charging, this is normal.
17. Do not continue charging the battery if it does not recharge within the specified charging

18V CIRCULAR SAW ERI490CSW
time. Doing so may cause the battery to become hot, explode or ignite. The temperature
range over which the battery can be charged is 0°C to 30°C. Charging the battery at
temperatures outside this range may cause severe damage to the battery or reduce battery
life expectancy.
18. When the battery is worn out, insulate the terminals with adhesive tape or similar materials
before disposal.
19. Do not dispose of batteries in fire, or with household waste. Return exhausted batteries
to your local collection or recycling point.
Warning: If a small amount of electrolyte should leak from the battery pack
under extremes of temperature or after heavy use, then wash off immediately
from your skin and hands using clean water. For eye contact, rinse thoroughly with clean
water and seek medical treatment immediately.
Warning: Some dust created by power sanding, sawing, grinding, drilling and
other construction activities contains chemicals known to cause cancer, birth
defects or other reproductive harm. Some examples of these chemicals are:
• Lead from lead-based paint.
• Crystalline silica from bricks and cement and other masonry products.
• Arsenic and chromium from chemically-treated lumber.
Your risk from these exposures varies, depending upon how often you do this type of work. To
reduce your exposure to these chemicals:
• Work in a well-ventilated area.
• Work with approved safety equipment, such as those dust masks that are specially designed
to filter microscopic particles.
VIBRATIoN
The European Physical Agents (Vibration) Directive has been brought in to help reduce
hand arm vibration syndrome injuries to power tool users. The directive requires power tool
manufacturers and suppliers to provide indicative vibration test results to enable users to make
informed decisions as to the period of time a power tool can be used safely on a daily basis
and the choice of tool.
Further Advice can be found at www.hse.gov.uk
Vibration total values (triax vector sum) determined according to EN 60745:
Cutting wood:
a
h,W
=4.51m/s²
Uncertainty K=1.5m/s²
The declared vibration emission value should be used as a minimum level and should be used
with the current guidance on vibration.
Calculating the actual period of the actual period off use can be difficult and the HSE website
has further information.
The declared vibration emission been measured in accordance with a standardised test stated
above and may be used to compare one tool with another tool.
The declared vibration emission value may also be used in a preliminary assessment of
exposure.

Warning: The vibration emission value during actual use of the power tool can differ from
the declared value depending on the ways in which the tool is used dependant on the
following examples and other variations on how the tool is used:-
How the tool is used and the materials being cut or drilled.
The tool being in good condition and well maintained.
The use the correct accessory for the tool and ensuring it is sharp and in good condition.
The tightness of the grip on the handles.
And the tool is being used as intended by its design and these instructions.
While working with this power tool, hand/arm vibrations occur. Adopt the correct
working practices in order to reduce the exposure to vibration.
This tool may cause hand-arm vibration syndrome if its use is not adequately
managed.
Warning: identify safety measures to protect the operator that are based on an
estimation of exposure in the actual conditions of use (taking account of all parts of the
operating cycle such as the times when the tool is switched off and when it is running idle in
addition to the trigger time).Note The use of other tools will reduce the users’ total working
period on this tool.
Helping to minimise your vibration exposure risk.
ALWAYS use sharp chisels, drills and blades.
Maintain this tool in accordance with these instructions and keep well lubricated (where
appropriate).
Avoid using tools in temperatures of 10ºC or less.
Plan your work schedule to spread any high vibration tool use across a number of days.
Health Surveillance
All employees should be part of an employer’s health surveillance scheme to help identity any
vibration related diseases at an early stage, prevent disease progression and help employees
stay in work.
Double insulation
The charger is double insulated. This means that all the external metal parts are electrically
insulated from the mains power supply. This is done by placing insulation barriers between the
electrical and mechanical components making it unnecessary for the tool to be earthed.
Vibration and noise reduction
To reduce the impact of noise and vibration emission, limit the time of operation, use low-
vibration and low-noise operating modes as well as wear personal protective equipment.
Take the following points into account to minimize the vibration and noise exposure risks:
1. Only use the product as intended by its design and these instructions.
2. Ensure that the product is in good condition and well maintained.
3. Use correct application tools for the product and ensure they in good condition.
4. Keep tight grip on the handles/grip surface.
5. Maintain this product in accordance with these instructions and keep it well lubricated
(where appropriate).
6. Plan your work schedule to spread any high vibration tool use across a number of days.

18V CIRCULAR SAW ERI490CSW
Familiarise yourself with the use of this product by means of this instruction
manual. Memorise the safety directions and follow them to the letter. This will
help to prevent risks and hazards.
1. Always be alert when using this product, so that you can recognise and handle risks early.
Fast intervention can prevent serious injury and damage to property.
2. Switch off and disconnect from the power supply if there is any malfunction. Have the
product checked by a qualified specialist and repaired, if necessary, before you put it into
operation again.
Residual risks
Even if you are operating this product in accordance with all the safety requirements,
potential risks of injury and damage remain. The following dangers can arise in connection
with the structure and design of this product:
1. Health defects resulting from vibration emission if the product is being used over long
periods of time or not adequately managed and properly maintained.
2. Injuries and damage to property due to broken application tools or the sudden impact of
hidden objects during use.
3. Danger of injury and property damage caused by flying objects.
Warning: This product produces an electromagnetic field during operation! This field may
under some circumstances interfere with active or passive medical implants! To reduce
the risk of serious or fatal injury, we recommend persons with medical implants to consult their
doctor and the medical implant manufacturer before operating this product!
Important note:
Be sure the supply is the same as the voltage given on the rating plate for the charger. The
charger is fitted with a two-core cable and plug.
Remove the mains plug from socket before carrying out any adjustment or servicing.

SyMBoLS
To reduce the risk of injury, user must read instruction manual
Warning
Double insulation
Indoor use only
1h charging time
Do not expose to rain or water
Do not burn Wear gloves
Always charge the battery pack between temperatures 0°C to 30°C. Ideal charging
temperature is 18°C to 24°C.
This symbol indicates that this battery contains lithium. This battery shall be brought
to your shop to be recycled.
Wear ear protection Wear eye protection Wear dust mask
Do not dispose of batteries, Return exhausted batteries to your local collection
or recycling point.
Waste electrical products should not be disposed of with household waste.
Please recycle where facilities exist. Check with your Local Authority
or retailer for recycling advice.
yyWxx Manufacturing date code; Year of manufacturing (20yy) and week of manufacturing
(Wxx);
max30 C
1h

18V CIRCULAR SAW ERI490CSW
30
29
31
3
2
1
4
6
5
7
8
9
10
11
14
15
16
17
13
12

1. LOCK-OFF BUTTON
2. ON/OFF SWITCH
3. FRONT HANDLE
4. SPINDLE LOCK BUTTON
5. BASE PLATE ANGLE SCALE
6. BASE PLATE BEVEL LOCK KNOB
7. PARALLEL GUIDE LOCK KNOB
8. CUTTING MARK, 45°
9. CUTTING MARK, 0°
10. PARALLEL GUIDE
11. BASE PLATE
12. LOWER GUARD LEVER
13. LOWER BLADE GUARD
14. FIXED GUARD
15. VACUUM ADAPTER
16. BATTERY PACK
17. BATTERY PACK RELEASE BUTTON
18. SPINDLE (See Fig.2)
19. INNER FLANGE (See Fig.2)
20. SAW BLADE (See Fig.2)
21. OUTER FLANGE (See Fig.2)
22. BLADE BOLT (See Fig.2)
23. CUTTING DEPTH SCALE (See Fig.4)
24. HEX KEY (See Fig.4)
25. CUTTING DEPTH LOCK KNOB (See Fig.4)
26. HEX KEY STORAGE AREA (See Fig.6)
27. ADJUSTMENT SCREW (See Fig.4)
28. DUST EXTRACTION OUTLET (See Fig.7)
29. CHARGER
30. GREEN INDICATOR LIGHT
31. RED INDICATOR LIGHT
32. CHARGER STANDS (See Fig.1-1)

18V CIRCULAR SAW ERI490CSW
TEChNICAL DATA
Voltage 18V
No load speed 3600/min
Blade size 140mm
Cutting capacity
Cutting Depth at 90° 41.5mm
Cutting Depth at 45° 30mm
Battery capacity 3.0Ah (54Wh) Li-Ion
Bevel capacity 0-50°
Machine weight 3.1kg
NoISE DATA
Sound pressure level L
pA
: 85dB(A) K
PA
=3.0dB(A)
Sound power level L
wA
: 96dB(A) K
WA
=3.0dB(A)
Wear ear protection when sound pressure is over 80dB(A)
ACCESSoRIES
3.0Ah 18V Li-Ion Battery packs 1pc
1h Charger 1pc
Hex key 1pc
Parallel guide 1pc
Dust adapter 1pc
Saw blade(Ø140 x Ø10 x 1.6mm, 40Teeth) 1pc
Charger stands 2pcs

oPERATIoN INSTRUCTIoNS
Note: Before using the tool, read the
instruction book carefully.
INTENDED USE
The machine is intended for lengthways and
crossways cutting of wood with straight cutting lines
as well as bevel angles to 50° while resting firmly on
the work piece.
CHARGING PROCEDURE
1. BEFORE USING YOUR CORDLESS CIRCULAR
SAW
Your battery pack is UNCHARGED and you must
charge once before use.
Warning: Only use charger ERB424CHR to
charge battery ERI489BAT, The charger and
battery pack are specifically designed to work together
so do not attempt to use any other devices. Never
insert or allow metallic objects into your charger or
battery pack connections because an electrical failure
and hazard will occur.
2. INSTALL THE CHARGER STANDS (See Fig.1-1,
1-2 & 1-3)
There are 2 working positions for charger, two
charger stands was provided for charger standing,
slide the two charger stands (32) into the both
grooves on back of the charger (29). The charger
can stand as shown in Fig.1-3
3. CHARGE THE BATTERY PACK (See Fig.1-4)
Connect the battery charger to the power supply and
the green light (30) will illuminate. Slide the battery
pack (16) into the charger to make the connections.
The green light (30) will be off and the red light
(31) will illuminate to show charging has started. A
discharged battery at normal ambient temperature
will take approximately 1 hour to reach full charge.
When charging is completed the green light (30) will
illuminate while the red light (31) is off.
Warning: When battery charge runs out after
continuously use or exposure to direct sunlight
or heat, allow time for the tool to cool down before
re-charging to achieve the full charge.
Note: This charger is designed to detect some
problems that can arise with battery pack. (see table
below)
Fig 1-1
Fig 1-2
Fig 1-4
16
30
31
32
29
16
30
31
A
29
16
30
31
A
29
Fig 1-3
16
30
31

18V CIRCULAR SAW ERI490CSW
Red Flashing
Green Off
Defective battery, after
pre-charge 30 minutes
with trickle current, the
total battery voltage is
still less than 10.0V
Red ON
Green Off
Charging
Green ON
Red Off
Power On and Fully
Charged
Green Flashing
Red Off
The temperature of
battery pack is less
than0°or more than
45°C
4. REMOVE OR INSTALL BATTERY PACK (See
Fig.2)
Press the battery pack latch and remove the battery
pack from the drill. After recharge slide the battery
pack into drill’s battery port. A simple push and slight
pressure will be sufficient.
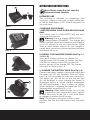
5. CHANGING THE SAW BLADE
Before any work on the machine itself, remove
the battery.
Wear protective gloves when mounting the
saw blade. Danger of injury when touching the saw
blade.
Only use saw blades that correspond with
the characteristic data given in the operating
instructions.
Do not under any circumstances use grinding
discs as the cutting tool.
For changing the cutting tool, it is best to place the
machine on the face side of the motor housing.
REMOVING
Press the spindle lock button (4) and keep it
depressed.
The spindle lock button (4) may be actuated only
when the saw blade is at a standstill.
Loosen the blade bolt (22) in clockwise direction with
the hex key (24). Remove the outer flange (21). Tilt back
the lower blade guard (13) and hold it firmly with the
lower guard lever (12). Remove the saw blade (20).
MOUNTING
Clean the saw blade and all the clamping parts to be
assembled. Tilt back the lower blade guard (13) and
hold it firmly with the lower guard lever (12). Place the
saw blade (20) onto the inner flange (19). Assemble
Fig 2
18
19
20
21
22

Fig 3
Fig 4
Fig 5
18
19
20
21
22
23
24
25
8
9
0°
45°
28
15
6
7
23
26
5
10
27
the outer flange (21) and the blade bolt (22). Use the
hex key to tighten the blade bolt (22) in anti-clockwise
direction with 1/4 turn more than finger tight.
Take care that the mounting positions of the
inner flange and outer flange are correct.
When mounting: Ensure that the cutting direction
of the teeth (direction of arrow on saw blade)
and the direction-of-rotation arrow on the blade
guard match.
OPERATION
1. ADJUST THE CUTTING DEPTH (See Fig.3)
To achieve an optimum cut, the saw blade must not
protrude the material. For adjusting the cutting depth,
loosen the cutting depth lock knob (25) and raise the
saw from the base plate, or lower it to the base plate
respectively. Adjust the required cutting depth using
the cutting depth scale (23). Tighten the cutting depth
lock knob again.
2. ADJUST THE CUTTING ANGLE
Loosen the base plate bevel lock (6) in anti-clockwise
direction. Tilt the base plate away from the machine
until the required cutting angle is adjusted on the
angle scale (5 ). Tighten the bevel lock knob (6) by
turning it in clockwise direction.
Note:The adjustment screw (27) is used to set the
accurate bevel angle at 0°. (See Fig.4)
3. CUTTING GUIDE (See Fig.5)
The cutting mark 0° (9) indicates the position of the
saw blade for right-angled cuts. The cutting mark 45°
(8) indicates the position of the saw blade for 45° cuts.
Both cutting marks include the width of the saw
blade. Always guide the saw blade off of the drawn-
up cutting line so that the required measure is not
reduced by the width of the saw blade. For this,
choose the corresponding notch side of the cutting
mark 0° (9) or 45° (8) as shown in the illustration.
Note: It is best to carry out a trial cut.
4. HEX KEY STORAGE (See Fig.6)
The hex key provided can be placed in the area under
the machine motor.
Fig 6
18
19
20
21
22
23
24
25
8
9
0°
45°
28
15
6
7
23
26
5
10
27
23
24
25
23
27

18V CIRCULAR SAW ERI490CSW
5. DUST/CHIP EXTRACTION (See Fig.7)
Fasten the vacuum adapter (15) onto the dust
extraction outlet (28) until it latches. Directly connect
a suitable vacuum hose to the adapter.
Note: There is an arrow on the surface of the adapter
which show the tighten direction.
The vacuum adapter must be mounted
anytime.
Clean the vacuum adapter regularly to ensure
optimum dust extraction. The vacuum cleaner must
be suitable for the material to be worked.
STARTING OPERATION
1. SWITHCING ON AND OFF
For starting operation the machine, actuate the lock-
off button (1) first, and then press and hold the On/off
switch (2) afterwards.
To switch off the machine, release the On/off switch (2).
For safety reasons the On/Off switch of the
machine cannot be locked; it must remain
pressed during the entire operation.
2. ELECTRICAL BRAKE
An integrated electrical brake immediately reduces
the speed of the saw together with the saw blade
after switching off the machine.
WoRKING hINTS foR yoUR CoRDLESS
CIRCULAR SAW
Always use a blade suited to the material and material
thickness to be cut. The quality of cut will improve as
the number of blade teeth increase. Always ensure
the work-piece is firmly held or clamped to prevent
movement. Support large panels close to the cut line.
Any movement of the material may affect the quality
of the cut. The blade cuts on the upward stroke and
may chip the uppermost surface or edges of your
work piece when cutting, ensure your uppermost
surface is a non visible surface when your work is
finished.
1. PARALLEL GUIDE (See Fig.8)
Used for making cuts parallel to a work piece edge
at a chosen distance. Slide the parallel guide arm
through both fixtures to achieve the required cutting
distance and tighten screw to lock into position
(7). It can be used from both sides of the base plate
Fig 8
18
19
20
21
22
23
24
25
8
9
0°
45°
28
15
6
7
23
26
5
10
27
Fig 7
18
19
20
21
22
23
24
25
8
9
0°
45°
28
15
6
7
23
26
5
10
27

(11).There is a cutting guide notch on the front of the
base plate (11) for using with a parallel guide (10).
For straight cuts, use the 0° guide mark to align with
your parallel guide scale. For a 45° bevel cut, use the
45° guide mark to align with your parallel guide scale.
Securely clamp the parallel guide (10) (See Fig. 7).
Always make a trial cut to check the setting.
2. BEVEL CUTS (See Fig.9)
Set required bevel angle between 0° and 50°. Do not
use the depth of cut scale when making bevel cuts
due to possible inaccuracy.
Loosen the base plate bevel lock button (6) and
rotate the base plate (11) to set the bevel angle
using the base plate angle scale (5) provided. Then
clamp the base plate (11) position using the lock
(6) (See Fig. 5). Finally, check the angle and ensure
the base plate is firmly clamped. The angle scale (5)
on the base plate (11) are accurate for most general
purposes but it is recommended for accurate work to
set the angle with a protractor and make a test cut
on other material. Do not use the depth of cut scale
when making bevel cuts due to possible inaccuracy.
Fig 9
18
19
20
21
22
23
24
25
8
9
0°
45°
28
15
6
7
23
26
5
10
27
Page is loading ...
Page is loading ...
Page is loading ...
Page is loading ...
-
 1
1
-
 2
2
-
 3
3
-
 4
4
-
 5
5
-
 6
6
-
 7
7
-
 8
8
-
 9
9
-
 10
10
-
 11
11
-
 12
12
-
 13
13
-
 14
14
-
 15
15
-
 16
16
-
 17
17
-
 18
18
-
 19
19
-
 20
20
-
 21
21
-
 22
22
-
 23
23
-
 24
24


Erbauer ERI490CSW Original Instructions Manual
- Category
- Power universal cutters
- Type
- Original Instructions Manual
Ask a question and I''ll find the answer in the document
Finding information in a document is now easier with AI
Related papers
-
 Erbauer ERI604IPD User manual
-
 Erbauer ERI616HTL Original Instructions Manual
-
 Erbauer ERB690CSW Original Instructions Manual
-
 Erbauer ECS18-Li Original Instructions Manual
-
 Erbauer EJS18-Li Original Instructions Manual
-
 Erbauer ERB596CSW Original Instructions Manual
-
 Erbauer ERI603COM User manual
-
 Erbauer ERB373RSP User manual
-
 Erbauer ERB373RSP User manual
-
 Erbauer ERI068TOR User Instruction Manual


