Page is loading ...

SERIES TBS
INSERTION TURBINE
INSTRUcTIONS
TBS-1XX
TBS-0XX
F-TBS

Rotor
Rugged cast aluminum housing
18 Foot Cable
Modular electronics (optional)
•rate/total/pulse/4-20mA
(Series RTI)
•blind4-20transmitter
(SeriesBAT)
Compression nut
for easy adjustment, secure locking
Adaptertting
with1-1/2”NPTthreads
Rotor housing
Removable jewel bearings
TBS-0XX
Adaptertting
with2”NPTthreads
Full-port2”ballvalve
for sensor removal
2”Adapter
removes to mount
hot-tapmachine
3/4”diametertubing
for low insertion force
TBS-1XX
Locking collar
TABLE OF CONTENTS
General Information
Features,Specications .......................................................................................................................................Page 1
Installation
Piping,Immersion,PositioningtheMeter ........................................................................................................... Page 2
StraightPipeRecommendations .........................................................................................................................
Page 3
FullPipeRecommendations ................................................................................................................................. Page 4
Fitting Installation, Meter Installation .................................................................................................................. Page 5
ProperDepthSetting,DimensionC,PipeWallThickness ..................................................................................Page 6
Set-Up
Connection,Calibration,K-Factors ......................................................................................................................Page 7
Operation
Flow Range, Flow Rates ........................................................................................................................................Page 8
Parts List
PartsExplodedView..............................................................................................................................................Page 9
Troubleshooting & Repair
Troubleshooting, Repair, Rotor Replacement ......................................................................................................... Back
TABLES AND DIAGRAMS
Features ................................................................................................................................................................ Page 1
Specifications ....................................................................................................................................................... Page 1
PositioningtheMeter ........................................................................................................................................... Page 2
Piping .................................................................................................................................................................... Page 2
StraightPipeRecommendations ........................................................................................................................
Page 3
FullPipeRecommendations ................................................................................................................................ Page 4
Meter Installation ................................................................................................................................................. Page 5
DepthSetting ....................................................................................................................................................... Page 6
PipeWallThickness ............................................................................................................................................. Page 6
ConnectionDiagram ............................................................................................................................................ Page 7
PartsExplodedView............................................................................................................................................. Page 9
PartsList ............................................................................................................................................................... Page 9
Rotor Replacement ..................................................................................................................................................Back
Page 1
GENERAL INFORMATION
The Series TBS is an adjustable depth insertion turbine that
comesinbrassor316stainlessmodelstot3”to40”pipe.
Installationttingsarestandard1-1/2"(TBS-XSXModels)or
2”(TBS-XLXModels)maleNPT.Fittingssuchassaddlesand
weldoletsmaybepurchasedeitherlocallyorfromDwyerInstru-
mentsInc.PleaseseeSeriesSDF.
Rubybearingsandanon-dragpickoffgivetheseadjustable
insertionturbineowsensorsawideowrangeandlonglife.
Asensordetectsthepassageofminiaturemagnetsinthero-
torblades.Theresultingsquare-wavesignalcanbesentfor
hundreds of feet without a transmitter, over unshielded cable.
ThissignalcanbeconnecteddirectlytomanyPLC’sandother
controls without any additional electronics.
If desired, a modular system of electronics can be installed
directlyontheowsensorormountedremotely.TheSeries
RTI (loop powered) provides digital rate and total display, as
well as programmable pulse. The Series RTI also provides a
4to20mAanalogoutput.TheBATisablindanalog(4to20
mA) transmitter. Programmablepulse for pumppacing is
availablewiththePWD.
The“hot-tap”modelscanbeinstalledorservicedwithoutshut-
tingdownthelinebymeansofa2”full-portisolationvalve
thatcomeswithanippleforinstallationonthepipetting.In
most circumstances, no special tool is required.
FEATURES
SPECIFICATIONS*
6-40Vdc
<2mA
Magnetoresistive
CurrentSinkingPulse
100mAmax
3to40Vdc
-S Model -L Model
3”-12”(50-300mm) 12”-40”(300-890mm)
Cast aluminum
Brass or 316 SS
PVDFstandard
Nickel-boundtungstencarbide/Ruby
TBS-0 TBS-1
None Bronze(316SSoptional)
1-1/2”NPT 2”NPT
0.5-30feet/sec(0.15-9.14meter/sec)
+/-1.5%offull-scale
200˚F(93˚C)
200psi(14bar)
0.44xpressureinpipe
#22AWG3-con,18’(6m);2,000’(650m)maximumcablerun
Power
Supply Voltage
Current
Sensor Type
Output
Sinking Current
External Pull-up Resistor
Pipe Size
Materials Housing
Sensor Body
Rotor
Shaft/Bearings
Isolation Valve
Fitting Size
Flow Range
Accuracy
Maximum Temperature
Maximum Pressure
Insertion Force
Cable
*Specications subject to change.
Note:ForlargerpipesizescontactDwyer

INSTALLATION
Page 2 Page 3
INSTALLATION
STRAIGHT PIPE RECOMMENDATIONS
(X = diameter)
5X
10X
5X10X
5X
20X
5X
20X
30X
50X
Reduced Pipe
Two Elbows In Plane
Two Elbows, Out Of Plane
Expanded Pipe
Swirling Flow
Propeller Meter
Partially Open
Buttery Valve
Spiral Flow
Fair (unacceptable if air is
present)
Fair (unacceptable if uid
contains sediment)
Best
mayexperienceoccasional temporary immersion, as in a
oodedvault,aunitmodiedforimmersionshouldbespeci-
ed(Option-IMM).
Aninsertionowsensormeasuresthevelocityofowatone
pointinthepipe;owrateandtotalcanbeinferredfromthis
onepoint.Accuracyisdecreasedbyanyfactorwhichmakes
theowatthemeasuredpointunrepresentativeoftheentire
owstream. Thisincludes distortedowpatternscaused
byupstreamttingstooclosetothesensor.Theworstof-
fendersarettingsthatincreasetheowononesideofthe
pipe,suchaspartially-openedgateorbutteryvalves.Fluid
movinginapipedoesnotowatthesamevelocity.Toward
thecenterofthepipe,uidmovesfasterthanatthewall,and
therelationshipbetweenthetwochangesasoverallowrate
increases.Thischangeinthe“velocityprole”canresultin
non-linearity,whichmeansthattheK-factorthatiscorrectfor
oneowratemaybeincorrectforanother.Recommended
depth settings (see page 6) have been carefully chosen to
minimizethissourceoferror,andshouldbefollowedcarefully,
especiallyinthesmallerpipesizes.
Piping. For best results, the TBS sensor should be
installed with at least ten diameters of straight pipe
upstreamandvedownstream.Certainextremesituations
suchaspartially-openedvalvesareparticularlydifcultand
may require more straight diameters upstream. See Straight
PipeandFullPiperecommendationsonfollowingpages.
Immersion. The Series TBS standard sensors are not de-
signed for continuous underwater operation. If your meter
Positioning the Meter. Horizontal is thepreferredinstal-
lation orientation, since it improveslow-ow performance
slightly and avoids problems with trapped air. Bottom, top,
and vertical pipe installations are all acceptable if required
by the piping layout.
CAUTION: These water meters are
not recommended for installation
downstream of the boiler feedwater
pump where installation fault may
expose the meter to boiler pressure
and temperature. Maximum recom-
mended temperature is 200ºF.
TBS
TBS
TBS
TBS
TBS
TBS

Page 4
INSTALLATIONINSTALLATION
FULL PIPE RECOMMENDATIONS
Allowsairpocketstoformatsensor
Ensuresfullpipe
Post-valvecavitationcancreateairpocket Keeps pipe full at sensor
Aircanbetrapped
Allowsairtobleedoff
Page 5
Better InstallationPossible Problem
Better InstallationPossible Problem
Better InstallationPossible Problem
TBS-0XX INSTALLATION
Fitting Installation.TBS-0XXsensorscomewitha1-1/2”maleNPTpipe
threadadaptertting.AnyttingthatprovidesthematchingNPTfemale
threadmaybeused.(ForcomparablesaddlettingpleaseseeSeries
SDF.)Installationprocedurecompensatesforttingheightdifferences.
Cutaminimum1-3/4”holeinthepipe.Ifpossible,measurethewall
thickness and write it down for use in depth setting. Then install the
threadedtting(saddle,weldolet,etc.)onthepipe.
Meter Installation. Loosen the compression nut so that the adapter slides
freely.Pullthemeterfullyupwardandnger-tightenthecompression
nut.Usingathreadsealant,installtheadapterinthepipetting.Do
not overtighten. Loosen the compression nut and lower the meter to
the appropriate depth setting (see diagram and instructions that follow).
Caution:Donotallowthemetertofallintothepipeuncontrolled,asthis
maydamagethemeter.Besureowisinthedirectionofthearrowon
the housing. Tighten compression nut fully.
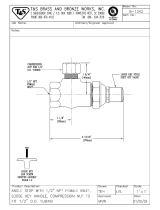
TBS-1XX INSTALLATION
‘Hot-tap’meters are designed to be installed and serviced without
depressurizingthepipe.
Fitting Installation. Thehot-tapsensorshavea2”maleNPTthreadfor
compatibilitywiththe2”isolationvalve.Anyttingthatprovidesmatching
NPTfemalethreadmaybeused.Theinstallationprocedurecompensates
fordifferencesinttingheight.
If initial installationis performedon anunpressurizedpipe, cuta
minimum1-3/4”holeinthepipe.Ifpossible,measurethewallthickness
andwriteitdownforuseindepthsetting.Theninstallthethreadedtting
(saddle,weldolet,etc.)onthepipe.(SuchastheSeriesSDF.)
If it is necessary to do the initial installation under pressure, any standard
hot-tapdrillingmachinewith2”NPTadapter,suchasaTransmateora
Mueller,canbeused.Ordinarily,itisnotnecessarytouseaninstallation
tool,sincethesmall-diametertubecanbecontrolledbyhandbutshould
be used for higher pressures.
Meter Installation. Remove the sensor unit from the valve assembly.
Usingathreadsealant,installthevalveassemblyonthepipetting.If
theinitialinstallationisapressure(“hot-tap"),removethe1-1/2”x2”
adapter bushing at the back of the valve. Thread the tapping machine
on,openthevalve,andtapusingaminimumof1-3/4”ormaximum
1-7/8”cutter.Afterretractingthemachineandclosingthevalve,reinstall
theowsensor.Whenthesensorissecure,openthevalveandadjust
depthsetting(seediagramandinstructionsthatfollow).Besureowis
in the direction of the arrow on the housing. Tighten locking collar and
compression nut fully.
Compression nut
Adaptertting
with
standard1-1/2"
NPTthreads
Compression nut
2”adapterremoves
tomounthot-tap
machine
Full-port2”ball
valve allows sensor
removal
Standard2”
NPTthreads
TBS-1XX Sensor
Removal
Locking collar
TBS-0XX

Proper Depth Setting. It is important for accuracy that
the sensor be inserted to the correct depth into the pipe.
1.InTable1,ndDimensionCforyoursensormodel
andpipesize.Subtractwallthicknessofyourpipe
(Table2)tocalculateDimensionD.
2. Measuringfromtheoutsideofthepipetothejoint
in the housing, as shown in the diagram on the left,
adjustthesensortoDimensionDandhand-tighten
compression nut.
3. Aligntheconduithousingwiththecenterlineofthe
pipe, as shown. Be sure the arrow on the housing
pointsinthedirectionofow.
4. CheckDimensionDonemoretime.
5. Tightenthecompressionnutfully.
strain
relief
FLOW
Page 6
INSTALLATION
Page 7
TABLE 2: PIPE WALL THICKNESS
PVC/Steel
Sch. 40
PVC/Steel
Sch. 80
Stainless
Steel (10S)
Stainless
Steel (40S)
Copper Tubing
(Type L)
Copper Tubing
(Type K)
Brass Pipe
Duct. Iron
(Class 52)
NOMINAL PIPE SIZE
3” 4” 6” 8” 10” 12” 14” 16” 18” 20” 24” 30” 36”
0.216 0.237 0.280 0.322 0.365 0.406 0.438 0.500 0.562 0.593 0.687
0.300 0.337 0.432 0.500 0.593 0.687 0.750 0.843 0.937 1.031 1.218
0.120 0.120 0.134 0.148 0.165 0.180 0.188 0.188 0.188 0.218 0.250 0.312 0.312
0.216 0.237 0.280 0.322 0.365 0.375 0.375 0.375 0.375 0.375 0.375 0.375 0.375
0.090 0.110 0.140 0.200 0.250 0.280
0.109 0.134 0.192 0.271 0.338 0.405
0.219 0.250 0.250 0.312 0.365 0.375
0.280 0.290 0.310 0.330 0.350 0.370 0.390 0.400 0.410 0.420 0.440 0.470 0.530
SET-UP
Connection. Sensors are supplied with 18 ft. of cable.
For sensors with no additional electronics, see diagram for
colorcoding.Forsensorswithon-boardelectronics,see
the manual accompanying the electronics module.
Calibration (“K-Factor”). In order to properly process pulses
fromtheowsensor,anumbermustbeenteredintothecontrol
towhichthesensorisconnected.Thisnumber,calledtheK-
factor, is the number of pulses the sensor puts out per unit of
uidpassingthroughthepipe.ItisnormallyprovidedforDwyer
sensors in pulses per gallon (see Table 3 below). These numbers
arebasedonextensivetesting,whichhasshowncloseagree-
ment between different TBS sensors in the same installation.
MostK-factorerrorcanbeattributedtoinstallationvariables,
suchasdepthsettingandttingconguration.
Itispossibletoeldcalibrateasensorbycatchingtheuidina
measured container and comparing with the number of pulses
recorded.(Torecordindividualpulses,settheK-factoronthe
controlto1.00.)Thisisespeciallydesirableiftheinstallation
has less than the recommended length of straight pipe up-
streamofthesensor.Fordetailedintructionsoneldcalibration,
pleasecontactDwyerInstrumentsInc.
RECORD YOUR SETTINGS
Onceyouhavethemetersetupandoperational,it
is important to record your meter setttings and save
them for future reference.
K-Factor
InsertionDepth(Dim.D)
NOMINAL PIPE SIZE
3” 4” 6” 8” 10” 12” 14” 16” 18” 20” 24” 30” 36”
9.16 9.08 8.99 8.82 8.48 8.14 7.80 7.46 6.78 - - - -
14.16 14.08 13.99 13.82 13.48 13.14 12.80 12.46 11.78 10.42 9.40 9.38 -
16.00 15.80 15.70 15.50 15.10 14.80 14.50 13.80 - - - - -
19.95 19.85 19.65 19.45 19.15 18.85 18.45 17.75 16.45 15.45 14.35 - -
TBS-0-S
TBS-0-L
TBS-1-S
TBS-1-L
TABLE 1: DIMENSION "C"
Nominal Pipe Size
3” 4” 6” 8” 10” 12” 14” 16” 18” 20” 24” 30” 36”
PVC/Steel
Sch. 40
12.067 7.049 2.949 1.690 1.033 0.694 0.575 0.465 0.391 0.326 0.220 - -
PVC/Steel
Sch. 40
13.506 7.917 3.293 1.845 1.150 0.772 0.631 0.498 0.419 0.354 0.419 - -
Stainless Steel
(10S)
10.688 6.160 2.663 1.551 0.944 0.642 0.538 0.439 0.364 0.303 0.199 0.127 0.088
Stainless Steel
(40S)
12.067 7.049 2.949 1.690 1.033 0.687 0.565 0.455 0.377 0.313 0.204 0.128 0.088
Copper Tubing
(Type K)
13.441 7.777 3.317 1.865 1.181 0.781 - - - - - - -
Copper Tubing
(Type L)
13.097 7.564 3.193 1.800 1.133 0.744 - - - - - - -
Copper Pipe
12.115 7.156 2.886 1.682 1.033 0.684 - - - - - - -
Duct Iron
(Class 52)
9.974 6.301 2.734 1.528 0.948 0.635 0.487 0.401 0.330 0.269 0.177 0.114 0.079
TABLE 3: TX100/200 K-factors (in Pulses/Gallon) for various pipe sizes

Page 8
Page 9
PARTS LIST
TBS-0XX Parts
1 Upper housing assembly
2 Housing Gasket
3 Lower housing
4 Housing screw assembly
5 Plug, steel
6 Strain relief
7 Sensor w/cable
8 Tube
9 Compression nut
10 Compression Ferrule
11 Adapter tting
12 Rotor housing O-ring
13 Rotor housing
14
Jewel bearing assembly
(for carbide shaft)
15 Turbine Rotor assembly
16
Rotor repair kit
(consists of #14 & #15)
(0.5)
(1.0)
(2.0)
(5.0)
(10.0)
(20.0)
(30.0)
TABLE 4: Flow Rates converted from Feet/Sec to Gallons/Minute at various velocities: Schedule 40 pipe
Nominal pipe size
Feet / Sec
3" 4" 6" 8" 10" 12" 16" 24" 30" 36" 38" 40"
11.5 19.8 45 78 123 176 313 704 1100 1585 1770 1960
23 39.7 90 156 246 349 551 1250 2200 2910 3530 3915
46.1 79.4 180 312 492 698 1100 2510 4401 5830 7070 7825
115 198 450 780 1230 1740 2750 6270 11002 14570 17670 19560
230 397 900 1560 2460 3490 5510 12530 22005 29140 35350 39120
461 794 1800 3120 4920 6980 11020 25060 44010 58270 70700 78240
691 1190 2700 4680 7370 10470 16520 37600 66015 87410 106050 117500
Flow Range.Thesesensorsaredesignedtooperateatow
velocitiesof0.5to30feetpersecond(seeTable2,below).
If erratic readingsare encountered atlow ows, check the
charttoseeifowisbelowminimumforthepipesize.The
standard shaft and bearings should have a long life at continu-
oushighow.
TBS-1XX Parts (hot-tap)
All part numbers are the same except those
below
17 Locking Collar
18 Adapter tting O-ring
19 Adapter, hot tap
20
Valve assembly
(inlcudes Adapter, #20)
OPERATION
TX101/201
TX115/215
TBS-0XX
TBS-1XX

TROUBLESHOOTING and REPAIR
CAUTION! Never attempt to remove a
ow sensor when there is pressure in
the pipe. Loosen the compression nut
slowly to release any trapped pressure.
If uid sprays out when removing the
sensor, stop turning and depressurize the pipe. Fail-
ure to do so could result in the sensor being thrown
from the pipe, resulting in damage or serious injury.
WARRANTY/RETURN
Rotor Replacement.Rotorsareeasilyeld-replaced.Shaft
and rotor are a single unit, and are not replaced separately.
If replacement is due only to normal shaft wear, bearing re-
placement is probably not necessary. If the rotor has been
damaged by impact, the bearings should also be replaced.
Rotor and bearings can be ordered as a kit (see parts listing).
Followthesesteps:
1.Unscrewthethreadedbearinghousingstoexposethe
shaft ends. If bearings are being replaced, back them
completely out.
2.Removetherotor.Putthenewrotorinitsplace.
3. Thread in one bearing housing part way, then the
other. Take care to start the end of the shaft into
the bearing hole before tightening further.
4.Screwinbearinghousingsuntiltheybottom.
Note: Do not use excessive force.
5.Checkforfreespin.Blowinglightlyontherotor
should result in it spinning rapidly and coasting
to a smooth stop.
Shaft
Turbine Rotor
Bearing
Housing
Theowsensorhasonlyonemovingpart,therotor.Ifthis
isturningproperlyandthereisnosignal,theHall-effect
sensor is not operating properly. To check the signal, ap-
ply12VDCregulated*powertothered(+)andblack(-)
leads.Setamultimetertovoltagereading.Putthepositive
multimeter lead on the red wire and the negative lead on
thewhitewire.Slowlyturntherotor.Voltagereadingshould
swingbetween+12Voltsand0Voltsastherotorturns.If
it does not, the Hall effect sensor is not working properly.
Checking for continuity is not a useful test of these sensors.
*NOTE:Anunregulatedpowersupplycanexceedmaxvoltageof
micro powered sensor (gray cable) and damage sensor.
Referto"TermsandConditionsofSale"inourcatalogoron
our website. Contact customer service to receive a Returns
GoodsAuthorizationnumberbeforeshippingyourproduct
back for repair. Be sure to include a brief description of the
problem plus any relevant applciation notes.
Troubleshooting
PL-OM-65200391-091912
9/19/12
Dwyer Instruments, Inc. • 102 Indiana Highway 212 • Michigan City, IN 46360 • USA
(P) 219.879.8868 • (F) 219.872.9057 • 1.800.872.9141 • www.dwyer-inst.com
/