Page is loading ...

eSPINNER
®
indoor cycling bike.
INSTALLATION
AND
O
PERATION MANUAL

2

3
CORPORATE HEADQUARTERS
14410 Myford Road
Irvine, CA 92606 USA
Phone +1 714 669 1660
Fax +1 714 669 0287
800 228 6635 (toll-free within the U.S.A., Canada)
Star Trac Europe
Unit 4, The Gateway Centre, Coronation Road
Cressex Business Park, High Wycombe,
Bucks HP12 3SU United Kingdom
Phone +44 (0) 1494 688260
Fax +44 (0) 1494 688269
Star Trac Asia
No. 39A Jalan Pemimpin,
Halcyon Building #01-02
Singapore 577183
Phone +65 6255 6252
Fax +65 6255 1501
Copyright 2008. Star Trac by Unisen, Inc. Star Trac Fitness, Star Trac®, and the Star Trac Logo are registered trademarks of Unisen Inc. All
rights reserved, including those to reproduce this book or parts thereof in any form without first obtaining written permission from Star Trac.
Spin
®
, Spinner
®
, Spinning
®
and the Spinning logo are registered trademarks of Mad Dogg Athletics, Inc.
Apple, iPod, iTunes, iPhone, iTouch, and the Apple logo are a register trademarks of Apple, Inc.
Smart Release™ is a registered trademark of Nautilus, Inc.
SPD is a registered trademark of Shimano American Corporation.
Every effort has been made to keep this information current; however, periodically, changes are made to the information herein, and these
changes will be incorporated into new editions of this publication. All product names and logos are trademarks of their respective owners. Printed
in the USA.

4
Before using this product, it is essential to read this ENTIRE operations manual and ALL instal-
lation Instructions. It describes equipment setup and instructs users and members on how to
use it correctly and safely.
Health related injuries may result from incorrect or excessive use of exercise equipment. Star
Trac strongly recommends you and your members to discuss their health program or fitness
regimen with a health care professional, especially if they have not exercised for several years,
are over 35, or have known health conditions.

5
Table of Contents
DESCRIPTION PAGE
Regulatory Information 6
FCC 6
EUROPEAN DIRECTIVES 6
SAFETY STANDARDS 6
Specifications 7
INTRODUCTION 7
STAR TRAC™ eSPINNER® CONSOLE SPECIFICATIONS 7
INPUT POWER REQUIREMENTS 7
Safety Instructions 8
IMPORTANT SAFETY INSTRUCTIONS 8
Assembly and Setup 9
UNPACKING 9
ASSEMBLY 11
TV SETUP 18
Testing the Bike 21
Display Console 22
eSPINNER CONSOLE 22
WORKOUT OPTIONS SCREEN 23
WORKOUT SCREEN 24
Bike Adjustments 25
SEAT ADJUSTMENT 25
HANDLEBAR ADJUSTMENT 26
PEDAL STRAP ADJUSTMENT 26
RESISTANCE CONTROL 26
SMART RELEASE™ SYSTEM 26
Users Information 27
BIKE SETUP 27
HAND POSITIONS 28
RIDING POSITIONS 28
STRETCHING 29
Display Operation Instructions 31
ENERGY ZONE™ 31
RIDING THE SPINNER 32
SPINNING VIDEO SUMMARY 34
BUILD YOUR WORKOUT 35
RIDE TO MY MEDIA 36
TV Functions 37
iPod ® Media Center 38
USB Media Center 39
Additional Features 40
USING PERSONAL FAN 40
HEART RATE MONITORING 40
Service Menu 41
Maintenance 43
PREVENTIVE MAINTENANCE 43
CHAIN TENSION ADJUSTMENT 45
CLUTCH ADJUSTMENT 46
Parts Replacement 47
Troubleshooting 48

6
Regulatory Information
FCC
The eSpinner® has been tested and found to comply with the limits for a Class A digital device pursuant to Part 15 of
FCC rules. Under the FCC guidelines, operation is subject to the following two guidelines: (1) this device may not cause
harmful interference, and (2) this device must accept any interference received, including interference that may cause
undesired operation.
The STAR TRAC eSpinner generates and uses radio frequency energy. If the products are not installed and used in ac-
cordance with the instructions provided in the manual, interference with radio communications may occur. Likewise, if
unapproved accessories are installed, interference with radio communications may occur. The intent of the FCC Class A
limit is to provide reasonable protection against harmful interference in a COMMERCIAL environment. However, there is
no guarantee that interference may not occur in a specific installation. In the event that interference is experienced, turn
off the unit to verify that it is in fact the source. If the interference clears with the unit off, then try each of the following
measures and combinations thereof:
• Reorient or relocate the product.
• Reorient or relocate the receiving antenna of your television, radio, and / or VCR recorder.
• Connect the unit to a different power outlet.
• Consult Star Trac Product Support, your authorized dealer, or a qualified radio / television technician for as-
sistance.
EUROPEAN DIRECTIVES
This product, when used in conjunction with the approved cardio equipment, conforms to the requirements of the Euro-
pean Council directives:
• 89/336/ECC, Electromagnetic Compatibility
• 92/590/EEC, General Product Safety Directives
• 73/23/EEC, Electrical equipment Low Voltage Safety Directive
SAFETY STANDARDS
This product has been tested and/or verified, in conjunction with the approved cardio equipment, to meet the following
standards:
• UL 1647 Safety for Motor operated Massage and Exercise Machines
• CAN/CSA E335-1/3E-94 Safety of Motor Operated Appliances (Household and Commercial)
• EN 60355-1 Safety of the household and Similar Electrical appliance
• EN957-1 General safety requirements and test methods
• EN 957-5 Pedal Crank Training Equipment, additional safety requirements
• EN 957-10 Exercise bicycles with a fixed or without flywheel, additional safety requirements & test methods

7
Specifications
INTRODUCTION
Thank you for choosing STAR TRAC. Our products have been designed to provide the user the most reward-
ing experience based upon the carefully planned features it possesses. The design elements of this product
will provide you with a comfortable, intuitive, safe and reliable experience, guiding you to a habit-forming life-
style. Our mission is to provide products to mold lifelong habits for health and fitness, and our Embedded Dis-
play products will provide the path to meet your goals.
STAR TRAC™ eSPINNER® CONSOLE SPECIFICATIONS
Console LCD:
15”, 500 Nits (cd/m
2
) brightness Integrated LCD System with Touch Screen Technology
Resolution:
1024x768
Touch Screen:
5 wire resistive touch screen
Headphone Jack:
3.5mm Stereo
iPod® Compatibility:
5G iPod, iPod Classic
iPod nano, 2G nano, 3G nano
iPod touch
iPhone
User Languages:
English, Swedish, Portuguese, Spanish, German, Italian, Dutch, French, Chinese, Japa-
nese.
Broadcast Capabilities:
(ATSC/NTSC or PAL/SECAM).
• ATSC/NTSC tuner supports:
♦ ATSC (Advanced Television Systems Committee) Digital Television
♦ NTSC, NTSC-HRC, NTSC-IRC
• PAL/SECAM TUNER supports:
♦ PAL, PAL-BG, PAL-I, PAL-DK,
♦ SECAM, SECAM-B
♦ DVB-T
POWER REQUIREMENTS (input)
♦ Volts: 100 - 240V 50/60 Hz
♦ Amps: 1.5A

8
Safety Instructions
Important Safety Instructions
The following fitness safeguards and operating precautions are directed to purchasers and users of the eSpinner
®
indoor
cycling bike. Club Managers should ensure that members and fitness staff are trained to follow these same instructions.
Failure to follow these safeguards may result in injury or serious health risk.
DANGER – To reduce the risk of electric shock, always unplug this appliance from the electrical outlet after using it and
before cleaning.
WARNING – To reduce the risk of burns, fire, electric shock, or injury to persons: An appliance should never be left unat-
tended when plugged in. Unplug from outlet when not in use, and before putting on or taking off parts. To disconnect,
turn all controls to the off position, then remove plug from outlet.
When using the eSpinner, basic precautions should always be followed, including the following:
1. Read all instructions before using the eSpinner.
2. Close supervision is necessary when this appliance is used by, on, or near, invalids or disabled persons.
Children under the age of 16 should not ride the eSpinner bike. The bike mechanism and ergonomics are
designed for adult use only.
3. Always follow the console instructions for proper operation.
4. Use the eSpinner only for its intended use as described in this manual. Do not use attachments not recom-
mended by the manufacturer.
5. Keep the cord away from heated surfaces.
6. Never operate the eSpinner with the air openings blocked. Keep the air openings free of lint, hair, and the
like.
7. Do not insert any object, hands or feet into any openings, or expose hands, arms or feet to the drive mecha-
nism or other potentially moving part of the bike.
8. Do not use outdoors.
9. Do not operate where aerosol (spray) products are being used or where oxygen is being administered.
10. Never operate the eSpinner if it has a damaged cord or plug, if it is not working properly, if it has been
dropped or damaged. Call your dealer or Star Trac at (800) 503-1221, or USA 1-714-669-1660 for examina-
tion and repair.
11. If at any time you feel dizzy or have difficulty breathing, gradually stop pedaling and carefully dismount the
bike.
12. Ensure that adjustment knobs (seat height, seat fore-and-aft, and handlebar) are properly secured and do
not interfere with range of motion during exercise.
13. The maximum user weight should not exceed 350 pounds (159 kilograms).
14. eSpinner bikes have a weighted flywheel equipped with Smart Release™. This allows the benefits of the
direct drive system with a safety clutch to release the crank from the direct drive when a force is applied to
the pedals.
15. After exercising, turn the resistance knob to increase resistance so the pedals will not rotate freely and po-
tentially injure someone.
16. Listen to your body, ride at your own pace and set your bike’s resistance at the level that feels right for you.
17. Keep children and pets away from the bike whenever it's in use.
18. Never turn the pedal crank arms by hand. Stay hydrated. Drink water throughout your ride as needed.
19. Always keep some resistance on the flywheel.
20. Stay in control by executing all core movements and hand positions at a slow pace before attempting to in-
crease your speed. Do not attempt to ride the bike in a standing position at a high RPM until you have prac-
ticed at slower speeds.
21. Focus on form, posture and making smooth transitions between movements.
22. Do not use the bike without proper footwear. Never operate the bike with bare feet.
23. Never remove your feet from the pedals while still in motion. Prevent your feet from coming out of the toe
clip or shoe cage by keeping shoe laces tucked in and foot straps pulled snug around your shoe. If your foot
does become disengaged, push down on the resistance knob to stop the flywheel’s motion.
SAVE THESE INSTRUCTIONS FOR FUTURE REFERENCE

9
Assembly and Setup
Use the following procedures to unpack and assemble your eSPINNER
®
. Your eSpinner is shipped in two
separate cartons.
Carton 1 – large box container the bike frame and associated assembly parts.
Carton 2 – smaller box container the display console, manual, warranty and power cord.
UNPACKING
Prepare the area that you will be unpacking and assembling the bike to be free from debris that may cause
damage. Observe all safety precautions and take care while unpacking and assembling the bike. First cut
and remove the shipping straps from the carton. Gently lay the box on its side and carefully cut the tape on
the bottom of the carton and fold the flaps outward. Position the shipping carton back upright (“Heavy End”
towards the bottom). Open the top of the carton and fold back all four flaps. Carefully lift the carton to ex-
pose the bike. Remove all parts from the shipping carton and foam inserts, and verify that the following
parts are included in your shipment:
eSpinner Parts List – Carton 1 Frame
Description Qty. Description Qty.
Main Frame Assembly 1 Leg Assembly 2
Handlebar Post 1 Water Bottle Holder 1
Handlebar w/ Grip 1 Console Post Plastic Sleeve 1
Seat Post 1 Console Post 1
Seat Slider Assembly w/ Saddle 1 Spare Parts Kit (includes brake pad and
pedal straps)
1
Pedals (set of two) 1
Hardware
M8x1.25, 16mm Flat Head Screw 2 Multi-Wrench 1
M8x1.25, 16mm Socket Set Screw 1 Rear Pop Pin 1
Wrench 21 mm 1 Wrench Hex 3mm 1
M10x1.5, 45 Button Head Screw 2 Spacer 30 mm 2
M6x1x10 mm Console Post Screw 1 M10x1.5, 60 mm Button Head Screw 4
M4x1x10 mm Console Sleeve Screw 2 M10x1.5, 65 mm Button Head Screw 4
Transport Wheels 2 M10x1.5 Nyloc Hex Nut 4
Wrench Hex, 5mm 1 20 mm Washer, Flat 16
Wrench Hex, 4mm 1 M8 x 1.25, 20 mm Flat Head Screw 2
eSpinner Parts List – Carton 2 Console
Description Qty. Description Qty.
Main Console 1 5/16x18x .75” Phillips Pan Head Screw 4
Manual 1 Power Cord 1
Warranty Card 1
Spare Parts Kit- Save the box of spare parts in a safe place so you have service parts when needed in the
future.

10
Assembly and Setup
Take time now to enter your eSpinner
®
serial number in the space below (serial number is located between
the forks on the main frame ). If parts are missing, or if you have any operational questions, please call Star
Trac’s Service department at (800) 503-1221; have your serial number ready.
Serial No._____________________________________________
NOTE: If you are missing any of the parts listed above, inspect the packing material and the box for items
that may have been overlooked. If parts are missing, or if you have any product questions, please call Star
Trac’s Service Department at (800) 503-1221, please have your eSpinner’s serial number ready.
CAUTION: Damage to the bike during assembly is not covered as part of the limited Star Trac® warranty.
Take care not to drop or lean the bike on the handle bar pop-pin. Carefully stand the bike up in the normal
upright position on a stable surface so it will not tip over during assembly.

11
Assembly and Setup
ASSEMBLY
WARNING – DO NOT USE POWER TOOLS or POWER DRIVE ASSEMBLY TOOLS DURING THE AS-
SEMBLY OF THE eSPINNER. FAILURE TO FOLLOW THESE INSTRUCTIONS MAY DAMAGE THE
PRODUCT DURING ASSEMBLY WHICH IS NOT COVERED UNDER THE STAR TRAC WARRANTY.
Following these steps in order will minimize the build time and ensure proper assembly.
1. Install the Rear Leg
Parts needed:
−
One leg assembly
−
M10 x 1.5 x 60 mm Button Head Screw – 2
−
M10 x 1.5 x 65 mm Button Head Screw – 2
−
20 mm Flat Washer – 8
−
M10 x 1.5 Nyloc Hex Nut – 4
−
5 mm Hex Wrench
−
Multi-wrench
♦
Lift up the rear of the bike frame and place the rear leg assembly
in position under the frame, aligning the holes in the leg with the
holes in the frame.
♦
Position the leg so the thicker end faces toward the front of the
bike
♦
Using the 5mm Hex wrench and the 13mm multi-wrench insert 2-
M10X60mm (rear-most holes) and 2-M10X65mm (front-most
holes) button head screws, nuts and washers (under bolt head
and nut), to secure the rear leg assembly to the frame.
♦ Tighten all hardware securely using a torque wrench to 85 in-lbs.
2. Install the Rear Pop Pin
Parts needed:
−
Pop pin
−
21 mm open wrench
♦
Carefully thread the pop pin assembly into
the open hole on the rear of the bike frame.
♦
Using the 21 mm open end wrench, tighten
the pop pin to the frame to 50 in-lbs.
Step 1
Step 2

12
Assembly and Setup
3. Install the Handlebar
Parts needed:
− M8x1.25, 16mm Flat Head Screw - 2
− 5mm Hex Wrench
− M8x1.25, 16mm Socket Set Screw - 1
− 4mm Hex Wrench
3A.
♦ Position the handlebar post in its upright position (numbers will be right
side up).
♦ Insert handlebar into the handlebar post. Secure assembly with the
M8x1.25, 16mm Flat Head Screws.
♦ Insert the set screw into the back side of the handlebar assembly. Torque all
fasteners to 60 in-lbs.
3B.
♦ Slide the handlebar post into the frame making sure the holes face the front of
the bike.
♦ Allow the post to go into the frame all the way in to level 1 and align the pop pin
so it snaps into the hole then tighten the pop pin and test for steadiness.
♦ Loosen the pop pin and raise the handlebar to its highest position number 10
and tighten the pop pin and test for steadiness.
4. Install the Front Leg
Parts Needed:
− Leg Assembly - 1
− M10 x 1.5 x 60 mm Button Head Screw – 2
− M10 x 1.5 x 65 mm Button Head Screw – 2
− 20mm Washer, Flat - 4
− 5mm Hex Wrench
♦ Have one person lift up the front of the bike frame and hold -or-
lift up the bike frame and wedge a block (i.e wood…something
that will not damage paint and frame)
♦ Inspect the bottom of the mounting area to make sure the RPM
cable is fully seated and secured in the bottom groove.
♦ While the front of the bike frame is suspended in the air, assem-
ble the front leg. Position the leg so the thicker end faces to-
wards the front of the bike. Install the 2 longer M10 bolts with
washers in the holes towards the front of the bike. Install the 2
shorter M10 bolts with washer in the holes towards the rear of
the bike.
♦ Tighten all screws/nuts securely using a torque wrench to 85
lbs-in.
♦ Remove any materials used to hold the bike during assembly
Step 3A
Step 3B
Step 4

13
Assembly and Setup
5. Install Transport Wheels
Parts Needed:
− Transport Wheels – 2
− M10 x 1.5 x 45 mm Button Head Screw – 2
− 30 mm spacer - 2
− 20 mm flat washer – 4
− 5 mm hex wrench
♦ With the bike frame securely on level ground insert the spacer into the in-
side of the transport wheel. Position one 20 mm washer on each side of
the spacer and slide the M10 screw through the wheel.
♦ Using the 5 mm hex wrench tighten the M10 screw until snug and torque to
85 lbs-in.
6. Install the Saddle and Seat Slider
Parts Needed:
− Seat Post
− Seat slider assembly with Saddle
6A.
♦ Disengage rear pop-pin by loosening then pulling away from the frame. While still holding onto the
pop-pin, install the seat post into the frame and lower it to the lowest position and tighten the pop pin
securely once again.
6B.
♦ Slide the seat slide into the top of the seat post with the saddle
pointed towards the front of the bike.
♦ Rotate the seat slider lock knob as needed so that the slider
clamp is in alignment with the guide rail
♦ There is a locking pin under the saddle that has to be pulled up
as you move the slider into position. Release the pin when the
indicator is within the 0 to 9 range.
♦ Test the seat slide for proper operation and full travel.
Step 5
Step 6A
Step 6B

14
Assembly and Setup
7. Install the Pedals
Parts Needed:
− Pedals set of two
− Mutli wrench
NOTE: The pedal shafts are marked “R” and “L”. Trying to install the
pedals on the wrong side may damage the pedal and the crank arm
take caution to attach the pedals to the correct side of the bike.
♦ Turn the left pedal spindle counterclockwise when threading into
the left crank arm; turn the right pedal spindle clockwise when
threading into the right crank arm.
♦ Install the pedals on the pedal cranks using a 15mm open-end
wrench and tighten securely.
8. Install the Water bottle Cage
Parts Needed:
− 5 mm Hex Wrench
− Water Bottle Cage
− M10 x 1.5, 25 Flat Head Screws - 2
♦ Position the water bottle cage under the support cross bar. Make sure the
closed end of the cage is facing down and towards the rear of the bike.
♦ Carefully thread one of the screws thorough the hole in the water bottle cage
and tighten securely to the frame. Then install the second screw. Tighten
both screws using the 5 mm hex wrench.
♦ Tighten both screws to 85 in lbs using.
Step 7
Step 8

15
Assembly and Setup
9. Install the Computer Console
Note: This step requires 2 people to properly install the console. Failure to
follow this instruction could result in serious damage to the console.
WARNING – THE POWER CORD MUST BE UNPLUGGED DURING THIS
ASSEMBLY PROCESS OR SEVERE INJURY MAY OCCUR.
Parts Needed:
− Console support tube
− Console support sleeve
− Console
− 5/16 x 18 x .75 pan head screw- 4
− M6 x 1.0 x 15mm hex bolt - 1
− M4 x 1.0 x 10 mm Phillips pan head screw - 2
− Phillips screw driver #2
− 3/16 Allen wrench
− Rubber mallet – not supplied – optional
− 7/16 open end wrench – 2 – not supplied
9A.
♦ One user should hold the console with the screen facing them. The
other user should carefully guide the 3 cords from the back of the con-
sole through console support plate. The console support plate should
then be attached to the console taking extreme caution to not pinch or
trap any of the cords between the console and the support plate.
♦ With the console plate aligned to the console, screw the 4, 5/16 x 18
pan head screws to the console. Tighten with the 3/16 Allen wrench to
25 in-lbs.
9B.
♦ Next, slide the console support sleeve onto the console support tube.
Then inserts the M6 x 1.0 x 15 mm hex bolt into the bottom of the con-
sole post.
♦ Tighten with the 5 mm hex wrench to 25 in-lbs.
Step 9A
Step 9B

16
Assembly and Setup
9C.
♦ Attach the 3 wires coming from the console to the 3 mating wires coming
from inside the console support tube.
♦ Attach the ground wire from the console support tube to the ground
wire coming from inside.
♦ To securely connect the coax cable tighten the connectors finger tight.
Using 2, 7/16” open wrenches attach one wrench to the female hex and
one wrench to the console connector end, tighten a quarter turn. Move
the wrench to the connector on the frame side of the connection and
tighten a quarter turn.
♦ While one person is still holding the console, carefully thread the ex-
cess wires into the open end of the eSpinner console support tube. You
must take care to make sure that the wires are not pinched or severed
during the next step.
♦ With the wires properly stored, begin to slide the console and the con-
sole support sleeve into the console support tube.
♦ The plastic sleeve is a tight fit with the console support tube and will
need to be firmly pressed into place. You can gently use a rubber mallet
to assist the console support sleeve into place.
9D.
♦ Once the console support sleeve is installed, secure the sleeve to the
frame with the 2 M4 x 1.0 x 10 mm Phillips pan head screws and the
included Phillips head screw driver.
10. Leveling the Bike
Parts Needed:
− Multi-Wrench
♦ Move the bike to the a clear, level surface area where you plan to oper-
ate the unit. There are four leveling feet on the bottom of the eSpinner
that can be adjusted to securely level the product. The eSpinner re-
quires approximately 4’ x 7’ of open floor space to safely operate the
bike.
Step 9C
Step 9D
Step 10

17
Assembly and Setup
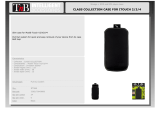
11. Power Connection
Parts Needed:
− Coax Cable (not provided)
− Power Cord
♦ Connect a coax cable to the coax input at the base
of the bike to feed TV signal.
♦ Connect the included power cord to the IEC con-
nector.
♦ Connect the power cord to the appropriate power
outlet.
♦ Turn the ON/OFF switch to the ON position. It
should take approximately 80 seconds for the console to
boot into the eSpinner application. You should see the
‘home’ screen when the unit is fully booted.
Coax Cable Input
IEC Power Input
ON / OFF Switch
WARNING: This product will be wired for either 120 VAC nominal power
input OR 230 VAC nominal input. It is factory-equipped with a specific elec-
tric cord and plug to permit connection to the proper electric circuit. Make
sure that the product is connected to a dedicated power line having an out-
let with the same configuration as that of the plug. NO adapter should be
used with this product. If the product must be reconnected for use on a
different type of electric circuit, the reconnection should be made by quali-
fied service personnel

18
Assembly and Setup
3
1 2
TV SETUP
♦ On the start screen,
Press the
start button.
You should see the work-
out options screen.
♦ A 3-touch sequence is needed to access the password entry
dialog.
Touch the locations on the workout options
screen in the sequence shown and a password dialog should
appear.
Note: Each location must be pressed within 1 second of the
previous location. If you are unable to access the password
screen after several attempts, you may need to re-calibrate
the touch screen.
♦ After the password
screen appears, type
‘
218’ then ‘enter’ to
gain entry into the Ser-
vice Menu Screen.
♦ Within the service menu, press Calibration and setup.

19
Assembly and Setup
♦ Once in the Calibration and Setup screen, press the tv setup button. The TV Setup screen will appear.
♦ Once in the TV Setup Screen, press the scan menu button to access the TV scan screen.
♦ Within the TV scan screen:
− press the change mode button repeatedly until the appropriate TV mode appears.
− Press the change type button to select the correct signal type appears.
Note: The following table outlines the options:
♦ Once the correct TV mode and type had been selected, press the start
scan
to perform the channel scan.
PAL / SECAM / DVB
NTSC/ATSC
TV mode Signal type
TV mode Signal type
ATV Air
PAL_B_G
ATV Air NTSC
PAL_B_G
ATV Cable
ATV STD
PAL_D_K
ATV HRC
PAL_I
ATV IRC
ATV Cable
PAL_B_G
DTV Air ATSC
PAL_D_K
DTV Cable
QAM STD
PAL_I
QAM HRC
SECAM_L
QAM IRC
DTV Air DVB-T

20
Assembly and Setup
♦ A progress bar will indicate the scanning progress.
NOTE: you may stop the scan process at any time by press-
ing the
stop scan button. If you do so, only the channels
scanned up to that point will be displayed.
♦ You may press the tv menu button to return to the TV scan
screen.
♦ Once in the channel scan is completed, press the debug menu
button twice to exit TV Setup mode into the workout options
screen.
Congratulations, you have now completed the assembly and setup of your eSPINNER® . Enjoy the ride.
!Attention! Crank bolt must be re-torqued after the first 10 hours of use. Refer to Preventive Maintenance section.
/