Page is loading ...

1
Style 5 – Style 5S – Style 7 – Style 7 D – Style 7 E – Style 10 – Style 10S
IND – IMP – RADIO (FI+DCF) – DHF – AFNOR
HORLOGES DIGITALES intérieures
DIGITAL CLOCKS indoor
Notice d’installation et de mise en service
Installation and operation manual
S’assurer à réception que le produit n’a pas été endommagé durant le transport pour réserve au transporteur.
When receiving goods, please check that the item is not broken. If the product is damaged, a claim
should be addressed to the shipping company.
BODET SA
BP30001
49340 TREMENTINES I France
Tél. support France: 02.41.71.72.99
Tel. support (intl): +33 241 71 72 00
Fax France: 02.41.71.72.01
Fax (intl) : +33 241 71 72 02
Réf : 607793 A
www.bodet-time.com

2
EN
Table of contents
I – Initial checks 4
1.1 Unpacking the clock 4
1.2 Cleaning 4
II – Installation 5
2.1 Wall mounting – Style 5-5S-7-7D-7E IND-IMP-FI+DCF-AFNOR-DHF 5
2.2 Wall mounting – Style 10-10S IND-IMP-FI+DCF-AFNOR-DHF 6
2.3 Electrical connections for various synchronisation cards 7
III – Connecting to the time distribution network 9
3.1 Parallel distribution with inverted polarity 9
IV – Default configuration 9
V – Location of the "S" and "+" keys 10
VI – Style 5S & Style 10S – Timer mode 10
VII – Basic configuration 11
7.1 Setting time/date/year – all models except Style 7 Date 11
7.2 Setting time/date/year – Style 7 Date 12
7.3 Configuration menu – all models except Style 7 Date 13
7.4 Configuration menu – Style 7 Date 15
VIII – Adjusting the brightness 18
IX – Memory backup 18
X – Technical specifications 18
XI – Maintenance menu 21
11.1 Maintenance menu – all models except Style 7 Date and Style 7 Ellipse 21
11.2 Maintenance menu – Style 7 Date and Style 7 Ellipse 25

4
I – Initial checks
Thank you for choosing a BODET clock.
This product has been carefully designed, adhering to ISO 9001 quality processes, to ensure your
satisfaction. We recommend that you read this manual and the general safety measures and
operating instructions carefully before handling the clock.
Retain this manual for reference for the lifespan of your clock.
The information supplied is non-binding; Bodet reserves the right to make changes to equipment,
including functional, technical and aesthetic changes or changes to colours, without notice.
Failure to observe these instructions may cause irreversible damage to the clock and
invalidate the warranty.
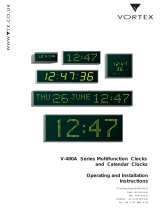
These instructions relate to the following clocks:
Style 5: hours and minutes display. Height of digits: 5 cm.
Style 5S (seconds): hours, minutes and seconds display. Height of digits: 5 cm.
Style 7: hours and minutes display. Height of digits: 7 cm.
Style 7D (date): hours, minutes, date, day and week display. Height of digits: 7 cm; height of
letters: 5cm.
Style 7E (ellipse): hours, minutes and revolving seconds display on ellipse design. Height of
digits: 7 cm.
Style 10: hours and minutes display. Height of digits 10 cm.
Style 10S (seconds): hours, minutes and seconds display. Height of digits: 10 cm.
These instructions relate to synchronisation of the clocks as follows:
IND (independent) - IMP (impulse): The clock should be configured independently, or as part
of a time distribution network, driven by a master clock which sends out impulses (independent,
minute or half minute in parallel).
RADIO (FI + DCF): The clock may be configured independently or radio-synchronised using an
external France Inter or DCF or GPS antenna (optional product not included).
DHF: The clock is radio-synchronised by a DHF radio signal.
AFNOR: The clock should be installed as part of a wired coded time distribution network in
compliance with AFNOR or IRIG-B standards.
1.1 Unpacking the clock
Carefully unpack the clock and check the contents of the package. This should include:
• Style clock
• 3 screws (Ø4mm)
• Anti-static cleaning kit
• Manual
• IMPORTANT:productidenticationlabel
An identification label is affixed to the back of the clock. Use the URL link shown to download these
instructions from the Bodet website: www.bodet-time.com.
1.2 Cleaning
Use an anti-static product identical to that in the cleaning kit provided.
Never use alcohol, acetone or other solvents, which may damage your clock’s casing or glass.
EN

5
II – Installation
2.1 Wall mounting – Style 5-5S-7-7D-7E IND-IMP-FI+DCF-AFNOR-DHF
The visuals below refer to the Style 5 clock. However, the installation process shown also applies to
Styles 5S, 7, 7D and 7E. Refer to the Technical specifications on page 18 for clock dimensions.
1) Fix the wall bracket to the wall using the four Ø4 mm dowel screws supplied.
2) For cabled versions (AFNOR and IMP),
insert the power and synchronisation cables:
• From above: cut through the top of
casing u.
• From the rear: dedicated space v.
3) Attach the electronic board to the wall
bracket. Insert the lower part of the electronic
board into the back of the wall bracket then
push the upper part of the board in towards
the back of the bracket until it clicks w.
4) For electrical connections, refer to page 7.
5) Connect the power cable to the electronic
board using a plastic cable tie (mounting
hole provided in the electronic board).
6) Connect the ribbon from the LED modules
(clock casing) to the electronic board x.
7) Attach the clock to the wall bracket by
inserting the upper part of the clock into the
back of the bracket in the slots provided,
then press the clock in until it clicks.
Secure the clock to the bracket at the bottom,
using the mounting screw provided.
Ensure that the cables are not trapped
during this operation.
8) The clock may be subsequently detached from the bracket by lifting the lower part of the clock
outwards, then removing the upper part.
9) Remove the protective film from the front and clean the clock using an anti-static cloth.
Right side
cutaway view
EN
u
v
w
x
w
Back view

6
v
Back view
2.2 Wall mounting – Style 10-10S IND-IMP-FI+DCF-AFNOR-DHF
The visuals below refer to the Style 10 clock. However, the installation process shown also applies
to Style 10S. Refer to the Technical specifications on page 18 for clock dimensions.
1) Fix the wall bracket to the wall using the four Ø4 mm dowel screws supplied.
2) For cabled versions (AFNOR and IMP),
insert the power and synchronisation cables:
• From above: cut through the top of
casing u.
• From the rear: dedicated space v.
3) Attach the electronic board to the wall
bracket. Insert the lower part of the electronic
board into the back of the wall bracket then
push the upper part of the board in towards
the back of the bracket until it clicks w.
4) For electrical connections, refer to page 7.
5) Connect the power cable to the electronic
board using a plastic tie (mounting hole
provided in the electronic board).
6) Connect the ribbon from the LED modules
(clock casing) to the electronic board x.
7) Attach the clock to the wall bracket by
inserting the upper part of the clock into the
back of the bracket in the slots provided,
then press the clock in until it clicks.
Secure the clock to the bracket at the bottom,
using the mounting screw provided.
Ensure that the cables are not trapped
during this operation.
8) The clock may be subsequently detached from the bracket by lifting the lower part of the clock
outwards, then removing the upper part.
9) Remove the protective film from the front and clean the clock using an anti-static cloth.
u
Wall bracket Style 10
+ electronic board
EN
w
w
x
Right side
cutaway view

7
2.3 Electrical connections for various synchronisation cards
Below are the wiring diagrams for the electronic boards for the various synchronisations.
IND (independent) synchronisation card
IMP (impulse) synchronisation card
Radio (FI+DCF) synchronisation card
EN
Connector for control keypad
Refer to the keypad instructions
(supplied with the keypad)
Neutral (blue)
Phase (brown)
Use the
appropriate
polarity for
the network
(otherwise
there will be
a delay of
30-60 secs)
Neutral (blue)
(black)
(red)
Phase (brown)
Connector for control keypad
Refer to the keypad instructions
(supplied with the keypad)
Connector available for Style 5S
and 10S only (timer mode)
Refer to page 10
External synchronisation:
France Inter or DCF or GPS (option)
Neutral (blue)
Phase (brown)

8
DHF synchronisation card
AFNOR synchronisation card
EN
Connector available for Style 5S
and 10S only (timer mode)
Refer to page 10
Neutral (blue)
Phase (brown)
Polarity is
irrelevant to
the network
Neutral (blue)
(black)
(red)
Phase (brown)
Connector for control keypad
Refer to the keypad instructions
(supplied with the keypad)

9
III – Connecting to the time distribution network
Connect the 100-240VAC 50/60Hz mains power supply. (See chapter 2.)
3.1 Parallel distribution with inverted polarity
Minute // (12-24-48 Volt), ½ minute // (24 Volt) and AFNOR
1) Ensure that the clock is designed to be synchronised by "Impulse" or to be connected to a time
code distribution network that meets the AFNOR standard .
2) Connect the impulse cable to terminal strip (A). Use the correct polarity for impulse synchronisation.
There is no polarity in AFNOR.
Minute or ½ minute mode (only)
3) Select the impulse frequency (minute or ½ minute) (refer to page 23) and display mode
(refer to page 13 or 15, depending on your clock).
4) Set the clock to the correct time (refer to page 11 or 12, depending on your clock).
IV – Default configuration
To restore factory settings, press the red button on the electronic board until the clock turns black.
Open the clock to access this button (see Installation).
Location of button on the electronic board (example shows an Impulse card):
EN
A
IMPULSE
AFNOR
OR
A

10
V – Location of the "S" and "+" keys
1) These two keys are located on the back of the clock:
– Right side: when viewed from the back
– Left side: when viewed from the front (when being handled)
2) The “S” key is above the “+” key.
3) When pressed, an LED lights up to indicate the selected key.
Example showing the two keys pressed simultaneously:
VI – Style 5S and Style 10S – Timer mode
1) The timer keypad operates in count or countdown modes.
It has the following functions: start, stop, split time, closure of a dry contact when the count or
countdown ends (stops at a pre-programmed time).
The timer keypad can control up to ten Style 5S or Style 10S clocks.
The electronic board for Style 5S and Style 10S clocks is fitted with a connector strip (j).
2) Connect the timer keypad to the strip (j) using a 4-core cable (T-, T+, 0V and 15V) for the first
clock.
Wiring example using three Style 5S clocks (synchronisation via impulses):
3) To link several Style 5S or Style 10S clocks to a single timer keypad, connect the T- and T+
terminals together using a 2-core cable (twin telephone cable). The first clock remains connected to
the timer keypad via a 4-core cable.
4) For more information, please refer to the timer keypad instructions.
EN
0V
0V
Green
Yellow
White
Brown
8/10 cable, twin pairs (unshielded)
20 m
max.
15V
15V
T+
T+
T-
T-

11
VII – Basic configuration
7.1 Setting time/date/year – all models except Style 7 Date
To set time, date and year, press and hold "S" for 3 seconds.
EN
+
+
+
+
+
+
+
+
+
+
Set hour
Set minutes
Set year
Set month
Set day
End of menu
S
S
Hold down for 3 seconds
S
S
S
S

12
7.2 Setting time/date/year – Style 7 Date
To set time, date and year, press and hold "S" for 3 seconds.
EN
+
+
+
+
+
+
+
+
+
+
Set hour
Set minutes
Set year
Set month
Set day
End of menu
S
S
S
Hold down for 3 seconds
S
S
S

13
7.3 Configuration menu – all models except Style 7 Date
Access the configuration menu by pressing and holding "S" then "+" for 3 seconds.
Note: the temperature display option is only available on the following models:
Style 7D, Style 7E, Style 10, Style 10S
EN
+
+
+
+
+
+ +
+
S
S
S
S
S
S
S
S
S
Select display mode: 12 or 24 hr (default 24 hr)
Hold down for 3 seconds
+
Show display options
(default HH:MM)
Select time zone
(default Eur)
Time difference: hours
(GMT mode)
Time difference: minutes
(GMT mode)
Select day of the week
Select a set date
Month for changeover to summer time
(default 3, i.e. March)
Select week number for the changeover
to summer time (from 1 to 7; F to
configure a set date)
If 1 to 7 selected
If F selected
End of menu (GMT mode)
Local mode only for AFNOR synchronisation
Select energy-saving mode
(default Eco)
EcoP mode:
Select looped switch-off time from 0 to 23
(default 23)
Select looped switch-on time from 0 to 23
(default 6)
+
+
S
S
S
+
+ + +
+ + +
+
+
+ +
+
S
S
+
+ +
++++
S
+ +

14
(cont.)
EN
S
+
+
+ +
Month for changeover to winter time
(default 10, i.e. October)
+ +
+
+
Select week number for the
changeover to winter time
(from 1 to 7; F to configure a set date)
If 1 to 7 selected
If F selected
S
S
Select day of the week
Select a set date
Time difference: hours
(PrG mode)
Time difference: minutes
(PrG mode)
End of menu
S
S
+ + +
+ + +

15
7.4 Configuration menu – Style 7 Date
Access the configuration menu by pressing and holding "S" then "+" for 3 seconds.
Note: the temperature display option is only available on the following models:
Style 7D, Style 7E, Style 10, Style 10S
EN
+
S
S
S
S
S
S
S
S
S
Hold down for 3 seconds
+
+
+ +
+
+
+
+
+
+
+ + +
+
+
+
+
S
Select display mode: 12 or 24 hr (default 24 hr)
Select energy-saving mode
EcoP mode:
Select looped switch-off time
from 0 to 23 (default 23)
Select looped switch-on time
from 0 to 23 (default 6)
Select main display language
Select second display language
Select the
information to be
displayed on the
middle line
Set the middle line display to alternate with the day
(only day, week and T °)

16
(cont.)
EN
+ +
+
+ +
+
+ +
+ + + +
Select time zone
(default Eur)
S
+
+
+ +
S
S
S
Local mode only for AFNOR synchronisation
End of GMT menu
S
+ +
+ + +
+
+
If 1 to 7 selected
If F selected
S
S
Time difference:
hours (GMT mode)
Time difference:
minutes (GMT mode)
Month for changeover to summer time
(default 3, i.e. March)
Line 1: select month
Line 2: month as 3 letters
Line 3: indicates that month is the parameter
required for the changeover to summer time
Select week number for the
changeover to summer time
(from 1 to 7; F to configure a set date)
Select day of the week
Select a set date

17
(cont.)
EN
+
S
+ +
+ + +
+
+
If 1 to 7 selected
If F selected
S
S
Month for changeover to winter time
(default 10, i.e. October)
Line 1: select month
Line 2: month as 3 letters
Line 3: indicates that month is the parameter
required for the changeover to winter time
Select week number for the
changeover to winter time
(from 1 to 7; F to configure a set date)
Select day of the week
Select a set date
+ + +
+ + +
S
S
End of GMT menu
Time difference: hours (PrG mode)
Time difference: minutes (PrG mode)

18
VIII – Adjusting the brightness
Brightness can be adjusted when the Style clock is in normal operating mode, i.e. when it is neither
in the configuration menu nor in the set time menu. The default brightness is level 2.
IX – Memory backup
Style clocks have a permanent backup feature that stores all of the configuration parameters and
display settings (for approx. 20 years), even in the event of prolonged power failure.
X – Technical specifications
Style clocks comply with Electromagnetic Compatibility Directive 89/336/EEC and Low Voltage
Directive 73/23/EEC by referring to EN 60950.
They comply with these European standards:
• EN 55022 (December 1994) Radio disturbance produced by information technology
equipment.
• EN 50082-1 (June 1992) Electromagnetic compatibility. Generic immunity standard.
They are designed for use in a residential, commercial or industrial environment.
– Power supply: 115 or 230V (depending on model) ±10% 50/60 Hz
– Mains powered slaves consumption: 6 mA to 24V
– In the event of a power failure, time and date are saved for 1 week
– Backup for other settings: permanent
– Operating temperature: -5° to +55°C
– Protection rating: IP30, IK02
EN
+
Hold down for 3 seconds
+ + +
S
End of menu
Select light intensity
LUM 1: low intensity
LUM 4: high intensity

19
EN
Dimensions for wall mount
Style 5
– Weight: 0.25 kg
Style 5S
– Weight: 0.37 kg
Style 7
– Weight: 0.4 kg
Style 7D & Style 7E
– Weight: 0.965 kg
120
56
7°
243
2353
2
106
Ø 4.4
R 2.2 60
120
368
60
R 2.2
2353
2
56
7°
106
Ø 4.4
60
7°
140
120
320
Ø 4.4
R 2.2
60
3653
2
73
134
7°
320
67R 2.2
65154
320
2

21
XI – Maintenance menu
To access the maintenance menu, open the configuration menu by pressing and holding "S",
then "+" for 3 seconds. Release both keys, then press and hold "S", then "+" again for 7 seconds.
11.1 Maintenance menu – all models except Style 7 Date and Style 7 Ellipse
Radio synchronisation (FI+DCF)
EN
+
S
S
S
S
S
S
S
S
Hold down for 3 seconds
+
+
S
Hold down for 7 seconds
+
Open configuration menu
Search the information frame in accordance with
the selected synchronisation. (Default: Auto mode)
Wait for the FI signal for about 3 minutes before checking
DCF synchronisation.
Check reception from an antenna if one is connected.
The double hyphen indicates good reception
Select radio synchronisation
Information display: time and date
Software version
May differ from the version shown depending on the date of purchase.
Reset clock (enabled if “rstY” is selected)
Restore factory settings (enabled if “dF Y” is selected)
Display test (tests for correct functioning of all LEDs)
Set T° offset
(Style 10-10S)
...
+ +
+
+
+
+ +
...
+ ++
End of menu

22
DHF synchronisation
EN
+
S
S
S
S
S
S
S
S
Hold down for 3 seconds
+
+
S
Hold down for 7 seconds
+
Open configuration menu
Select DHF mode
DHF (default) or DHFi (the clock operates using its internal time base)
Select mode: cod or loc (default cod)
Cod: the clock displays the time code data received, without modification.
Loc: the clock calculates and displays local time using the time code data received plus its summer/winter time
changeover and time difference settings.
Display dynamic reception
Software version
May differ from the version shown depending on the date of purchase.
Reset clock (enabled if “rstY” is selected)
Restore factory settings (enabled if “dF Y” is selected)
Display test (tests for correct functioning of all LEDs)
Set T° offset
(Style 10-10S)
...
+
+
+
+
+ +
...
+ ++
End of menu
+
S
S
S
S
+
+
Select time zone
(default Eur)
+
+ + +
++++
/