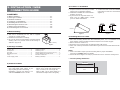
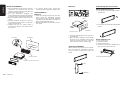
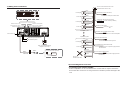
Clarion CZ305 is a versatile car audio system that seamlessly integrates with your vehicle's dashboard, providing a range of features to enhance your driving experience. With its 4-channel RCA output connections, you can connect external amplifiers, granting you the flexibility to customize your audio setup. It supports various audio sources, including radio, CD, and Bluetooth, allowing you to enjoy your favorite music effortlessly. Additionally, it includes a SiriusXM-Connect tuner, enabling you to access satellite radio channels, expanding your entertainment options.
Clarion CZ305 is a versatile car audio system that seamlessly integrates with your vehicle's dashboard, providing a range of features to enhance your driving experience. With its 4-channel RCA output connections, you can connect external amplifiers, granting you the flexibility to customize your audio setup. It supports various audio sources, including radio, CD, and Bluetooth, allowing you to enjoy your favorite music effortlessly. Additionally, it includes a SiriusXM-Connect tuner, enabling you to access satellite radio channels, expanding your entertainment options.


-
 1
1
-
 2
2
-
 3
3


Clarion CZ305 is a versatile car audio system that seamlessly integrates with your vehicle's dashboard, providing a range of features to enhance your driving experience. With its 4-channel RCA output connections, you can connect external amplifiers, granting you the flexibility to customize your audio setup. It supports various audio sources, including radio, CD, and Bluetooth, allowing you to enjoy your favorite music effortlessly. Additionally, it includes a SiriusXM-Connect tuner, enabling you to access satellite radio channels, expanding your entertainment options.
Ask a question and I''ll find the answer in the document
Finding information in a document is now easier with AI
Related papers
-
Clarion CZ505 Installation guide
-
Clarion CZ205 Installation guide
-
Clarion NX602 Installation guide
-
Clarion CZ702 Owners And Installation Manual
-
Clarion CLCK Owner's manual
-
-
Clarion FZ502 User manual
-
-
Clarion CX305 Installation guide
-