Page is loading ...

Instruction
Manual
IMPORTANT
For your safety read
instructions carefully
before assembling or
using this product.
Save this manual for
future reference.
Compact Bandsaw
BS250


Terms & Conditions Of Usage
Health & Safety Guidance page 4
Additional Safety Instructions For Bandsaws page 5
Record Power Guarantee page 6
EU Declaration Of Conformity page 31
User Manual
1. Getting To Know Your Bandsaw page 7
2. Machine Specification page 7
3. Stand & Wheel Kit Assembly page 8
4. Machine Assembly page 12
5. Machine Setting page 15
6. Bandsaw Blade Set Up page 17
7. Connection Of The Electricity Supply page 18
8. Operation & Bandsawing Practice page 19
9. Dust Extraction page 23
10. Maintenance page 24
11. Parts Diagram page 28
12. Parts List page 30
Consumable Spare
Parts Quick Find
See page 28 for parts diagrams
3
Part Description Part Number
Blades
1/4” x 6TPI Bandsaw Blade
BB701406
3/8” x 6TPI Bandsaw Blade
BB703806
1/2” x 4TPI Bandsaw Blade
BB701204
1/2” x 6TPI Bandsaw Blade
BB701206
Pack of 3
Blades (1/4, 3/8, 1/2) BB70-3PACK
Table Insert 127
Bandwheels
Drive belt 93
Bandwheel tyre 26
Wheel bearing 18
Brush 58
Upper Blade Guides
Hex bolt M6-1.0x15 149
Upper guide support block 153
Lower Blade Guides
Washer 113
Left cover 130
Hex socket screw 131
Lower blade guide support 132
Right cover 135
Hex bolt M5-0.8 x 10 136
Flat washer M5 137
Blade support shaft 146
Contents

READ ALL THE INSTRUCTIONS IN THIS MANUAL
CAREFULLY BEFORE ASSEMBLY, INSTALLATION AND USE
OF THIS PRODUCT.
KEEP THESE INSTRUCTIONS IN A SAFE PLACE FOR
FUTURE REFERENCE.
WARNING: When using electric tools, basic safety precautions
should always be followed to reduce the risk of fire, electric
shock and personal injury.
SAFE OPERATION
1. Eye Protection
The operation of any power tool can result in
foreign objects being thrown into your eyes, which can result
in severe eye damage. Always wear safety glasses or other
suitable eye protection. Wear safety glasses at all times.
Everyday glasses only have impact resistant lenses. They are
not safety glasses which give additional lateral protection. It
is also important to wear ear protectors when operating the
bandsaw.
2. Keep work area clear.
Cluttered areas and benches invite accidents and injuries.
3. Consider work area environment.
Do not expose the machine to rain or damp conditions.
• Keep the work area well lit.
• Do not use the machine in the presence of flammable
liquids or gases.
4. Guard against electric shock.
Avoid body contact with earthed or grounded surfaces.
5. Keep other persons away (and pets).
Do not let persons, especially children, not involved in the work,
touch the machine, or extension cord (if used) and keep visitors
away from the work area.
6. Store idle tools.
When not in use, tools should be stored in a dry, locked- up
place, out of reach of children.
7. Do not force the machine.
It will do the job better and work more safely if operated at the
speed at which it was intended.
8. Use the right tool.
• Do not force small tools to do the job of a heavy-duty tool.
• Do not use tools for purposes other than those for which they
were intended.
9. Dress properly.
• Non-slip footwear is recommended.
• Do not wear loose clothing, neckties or jewellery; they can be
caught in moving parts.
• Roll up long sleeves above the elbow.
• Wear protective hair covering to contain long hair.
10. Use protective equipment
• Use safety glasses. (See note 1. above)
• Use face or dust shield if cutting operation creates dust.
• Use ear plugs or ear defenders when the machine is in use
11. Connect dust extraction equipment.
(See section 9, page 22)
12. Do not abuse the cord.
Never yank the cord to disconnect it from the socket. Keep the
cord away from heat, oil and sharp edges.
13. Do not overreach.
Keep proper footing and balance at all times.
14. Secure work.
Ensure that your work piece is properly held before
starting to cut.
15. Maintain tools with care.
• Follow instructions for lubrication and changing accessories.
• Inspect electric cords periodically and, if damaged, have them
repaired by an authorized service facility or qualified electrician.
• Inspect extension cords (if used) periodically and replace if
damaged. Always use properly rated extension cord.
16. Disconnect Machine.
When not in use, before servicing, changing blades etc.
disconnect the machine from the power supply.
17. Never leave machine running unattended.
Turn power off, do not leave machine until it comes to a
complete stop.
18. Remove adjusting keys and wrenches.
ENSURE that all adjusting wrenches and keys are removed
before switching the machine ‘ON’.
19. Avoid unintentional starting.
Ensure the switch is in the “STOP” position before turning
on the power from the main electricity supply. Your Record
Bandsaw already incorporates low voltage protection. This
means the machine will not automatically start up after say a
power cut, unless you first reset the start switch.
20. Out-door Extension Leads.
Your machine should not be used outdoors.
21. Stay alert.
Watch what you are doing, use common sense and do not use
the machine when you are tired.
22. Check for damaged parts.
• Before use of the machine, it should be carefully checked to
determine that it will operate properly and perform its intended
function.
• Check for alignment of moving parts, binding of moving parts,
breakage of parts, mounting and any other conditions that may
affect its operation.
• A guard or other part that is damaged should be properly
repaired or replaced by a qualified person unless otherwise
indicated in this instruction manual. Have defective switches
replaced by a qualified person.
• Do not use the machine if the switch does not turn on and off.
23. Warning!
• The use of any accessory or attachment, other than those
recommended in this instruction manual, or recommended by
our Company may present a risk of personal injury.
24. Have your machine repaired by a qualified person.
• This electric machine complies with the relevant safety rules.
Only qualified persons using original spare parts should carry
out repairs. Failure to do this may result in considerable danger
to the user.
25. This machine is designed for cutting wood.
• It can safely cut some plastics and acrylics but should never
be used to cut metal.
Maintenance and Servicing
This machine requires very little maintenance. This handbook
gives clear instructions on installation, set up and operation.
Read these instructions carefully. Remember always to switch
off and unplug from the main electricity supply before carrying
out any setting up or maintenance operations.
Should you need advice on the repair or maintenance of this
product, our Customer Service Department can be contacted
on 0870 770 1777 and will be happy to assist you.
Health & Safety Guidance
Record Power Health & Safety Guidance v1.0

SAFETY IS A COMBINATION OF OPERATOR
COMMON SENSE AND ALERTNESS AT ALL
TIMES WHEN THE BANDSAW IS BEING USED.
WARNING: FOR YOUR OWN SAFETY, DO NOT ATTEMPT
TO OPERATE YOUR BANDSAW UNTIL IT IS COMPLETELY
ASSEMBLED AND INSTALLED ACCORDING TO THE
INSTRUCTIONS.
SAFE OPERATION
1. The bandsaw should be bolted to a workbench or suitable
stand where possible.
2. If you are not thoroughly familiar with the operation of
bandsaws, obtain advice from your supervisor, instructor, or
other qualified person or contact your retailer for information
on training courses. Do not use this machine until adequate
training has been undertaken.
3. Never turn the machine ‘ON’ before clearing the table of all
objects (tools, scrap pieces etc.)
4. Ensure that:
(i) the voltage of the machine corresponds to the mains voltage.
(ii) To use an earthed power source (wall socket).
(iii) The cord and plug are in good condition, i.e. not frayed or
damaged.
(iv) No saw teeth are missing and the blade is not cracked or
split. Otherwise replace blade.
(v) The blade is properly tensioned and aligned.
5. Never start the machine with the saw blade pressed against
the workpiece.
6. Never apply sideways pressure on the blade as this may
cause the blade to break.
7. Care must be taken when cutting wood with knots, nails or
cracks in it and / or dirt on it, as these can cause the blade to
get stuck.
8. Never leave the machine running unattended.
9. Ensure the teeth of the blade are pointing downwards.
10. Do not use saw blades which are damaged or deformed.
11. Replace the table insert when it is worn.
12. When cutting round timber use a suitable device to prevent
twisting of the workpiece. See section 8 Fig. 8.5.
13. DO NOT operate the machine when the door or the blade
guard is not closed.
14. Adjust the guard as close as possible to the workpiece
being cut.
15. Ensure the selection of the saw blade and speed are
suitable for the material to be cut. For most wood cutting
applications the fastest of the two speeds should be used.
See
section 8.
16. If the mains lead is damaged, it must only be replaced by a
qualified electrician.
17. Never use a long extension cable.
18. WARNING LABELS – It is important that labels bearing
Health & Safety Warnings are not removed or painted over. New
labels are available from Customer Services.
19. MECHANICAL SAFETY – The security of all clamps and
work holding devices should be checked before switching on.
20. WOOD DUST – The fine particles of dust produced in
cutting operations are a potential health risk. Some imported
hardwoods do give off highly irritant dust which causes a
burning sensation. We strongly recommend the use of a dust
collector and dust mask/visor (see section 10, page 26). Our
Customer Services Department will also be happy to advise you
on the correct unit for your needs.
21. This machine falls under the scope of the ‘Health &
Safety at Work etc. Act 1974’, and the ‘Provision & Use of
Work Equipment Regulations 1998’. We recommend that you
study and follow these regulations. Further guidance can be
found in the Safe Use of Narrow Bandsaws and the Safe Use
of Woodworking Machinery code of practice booklet (L114)
published by Health & Safety Executive and available by visiting
http://www.hse.gov.uk/pubns/wis31.htm.
For further help on any of the above matters please contact our
Customer Services Department at :-
Tel: 0870 770 1777 Fax: 0870 770 1888
WARNING: Do not allow familiarity (gained from frequent use of
your machine) to cause complacency. Always remember that a
careless fraction of a second is sufficient to inflict severe injury.
Additional Safety Instructions
For Bandsaws
4 5
Record Power Bandsaw Safety v1.0

Record Power Guarantee
1. INTRODUCTION
1.1 We supply machinery through a network of dealers and
authorised distributors and you should be aware that your
contract of sale is with the retailer from whom you purchased
this product.
1.2 If you are not satisfied with this product you should in the
first instance approach the retailer from whom you purchased it.
1.3 Customers have statutory rights to protect them and
information on this can be found at the Citizens Advice Bureau
or on such web-sites as that operated by the DTI (http://www.
dti.gov.uk)
1.4 Returning your guarantee card will speed up the claims
procedure and can be very helpful as a proof of purchase
should the initial receipt be mislaid or damaged. We recommend
that this is returned as close to your original purchase date as
possible.
1.5 Correct installation, set-up, adjustment and routine
maintenance of the machine are the responsibility of the end-
user and problems arising from incorrect set-up, adjustment or
maintenance are not covered by the terms of this guarantee.
However support is available in the first instance from the retailer
who supplied you and free technical support is available from
Record Power on 0870 7701777 during office hours and from
an extensive knowledge base on our website www.recordpower.
co.uk. We also recommend that those users who have not had
suitable training in the safe use of machinery should seek such
training locally before using or attempting to set up and adjust
any machinery (please contact your retailer for recommendations
in your local area).
2. GUARANTEE
2.1 In addition to the above Record Power guarantees that for
a period of 5 years from the date of purchase the components
of this product will be free from defects caused by faulty
construction or manufacture.
2.2 During this period Record Power will repair or replace free
of charge any parts which are proved to be faulty in accordance
with paragraph 2.1 above provided that:
2.2.1 You follow the claims procedure set out below;
2.2.2 We are given a reasonable opportunity after receiving
notice of the claim to examine the product.
2.2.3 If asked to do so by us, you return the product to Record
Power's premises or other approved premises such as those of
the supplying dealer, for the examination to take place.
2.2.4 The fault in question is not caused by continuous
industrial use, accidental damage, fair wear and tear,
wilful damage, negligence on your part, incorrect electrical
connection, unapproved modification, abnormal working
conditions, failure to follow our instructions, misuse, or alteration
or repair of the product without our approval.
2.2.5 This product has been purchased by you and not used for
hire purposes;
2.2.6 This Guarantee extends to the cost of carriage incurred
by you returning the product to Record Power as long as it
is demonstrated that the defect falls within the terms of this
Guarantee and you follow the claims procedure as outlined
below;
3. CLAIMS PROCEDURE
3.1 In the first instance please contact the retailer who supplied
the product to you. In our experience many initial problems with
machines that are thought to be due to faulty parts are actually
solved by correct setting up or adjustment of the machines.
A good dealer should be able to resolve the majority of these
issues much more quickly than processing a claim under the
guarantee.
3.2 If the dealer who supplied the product to you has been
unable to satisfy your query, any claim made under this
Guarantee should be made directly to Record Power at the
address set out at the foot of this Guarantee. The claim itself
should be made in a letter setting out the date and place of
purchase, and giving a brief explanation of the problem which
has led to the claim. This letter should then be sent with proof of
the purchase date (preferably a receipt) to Record Power. If you
include a phone number or email address this will help to speed
up your claim.
3.3 PLEASE NOTE that it is essential that the letter of claim
reaches the address below on the last day of this Guarantee at
the latest. Late claims will not be considered.
3.4 We will contact you once we have received your initial
written claim. If it is necessary to return the item, in most cases
but subject always to clause 2.2.5, we will arrange for collection
or will provide freepost information to enable return depending
on the weight and size of the product concerned. If the product
is to be returned to us, we will agree with you in advance a
Returns Number, to speed tracking of the claim and ensure the
most appropriate method of return to you is used.
4. NOTICE
This Guarantee applies to all goods purchased from an
authorised retailer of Record Power within the United Kingdom
of Great Britain and Northern Ireland. This Guarantee does not
confer any rights other than those expressly set out above and
does not cover any claims for consequential loss or damage.
This Guarantee is offered as an extra benefit and does not affect
your statutory rights as a consumer. Additional written copies of
this Guarantee can be obtained by writing to the address below.
Please include a stamped and self addressed envelope for each
copy of the Guarantee requested.
Record Power Ltd.
Unit B, Adelphi Way
Ireland Industrial Estate
Staveley, Chesterfield
S43 3LS
Record Power Guarantee v1.0

2. Machine Specification
1. Getting To Know Your Bandsaw
Fig.1
A Blade Tensioning Knob
B Rise & Fall Lock
C Blade
D Upper Blade Guide
E Mitre Fence
F Rip Fence
G Rip Fence Rail
H Table
I Stand & Wheel Kit (optional)
J Rise & Fall Knob
K Tracking Knob
L Tracking Knob Lock
M Motor Rating Plate
N Table Tilting Handle
O 100mm Dust Extraction Port
P Motor
6 7
A
B
C
F
I
D
E
H
J
K
P
N
G
L
BS350 SPECIFICATION
Blade length: 1785mm (70
1
/4”)
Blade width: 6mm - 13mm (
1
/
4
” -
1
/
2
”)
Max depth of cut: 120mm
Throat depth: 240mm
Table size: 315 x 350mm
Max width blade to rip fence: 140mm
Table height (from floor): 370mm
Extraction port: 100mm
Motor power (output):
1
/3hp
Weight: 30kg
Footprint: 340 x 240mm
Dimensions: 860mm (height) x 550mm
(width) x 480mm (depth) (without stand)
BS250 SPECIFICATION
M
O

3. Stand & Wheel Kit Assembly (Optional)
3.1 Stand & Wheel Kit Assembly
CAUTION! The machine is heavy. Additional help or a
suitable lifting device or support will be required for lifting
the machine onto the stand.
The stand and wheel kit comes as a self assembly unit Fig.3.1.
Stand
1. 2 x Long top brace supports
2. 2 x Short top brace support
3. 2 x Long mid brace supports
4. 2 x Short mid brace supports
5. 4 x Legs
Wheel Kit
6. 1 x Operating frame
7. 1 x Operating frame pedal
8. 2 x Brace support b
ars
9. 2 x Axles
10. 4 x Rubber feet
11. 3 x Phillips head bolts
12. 8 x Fixing pins
13. 8 x Washers
14. 24 x Short fixing bolts
15. 4 x Long fixing bolts
16. 2 x Short stem wheels
17. 2 x Long stem wheels
18. 1 x Release
pedal
Fig.3.1
1
2
3
4
5
6
7
8
9
10
11
12 13
14
15
16
17
18

3. Stand & Wheel Kit Assembly (Optional) - cont.
Note: When assembling this legstand
Do Not fully tighten the nuts and bolts
until the assembly is complete. Finger
tight should be sufficient.
3.2 Stand Assembly
1. Locate the first leg and secure it to
one of the long top brace supports using
the nuts, bolts and washers supplied
Fig.3.2 and Fig.3.2B.
2. In the same way, attach the second
leg to the brace support
Fig.3.3.
3. Locate the short top brace supports
and fix the to the legs as shown Fig.3.4.
4. Continue in this way until all of the
legs and top brace supports have been
fitted Fig.3.5.
5. Locating holes a third of the way
down each leg are for securing the
mid
brace supports. Fix the long mid brace
supports to the frame using the nuts,
bolts and washers Fig.3.6.
6. Finally, fit the short mid brace support
to one of the shorter sides
Fig.3.7.
Note
The side with the short mid brace
support fitted will be referred to as the
back of the stand. This leaves the front
area free for wheel kit operation
.
Note
If you are not fitting the wheel kit,
attach the final brace as shown in
Fig.3.8.
Fig.3.3
Fig.3.4
Fig.3.5
Fig.3.6Fig.3.2
Fig.3.7
Fig.3.2B
BACK
LONG TOP BRACE
SUPPORT
SHORT TOP BRACE
SUPPORTS
8 9
Fig.3.8
LONG TOP BRACE
SUPPORT
LONG MID BRACE
SUPPORTS
LEG
SHORT MID
BRACE SUPPORT
TO BE FITTED IF
THE WHEEL KIT
IS NOT REQUIRED
SPACE LEFT
FOR WHEEL KIT
OPERATION

3. Stand & Wheel Kit Assembly (Optional) - cont.
3.3 Wheel Kit Assembly
1. On the underside of the operating
frame, feed the short stem wheels
through the pre-drilled holes and secure
with one of the pins and washers
provided
Fig.3.9.
2. With the operating frame in hand,
attach the release pedal to the underside
of the operating frame using the 3
Phillips head bolts
Fig.3.10. The slots
on the release pedal are elongated to
allow adjustment when the wheel kit is
assembled.
3. Take the two long stem wheels and
pass them through the pre drilled holes
in the operating frame pedal and secure
with pins
Fig.3.11.
Now slide an axle through one of the
front legs and hook a brace support bar
on it. Place a washer on and slide a pin
through the axle end
Fig.3.12.
4. Pass the axle through the operating
frame pedal and through the opposing
leg. Once the axle is through the
opposing leg hook the remaining brace
support bar on the axle and secure with
a washer and pin as previous
Fig.3.13.
5. Now pass the remaining axle through
the rear of the stand and hook the brace
support bar with washer and pin as
previous.
Fig.3.14.
6. The operating frame can now be fitted
to the axle and secured to the opposing
rear leg with the other brace support
bar, washer and pin. Ensure when this
operating frame is fitted that it sits below
the operating frame pedal
Fig.3.15.
7. Slide the rubber feet onto the bottom
of the band
saw legs and position
the frame upright. Once the frame
is
upright, the whole assembly should fall
into place. However it will not operate
correctly until the actual bandsaw is
fitted. Fig.3.16.
Fig.3.9
Fig.3.11
Fig.3.13
Fig.3.10
RELEASE PEDAL
Fig.3.12
AXLE
WASHER
PIN
BRACE
SUPPORT BAR
Fig.3.14
Fig.3.15
Fig.3.16
OPERATING
FRAME
LONG STEM
WHEELS
OPERATING
FRAME PEDAL
BRACE
SUPPORT BAR
OPERATING FRAME
BELOW THE PEDA
L
OPERATING
FRAME PEDAL
RUBBER
FEET
AXLE

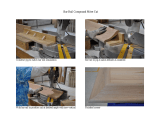
3. Stand & Wheel Kit Assembly (Optional) - cont.
3.4 Fitting the bandsaw to the stand
CAUTION! The machine is heavy.
Additional help or a suitable lifting
device or support will be required for
lifting the machine onto the stand.
1. Lift the bandsaw over the stand and
place the long fixing bolts through the
four location holes in the bandsaw base
Fig.3.19.
2. Secure the bandsaw to the stand with
the remaining washers and
nuts Fig.3.20.
Fig.3.17
LONG FIXING BOLTS
10 11
Note
Before fully tightening all of the
fixtures on the stand ensure that the
long fixing bolts and nuts are fitted
through each top corner of the stand.
Once this is complete the rest of the
stand can be fully tightened and the
bandsaw can be fitted.
1. Feed the long fixing bolts up through
the stand and secure the four corners
using the washers and bolts provided
Fig.3.17.
2. Once the stand is fully tightened
adjust the position of the release pedal
so it fastens the operating pedal down
Fig.3.18A and Fig.3.18B. The bandsaw
can now be fitted
.
Fig.3.20
Fig.3.19
LOCATION
HOLES
Fig.3.18A
Fig.3.18B
RELEASE PEDAL

4. Machine Assembly
4.1 Unpacking and components included
The machine is supplied partly assembled. Prior to use, further
assembly is required.
When unpacking the machine the following components are
included for the initial assembly
Fig.4.1:
1. 1 x Table
2. 1 x Fence
3. 1 x Trunnion
4. 1 x Fence rail
5. 1 x Extraction port
6. 1 x Mitre fence
7. 1 x Push stick
8. 4 x
Bolts
9. 4 x Serrated washers
10. 4 x Star knobs
11. 4 x Washers
12. 1 x Tension knob
13. 2 x Allen keys
1
2
3
5
6
7
8
9
11
12
10
13
4
Fig.4.1

4. Machine Assembly - cont.
Fig.4.1B
THRUST BEARING
Fig.4.3
TRUNNION
TABLE FIXING BOLT & WASHER
12 13
At this stage it is advisable to make an
initial setting in the lower blade guides,
slacken the two left hand side grub
screws
Fig.4.1A, then position the guide
assembly so the blade runs centrally on
the thrust bearing
Fig.4.1B.
4.1 Fitting the table
Attach the trunnion to the trunnion carrier
with the ratchet handle supplied
Fig.4.2.
Adjust the trunnion until it is level and fit
the table using the four table bolts and
serrated was
hers Fig.4.3.
Caution
It may be necessary to seek
assistance with this as the table is
heavy and will not be stable until
bolted down.
4.2 Fitting the fence rail
Take the four star knobs and was
hers
and fit them into the threaded holes on
the underside of the table
Fig.4.4. But do
not fully tighten.
Slide the fence rail into the gap left
between the table and the star knobs
then tighten the star knobs to secure the
fence rail
Fig.4.5.
4.3 Fitting the rip fence
Slide the rip fence assembly onto the
fence rail and along the back of the table
Fig.4.6.
Pull down the locking lever to secure
the position, if the locking lever does
not lock the fence it can be adjusted by
rotating it clockwise this will enable the
fence to be locked securely
Fig.4.7.
Do not over tighten as this can damage
the cam. Tighten just enough to keep the
fence stable and secure.
Adjust this until you are happy with the
setting.
Tip
When locking the rip fence it is
advisable in place downward pressure
on the top of the fence
with one hand.
This ensures that the fence registers
correctly on the bottom flat of the
fence rail Fig.4.8.
Fig.4.4
Fig.4.5
Fig.4.6
Fig.4.7
Fig.4.8
Fig.4.1A
Fig.4.2
TRUNNION
TWO GRUB SCREWS
FENCE RAIL
STAR KNOBS & WASHERS
FENCE ASSEMBLY
LOCKING LEVER
APPLY PRESSURE
TRUNNION
CARRIER
BOTTOM FLAT RAIL
ROTATE TO TIGHTEN

4.4 Fence alignment 1
Adjustment can be made to the fence
in relation to being square to the blade.
This is done by slackening the four star
knobs on the fence rail and adjusting the
rails position until the fence is square to
the blade.
Please note this adjustment must be
made with the fence in a clamped
position Fig.4.9.
4.5 Fence alignment 2
Check that the fence is
90º to the table
using a suitable square, there is no need
for adjustment as this area is factory
set Fig.4.10A. However if settings have
slipped during transit slight adjustment
may be needed. The best way to adjust
this is by adding extra washers or shims
between the star knobs and the
fence rail
where required Fig.4.10B.
Tip
When an accurate cut is crucial it is
good practi
ce to check all settings
before machining the workpiece and
make a test cut with some scrap
material.
4.6 Fitting the tension knob
To fit the tension knob simply place
into the slot on the top of the machine
Fig.4.11.
4.7 Fitting the extraction port
If the machine is to be used with a
100mm dust extractor, it is necessary to
fit the adapter supplied. Simply
slide this
onto the existing port
Fig.4.12.
4.8 Sub Fence
The sub fence is supplied for use with
thin material to enable the blade guard to
be lowered over the workpiece. The sub
fence can be re-fitted as seen below.
4. Machine Assembly - cont.
FENCE
FENCE BAR
FENCE
Fig.4.9
Fig.4.10A
Fig.4.10B
Fig.4.11
Fig.4.12
ADD WASHERS
TO SQUARE
FENCE TO TABLE
TENSION KNOB
EXTRACTION
PORT
FENCE BAR
SUB FENCE
FENCE
SUB FENCE
FENCE
SUB FENCE
Normal Use
Cutting Thin Material

14 15
5. Machine Setting
5.1 Tilting the table
The tilt mechanism will be used when squaring the table to the
blade. Tilt the table as follows: Loosen the lock handle on the
table trunnion.
Adjust the table by hand to desired angle. Use
the angle indicator scale on the trunnion bracket to find the
desired angle. Re-tighten the lock handle to secure the table.
5.2 Setting the table stop at 90º to sawblade
Tools Required:- Small 90
º square (Not supplied)
The table can be set at 90
º to the Bandsaw Blade (See Fig.5.2)
by adjusting the table stop screw (See Fig.5.3) underneath the
table.
• First offer the square up to the blade to give an indication of
adjustment required.
• If the table is not at 90º to the blade use table tilting
mechanism (See 5.1) to adjust the table until it is 90º to the
blade. If the table stop screw position is too high it may be
necessary to wind this down out of the way so 90º can be
achieved (See Fig.5.2).
• Once the table is at 90º to the blade lock off the lock handle
on the table tilt mechanism to secure the table position
(See
Fig.5.1).
• Now set the table stop screw (See Fig.5.3), the table stop
screw should be adjusted to meet the registration point on the
underside of the table (now set at 90º) to ensure that the table
always returns to square after tilting. The table stop screw is
located above the bandwheel on the lower bandwheel housing.
By first slackening the locking nut and then adjusting the hex
screw the table stop screw can be set correctly. Re-tighten the
locking nut making sure that the setting is maintained.
5.3 Adjusting the table tilt scale
Once the table is set at 90
º to the Bandsaw Blade it may be
necessary to adjust the angle pointer on the angle scale so any
further angles are accurate. To do this use a Phillips screwdriver
to loosen the pan head screw and adjust the pointer to 0
º (See
Fig.5.1).
CAUTION!
Before carrying out any adjustments or maintenance ensure
that the machine is isolated and disconnected from the
electricity supply.
Fig.5.2
Fig.5.3
90º SQUARE
TABLE STOP SCREW
Fig.5.1
TABLE TILT MECHANISM
(TRUNNION)
LOCKING HANDLE
SCALE POINTER

5.4 Tensioning the blade
The blade tensioning knob should be used to increase or
decrease tension. The only accurate way to check a blade is
with a tension meter. These are very expensive so most users
may need another method. We
suggest testing the tension by
the amount the blade will deflect sideways. First set the guides
to the maximum height above the table, making sure the saw is
turned off. Push the blade sideways with a reasonable amount
of pressure using the index finger. When pushing with the index
finger a correctly tensioned blade should not move more than a
1/4" sideways
Fig.5.4. An incorrectly tensioned blade will easily
move more than 1/4" sideways
Fig.5.5.
However, perhaps the most tried and tested way of blade
tensioning is simply: If the bandsaw is cutting accurately then
the blade is tensioned correctly, if the blade tends to wander
and an accurate cut cannot be achieved then the blade tension
needs adjusting. If adjusting the tension does not solve the
problem the blade may need replacing.
If the machine is to stand idle for a period it is good practice to
slacken tension and re-tension when next using.
5.5 Tracking the Bandsaw blade
Isolate the machine from the supply by unplugging the mains
plug. Set the tracking of the blade before setting the blade
guides. Once the blade is tensioned, track the blade by turning
the upper bandwheel by hand and adjusting the tracking knob
Fig.5.6. By turning the tracking knob clockwise the blade
will move towards the back of the bandwheel, by turning the
tracking knob anti-clockwise the blade will move to the front of
the bandwheel. The blade should run as close to the centre of
the bandwheel as possible, as shown
Fig.5.7. On narrow blades
(eg 1/4" and 3/8") it may be necessary to run the blade to the
rear of the bandwheel. After the blade is tracked in the desired
position on the bandwheel, rotate the wheel several more times
by hand without any further adjustment ensuring that the blade
remains in the same position. Once this has been achieved lock
the tracking knob with the winged nut
.
NB: It takes a few revolutions of the bandwheel for the effecting
adjustment on the tracking knob to become apparent. To avoid
over-adjusting, make small gradual adjustments on the tracking
knob and revolve the bandwheel on a few times to check the
effect before making further adjustments.
5. Machine Setting - cont.
CAUTION!
Before carrying out any adjustments or maintenance ensure
that the machine is isolated and disconnected from the
electricity supply.
Fig.5.6
Fig.5.7
Fig.5.4
CORRECT TENSION ON
THE BLADE
Fig.5.5
INCORRECT TENSION
ON THE BLADE
GUIDES
TRACKING KNOB
TRACKING KNOB
LOCK
BLADE

6.1 Adjusting the Upper Guides
First check that all of the roller guides are moving freely. To
adjust the upper blade guides, position the guide assembly
relative to the blade by slackening off the lock nut
(Fig.6.1) and
moving the guide carrier until the roller guides are just behind
the gullets of the blade
Fig.6.3. Now adjust the whole guide
assembly so the blade runs centrally on the thrust bearing
Fig.6.5. This is done by slackening off the two grub screws
on the back of the guide carrier
Fig.6.2 and positioning the
assembly as desired
Fig.6.5. Next set the roller guides as near
as possible to the blade without actually touching
Fig.6.6. This
is done by loosening the Allen bolts in each guide
Fig.6.1 and
positioning the guides. When you are satisfied that the guides
are positioned correctly tighten the Allen bolt taking care not to
disturb the position of the guides
. Finally, set the thrust bearing
as near to the back of the blade without actually touching
Fig.6.4
6.2 Adjusting Lower Guides
To adjust the lower blade guides, first slacken off the lock
nut Fig.6.8, move the guide carrier casting so the guides
are just behind the gullets of the blade
Fig.6.6. Next set the
roller guides as near as possible to the blade without actually
touching Fig.6.9. This is done by releasing the Allen bolts See
Fig.6.8 on each side of the blade. Finally adjust the thrust
bearing to be just clear of the back of the blade
Fig.6.7.
6.3 Adjusting the cutting height
When the machine is in operation the cutting height must be
adjusted so there is maximum guarding for the blade. Also so
the blade guides are providing optimum support to the blade.
To adjust the cutting height loosen the rise and fall lock knob
and turn the rise and fall handwheel to raise or lower the guide
post/upper blade guide assembly to the desired height
Fig.6.11.
Note: The upper blade guide should provide approximately
5mm clearance above the workpiece. After the desired position
has been set tighten the rise and fall lock knob.
16 17
6. Bandsaw Blade Set Up
Fig.6.1
Fig.6.2
THRUST BEARING
Fig.6.7
CAUTION!
Before carrying out any adjustments or maintenance
ensure that the machine is isolated and disconnected
from the electricity supply.
LOCK NUT
Fig.6.3 Fig.6.4
ROLLER GUIDE THRUST BEARING
BLADE GULLET
Fig.6.8
RISE & FALL KNOB
RISE & FALL LOCK
GUIDE CARRIER
Fig.6.6
ROLLER GUIDES
Fig.6.5
BLADE
THRUST
BEARING
TWO GRUB SCREWS
ALLEN BOLT
LOCK NUT
ALLEN BOLTS
THRUST BEARING
ROLLER GUIDE
ROLLER GUIDE
SIDE VIEW
FRONT VIEW

7. Connection Of The Electricity Supply
Once the machine has been correctly assembled and set up, the electricity supply can be connected.
The machine can only be connected to a single phase supply. Before connecting the electrical supply ensure that it is the correct
voltage, phase and frequency, and that it has sufficient capacity for the machine. The relevant information can be found on the
rating plate located on the rear of the machine (See Fig.1)
.
Machines supplied for use in the UK are fitted with a BS1363 plug fitted with a 13 amp fuse. Ensure that you use the appropriate
plug for use in other countries. If the plug fitted to the machine is changed for any reason, the wires in the mains lead are coloured
in accordance with the following code:
Green and yellow: Earth
Blue: Neutral
Brown: Live
As the colours of the wires in the mains lead may not correspond with the coloured markings identifying the terminals on your plug,
proceed as follows:
The wire coloured green and yellow must be connected to the terminal marked ‘E’ or by the earth symbol ~ or coloured green; or
green and yellow.
The wire coloured blue must be connected to the terminal marked ‘N’ coloured black.
The wire coloured brown must be connected to the terminal marked ‘L’ or coloured red.
IT IS IMPORTANT THAT THE MACHINE IS EFFECTIVELY EARTHED.
If in doubt about the connection of the electrical supply consult a qualified electrician.
RCD (Residual Current Device)
For your additional safety we always recommend the use of an RCD (sometimes called Residual Current Circuit Breaker
or Earth Leakage Circuit Breaker).
Switch the machine on by pressing the green button in the switch unit.
Switch the machine off by pressing the red button on the switch unit.
This machine is fitted with a No Volt release switch.

18 19
8. Operation & Bandsawing Practice
8.1 Basic bandsawing principles
• The blade cuts on a continuous down stroke.
• Slowly feed the workpiece towards the blade, using only
light pressure whilst letting the blade do the cutting.
• Firmly hold the workpiece and feed it towards the blade
slowly, using the push stick and keeping your hands well
away from the blade.
• For best results the blade must be sharp. Damaged or worn
blades should always be replaced.
• Select the right blade for the job, depending on the
thickness of the wood and the cut to be made. See TABLE 1.
• For straight cutting use the rip fence supplied.
• When cutting shapes, follow the design marked out by
pushing and turning the workpiece evenly. Do not
attempt to turn the workpiece without pushing it, as
this may cause the workpiece to get stuck, or the blade to
bend.
• CAUTION! Particular care should be taken towards
the end of the cut as there will be a sudden decrease in
resistance and care must be taken to stop hands from
being thrown towards the blade.
Always ensure that your machine is properly maintained and
clean. Before commencing work on an important project, it
is advisable to familiarise yourself with the operation of the
equipment by practising on low value materials.
8.2 Complicated cutting
Very complicated cuts and small radius curves are the best
accomplished with the aid of pre-drilled holes combined with
a few tangential or radial cuts. This technique will achieve
excellent results without putting undue tension on the blade and
blade guide assembly.
8.3 Reversing the blade out of a cut
If at all possible we advise that reversing out of a cut is avoided.
But in situations such as cutting scrolls it may not be possible
to complete a cut. This requires the blade to be reversed out of
the cut. Care is necessary to minimise damage to the work and
blade. When removing large pieces of material it is advisable to
make the shorter cut last to avoid having to reverse out of the
longer cut. When reversing out of a cut it is advisable to leave
the blade running, but take extreme care not to pull the blade
off the band wheel.
8.4 Blade stall
In circumstances such as cutting deep or wet timber, the work
piece may close up behind the blade causing it to stall. In
this instance the machine should be switched off and isolated
and the material wedged open so the blade can be carefully
reversed out.
8.5 Blade selection (TPI)
The selection of the best blade configuration (See Fig 8.1) is
necessary for optimum cutting performance.
• Correct blade choice is primarily dependant on two factors:
material thickness and material type.
• Greater TPI should be selected as material thickness
decreases.
• For thicker material a lower TPI should be used otherwise the
gullet will not be sufficient to clear the waste and the blade will
stall or burn the wood.
• However, if the TPI is too great, the tooth loading will be
insufficient to enable penetration; and cutting. The teeth will
also rapidly lose their sharpness.
The accompanying blade selection chart
(Fig.8.3 shown
overleaf) gives guidance on the TPI that should give the best
results when cutting a variety of material types and thickness.
This table
provides recommendations on selecting the correct
blade for a variety of commonly used materials. If in doubt
about any aspects of blade selection contact Customer
Services on 0870 770 1777 for assistance.
The table provides a guide to selection only. Exact tooth
configurations are not always available, nor are all blade
configurations covered, but the principles remain the same.
For special applications, custom blades can be supplied please
call Customer Services on 0870 770 1777 and we can advise
you accordingly on your specific needs.
Fig.8.1
TPI = Teeth Per Inch

8. Operation & Bandsawing Practice - cont.
8.5 Blade selection (TPI cont.)
Having selected an appropriate blade
for the particular thickness and type of
material to be sawn, it is essential that
the saw blade is allowed to cut freely by
not applying too much pressure.
• The need for excessive pressure is
likely to be a result of the incorrect blade
selection or a worn blade and will result
in inaccurate cutting and possibly blade
breakage.
8.5 Blade selection (width)
• When cutting shapes, the width of the
blade limits the minimum radius that can
be cut.
• If the blade is too wide for the cutting
radius the blade will twist and possibly
jam or break.
• The smaller the radius the narrower
the blade has to be.
Fig.8.2 provides
guidance on the minimum radius to be
cut with the most commonly used blade
widths.
Fig 8.2
To scale
8.6 Blade selection summary
To see how TPI and width of the blade
come together, see Fig.8.3.
• Regularly examine the blade for
excessive damage or cracking as a result
of fatigue. If such damage is present
replace the blade.
• It is important to use a sharp blade.
Dull teeth result in increased feed
pressure producing a poor quality finish
and an inaccurate cut.
Please note as well as the blades listed,
we can also supply bandsaw blades
to almost any specification please call
Record Power Customer Services on
0870 770 1777 for further details.
Fig 8.3
/