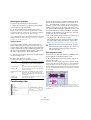
Steinberg Wavelab Studio 6.0 Operating instructions
- Category
- Vacuum cleaners
- Type
- Operating instructions

Operation Manual

Operation Manual by Anders Nordmark,
Revision for WaveLab Studio by Stefan Zachau
The information in this document is subject to change without notice and does not represent a commitment on the part
of Steinberg Media Technologies GmbH. The software described by this document is subject to a License Agreement
and may not be copied to other media except as specifically allowed in the License Agreement. No part of this publica-
tion may be copied, reproduced or otherwise transmitted or recorded, for any purpose, without prior written permission
by Steinberg Media Technologies GmbH.
All product and company names are ™ or ® trademarks of their respective owners. Windows XP is a trademark of
Microsoft Corporation. The Mac logo is a trademark used under license. Macintosh and Power Macintosh are registered
trademarks.
© Steinberg Media Technologies GmbH, 2006.
All rights reserved.

Table of Contents

4
Table of Contents
7 Introduction
8 Welcome!
8 Key command conventions
8 How you can reach us
9 Installing and setting up
10 Setting up the computer
10 Installation procedure
11 Register your software!
11 Launching WaveLab Studio
11 Program settings
13 Installing a CD/DVD recorder
14 Installation done! Where do I go next?
14 About the Tracer application
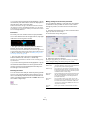
15 Overview
16 Get to know WaveLab Studio
16 The windows and what you can do with them
18 Find your way around in WaveLab Studio
19 Basic methods
20 Why you should read this chapter
20 Getting help
20 Undo and Redo
21 Working with windows
23 Dockable control bars
25 The status bar
25 Speed menus
26 Units of time and level
26 Setting values
28 Presets
29 About non-modal dialogs
29 Using the computer keyboard
30 Editing in the Wave window
31 About this chapter
31 Creating new empty documents
31 Opening Waves
33 Window overview and adjustments
35 Setting the zoom factor
38 Navigating through the file
38 Snapshots
39 Setting the ruler start position
39 Working with a meter based display
39 Setting the wave cursor position
40 Selecting
44 Basic editing commands
49 File handling in Wave windows
56 Editing audio properties and file attributes
57 Playback and recording
58 Playing back
63 Recording
68 Metering
69 Introduction
69 The meters
76 Off-line processing
77 Introduction
77 Applying processing
77 Level Normalizer
78 Gain Change
78 Loudness Normalizer
80 Dynamics
82 Level envelope
83 Fade-in and fade-out
83 Crossfade
85 Invert Phase
85 Reverse
85 Eliminate DC Offset
85 Waveform Restorer
85 Time Stretch
87 Pitch Correction
88 Pitch Bend
89 Harmonization
90 Hi-fi Chorus
90 EQ
91 Convert sample rate
91 Support for reNOVAtor™
92 Master Section
93 Introduction
93 The Master Section window
94 About the signal path
94 The Master level pane
96 The Effects pane
99 The Dithering pane
101 Master Section presets
102 Rendering
104 The Monitor window
107 Spectrum Display
108 Selecting Spectrum display mode

5
Table of Contents
110 Batch processing
111 Introduction
112 Opening the Batch Processor
112 Overview of the Window
113 The Input tab – Assembling a list of files
116 Setting up the processing tasks to be performed
120 The Output tab – Settings for created files
123 Scheduling
124 Running and stopping the batch(es)
124 Using presets for batch processing
125 Batch file encoding
126 Basic procedure
127 Markers
128 Introduction
129 Creating markers
130 About the marker list
130 Marker appearance and visibility
130 Editing, converting and naming markers
131 Moving and duplicating markers
131 Deleting markers
131 Operations involving markers
134 Using Auto Split
135 Introduction
135 The Auto Split dialog
136 The Audio Montage
137 Introduction
137 The Audio Montage window
139 Assembling the Montage
144 Zooming and navigating
147 Playing back
150 Recording
151 Rearranging clips
160 Editing in the Clips view
162 Managing clips and source files
164 The volume envelope
170 Using fades and crossfades in the Montage
174 The pan envelope
175 Transforming clips
177 Adding effects to tracks and clips
181 Managing effects in the Plug-ins view
182 The Meta Normalizer
183 Groups
185 Using markers in the Montage
187 Undo/Redo and History
188 File handling in the Audio Montage
191 Using video tracks
192 Mixing down – The Render function
193 Preparing the Audio Montage for CD burning
196 Creating an Audio CD report
199 Burning an audio CD
200 Introduction
200 Selecting a CD-R unit
200 Testing an audio CD before burning
201 Writing a CD
202 The audio CD format – Background information
204 Data CD/DVD Projects
205 Introduction
205 Creating a new Data CD/DVD Project
205 Source window settings
206 Destination window settings
207 The Write dialog for the Data CD/DVD
208 Importing audio CD tracks
209 Importing audio CD tracks into WaveLab Studio
212 Creating labels
213 Introduction
213 Using the Label Editor
215 Positioning objects
217 Defining user variables
218 Printing labels
220 Analysis
221 Global analysis
225 3D Frequency Analysis
228 Generating signals
229 Audio Signal Generator
230 DTMF Generator

6
Table of Contents
231 Synchronizing WaveLab Studio to ex-
ternal devices
232 Introduction
232 MTC sync
235 Sampling and creating loops
236 Introduction
236 Using WaveLab Studio with Steinberg HALion
236 Editing sample attributes
237 Basic looping
238 Using the Crossfade Looper
242 Using the Loop Tone Equalizer
244 Requirements
245 This is what you need…
245 Computer requirements
246 About audio cards
246 About the System Information feature
247 Customizing
248 What is customizing?
248 Preferences
248 Folder editing
249 Saving the window layout
249 Styling WaveLab Studio – Wave windows
251 Styling WaveLab Studio – Audio Montage win-
dows
254 Working with window layouts
254 Setting default size and position for windows
255 Creating a Favorites menu
255 Customizable key commands
257 Organizing plug-in processors
260 Plug-in processor reference
261 About WaveLab Studio plug-ins
264 VST Plug-ins
276 Troubleshooting
277 General problems
277 Problems with opening files
277 Problems with saving files
278 Recording problems
278 Playback problems
279 Editing problems
279 Troubleshooting and precautions
279 Problems and solutions
279 Questions and Answers
280 Day to day precautions for trouble-free CD writing
280 Hardware and setup issues
282 Key commands
283 File handling
283 Wave display mode
283 View
283 Zooming
283 Processing
284 Playback and cursor position
284 Selecting
285 Editing and Recording
285 Markers
285 Miscellaneous
286 Index

1
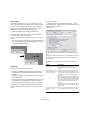
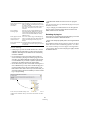
Introduction

8
Introduction
Welcome!
Congratulations on your choice of WaveLab Studio,
which is the audio editor of choice, not only in top-of-the-
line mastering and restoration facilities, but also for any
serious engineer or musician.
WaveLab Studio is continuously developed and refined, in
collaboration with our users – from professional audio en-
gineers to hobbyists. Your input helps making this pro-
gram one of the most flexible and user-friendly ever!
Find out about the ease of use and workflow that makes
working with WaveLab Studio so effective.
Steinberg has always shown a strong commitment to pro-
tect the investment of loyal customers. WaveLab Studio
follows this route by making use of the Steinberg key to
preserve your competitive advantage.
Your Steinberg Team.
Key command conventions
Many of the default key commands in WaveLab Studio
use modifier keys. For example, the default key command
for Undo is [Ctrl]-[Z] under Windows.
When key commands with modifier keys are described in
this manual, they are shown with the Windows modifier
key first, in the following way:
[Win modifier key]-[key]
For example, [Ctrl-[Z] means "press [Ctrl] , then press [Z]".
Similarly, [Alt]-[X] means "press [Alt] then press [X]".
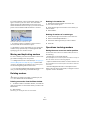
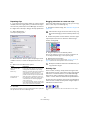
How you can reach us
After having installed and launched the program, you will
find a number of useful Steinberg Web links on the Help
menu (“Steinberg on the internet” submenu). These allow
you to get online support, check for updates, get answers
to frequently asked questions, etc.
!
These features require that you have a working Inter-
net connection.

2
Installing and setting up

10
Installing and setting up
Setting up the computer
Before proceeding, your computer should be set up and
the following items should be installed:
•Windows (see “This is what you need…” on page 245 for de-
tails on which version to use).
• The audio card and its driver.
Checking the audio card
To make sure the audio card will work as expected, you
can perform the following two tests:
• Use the software included with the audio card to make
sure you can record and play back without problems.
• Use the Media Player application (included with Win-
dows and described in the Windows documentation) to
record and play back audio.
Colors
At this point you might want to check and for example
change the number
of colors you use on your computer
screen. See your Windows documentation for instructions
on how to do this. The recommended setting for WaveLab
Studio is 24 or 32 bit mode (“True Color”).
Installation procedure
The Steinberg Key
Included with the WaveLab Studio package, you will find
the Steinberg Key (sometimes referred to as a “dongle”), a
hardware copy protection device that is part of the Wave-
Lab Studio copy protection scheme. WaveLab Studio will
not run if there is no Steinberg Key.
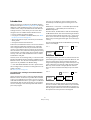
The Steinberg Key
The Steinberg Key is, in fact, a little computer on which
your Steinberg software licenses are stored. All hardware-
protected Steinberg products use the same type of key,
and you can store more than one license on one key. Also,
licenses can (within certain limits) be transferred between
keys – which is helpful, e.g. if you want to sell a piece of
software.
• If you already own copy-protected Steinberg software,
you must remove any existing Steinberg Keys from the
computer’s USB port before starting the WaveLab Studio
installation routine.
• If you are using other copy-protected Steinberg prod-
ucts, you may want to transfer all licenses for your applica-
tions to only one Steinberg Key, thus using only one USB
port of your computer. More information on the transfer of
licenses between keys can be found in the help for the
Syncrosoft License Control Center (which can be found in
the Start/Programs menu of your computer).
Installing the software
The installation procedure unpacks all the files and auto-
matically puts them in the right places.
1. Insert the CD-ROM disk in the drive.
The installation program should start automatically after a few seconds.
If, for some reason it doesn’t – for instance if you have “Auto Insert Noti-
fication” deactivated for your CD drive – perform steps 2-4 below. Oth-
erwise, proceed to step 5.
2. Launch the Explorer, open the “My Computer” window
or select “Run” from the Start menu.
3. Locate and double click on the drive symbol for the
CD-ROM drive.
4. Double click on the “setup” symbol (setup.exe).
5. Follow the instructions on screen.
!
Please read the following section before installing
the WaveLab Studio software.
!
The Steinberg Key must not be plugged in before the
installation of WaveLab Studio. Otherwise the oper-
ating system of your computer will register it as new
USB hardware and try to find drivers that won’t be
present before WaveLab Studio installation.

11
Installing and setting up
6. At one point of the installation a dialog appears re-
questing you to connect your Steinberg Key – do so.
The first time the copy protection device is plugged in, it will be regis-
tered as a new hardware device, and a dialog will appear asking you
whether you would like to find drivers for the device manually or automat-
ically. You should select to find drivers automatically, and click OK to
proceed and close the dialog.
7. Finally, a dialog informs you that the installation was
successful.
A restart may be requested – but if no dialog requests a restart it is not
necessary to do so.
When the installation is finished, the program is found
among your other programs on the Start menu and/or the
desktop.
This completes the installation of your WaveLab Studio
program! But, you’re not really done yet…
Register your software!
Registering your software will make sure you are entitled
to technical support and kept aware of updates and news
regarding WaveLab Studio.
Launching WaveLab Studio
1. Make sure the Steinberg Key is plugged into the USB
port.
2. Launch WaveLab Studio.
WaveLab Studio starts.
Ö The Steinberg Key has to be plugged in at all times
when running WaveLab Studio.
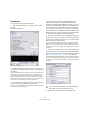
Program settings
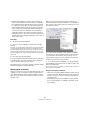
Before you start working, you should make some settings:
Audio card settings
You need to specify which audio card and driver you in-
tend to use. WaveLab Studio can communicate with the
audio card via any of the standard protocols; ASIO, MME
or WDM.
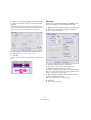
Selecting an ASIO driver
1. Open the Preferences–Audio device tab.
2. Select the ASIO driver from the “Playback device”
pop-up menu.
Note that the “Playback device” menu heading has now changed to
“Playback/Record device” and the Recording device section has been
greyed out. This is because with ASIO, the same driver is always used
both for output and input.
3. If you click the “Control Panel” button the audio card
settings application (usually installed with the audio card)
for the ASIO driver opens.
In the Control Panel you may find settings for buffer size, digital formats,
additional I/O connections, etc. depending on the audio card and the
driver.
4. Click on the “Connections” button.
The ASIO Audio connections dialog will appear, listing all available chan-
nel inputs and outputs in WaveLab Studio. Select the channels you want
to use for stereo output and input.
5. Close the dialog.
• When using ASIO, the playback resolution is set from
the ASIO driver (you may find a setting for this in the ASIO
Control Panel, depending on the hardware and driver).
Therefore, the Playback Resolution settings will be greyed out.
Selecting an MME/WDM driver
1. Select “Preferences…” from the Options menu.
2. Click on the Audio device tab.
3. Select the audio card you want to use for recording
and playback from the pop-ups.
If you only have one audio card you can also select the “Microsoft Sound
Mapper” options (the sound mapper is a “virtual audio card” which
“maps” all audio to your real card). However this does not let you take full
advantage of the card’s driver when recording audio and is therefore not
recommended.
4. Choose your “Playback Resolution”.

12
Installing and setting up
Additional audio settings
There are other settings in the Preferences that affect au-
dio playback and recording. We recommend that you try
the default settings before you change anything, since
these work well in most cases.
On the “Audio Card” tab, you will find the following set-
tings:
• Playback Buffer Number and Size.
These determine how much RAM memory is used for buffering when
playing back. If you get playback problems such as dropouts or glitches,
you should try to increase these values. Click the question mark icon in
the dialog for details.
• Recording Buffer Number and Size (not available when
using ASIO).
These determine how much RAM is used for buffering when recording. If
you get dropouts in the recorded audio, you should try increasing these
values. Click the question mark icon in the dialog for details.
On the Preferences–File tab, you will find the following
settings:
• Disk block buffer size.
Governs the buffer size used when WaveLab Studio is reading data from
the hard disk. If you experience problems in a read intensive scenario
(such as playing back an Audio Montage with a lot of simultaneous
clips), you should try changing this value.
If you change this setting, playback will stop when you leave the dialog.
• Use system cache.
When this is deactivated (default), WaveLab Studio reads files directly
from the hard disk, bypassing Windows’ file cache.
The option is available since it may remedy problems on certain systems
with slow disk drives. Note:
• If you activate this, avoid using large disk block buffer
size values!
• After activating this option, you need to close and re-
open all open files, for the setting to take effect!
About latency
In the Playback section of the Audio device tab, you will
find an indication of the current latency (at 16bit/44.1kHz
stereo). Latency is the delay between when audio is “sent”
from the program and when you actually hear it. The la-
tency in an audio system depends on the audio hardware,
its drivers and their settings. It’s usually possible to reduce
latency by lowering the number and size of the playback/
recording buffers. However, please note:
Temporary files
You also need to specify where WaveLab Studio should
store its temporary files. Temporary files are used for cer-
tain operations, such as WaveLab Studio’s extensive
Undo function (see “Undo and Redo” on page 20).
WaveLab Studio allows you to specify up to three differ-
ent folders for storing temporary files. If you have access
to more than one drive, saving your temp files on separate
drives (not partitions) can considerably speed up perfor-
mance.
For example, if your source files are located on the C:
drive, you could specify D:\temp and E:\temp as tempo-
rary folders.
This will not only improve performance, but also reduce
disk fragmentation.
!
With ASIO drivers, you may find these settings in the
ASIO Control Panel.
!
We recommend that you leave this option deacti-
vated!
!
While a very low latency can be crucial in a real-time
DAW application such as Steinberg Nuendo or Cu-
base, this is not strictly the case with WaveLab Stu-
dio. Here the important issues are optimum and
stable playback and editing precision. Therefore, you
should not try to reach the lowest possible latency
figures when working with WaveLab Studio. And
again, should you get dropouts, crackles or glitches
during playback, raise the Buffer Number setting on
the Preferences–Audio device tab.

13
Installing and setting up
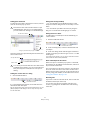
1. In Windows, create a separate folder in which to store
your “temp” files.
2. Select “Folders…” from the Options menu.
This opens the Folders dialog, where you can edit how various WaveLab
Studio folders are handled .
3. Click on the plus sign beside the “Temporary folders”
item (this is located in the “Work folders” category).
Three possible folders can be specified for temp files.
4. Selecting one of the Temporary Folder items will show
the current location where the temp files will be created in
the Folder field to the right.
5. Either type in the path to the directory or you can
browse the drives to locate and select the folder via a
standard Windows file dialog.
Click OK to select a folder and exit the file dialog.
Peak and view memories
A peak file is a small file with the extension “.gpk” automat-
ically created by WaveLab Studio each time a file is mod-
ified or opened in WaveLab Studio (if it hasn’t been
previously). The peak file contains information about the
waveform, and determines how it is drawn in the wave
window.
View memory files (extension “.mem”) store view informa-
tion relating to a specific audio file such as window and
scroll positions, etc., and optionally any Master Section ef-
fects used – see “Saving view settings” on page 54.
By default, peak files and view memory files are stored in
the same folder as the related audio file. Setting this to an-
other folder on a different drive will also improve perfor-
mance to a certain degree. Regardless of whether this
folder is on a different drive or not you also get the advan-
tage of not having the audio file folder cluttered with non-
audio files if a separate folder is used.
This folder can be specified from the Folders dialog, either
directly or via the Preferences–Wave edit tab.
Select Preferences from the Options menu and select the
Wave edit tab.
• If the “Save view settings in companion file” option is
activated, view memory files will be saved in the same
folder as the related audio file.
• If you select “Save in independent folder” you can click
the “Edit” button, which will open the Folder dialog with
the “Peak and view memories” work folder selected.
From here you can navigate to a new folder location to store the peak
and view memory temp files.
Installing a CD/DVD recorder
Hardware installation/connection
For general instructions on installing internal or connect-
ing external recorders via USB or Firewire, please refer to
the instructions that came with the computer, or the
recorder itself.
For WaveLab Studio, please just check the following
points:
• Make sure to have the latest firmware version installed in your
recorder unit. For CD recorders, the firmware you have must
support Disk-at-Once mode! In addition, running a unit with
older firmware might for example prevent you from writing
sub-index markers into the tracks.
Checking the installation of the CD/DVD
recorder
You might want to check that the recorder unit was actu-
ally found by the program. Proceed as follows:
1. Select “CD/DVD Information…” from the Tools menu.
The CD/DVD Info dialog appears.
!
The folder(s) should be on your fastest hard disk and
you should make sure you have plenty of room avail-
able on that hard disk (or partition). Putting the
“temp” files on a separate drive (that is, not the same
drive as your regular files) will speed up file opera-
tions considerably.

14
Installing and setting up
2. Check that your recorder unit appears in the list to the
left.
The list will also contain any regular DVD-ROM drives, etc. If your CD/
DVD recorder isn’t listed, there’s either something wrong with the instal-
lation or the unit is not supported by WaveLab Studio.
Installation done! Where do I go
next?
There are three things we suggest you do:
• Read through the rest of this book and try out the differ-
ent possibilities as you go along.
• Examine your WaveLab Studio directory and other disks
included in this package for files that might be useful to
you.
• If you run into problems, check the Troubleshooting
chapter in the Operation Manual.
About the Tracer application
In the WaveLab Studio directory created on your hard disk
during installation, you will find a folder called “Tools”.
Among other things, this folder contains a small applica-
tion called Tracer. This is a diagnostic tool that tracks and
logs various procedures that WaveLab Studio executes
when it is launched, e.g. the loading of plug-ins.
Should you run into problems with WaveLab Studio and
need to contact technical support, you can use the Tracer
application and pass on the information it displays to the
technical support staff. This could be of great assistance
since it might be possible to see exactly which operation
caused a problem.
• To use the Tracer, locate the file Tracer.exe in the Windows
Explorer and double click on it – or use the Run command on
the Start menu to browse for the file.
• After you have activated the Tracer application, launch Wave-
Lab Studio.
• All loading procedures are displayed as plain text, and you can
copy this information and then paste it into, for example, an e-
mail.

3
Overview

16
Overview
Get to know WaveLab Studio
Welcome to WaveLab Studio!
This chapter is intended to get you acquainted with the
program. We will here briefly describe its fundamental
functions and main features, so as to point you in the right
direction on your road to mastering all of the possibilities
that WaveLab Studio offers.
The windows and what you can do
with them
Working with WaveLab Studio, you will encounter a num-
ber of different windows that let you do different things.
Editing audio files, compiling files for burning CDs or
DVDs, applying effects and much, much more. This is an
overview of the main windows in the program.
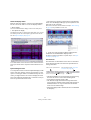
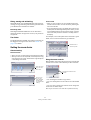
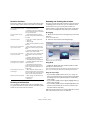
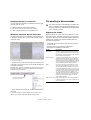
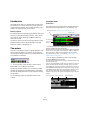
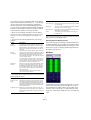
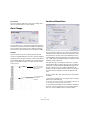
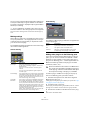
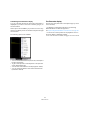
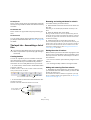
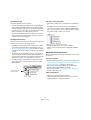
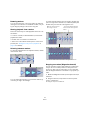
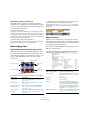
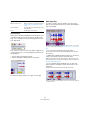
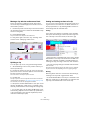
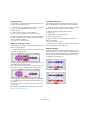
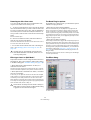
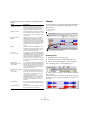
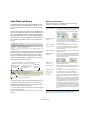
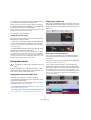
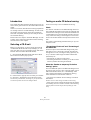
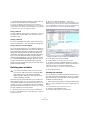
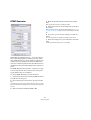
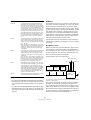
The Wave window
This is a Wave window, a graphical representation of an
audio file. It consists of two parts – the lower is the Main
view, and this is where you can perform various audio ed-
iting operations such as copying, cutting, pasting, moving,
deleting, etc.
The upper part is the Overview and serves to let you easily
navigate through long files.
You can read more about the Wave window and the oper-
ations you can perform in it in the chapter “Editing in the
Wave window” on page 30.
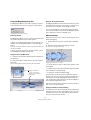
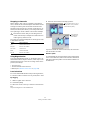
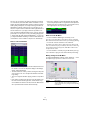
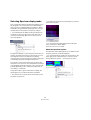
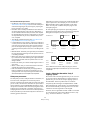
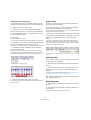
The Audio Montage window
This is an Audio Montage window. An Audio Montage lets
you compile and edit multiple clips (references to audio
files on disk) on one or several tracks.
As you can see, the window consists of two panes. The
lower one is called the Track View, and this is where you
assemble the clips. The appearance of the upper pane de-
pends on which of the 10 tabs at the very top of the win-
dow is selected. These tabs give you access to various
functions.
After you have imported audio files as clips into an Audio
Montage, you can arrange, edit and play back the clips.
You can also apply effects, fades or crossfades, and much
more, and last but not least, you can directly create CDs.
All in all, the Audio Montage is an excellent tool for ad-
vanced music CD creation.
Read more about the Audio Montage and its features in
the chapter “The Audio Montage” on page 136.

17
Overview
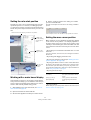
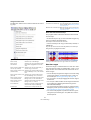
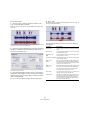
The Data CD/DVD Project window
The Data CD/DVD window can be used for compiling and
creating data CDs/DVDs (discs that exclusively contain
computer data) and Mixed Mode CDs (discs that contain
both data and audio).
The window is divided into two panes; the upper is called
the source window, and the lower is the destination win-
dow. You drag files from the source window to the desti-
nation window, in which you can rename, remove and
move files before burning a CD or DVD.
For a detailed description of the Data CD/DVD window and
what you can do with it, see “Creating labels” on page 212.
The CD/DVD Label Editor
This window is the Label Editor. Here you can design and
print custom labels for the CDs or DVDs you create. You
can create labels for both the front and back of a jewel
case, as well as for the discs.
Read more about this in the chapter “Creating labels” on
page 212.
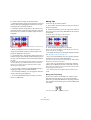
The Master Section
This is a very important part of WaveLab Studio, called the
Master Section. It has a number of uses including:
• Adding real-time effect plug-in processors such as Chorus,
Reverb, etc.
• Applying effects to files so that they are permanently made a
part of the files (as opposed to using them in real-time).
• Monitoring and controlling the WaveLab Studio output level.
• Adding dithering.
For details, see “Master Section” on page 92.

18
Overview
Find your way around in WaveLab
Studio
Editing and processing
Where do I go if I want to…
• Edit an existing audio file?
When you open an audio file, it appears in a Wave window, in which you
can edit it in various ways. See “Editing in the Wave window” on page 30.
• Compile and edit several audio files on multiple tracks?
Create an Audio Montage. See “The Audio Montage” on page 136.
• Apply processing to a wave file?
The Process menu contains a number of options for manipulating wave
files, including fade-in/out, normalize, time stretch and much more – see
“Off-line processing” on page 76. You can also use the Render function
in the Master Section to apply effects to a file.
• Apply processing and effects to multiple files in one go?
You do this with a function called batch processing. See “The Audio
Montage” on page 136.
• Convert an audio file into another audio format?
There are several ways: You can use either the “Save as” command or
the “Save Special” command on the File menu (see “Saving in another
format (Save as…)” on page 51), or the “Render” function in the Master
Section (see “Rendering” on page 102). Finally, batch file encoding lets
you convert multiple files to another format – see “Batch file encoding”
on page 125.
Playback and recording
Where do I go if I want to…
• Play back with real-time effects?
Effects are added in the Master Section, see “Master Section” on page 92.
In Audio Montages you can also add individual track and clip effects, see
“Adding effects to tracks and clips” on page 177.
• Record new audio files?
Use the Record button on the Transport bar. The new file will appear in a
Wave window, and can also be added as a new clip in a Montage. See
“Recording” on page 63.
• Record songs from an audio CD into WaveLab Studio?
You don’t – you import them directly from the disc. On the Tools menu
there is an option called “Import Audio CD tracks” (see “Importing audio
CD tracks into WaveLab Studio” on page 209).
CD/DVD creation
Where do I go if I want to…
• Create an audio CD that can be played back in a regu-
lar CD player?
You create an Audio Montage and use the CD Wizard and/or set individ-
ual CD track markers (see “The Audio Montage” on page 136).
• Create a data CD/DVD or a Mixed Mode CD/DVD con-
taining audio, data and video?
You do this in a Data CD/DVD window. See “Data CD/DVD Projects” on
page 204.
• Create labels for the CDs/DVDs I make?
This is done in the Label Editor. See “Creating labels” on page 212.
The above are just a few pointers to some of the funda-
mental functions in WaveLab Studio. While using them,
you will discover a multitude of other features and func-
tions that let you make full use of the possibilities of this
amazing program.
Have fun exploring WaveLab Studio!

4
Basic methods

20
Basic methods
Why you should read this chapter
This chapter describes general methods that you will use
when working with WaveLab Studio. Getting accustomed
with these procedures will allow you to work more effec-
tively with the program.
Getting help
WaveLab Studio comes with a detailed help system, mak-
ing it easy to look up procedures and descriptions from
within the program. There are several ways to access the
help system:
• By selecting “Operation Manual” from the Help menu.
• This takes you to the help in Adobe Acrobat format (ex-
tension “.pdf”). This PDF file contains all chapters of the
manual including additional sections describing plug-ins,
key commands and troubleshooting procedures.
• By pressing [F1].
Undo and Redo
WaveLab Studio has an extremely extensive Undo func-
tion, applicable when working in Wave windows, Audio
Montages or the CD Label Editor. You can:
• Undo as many steps back as you like, by using the Undo
item on the Edit menu.
The only limitation is the available hard disk space. You can also use the
shortcuts [Ctrl]-[Z] or [F3] to undo. [F3] has the added advantage in that
you can undo even if a modal dialog is currently open.
• Redo as many steps as you like, by using the Redo item
on the Edit menu (or by pressing [Ctrl]-[Y] or [F4]).
Furthermore, each window has its own undo “history”, so
you can click on any window and undo the last changes
made there, even if you afterwards worked in another win-
dow.
About Undo and disk space
Many undo operations require no memory or disk space.
However, operations that modify actual wave data (like
time stretch, EQ, etc.) require that a file copy of the se-
lected part of the wave is stored, so that it can be brought
back when you need to redo.
For this reason, WaveLab Studio will need to store files on
your hard disk, in the folder you have specified for the tem-
porary files (see “Temporary files” on page 12). These files
are automatically deleted each time you close or save the
related document.
Limiting the Undo function
If you run out of hard disk space or if you are applying pro-
cessing to extremely long sections of waves, you might
want to put a limit on the Undo function (applicable to
Wave windows only):
1. Select “Preferences” from the Options menu and click
the Wave edit tab.
2. Uncheck the “Unlimited” option in the Undo/Redo
section.
3. Change the Limit number to the desired value.
Clearing the undo
There might be situations where you have “collected” a
large number of undo possibilities that you know you don’t
need. You might then clear the whole undo “buffer” for
one file at a time. This will free up some primary memory
(RAM) but more importantly it will also delete all the “undo
files” from your hard disk, to free up space.
1. Select “Clear undo” from the Edit menu.
A window appears informing you of how much RAM and hard disk space
you will gain by this operation.
Page is loading ...
Page is loading ...
Page is loading ...
Page is loading ...
Page is loading ...
Page is loading ...
Page is loading ...
Page is loading ...
Page is loading ...
Page is loading ...
Page is loading ...
Page is loading ...
Page is loading ...
Page is loading ...
Page is loading ...
Page is loading ...
Page is loading ...
Page is loading ...
Page is loading ...
Page is loading ...
Page is loading ...
Page is loading ...
Page is loading ...
Page is loading ...
Page is loading ...
Page is loading ...
Page is loading ...
Page is loading ...
Page is loading ...
Page is loading ...
Page is loading ...
Page is loading ...
Page is loading ...
Page is loading ...
Page is loading ...
Page is loading ...
Page is loading ...
Page is loading ...
Page is loading ...
Page is loading ...
Page is loading ...
Page is loading ...
Page is loading ...
Page is loading ...
Page is loading ...
Page is loading ...
Page is loading ...
Page is loading ...
Page is loading ...
Page is loading ...
Page is loading ...
Page is loading ...
Page is loading ...
Page is loading ...
Page is loading ...
Page is loading ...
Page is loading ...
Page is loading ...
Page is loading ...
Page is loading ...
Page is loading ...
Page is loading ...
Page is loading ...
Page is loading ...
Page is loading ...
Page is loading ...
Page is loading ...
Page is loading ...
Page is loading ...
Page is loading ...
Page is loading ...
Page is loading ...
Page is loading ...
Page is loading ...
Page is loading ...
Page is loading ...
Page is loading ...
Page is loading ...
Page is loading ...
Page is loading ...
Page is loading ...
Page is loading ...
Page is loading ...
Page is loading ...
Page is loading ...
Page is loading ...
Page is loading ...
Page is loading ...
Page is loading ...
Page is loading ...
Page is loading ...
Page is loading ...
Page is loading ...
Page is loading ...
Page is loading ...
Page is loading ...
Page is loading ...
Page is loading ...
Page is loading ...
Page is loading ...
Page is loading ...
Page is loading ...
Page is loading ...
Page is loading ...
Page is loading ...
Page is loading ...
Page is loading ...
Page is loading ...
Page is loading ...
Page is loading ...
Page is loading ...
Page is loading ...
Page is loading ...
Page is loading ...
Page is loading ...
Page is loading ...
Page is loading ...
Page is loading ...
Page is loading ...
Page is loading ...
Page is loading ...
Page is loading ...
Page is loading ...
Page is loading ...
Page is loading ...
Page is loading ...
Page is loading ...
Page is loading ...
Page is loading ...
Page is loading ...
Page is loading ...
Page is loading ...
Page is loading ...
Page is loading ...
Page is loading ...
Page is loading ...
Page is loading ...
Page is loading ...
Page is loading ...
Page is loading ...
Page is loading ...
Page is loading ...
Page is loading ...
Page is loading ...
Page is loading ...
Page is loading ...
Page is loading ...
Page is loading ...
Page is loading ...
Page is loading ...
Page is loading ...
Page is loading ...
Page is loading ...
Page is loading ...
Page is loading ...
Page is loading ...
Page is loading ...
Page is loading ...
Page is loading ...
Page is loading ...
Page is loading ...
Page is loading ...
Page is loading ...
Page is loading ...
Page is loading ...
Page is loading ...
Page is loading ...
Page is loading ...
Page is loading ...
Page is loading ...
Page is loading ...
Page is loading ...
Page is loading ...
Page is loading ...
Page is loading ...
Page is loading ...
Page is loading ...
Page is loading ...
Page is loading ...
Page is loading ...
Page is loading ...
Page is loading ...
Page is loading ...
Page is loading ...
Page is loading ...
Page is loading ...
Page is loading ...
Page is loading ...
Page is loading ...
Page is loading ...
Page is loading ...
Page is loading ...
Page is loading ...
Page is loading ...
Page is loading ...
Page is loading ...
Page is loading ...
Page is loading ...
Page is loading ...
Page is loading ...
Page is loading ...
Page is loading ...
Page is loading ...
Page is loading ...
Page is loading ...
Page is loading ...
Page is loading ...
Page is loading ...
Page is loading ...
Page is loading ...
Page is loading ...
Page is loading ...
Page is loading ...
Page is loading ...
Page is loading ...
Page is loading ...
Page is loading ...
Page is loading ...
Page is loading ...
Page is loading ...
Page is loading ...
Page is loading ...
Page is loading ...
Page is loading ...
Page is loading ...
Page is loading ...
Page is loading ...
Page is loading ...
Page is loading ...
Page is loading ...
Page is loading ...
Page is loading ...
Page is loading ...
Page is loading ...
Page is loading ...
Page is loading ...
Page is loading ...
Page is loading ...
Page is loading ...
Page is loading ...
Page is loading ...
Page is loading ...
Page is loading ...
Page is loading ...
Page is loading ...
Page is loading ...
Page is loading ...
Page is loading ...
Page is loading ...
Page is loading ...
Page is loading ...
Page is loading ...
Page is loading ...
Page is loading ...
Page is loading ...
Page is loading ...
Page is loading ...
Page is loading ...
Page is loading ...
Page is loading ...
Page is loading ...
Page is loading ...
Page is loading ...
Page is loading ...
Page is loading ...
Page is loading ...
Page is loading ...
Page is loading ...
Page is loading ...
Page is loading ...
Page is loading ...
Page is loading ...
-
 1
1
-
 2
2
-
 3
3
-
 4
4
-
 5
5
-
 6
6
-
 7
7
-
 8
8
-
 9
9
-
 10
10
-
 11
11
-
 12
12
-
 13
13
-
 14
14
-
 15
15
-
 16
16
-
 17
17
-
 18
18
-
 19
19
-
 20
20
-
 21
21
-
 22
22
-
 23
23
-
 24
24
-
 25
25
-
 26
26
-
 27
27
-
 28
28
-
 29
29
-
 30
30
-
 31
31
-
 32
32
-
 33
33
-
 34
34
-
 35
35
-
 36
36
-
 37
37
-
 38
38
-
 39
39
-
 40
40
-
 41
41
-
 42
42
-
 43
43
-
 44
44
-
 45
45
-
 46
46
-
 47
47
-
 48
48
-
 49
49
-
 50
50
-
 51
51
-
 52
52
-
 53
53
-
 54
54
-
 55
55
-
 56
56
-
 57
57
-
 58
58
-
 59
59
-
 60
60
-
 61
61
-
 62
62
-
 63
63
-
 64
64
-
 65
65
-
 66
66
-
 67
67
-
 68
68
-
 69
69
-
 70
70
-
 71
71
-
 72
72
-
 73
73
-
 74
74
-
 75
75
-
 76
76
-
 77
77
-
 78
78
-
 79
79
-
 80
80
-
 81
81
-
 82
82
-
 83
83
-
 84
84
-
 85
85
-
 86
86
-
 87
87
-
 88
88
-
 89
89
-
 90
90
-
 91
91
-
 92
92
-
 93
93
-
 94
94
-
 95
95
-
 96
96
-
 97
97
-
 98
98
-
 99
99
-
 100
100
-
 101
101
-
 102
102
-
 103
103
-
 104
104
-
 105
105
-
 106
106
-
 107
107
-
 108
108
-
 109
109
-
 110
110
-
 111
111
-
 112
112
-
 113
113
-
 114
114
-
 115
115
-
 116
116
-
 117
117
-
 118
118
-
 119
119
-
 120
120
-
 121
121
-
 122
122
-
 123
123
-
 124
124
-
 125
125
-
 126
126
-
 127
127
-
 128
128
-
 129
129
-
 130
130
-
 131
131
-
 132
132
-
 133
133
-
 134
134
-
 135
135
-
 136
136
-
 137
137
-
 138
138
-
 139
139
-
 140
140
-
 141
141
-
 142
142
-
 143
143
-
 144
144
-
 145
145
-
 146
146
-
 147
147
-
 148
148
-
 149
149
-
 150
150
-
 151
151
-
 152
152
-
 153
153
-
 154
154
-
 155
155
-
 156
156
-
 157
157
-
 158
158
-
 159
159
-
 160
160
-
 161
161
-
 162
162
-
 163
163
-
 164
164
-
 165
165
-
 166
166
-
 167
167
-
 168
168
-
 169
169
-
 170
170
-
 171
171
-
 172
172
-
 173
173
-
 174
174
-
 175
175
-
 176
176
-
 177
177
-
 178
178
-
 179
179
-
 180
180
-
 181
181
-
 182
182
-
 183
183
-
 184
184
-
 185
185
-
 186
186
-
 187
187
-
 188
188
-
 189
189
-
 190
190
-
 191
191
-
 192
192
-
 193
193
-
 194
194
-
 195
195
-
 196
196
-
 197
197
-
 198
198
-
 199
199
-
 200
200
-
 201
201
-
 202
202
-
 203
203
-
 204
204
-
 205
205
-
 206
206
-
 207
207
-
 208
208
-
 209
209
-
 210
210
-
 211
211
-
 212
212
-
 213
213
-
 214
214
-
 215
215
-
 216
216
-
 217
217
-
 218
218
-
 219
219
-
 220
220
-
 221
221
-
 222
222
-
 223
223
-
 224
224
-
 225
225
-
 226
226
-
 227
227
-
 228
228
-
 229
229
-
 230
230
-
 231
231
-
 232
232
-
 233
233
-
 234
234
-
 235
235
-
 236
236
-
 237
237
-
 238
238
-
 239
239
-
 240
240
-
 241
241
-
 242
242
-
 243
243
-
 244
244
-
 245
245
-
 246
246
-
 247
247
-
 248
248
-
 249
249
-
 250
250
-
 251
251
-
 252
252
-
 253
253
-
 254
254
-
 255
255
-
 256
256
-
 257
257
-
 258
258
-
 259
259
-
 260
260
-
 261
261
-
 262
262
-
 263
263
-
 264
264
-
 265
265
-
 266
266
-
 267
267
-
 268
268
-
 269
269
-
 270
270
-
 271
271
-
 272
272
-
 273
273
-
 274
274
-
 275
275
-
 276
276
-
 277
277
-
 278
278
-
 279
279
-
 280
280
-
 281
281
-
 282
282
-
 283
283
-
 284
284
-
 285
285
-
 286
286
-
 287
287
-
 288
288
-
 289
289
-
 290
290
-
 291
291
-
 292
292


Steinberg Wavelab Studio 6.0 Operating instructions
- Category
- Vacuum cleaners
- Type
- Operating instructions
Ask a question and I''ll find the answer in the document
Finding information in a document is now easier with AI
Related papers
-
Steinberg WaveLab Elements 7 User manual
-
-
-
-
-
-
-
-
-
Other documents
-
Rexel 2101962 Datasheet
-
E-Mu 404 Tutorials Manual
-
E-Mu 1616m Owner's manual
-
Creative E-MU Digital Audio System 1820M Owner's manual
-
Solid State Logic Pro Convert User guide
-
Avid Studio MediaSuite Quick start guide
-
-
-
-