Rommelsbacher JG 40 User manual

Type
User manual

This manual is also suitable for

2
D GB
1 Kunststoffschale Plastic bowl
2 Abdeckhaube Cover
3 Portionsglas mit Schraubgewinde (150 ml) Single portion jar with screw top (150 ml)
4 Schraubdeckel Screw cap
5 Tastschalter für Zeiteinstellung (+) und (-) Push-buttons for time setting (+) and (-)
6 Display für Laufzeit Timer display
7 Tastschalter für EIN/AUS ON/OFF push-button
F I
1 Bac en plastique Vasca in plastica
2 Couvercle Coperchio
3 Pots en verre (150 ml) Vasetto in vetro con filettatura (150 ml)
4 Couvercle Coperchio avvitabile
5 Boutons de réglage du temps (+) et (-) Pulsanti per regolare il timer (+) e (-)
6 Affichage du temps de fonctionnement Monitor del timer
7 Bouton MARCHE/ARRET Pulsante acceso/spento
RU
1
Пластиковая чаша
2
Крышка
3
Порционная баночка (150 мл)
4
Завинчивающаяся крышка
5
Кнопки для установки времени (+) и (-)
6
Дисплей с отсчетом времени
7
Кнопка включения/выключения
8
Штекер с проводом электропитания
Produktbeschreibung / Product description
13
Page
Product description .......................................................................................................................................2
Introduction ................................................................................................................................................14
Intended use ...........................................................................................................................................14
Technical data .........................................................................................................................................14
Scope of supply .......................................................................................................................................14
Packing material .....................................................................................................................................14
For your safety ............................................................................................................................................15
General safety advices ............................................................................................................................15
Safety advices for using the appliance ....................................................................................................16
Prior to initial use ........................................................................................................................................17
Interesting facts ..........................................................................................................................................17
Operating the appliance..............................................................................................................................17
Preparing the milk ...................................................................................................................................17
Starting the yogurt ..................................................................................................................................17
Switching the appliance on and off .........................................................................................................18
Taking out the ready yogurt ....................................................................................................................18
Error Codes .................................................................................................................................................19
Cleaning and maintenance .........................................................................................................................19
Special accessories ......................................................................................................................................19
Tips .............................................................................................................................................................19
Recipes ........................................................................................................................................................20
F Mode d’èmploi ................................................................................................................23
I istruzioni per l‘uso ..........................................................................................................33
RU руководства по эксплуатации ............................................................................42
Contents
Instruction manual
GB
14
Introduction
We are pleased you decided in favour of this premium yogurt maker and would like to thank
you for your confi dence. Its easy operation will certainly fi ll you with enthusiasm as well.
To make sure you can enjoy using this appliance for a long time, please read through the
following notes carefully and observe them. Keep this instruction manual safely. Hand out all documents
to third persons when passing on the appliance. Thank you very much.
Intended use
The appliance is designed for preparing natural yogurt (normal household use only). Other uses or modi-
cations of the appliance are not intended and harbour considerable risks. For damage arising from not
intended use, the manufacturer does not assume liability. The appliance is not designed for commercial
use.
Technical data
Only connect the appliance to an isolated ground receptacle installed according to regulations. The rated
voltage must comply with the details on the rating label. Only connect to alternating current.
Nominal voltage: 230 V~ 50 Hz
Nominal power: 40 W
Protection class: II
Standby consumption: < 0.5 W
Number of portion jars: 8 (150 ml each) with screw caps
Setting time range: up to 18 hours
Scope of supply
Check the scope of supply for completeness as well as the soundness of the product and all components
(see product description page 2) immediately after unpacking.
Packing material
Do not simply throw the packing material away but recycle it.
Deliver paper, cardboard and corrugated cardboard packing to collecting facilities. Also plastic packing
material and foils should be put into the intended collecting basins.
In the examples for the plastic marking:
PE stands for polyethylene, the code fi gure 02 for PE-HD,
04 for PE-LD, PP for polypropylene, PS for polystyrene.
Disposal/recycling
According to the Waste Electrical and Electronic Equipment Directive, do not dispose of this
product with your normal domestic waste at the end of its lifespan. Therefore, please deliver
it at no charge to your appropriately licensed local collecting facilities (e.g. recycling yard)
concerned with the recycling of electrical and electronic equipment.
15
For your safety
WARNING: Read all safety advices and instructions!
Non-observance of the instructions and safety advices may
cause electric shock, fire and/or bad injuries!
General safety advices
Always keep children under 8 away from the product and the power cord.
Children from the age of 8 must be supervised when cleaning or
maintaining the appliance.
Children from the age of 8 and persons not having the knowledge or
experience in operating the appliance or having handicaps of physical,
sensorial or mental nature must not operate the appliance without
supervision or instruction by a person, responsible for their safety. Never
leave the appliance unattended during operation.
Children must not play with the appliance.
Packing material like e. g. foil bags should be kept away from children.
Do not operate this unit with an external timer or a separate telecontrol
system.
Prior to each use, check the appliance and the attachments for soundness,
it must not be operated if it has been dropped or shows visible damage. In
these cases, the power supply must be disconnected and the appliance has
to be checked by a specialist.
When laying the power cord, make sure that no one can get entangled
or stumble over it in order to avoid that the appliance is pulled down
accidentally.
Keep the power cord away from hot surfaces, sharp edges and mechanical
forces. Check the power cord regularly for damage and deteriorations.
Damaged or entangled cords increase the risk of an electric shock.
Do not misuse the power cord for unplugging the appliance!
Never immerse the appliance, power cord and power plug in water for
cleaning.
Do not store or operate the appliance outside or in wet rooms.
16
This electrical appliance complies with the relevant safety standards. In
case of signs of damage to the appliance or the power cord, unplug the
appliance immediately. Repairs may be effected by authorised specialist
shops only. Improper repairs may result in considerable dangers for the user.
Improper use and disregard of the instruction manual void all warranty
claims.
Safety advices for using the appliance
The plastic bowl must not be filled with water for operation!
Do not transport the appliance when hot. Appliance and accessories must
have cooled completely before cleaning or moving them!
Pull the power plug after each use for safe switch-off.
Observe the following when setting up the appliance:
o Place the appliance on a heat-resistant, stable and even surface
(no varnished surfaces, no table cloths etc.).
o Place it beyond children’s reach.
o The space above the appliance should be free. Leave a ventilation distance
of at least 20 cm to all sides to avoid damage by heat or vapour and to grant
an unobstructed work area. Unhindered air supply has to be ensured.
o Do not operate the appliance in the vicinity of sources of heat (oven,
gas flame etc.) or in explosive environments, where inflammable liquids
or gases are located.
17
Operating the appliance
Preparing the milk
For a complete filling 1 litre of milk is required.
Fresh milk:
If fresh milk is used for the starter mixture, it must be heated up to about 85 °C first in order to kill all
germs and bacteria. After that, the milk must be cooled to below 40 °C.
Homogenized milk (UHT milk):
When using UHT milk, no further preparation is required, as this type of milk already had been heated
before. However, it can be handled the same way as fresh milk.
Starting the yogurt
Different starter cultures can be used:
Natural yogurt:
When using commercially obtainable fresh, natural yogurt (150 ml), mind to take a type without any
preserving or flavouring additives, which was not ultra heat treated. This yogurt should have the same
fat content like the used milk.
IMPORTANT: Observe that the appliance will not be moved during the maturing of the yogurt,
so as not to interrupt or disturb the fermentation.
Prior to initial use
For a start, please clean the appliance as well as all accessories. For more detailed information please refer
to “Cleaning and maintenance”.
Interesting facts
Yogurt mostly is made of pasteurized and homogenized milk with a fat content of 1.5 % or 3.5
%. Lactobacilli transform the milk to yogurt by processing the milk sugar into lactic acid. And the
generated energy is used for multiplying the lactobacilli.
The optimum temperature for the ripening process is about 42 – 44 °C. The maturing time can vary,
depending on the ingredients and the desired consistency of the yogurt.
The density of the yogurt is also depending on the fat content of the used milk. Thus, milk with 3.5 %
fat content makes a rather firm yogurt whereby milk of 1.5 % fat content forms weaker yogurt.
There is dextrorotatory and laevorotatory yogurt. The difference is only the enclosed lactobacillus.
Depending on the type, lactic acid owns a mirror-inverted composition of the molecular groups. Adults
can well digest both, dextrorotatory and laevorotatory yogurt, whereby infants should be fed with
dextrorotatory yogurt only.
For a starter culture it is possible to use fresh natural yogurt (without additives), available in the trade,
or yogurt ferment from the health food shop.
NOTE: Take our suggestions as a basis and experiment on your own until you have found the optimum
timing and best ingredients for your favorite yogurt.
18
Yogurt ferment:
When using ferment from the health food shop, observe to get a fresh one and to use it according to its
specific manual.
With this appliance in total up to 1.2 litres of milk mixture can be processed:
Fill the milk (1 litre) in a sufficiently sized vessel.
Add the desired starter culture (see above) and stir it thoroughly until it has mixed evenly. Make sure
the temperatures of starter culture and milk are similar.
Then cautiously pour the mixture into the portion jars. Do not overfill the jars.
It is also possible to prepare the mixture directly in the portion jars. Give 1-2 teaspoons of yogurt into
each jar, then fill it up with milk and stir thoroughly.
Place the jars into the plastic bowl of the appliance with the screw caps on.
Place the cover. Make sure the cover is positioned correctly.
Switching the appliance on and off
Connect the mains plug to the socket.
For starting the process, push the ON/OFF push-button; the appliance starts the ripening process. The
electronic control ensures optimal temperature during preparation.
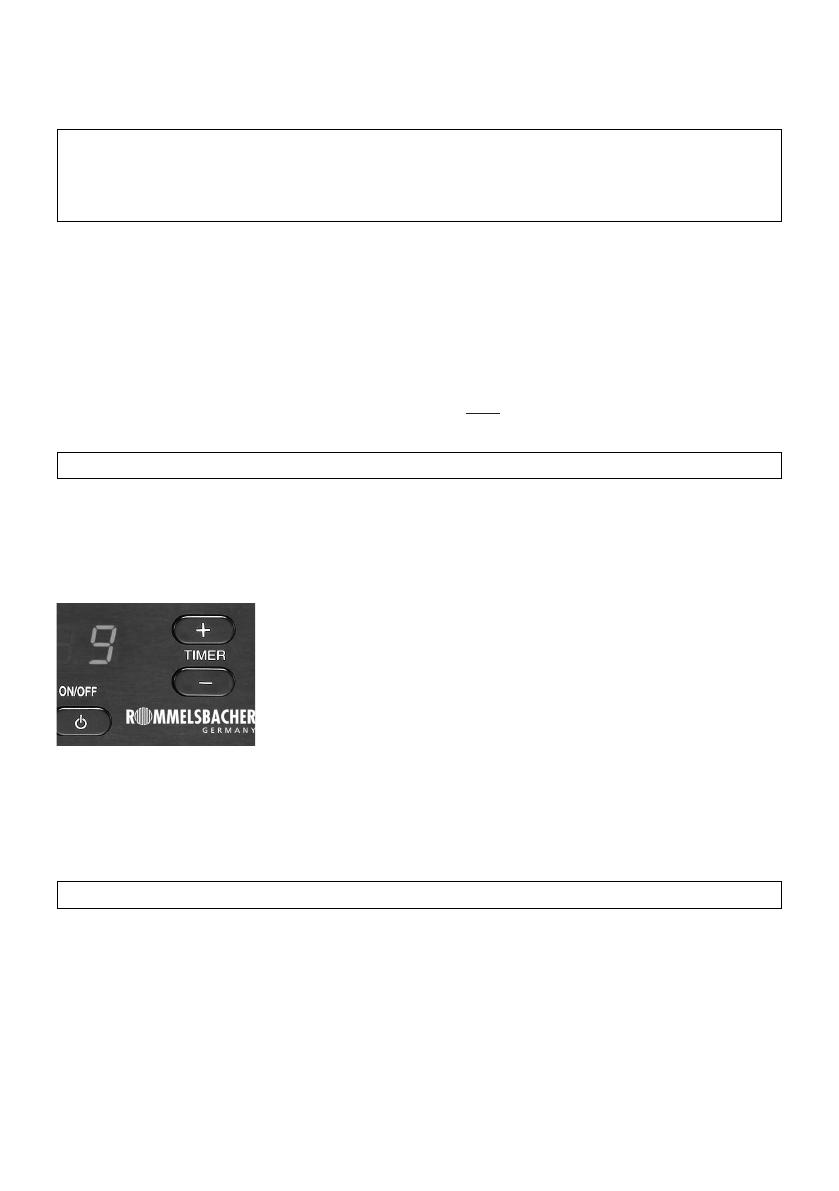
The display shows the time of 9 hours as standard. This is the average
ripening time required for the preparation of mild yogurt.
The ripening time influences the consistency and the taste of the yogurt.
More time means firmer yogurt and a more intense taste. You can freely
try out what kind of yogurt you like most.
The maturing time can be altered at any time. The push-buttons (+) and
(-) allow to set the time individually from 1 - 18 hours.
The process can be stopped at any time by applying the ON/OFF push-button again.
The timer is a “countdown-timer”. Having set the time, it counts backwards until “0”. To give a better
orientation, the last hour is displayed in minute intervals. As soon as the set ripening time has been
reached, there is a triple signal tone and the appliance cuts off automatically.
Always pull the mains plug after the ripening process has been finished.
Taking out the ready yogurt
Remove the cover. Pay attention, as inside the cover some condensed water may have cumulated. The
formation of condensation is normal and no reason for complaint.
Take out the portion jars and screw the caps on well.
Place the finished yogurt into the refrigerator for at least 4 hours in order to finally stop the ripening
process. Only then the yogurt should be refined with ingredients, processed or consumed.
NOTE: Before filling the jars clean them thoroughly and rinse with hot water.
NOTE: Each button pressing is acknowledged by a signal tone.
NOTE: Following to that you can use your home made yogurt for starting a new culture. Take the last
portion jar (150 ml) to make a new mixture. In case you take natural yogurt as starter, you can repeat
this procedure for 4 - 6 times. Using ferment as a starter, this procedure can be repeated up to 20 times.
After that a new starter culture should be used.
19
Cleaning and maintenance
ATTENTION: Hazard of injury and burns!
Before cleaning, always unplug the appliance and let all
parts cool down!
Never immerse the appliance and the plug in water or clean
them under running water!
Clean the appliance inside and outside with a damp tissue and wipe it dry.
Wash the cover, the portion jars and the caps in hot water with some dishwashing detergent. The porti-
on jars may also be cleaned in the dishwasher.
Before the next use, all parts must be completely clean and dry.
Do not use any abrasives or solvents!
Never use a steam jet appliance for cleaning!
Special accessories
For preparing larger quantities of yogurt we recommend our set of another 8 portion jars with screw
cap, available under article number “JG 8”. Contact your local dealer, specialist trader, retailer, mail order
house or online shop.
Tips
For achieving good results in yogurt making it is imperative to see for a perfect hygiene of all tools and
ingredients, as milk products are very sensitive of it.
For preparation only use milk and the starter culture! Additives like sugar, fruit or flavors should be
added to the ready yogurt only.
A longer ripening time means firmer yogurt and a more intense yogurt taste.
Any disturbance during the ripening process (e. g. by shaking or shocks) might cause the yogurt to stay
liquid.
Error Codes
In case of malfunctions the electronics of the unit shows corresponding error codes in the display:
Lo Failure in the electronic control. Electronic system defective.
Self help: Not possible – the appliance must be forwarded to the customer service.
Hi Failure in the electronic control. Electronic system defective.
Self help: Not possible – the appliance must be forwarded to the customer service
20
Recipes
„Sweeten“ your yogurt with fruit. Regardless of whether it is fresh fruit, canned fruit or frozen food -
yogurt mixed with fruit either in pieces or puréed is a delicious and healthy start to the day and an easily
digestible light snack for in between!
Homemade natural yogurt is a healthy base for many delicious dishes finding a variety of uses in the
kitchen. It can be used to make delicious cakes and other pastries, create light cake fillings or refine spicy
sauces, soups and dips. Here are just a few suggestions from us:
Yogurt dressing
250 - 300 g of natural yogurt
3 tbsp of cream
1 pinch of salt and sugar
garlic and paprika powder each
1 - 2 tbsp freshly chopped herbs (e.g. chives, parsley, dill)
1 tsp lemon juice for seasoning
Mix the ingredients (except the lemon juice) well and set aside to marinate. If necessary, season to taste
with salt and/or lemon juice before serving. Tastes particularly good with crisp lettuce such as Chinese
cabbage or radicchio.
Yogurt fruit ice cream
350 g of frozen fruits (e.g. raspberries or mixed berries)
150 g of natural yogurt
150 g of cream
6 - 8 tsp icing sugar (as desired and depending on sweetness of the fruits)
Stir cream, yogurt and icing sugar with a mixer until creamy. Purée the cold frozen fruit in a blender and
immediately mix it vigorously and evenly with the cream/yogurt mixture.
Place this mixture in the freezer for at least 45 minutes to cool down, then portion and serve quickly.
Breakfast drink
300 ml of orange juice
2 - 3 tsp wholegrain oat flakes
1 ripe banana
100 g of natural yogurt
1 tsp honey (for seasoning)
Gently heat about one third of the orange juice and allow the oatmeal to soak for 15 minutes. Peel the
banana, cut it into pieces and purée it finely together with the soaked oatmeal, the remaining orange
juice, yogurt and honey. Divide it between the glasses and enjoy!
21
Yogurt Drink „Tropic“
150 g of natural yogurt
8 cl of pineapple juice
2 cl of coconut syrup
1 dash of lemon juice
4 - 5 ice cubes
Shake all ingredients vigorously in a shaker. Pour into a tall glass and garnish with a fruit skewer or fresh
mint, if necessary.
Yogurt Bundt cake
150 g of natural yogurt
150 g of cooking oil
300 g of sugar
350 g of flour
1 sachet of baking soda
2 eggs
1 lemon
Stir cooking oil with yogurt, sugar, grated lemon zest and eggs until foamy. Add the flour mixed with
baking powder by sieving and stir vigorously to a thick dough.
Fill in a greased Bundt cake pan. Preheat the oven to 175 ° C (circulating air), bake the cake on the bottom
rail for about 50 - 60 minutes. After cooling, turn it out of the pan, sprinkle with powdered sugar or cover
with a sugar icing made of powdered sugar and a little lemon juice.
Steamed carrot and yogurt salad
250 - 300 g of natural yogurt
500 g of carrots
1 clove of garlic
2 tbsp rapeseed or olive oil
1 tbsp lemon juice
Salt, pepper, chilli powder
Peel the carrots, grate medium-fine and mix with the lemon juice. Heat the oil in a saucepan, add the
grated carrots, cover and simmer over medium heat for about 10 minutes, stirring occasionally. When the
carrots are cooked, remove the pot from the cooking plate.
Mix yogurt, pressed garlic, salt, pepper and chili powder and add to the steamed carrots. Let it all soak un-
til the liquid is almost absorbed. Allow to cool down and then put it in a fridge for about 1 hour. Fits very
well as an appetizer or as an accompaniment to grilled meats. Lukewarm also delicious as a light dinner.
  • Page 1 1
  • Page 2 2
  • Page 3 3
  • Page 4 4
  • Page 5 5
  • Page 6 6
  • Page 7 7
  • Page 8 8
  • Page 9 9
  • Page 10 10
  • Page 11 11
  • Page 12 12
  • Page 13 13
  • Page 14 14
  • Page 15 15
  • Page 16 16
  • Page 17 17
  • Page 18 18
  • Page 19 19
  • Page 20 20
  • Page 21 21
  • Page 22 22
  • Page 23 23
  • Page 24 24
  • Page 25 25
  • Page 26 26
  • Page 27 27
  • Page 28 28
  • Page 29 29
  • Page 30 30
  • Page 31 31
  • Page 32 32
  • Page 33 33
  • Page 34 34
  • Page 35 35
  • Page 36 36
  • Page 37 37
  • Page 38 38
  • Page 39 39
  • Page 40 40
  • Page 41 41
  • Page 42 42
  • Page 43 43
  • Page 44 44
  • Page 45 45
  • Page 46 46
  • Page 47 47
  • Page 48 48
  • Page 49 49
  • Page 50 50
  • Page 51 51
  • Page 52 52

Rommelsbacher JG 40 User manual

Type
User manual
This manual is also suitable for

Ask a question and I''ll find the answer in the document

Finding information in a document is now easier with AI