78
www.electrolux.com
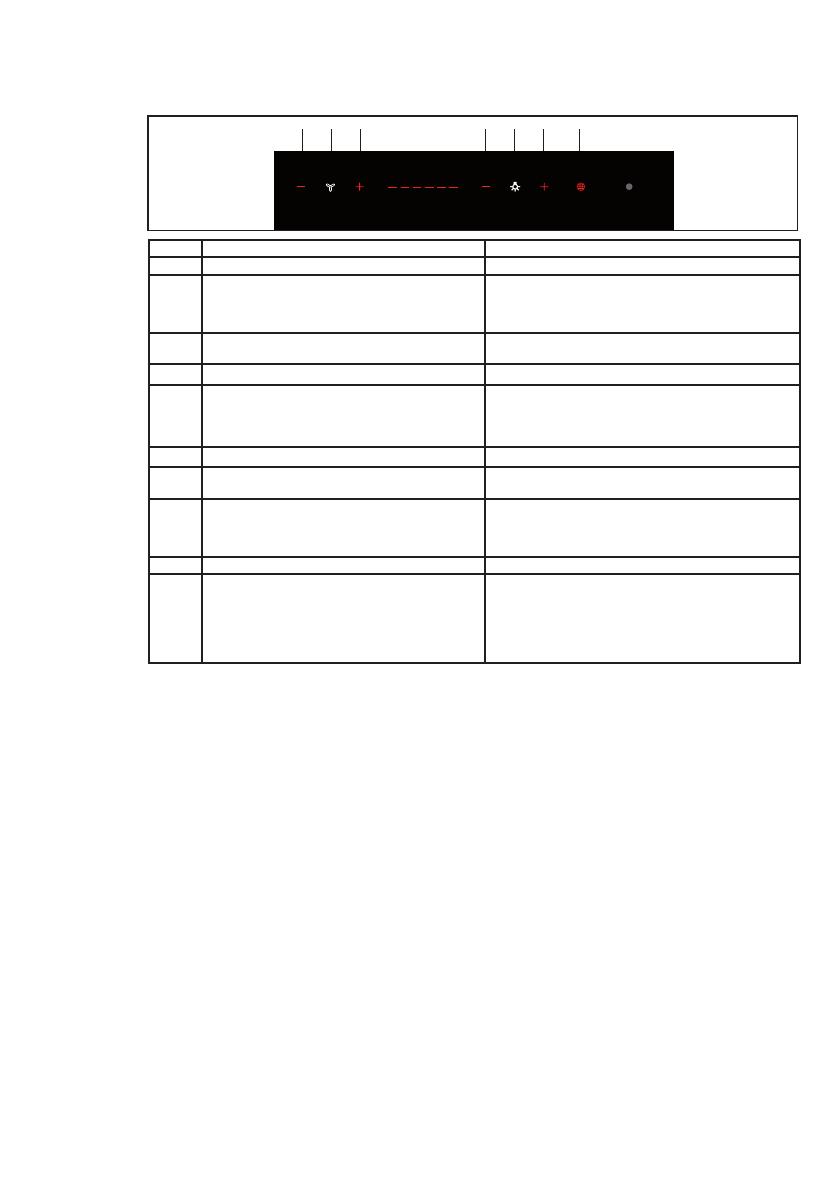
4. VALDYMAS
5. APŠVIETIMAS
• Dėl pakeitimo kreipkitės į techninius darbuo-
tojus. Norėdami nusipirkti, kreipkitės į techninius
darbuotojus.
.
Mygtukas Funkcija Ekranas
A Sumažina darbinį greitį arba išjungia nustatytą intensyvų greitį. Degančių šviesos indikatorių skaičius sumažėja.
Paspauskite mygtuką ir laikykite nuspaudę 5 sekundes, kad
įjungtumėte / išjungtumėte nuotolinio valdymo prietaisą.
1 mygtuko A+C blykstelėjimas parodo, kad nuotolinio valdymo prietaisas
įjungtas
2 mygtuko A+C blykstelėjimas parodo, kad nuotolinio valdymo prietaisas
išjungtas
B Variklį įjungia / išjungia ir ekrane parodoma greičio indikatorių
juostelė.
Užsidega nustatyto greičio šviesos indikatoriai.
C Padidina darbinį greitį. Degančių šviesos indikatorių skaičius padidėja.
Toliau paspauskite mygtuką, kad būtų aktyvuotas intensyvus
greitis, jis nustatytas veikti 6 minučių.Pasibaigus 6 minučių, inten-
syvus greitis automatiškai nukris prie žemesnio lygio, paskutinis
indikacinis diodas išsijungs.
ŠVIESOS INDIKATORIAUS juostelė visiškai įjungta -> Intensyvus greitis
įjungtas
D Sumažina apšvietimo intensyvumą. -
E Įjungia / išjungia apšvietimo sistemą esant maksimaliam
intensyvumui.
-
Paspauskite mygtuką ir laikykite nuspaudę 5 sekundes, kad būtų
įjungtas / išjungtas aktyvintosios anglies filtro įspėjamasis signalas.
Mygtuko C blykstelėjimas parodo, kad aktyvintosios anglies filtro
įspėjamasis signalas yra įjungtas
Mygtuko A blykstelėjimas parodo, kad aktyvintosios anglies filtro
įspėjamasis signalas yra išjungtas
F Padidina apšvietimo intensyvumą. -
G Veikiant filtro įspėjamajam signalui, paspauskite mygtuką, kad
pakartotinai nusistatytų įspėjamasis signalas. Šie rodmenys
matomi tik tuomet, kai variklis yra sustabdytas.
Kai procedūra nutraukiama, anksčiau pateikti rodmenys išjungiami:
Degantis mygtukas parodo, kad reikia išplauti metalinius riebalų filtrus.
Signalas įsijungia praėjus 100 gartraukio darbo valandų.
Blykčiojantis mygtukas parodo, kad reikia pakeisti aktyvintosios
anglies filtrus ir išplauti metalinius riebalų filtrus. Signalas įsijungia praėjus
200 gartraukio darbo valandų.
Kai gartraukis yra išjungtas, ekrane nerodomos jokios funkcijos, valdymo skydelyje matomas tik įprastas žymėjimas raidėmis.


