Years of field experience, special applications and product testing have revealed many subtleties regarding application and
installation of repair clamps. For maximum performance under adverse conditions take advantage of the JCM “Tricks of the
Trade.”
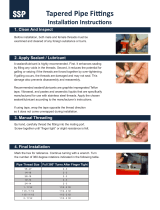
• Always clean and lubricate pipe with water or soapy water. This helps overcome friction when adjusting the clamp. Do not use oil base
pipe lubricant; the oil does not disperse, leaves residue and prevents the gasket from sealing/adhering to the pipe wall. Use water
solvent lubricant. Use of a mirror will assist inspection of backside of pipe or pipe in cramped, limited space.
• Place a reference mark on the pipe back from the damaged area to help in centering clamp over break.
Clamps provide maximum performance when centered over damage area.
• For installation on pipe under pressure: lubricate the clamp gasket with soap/water mixture, assemble clamp
on the pipe beside the damaged area, lightly engage bolts and slid the clamp over the damaged area,
proceed with installation steps.
• Damage involving large holes or massive pitted areas - use stainless steel plate over large holes (under
repair clamp) to provide the gasket a surface to seal against.
• Drill holes in the ends of splits or cracks to relieve forces which could cause splits to continue.
• Leave sufficient pressure on a broken line to prevent intrusion of foreign matter to prevent excessive line contamination.
• With pressure reduced, spraying water will cease as soon as water level rises above break.
• Lubricating clamp bolts will ease clamp installation and assure proper torquing of bolts.
JCM Quality Fitting Equipped With 18-8 Stainless Steel Bolts and Nuts
When not properly handled it is the nature of stainless steel fasteners to gall and freeze (seize up). This is due to the inherent properties
of the stainless material. Galling and freezing is often triggered by the presence of metal chips, burrs and grains of sand on the threads of
the bolts and nuts. Extra care has been taken by JCM prior to assembly and packing of this fitting to assure a trouble-free installation.
1. The nuts and bolts are made from material of different hardness so that they have different strengths.
2. Nuts are coated with a special antiseize coating. Additional lubricant may be needed. A Molybdenum-Base lubricant is
recommended.
3. Each nut is assembled by hand to be sure that it went on the bolt freely.
4. The bolts and nuts are handled carefully to avoid damage to the threads.
5. The bolts and nuts are made to exacting specifications to assure that the correct material is used and that the thread form is correct.
Stainless hardware is especially susceptible to galling. JCM supplies specially coated nuts to eliminate the galling caused by
overtorquing, but the bolt threads must be kept clean, free from nicks and not pitched or thrown into the tool bucket during the
installation process. Use of the JCM 901 Master Wrench or JCM 905 Torque Wrench with Deep Socket is highly recommended.
Use of pneumatic wrench for installation could cause hardware to seize and is not recommended.
Tricks of the Trade for Installation
Model 110
Patch Clamps