Whirlpool KGCE 3554/0 User guide

Category
Fridge-freezers
Type
User guide

This manual is also suitable for

66
GB TABLE OF CONTENTS
BEFORE USING THE APPLIANCE PAGE 67
SAFEGUARDING THE ENVIRONMENT PAGE 67
PRECAUTIONS AND GENERAL
RECOMMENDATIONS
PAGE 68
HOW TO OPERATE THE REFRIGERATOR
COMPARTMENT
PAGE 68
HOW TO OPERATE THE FREEZER
COMPARTMENT
PAGE 69
HOW TO DEFROST THE FREEZER
COMPARTMENT
PAGE 71
CARE AND MAINTENANCE PAGE 72
TROUBLE-SHOOTING GUIDE PAGE 73
AFTER SALES SERVICE PAGE 73
INSTALLATION PAGE 74
ELECTRICAL CONNECTION PAGE 75
89031-GB.fm5 Page 66 Friday, March 6, 1998 9:09 AM
67
Your new appliance is a combined fridge-freezer
exclusively for domestic use.
The freezer compartment can be
used for freezing fresh and cooked food, making
ice cubes, and storing frozen food.
Defrosting the freezer is a manual procedure.
The refrigerator compartment, which has an
automatic defrost feature, is used for the
storage of fresh food and beverages.
To make optimum use of your new appliance,
read this user handbook thoroughly, as it
contains a description of the appliance and
useful tips for storing food.
Keep this handbook for future consultation.
1. After unpacking the appliance, make sure
that the doors shut properly. Any damage
must be reported to your retailer within
24 hours after delivery of the appliance.
2. Wait at least two hours without moving
the appliance before connecting it to the
power supply.
3. Appliance installation and electrical
connections must be carried out by
a qualified technician in accordance with
the manufacturer's instructions and local
regulations.
1. Packing
The packaging material is 100% recyclable
(marked with the recycle symbol).
Follow local regulations for disposal.
The packaging material (plastic bags,
polystyrene parts, etc.) is potentially dangerous
and must be kept out of reach of children.
2. Product
The appliance is made using recyclable
materials. When scrapping, follow local waste
disposal regulations.
Make the appliance unusable by cutting off the
power cord. Dispose of this appliance correctly.
Take it to an authorised collection centre for the
recovery of refrigerant gas.
Information:
This appliance does not contain CFCs
(replaced with R134a) or HFCs
(replaced with R600a - Isobutane).
For more information, refer to the rating plate
affixed to the appliance.
BEFORE USING THE APPLIANCE
SAFEGUARDING THE ENVIRONMENT
89031-GB.fm5 Page 67 Friday, March 6, 1998 9:09 AM
68
Use the refrigerator compartment only for
storing fresh food and beverages and use the
freezer compartment only for storing frozen
food, freezing fresh food and making ice
cubes.
Do not cover or obstruct the air vents of the
appliance.
Do not store liquids in glass containers in the
freezer compartment - danger of bursting.
Do not eat ice cubes or ice lollies immediately
after taking them out of the freezer
compartment - risk of "cold" burns.
To avoid the risk of children becoming
trapped and therefore suffocating,
do not allow them to play or hide inside the
appliance.
Do not ingest the contents (non-toxic)
of the ice packs (if provided).
Before carrying out maintenance or
cleaning, always unplug the appliance or
switch the power supply off.
The power cable can only be replaced by an
authorized person.
After installation make sure that the appliance
is not resting on the supply cable.
Declaration of conformity
This appliance is intended to come into
contact with foodstuffs and conforms
to D.L. 108 of 25.01.1992
(European Directive 89/109/EEC).
This appliance is designed, built and sold in
compliance with:
the safety requirements of the "Low Voltage"
Directive 73/23/EEC;
the protection requirements of the "EMC"
Directive 89/336/EEC, modified by
Directive 93/68/EEC;
the efficiency requirements of
Directive 96/57/EEC.
Information
Appliances with isobutane (R600a)
Isobutane is a natural gas having low
environmental impact. Caution is required,
however, because Isobutane is inflammable.
Therefore, ensure that the pipelines of the
refrigerant circuit do not get damaged.
This appliance has two motors which allow
independent operation and control of the
refrigerator and freezer compartments.
Defrosting of the refrigerator compartment is
completely automatic.
The refrigerator can operate at ambient
temperatures between +10°C and +38°C.
Optimal peformance is obtained at temperatures
between +16°C and +32°C.
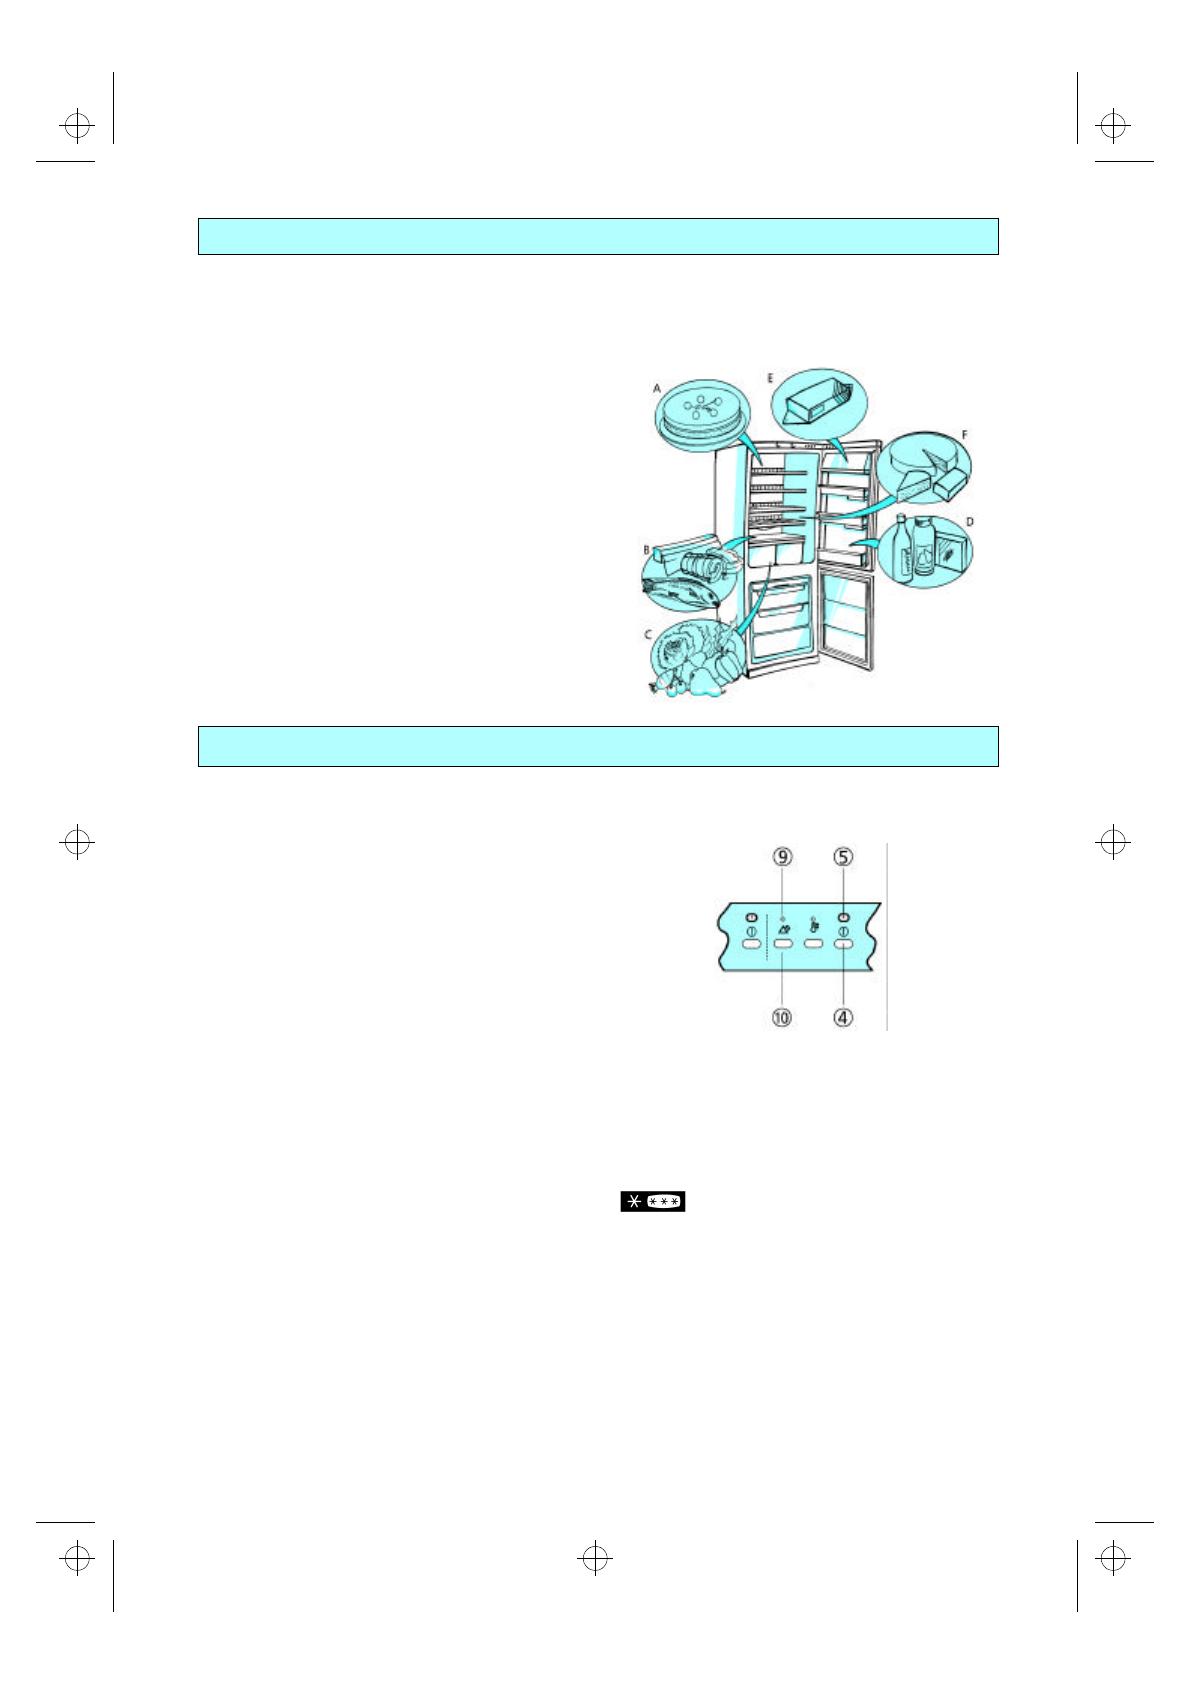
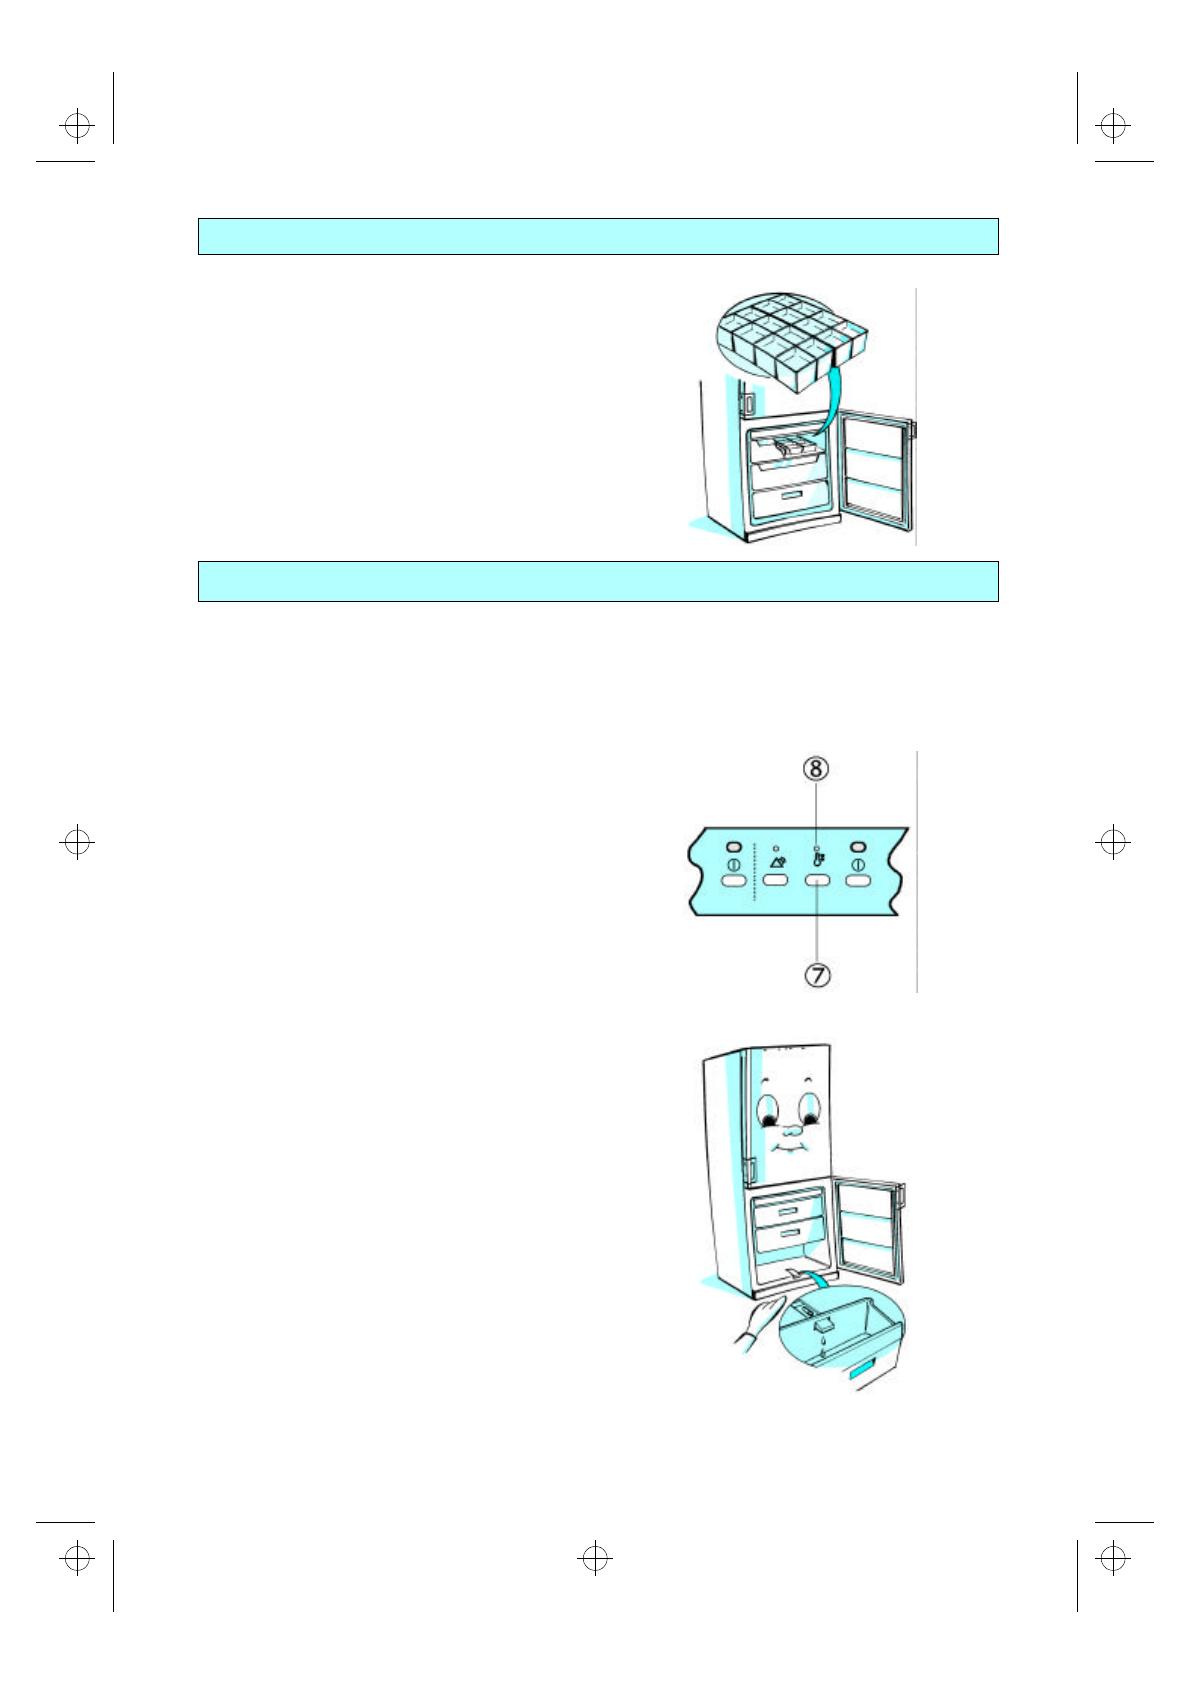
Switching on the appliance
Press the refrigerator compartment "ON"
button (1).
The inside light switches on when the
refrigerator door is opened.
An acoustic alarm sounds when the door has
been left open for more than 1 minute;
it will switch off when the door is closed.
Green LED (2) switches on, indicating
operation of the refrigerator compartment.
Important:
There is no need to adjust the compartment
temperature using the thermostat knob or set
the temperature using the button
(in electronic models), as the temperature is
factory set (+5° for electronic models)
to ensure the correct storage temperature for
fresh foods at ambient temperatures
between +20°C and +25°C.
After being switched on, the refrigerator
needs approx. 30 minutes to reach the
correct temperature to store a typical volume
of food in the refrigerator compartment.
.
PRECAUTIONS AND GENERAL RECOMMENDATIONS
HOW TO OPERATE THE REFRIGERATOR
COMPARTMENT
89031-GB.fm5 Page 68 Friday, March 6, 1998 9:09 AM
69
To adjust the temperature, follow the
instructions in the accompanying chart.
To switch off the refrigerator
compartment:
Press the refrigerator compartment "ON"
button again (1).
Using the refrigerator compartment
Position the food as shown in the figure.
A Cooked food
B Fish, meat
C Fruit and vegetables
D Bottles
E Butter
F Dairy products
Notes:
The space between the shelves and the rear
wall of the refrigerator compartment must be
unobstructed to allow air circulation.
Do not place the food in direct contact with the
rear wall of the refrigerator compartment.
Do not place hot food in the refrigerator.
Store liquids in closed containers.
Storing vegetables with high water content can
cause condensate formation in the crisper: this will
not affectthe refrigerator's efficiency.
Press the freezer compartment "ON" button (4).
1. Green LED (5) switches on, indicating
operation of the freezer compartment.
In electronic models, the green LED flashes
until the set temperature is reached, and then
illuminates steadily.
2. The acoustic alarm is activated;
to deactivate, press button (10).
3. Red LED remains switched on (for about
1 hour), until the critical alarm temperature is
reached.
The red LED switches on when:
The appliance is connected to the power
supply for the first time.
The freezer door has been left open for a
long time.
The quantity of foods loaded into the freezer
exceeds that indicated on the rating plate.
The freezer compartment temperature is
too high.
Important:
There is no need to adjust the temperature
using the thermostat knob or set the
temperature using the button (in electronic
models) as it has already been factory set
(-18° for electronic models) to provide the
correct storage temperature of frozen food in
the freezer compartment at ambient
temperatures between +20°C and +25°C.
After switching on, the freezer compartment
takes approx. 3 hours to reach a suitable
temperature for frozen food storage.
To adjust the temperature, follow the
instructions in the accompanying chart.
To switch off the freezer compartment:
Press the "ON" button (4) again.
How to freeze fresh food
You can use the freezer compartment
to freeze ambient temperature food.
The quantity of fresh food at an ambient
temperature of +25°C that can be frozen in
24 hours is indicated on the rating plate.
HOW TO OPERATE THE REFRIGERATOR COMPARTMENT
HOW TO OPERATE THE FREEZER COMPARTMENT
89031-GB.fm5 Page 69 Friday, March 6, 1998 9:09 AM
70
How to operate:
1. 24 hours before freezing fresh food, press
the fast freeze button (7) (for about
2 seconds in electronic models).
The yellow LED (8) switches on and remains
switched on for the entire period (24h).
2. Wrap and seal the food in: aluminium foil, cling
film, non-permable plastic wraps, polythene
containers with lids, freezer containers.
3. Place food in the top compartment, leaving
enough space for air to circulate around
packages. To speed up the freezing process
and increase the compartment capacity,
remove the top basket and place the food
directly on the refrigerator grid.
For more efficient freezing use the fast freeze
function for the next 24 hours by pressing the
button (7) again when the yellow LED (8)
switches off.
4. When freezing is complete, press the fast
freeze button (7) again to deactivate it.
Electronic models only:
The fast freeze function switches off
automatically after 24 hours (yellow LED (8)
switches off).
Note:
In the event of a power failure, the freezer
compartment maintains the correct storage
temperature for about 16 hours.
In models with one or two ice packs, this
temperature can be maintained for
about 25/30 hours.
Do not open the freezer compartment door
during a power failure.
Important:
For the periods of storage of frozen fresh
foods, refer to the adjacent table.
When purchasing frozen food products:
ensure that the packaging is not damaged
(frozen food in damaged packaging may
have deteriorated). Avoid packages that are
swollen or show evidence of damp areas
indicating that the food may have thawed
partially during its period of storage.
When shopping, leave frozen food
purchases till last and transport the products
in a thermally insulated bag.
Place the items in the freezer compartment
as soon as you get home.
If food has thawed, even partially, do not
re-freeze it. Consume within 24 hours.
Avoid, or reduce temperature variations to
the minimum.
Respect the best-before date on the package.
Always observe the storage information on
the package.
HOW TO OPERATE THE FREEZER COMPARTMENT
MONTHS FOOD
89031-GB.fm5 Page 70 Friday, March 6, 1998 9:09 AM
71
Making ice cubes
Fill the ice cube tray 3/4 with water and place
it at the bottom of the freezer compartment.
To speed up the ice making process, place
the tray at the bottom of the first drawer
(as shown in the figure) and not on the ice
pack rack (if provided).
Do not use sharp or pointed instruments to
detach the ice tray if it is stuck to the shelf.
.
Defrost the freezer compartment once or
twice a year, or when the frost build-up on the
walls reaches a thickness of about 3 mm.
Defrost the appliance when there is very little
food stored inside.
1. 24 hours before defrosting, press the fast
freeze button (7) (for about 2 seconds in
electronic versions).
The yellow LED (8) switches on. This action
brings the foods to the lowest possible
temperature.
2. Remove the food from the freezer
compartment, wrap in sheets of newspaper
and group together in a cool place or in a
portable cooler.
3. Disconnect the appliance from the mains
supply.
4. Remove the ice cube tray.
5. Remove the baskets.
6. Pull out the defrost water drain from the base
of the freezer compartment.
7. Leave the freezer compartment door open.
Place the lower basket, which has a hole in
the rear part, under the drain to collect the
defrost water.
Note: Do not use sharp or pointed metal
instruments to scrape off ice; do not heat the
freezer compartment artificially. Any damage
to the appliance resulting from failure to
observe these instructions is not covered by
the guarantee.
8. Clean the freezer compartment using a
sponge dampened in a solution of warm
water and neutral detergent. Do not use
abrasive products.
9. Rinse the interior and dry thoroughly.
10.Reconnect the appliance to the mains.
11.Refit the drain in place and reposition the
baskets.
12.Before putting the foods back in the freezer
compartment, press the fast freeze button (7)
again (for about 2 seconds in electronic
models). The yellow LED (8) switches on.
Note: The temperature rise of frozen food during
defrosting may shorten its storage life.
HOW TO OPERATE THE FREEZER COMPARTMENT
HOW TO DEFROST THE FREEZER COMPARTMENT
89031-GB.fm5 Page 71 Friday, March 6, 1998 9:09 AM
72
Before cleaning, unplug the appliance from the
mains.
Clean the inside of the freezer compartment when
defrosting.
Periodically clean the inside of the refrigerator
compartment with a sponge dampened in warm
water and/or neutral detergent. Rinse and dry with
a soft cloth. Do not use abrasives.
Clean the outside with a soft cloth dampened with
water. Do not use abrasive products or scouring
pads, stain removers (e.g. acetone,
trichloro-ethylene) or vinegar.
Defrosting of the refrigerator compartment is
completely automatic. Some models are provided
with a drain hole. Periodically clean the inside
using the tool supplied to ensure constant and
proper drainage of the defrost water.
Periodically clean the condenser at the rear of
the appliance and the plinth with a vacuum
cleaner or a brush.
Prolonged disuse
1. Empty the refrigerator and freezer compartments.
2. Disconnect the appliance from the mains.
3. Defrost the freezer compartment, and clean and
dry both compartments.
4. Leave the doors open to prevent formation of
unpleasant odours.
CARE AND MAINTENANCE
89031-GB.fm5 Page 72 Friday, March 6, 1998 9:09 AM
73
1. The appliance is not working.
Is there a power failure?
Is the plug properly inserted in the socket?
Is the electric power supply switched on?
Has the fuse blown?
Is the power cord in perfect condition?
Is the thermostat set to
l (Stop)?
Are buttons 1 and 4 pressed?
2. Temperature inside the compartments is
not low enough.
Are the doors closed properly?
Is the appliance installed next to a heat
source?
Is the thermostat setting correct?
Are the air circulation grilles blocked?
Is the condenser clean?
3. Temperature inside the refrigerator
compartment is too low.
ls the thermostat setting correct?
4. Water collects at the bottom of the
refrigerator compartment.
Is the defrost drain obstructed?
Is the thermostat setting correct?
5. The appliance is excessively noisy.
Is the appliance in contact with other
furniture or objects?
Are the pipes at the back touching or vibrating?
6. The inside light is not working.
Perform the checks for problem 1, and then:
Disconnect the appliance from the mains
supply.
Remove the bulb cover.
Check the bulb and replace it if necessary.
Do not exceed 15W.
N.B.: This product uses a special bulb;
to replace do not unscrew. Pull towards the
inside of the appliance.
7. The red LED remains switched on.
See: "How to operate the freezer
compartment".
Notes:
The front edge of the appliance may be
hot. This prevents the formation of
condensation and is not a defect.
Gurgling and hissing noises due to
expansion in the refrigerant circuit are
normal.
Before calling After-Sales Service:
1. See if you can solve the problem yourself
with the help of the Trouble-shooting guide.
2. Switch the appliance on again to see if the problem
persists. If it does, switch off and wait for about
an hour before switching on.
3. If the problem persists after this action,
contact After-Sales Service.
Specify:
the nature of the fault
the model
the service number (the number after the
word SERVICE on the rating plate on the
inside of the appliance)
your complete address
your telephone number and area code
Note:
The direction of door opening, if carried out
by After Sales Service, is not covered by the
warranty.
TROUBLE-SHOOTING GUIDE
AFTER SALES SERVICE
89031-GB.fm5 Page 73 Friday, March 6, 1998 9:09 AM
74
Install the appliance away from heat sources.
Place the appliance in a dry, well ventilated
place.
Make sure that the appliance is level.
Adjust the front feet if necessary.
Leave at least 5 cm clearance above the
appliance.
The sides of some models are extended at
the rear so the appliance can be placed
against the rear wall. Otherwise, fit the
spacers (if supplied) on the upper part of the
condenser at the rear of the appliance.
For models without lateral walls, the distance
between the unit and the wall must be at least
4.5 cm.
Cleaning the inside
(see "Care and maintenance").
Fit the accessories supplied.
Electrical connection
Electrical connections must be made in
accordance with local regulations.
Ensure that the voltage indicated on the
appliance rating plate corresponds to the
domestic supply voltage.
Appliance earthing is
compulsory by law.
The Manufacturer declines all liabilities
for injury to persons and animals or
damage to property resulting from failure
to observe these regulations.
If the plug and socket are not of the same
type, have the socket replaced by a qualified
electrician.
Do not use extension cables, multiple sockets or
adapters.
INSTALLATION
89031-GB.fm5 Page 74 Friday, March 6, 1998 9:09 AM
75
For Great Britain only
Warning - this appliance must be
earthed
Fuse replacement
If the mains lead of this appliance is fitted with a
BS 1363A 13amp fused plug, to change a fuse in
this type of plug use an A.S.T.A. approved fuse
to BS 1362 type and proceed as follows:
1. Remove the fuse cover (A) and fuse (B).
2. Fit replacement 13A fuse into fuse cover.
3. Refit both into plug.
Important:
The fuse cover must be refitted when changing a
fuse and if the fuse cover is lost the plug must not
be used until a correct replacement is fitted.
Correct replacement are identified by the colour
insert or the colour embossed in words on the
base of the plug.
Replacement fuse covers are available from
your local electrical store.
Connection to a rewirable plug
If the fitted plug is not suitable for your socket
outlet, then it should be cut off and disposed of in
order to avoid a possible shock hazard should it
be inserted into a 13A socket elsewhere.
A suitable alternative plug should then be fitted
to the cable.
The wires in the mains lead are coloured in
accordance with the following code:
BLUE - “NEUTRAL” (“N”)
BROWN - “LIVE” (“L”)
GREEN AND YELLOW - “EARTH” (“E”)
1. The GREEN AND YELLOW wire must be
connected to the terminal in the plug which is
marked with the letter “E” or by the Earth
symbol 4 or coloured green or green and
yellow.
2. The BLUE wire must be connected to the
terminal which is marked with the letter “N” or
coloured black.
3. The BROWN wire must be connected to the
terminal which is marked with the letter “L” or
coloured red.
For the Republic of Ireland only
The information given in respect of Great Britain
will frequently apply, but a third type of plug and
socket is also used, the 2-pin, side earth type. In
this case, the wire which is coloured GREEN
AND YELLOW must be connected to the EARTH
contact, and the two wires to the two pins,
irrespective of colour. The supply to the socket
must be fitted with a 16 amp fuse.
ELECTRICAL CONNECTION
89031-GB.fm5 Page 75 Friday, March 6, 1998 9:09 AM
  • Page 1 1
  • Page 2 2
  • Page 3 3
  • Page 4 4
  • Page 5 5
  • Page 6 6
  • Page 7 7
  • Page 8 8
  • Page 9 9
  • Page 10 10

Whirlpool KGCE 3554/0 User guide

Category
Fridge-freezers
Type
User guide
This manual is also suitable for

Ask a question and I''ll find the answer in the document

Finding information in a document is now easier with AI